Hello, ECS & Fargate
Getting Started with .NET on AWS: Amazon ECS & AWS Fargate

This episode: Amazon Elastic Container Service & AWS Fargate. In this Hello, Cloud blog series, we're covering the basics of AWS cloud services for newcomers who are .NET developers. If you love C# but are new to AWS, or to this particular service, this should give you a jumpstart.
In this post we'll introduce Amazon Elastic Container Service (ECS) and AWS Fargate and explain their differences. We'll use AWS Fargate to host a simple .NET "Hello, Cloud" web API on ECS in a Linux container. We'll do this step-by-step, making no assumptions other than familiarity with C# and Visual Studio. We're using Visual Studio 2022 and .NET 6.
ECS: What is it, and why use It?
Amazon Elastic Container Service (ECS) is "a fully managed container orchestration service that makes it easy for you to deploy, manage, and scale containerized applications." Let's unpack that.
There are two other AWS compute services that also run over ECS, AWS Fargate and AWS App Runner. All three are managed services that host containers. The difference lies in how much management, the number of concepts thrown at you, and how much control you have.
| Service | Theme | Container Support | Key Concepts |
| AWS App Runner | Fully managed serverless platform. No prior infrastructure experience required. | Linux | Containers |
| AWS Fargate | Highly managed, serverless platform. No need to deal with infrastructure details. | Linux, Windows | Clusters, Services, Tasks, Containers |
| Amazon ECS | Managed container orchestration service. | Linux, Windows | Clusters, Services, Tasks, Containers, Container Instances |
As the table above shows, ECS gives you the most control—and the most moving parts. Both ECS and Fargate support Windows containers as well as Linux containers. If you use ECS, you can also manage your on-premises containers using the Amazon ECS Anywhere service.
Although AWS Fargate is presented as a separate service, think of it more as an optional feature of ECS. Fargate doesn't have its own area of the AWS Console, for example. That's why we're covering both ECS and Fargate together in this one blog post.
Concepts
ECS comes with many concepts, so let's dive in. Organizationally, your ECS configuration consists of clusters, services, task definitions, and containers.
 Container. Each component of your application, such as a web app or microservice, will reside in a container, specifically a Docker container. A container is a convenient way to package your application and its dependencies, such as libraries and settings. For an overview of containers, see Hello, Containers. If you haven't worked with containers, you don't need to be concerned: you'll love them.
Task Definitions. A task definition is a kind of blueprint that organizes your containers into logical groups. It contains 1 to N containers (see what I did there?). Imagine you have three different containers that will be used together, and you want to treat them as a logical unit. You create one task definition that holds all three containers. From this point on, you deal with the task, not the individual containers. A task definition also defines configuration and operating instructions for your containers, including how much CPU and memory to give them, environment variables, and where to send logs.
Service. A service is a configuration of tasks. You can group tasks into a service, and configure the service for networking (for example, setting up a load balancer and public IP address).
Cluster. A cluster is a logical grouping of services, specific to a single region. Clusters are the top-level organization you'll encounter in the AWS console.
There are also some concepts related to execution: tasks and container instances.
 Tasks. An instance of a task definition is known as a task: task definitions are configuration, tasks are execution. A running task's containers are deployed on EC2. You scale by running multiple tasks for a task definition.
Container instances are the EC2 compute instances on which your tasks/containers will execute. ECS will schedule tasks on container instances. You can specify a task placement strategy to control how ECS selects instances. If you're using Fargate, infrastructure will be invisible to you, and you won't see container instances.
To summarize, containers allow you to split your applications into individual components. Task definitions let you define sets of containers that will be placed together, along with their properties and linkage. Services are groups of tasks, and clusters are groups of services.
If this seems like a lot to keep track of, that is the point. As the world moves to containers and microservices, we're decomposing our applications into fine-grained components. Something needs to glue it all together and direct the orchestra. ECS orchestrates and manages your multiple containers and scales them. In order for ECS to do that, it needs to understand your containers, their needs, and how they relate. Once you provide that information, ECS will do the work, scheduling your tasks to run containers on EC2 instances and enforcing the policies you've set up.
If your needs are simpler, ECS might be overkill. If you're feeling like all these layers resemble Russian nesting dolls, remember that you can simplify the model by using AWS Fargate (removing infrastructure from view), or hide it entirely by using AWS App Runner.
Now let's build something.
Our Hello, ECS Project
We’re going to create a .NET 6 web API project, test it locally, then publish to AWS ECS right from Visual Studio. The AWS publish operation will containerize the service (in Linux) and publish to ECS, where Fargate will run the container serverless. From there, we'll add a second container, this time using the AWS console.
One-time Setup
To experiment with ECS and .NET, you will need:
- An AWS account, and an understanding of what is included in the AWS Free Tier.
- Microsoft Visual Studio 2022. If you're using an older version of Visual Studio you won't be able to use .NET 6.
- AWS Toolkit for Visual Studio. Configure the toolkit to access your AWS account and create an IAM user.
- Docker Desktop. If you already have Docker, be aware that you need version 17.05 or later.
Step 1: Create an ECR Repository
In this step, we'll create an Elastic Container Repository. If you already have one, note its name for later and skip these steps.
Navigate to the AWS console and sign in.
At top-right, select the AWS Region you want to be working in from the dropdown, typically one close to your location. We're going to use N. California.
Navigate to the AWS Elastic Container Registry section. You can enter "ECR" in the search bar to find it.
Click Create Repository. On the dialog, enter a name for your repository and take note of it for later. The name we've used in our examples is hellocloud. You'll replace "hellocloud" with your repository name as you follow the remaining steps. Click Create repository to create the repository.
Step 2: Create a Policy for the AWS Toolkit User
In order to leverage the AWS Toolkit's integration with AWS fully, including creating and publishing ECS services, you'll need to create an IAM policy that adds the necessary permissions for role and instance profile actions. In this step, you'll create a new policy in AWS, then add it to your AWS Toolkit for Visual Studio user.
Important: You should always follow the principle of least privilege when it comes to security. This blog series assumes you are working in your own developer account for learning purposes and not working with anything production-related. If you're using an organization-owned AWS account, you should coordinate with your security principal on IAM settings.
- Sign in to the AWS console. Select the region at top right you want to be working in. We're using US West (N. Califoria).
- Navigate to the Identity and Access Management (IAM) area of the AWS Console. You can enter iam in the search box to find it.
- Click Policies.
- Click Create Policy.
- Click the JSON tab, and enter the policy JSON at the end of this step, replacing [account-number] with your AWS account number.

- Click Next:Tags.
- Click Next:Review.
- Enter the name IAMPublish and click Create policy.
- Navigate to IAM > Users and select the username you use with the AWS Toolkit for Visual Studio (you created this user when you installed and configured the toolkit).
- If not already assigned, add the built-in PowerUserAccess permission. The PowerUserAccess permission provides developers full access to AWS services and resources, but does not allow management of users and groups.
- Add the new IAMPublish permission.
{
    "Version": "2012-10-17",
    "Statement": {
        "Sid": "PolicyStatementToAllowUserToCreateRole",
        "Effect": "Allow",
        "Action": [
            "iam:AddRoleToInstanceProfile",
            "iam:AttachRolePolicy",
            "iam:CreateInstanceProfile",
            "iam:CreateInstanceProfile",
            "iam:CreateRole",
            "iam:DeleteRole",
            "iam:DeleteRolePolicy",
            "iam:DetachRolePolicy",
            "iam:GetInstanceProfile",
            "iam:GetRole",
            "iam:PassRole",
            "iam:PutRolePolicy",
            "iam:RemoveRoleFromInstanceProfile"
        ],
        "Resource": [
            "arn:aws:iam::[account-number]:role/*",
            "arn:aws:iam::[account-number]:instance-profile/*"
        ]
    }
}
Your AWS Toolkit for Visual Studio user now has the permissions it needs to create and publish to AWS Fargate.
Step 3: Create Web API Project
In this step you'll create a sample .NET 6 Web API project using the dotnet command.
- Open a command/terminal window, and CD to the folder where your project is.
Use the dotnet new command below to create a default web app project.
dotnet new webapi -n hello-ecs
We now have a Web API project.
Step 4: Code, Build and Test the Local Service
In this step you'll write the service code, then build and test the app locally in Visual Studio. We'll make a simple mock product catalog service.
In Solution Explorer, rename WeatherForecastController.cs to ProductController.cs.
Open ProductController.cs for editing. Replace its code with the code at the end of this step.
Build and run the project to test it. In the browser, test the /Product/catalog path and view the mock product catalog reponse.

Stop debugging. We have our microservice.
using Microsoft.AspNetCore.Mvc;

namespace hello_ecs.Controllers;

[ApiController]
[Route("[controller]")]
public class ProductController : ControllerBase
{
    private static readonly Product[] Products = new[]
    {
       new Product { SKU = "001", Name = "Widget", Description = "Widget, standard", Price = 1.00M },
       new Product { SKU = "002", Name = "Blivet", Description = "Blivet, standard", Price = 1.50M },
       new Product { SKU = "003", Name = "Blivet LH", Description = "Blivet, left-handed", Price = 2.50M },
       new Product { SKU = "004", Name = "Sprocket", Description = "Sprocket, standard", Price = 37.00M },
       new Product { SKU = "005", Name = "Sprocket Max", Description = "Sprocket, extra large", Price = 54.00M }
    };

    private readonly ILogger<WeatherForecastController> _logger;

    public ProductController(ILogger<WeatherForecastController> logger)
    {
        _logger = logger;
    }

    [HttpGet("catalog")]
    public Product[] Get()
    {
        return Products;
    }
}

public class Product
{
    public string SKU { get; set; }
    public string Name { get; set; }
    public string Description { get; set; }
    public Decimal Price { get; set; }
}
Step 5: Publish the .NET Project to AWS Fargate
In this step, you'll publish your service to ECS using AWS Fargate.
- In Visual Studio, go to the AWS Explorer and select the same region you selected in Step 1.
- In Visual Studio, right-click the hello-ecs project and select Publish to AWS.

- If you are prompted about switching to a new AWS publishing experience, click Switch to new experience. We will be using the new AWS publishing experience here.
- For Publish to, select New target.
- Set Application name to hello-ecs.
- Select the option ASP.NET Core App to Amazon ECS using Fargate.

- Read through the Publish details text and take note of what the publish action will do. The service will deploy to ECS, with Fargate managing the compute power—in other words, this is serverless and you won't see the EC2 instances. A Docker container will be created. A new ECS service will be created, because we selected New target. Once the ECS service exists, you'll select Existing target when you publish in the future.
- To view your publishing options, click the Edit publish settings link. This option page gives you control over the IAM role for the service, the number of tasks to start running, whether a new ECS cluster is created, and names for the cluster and service. We're happy to stick with the defaults.
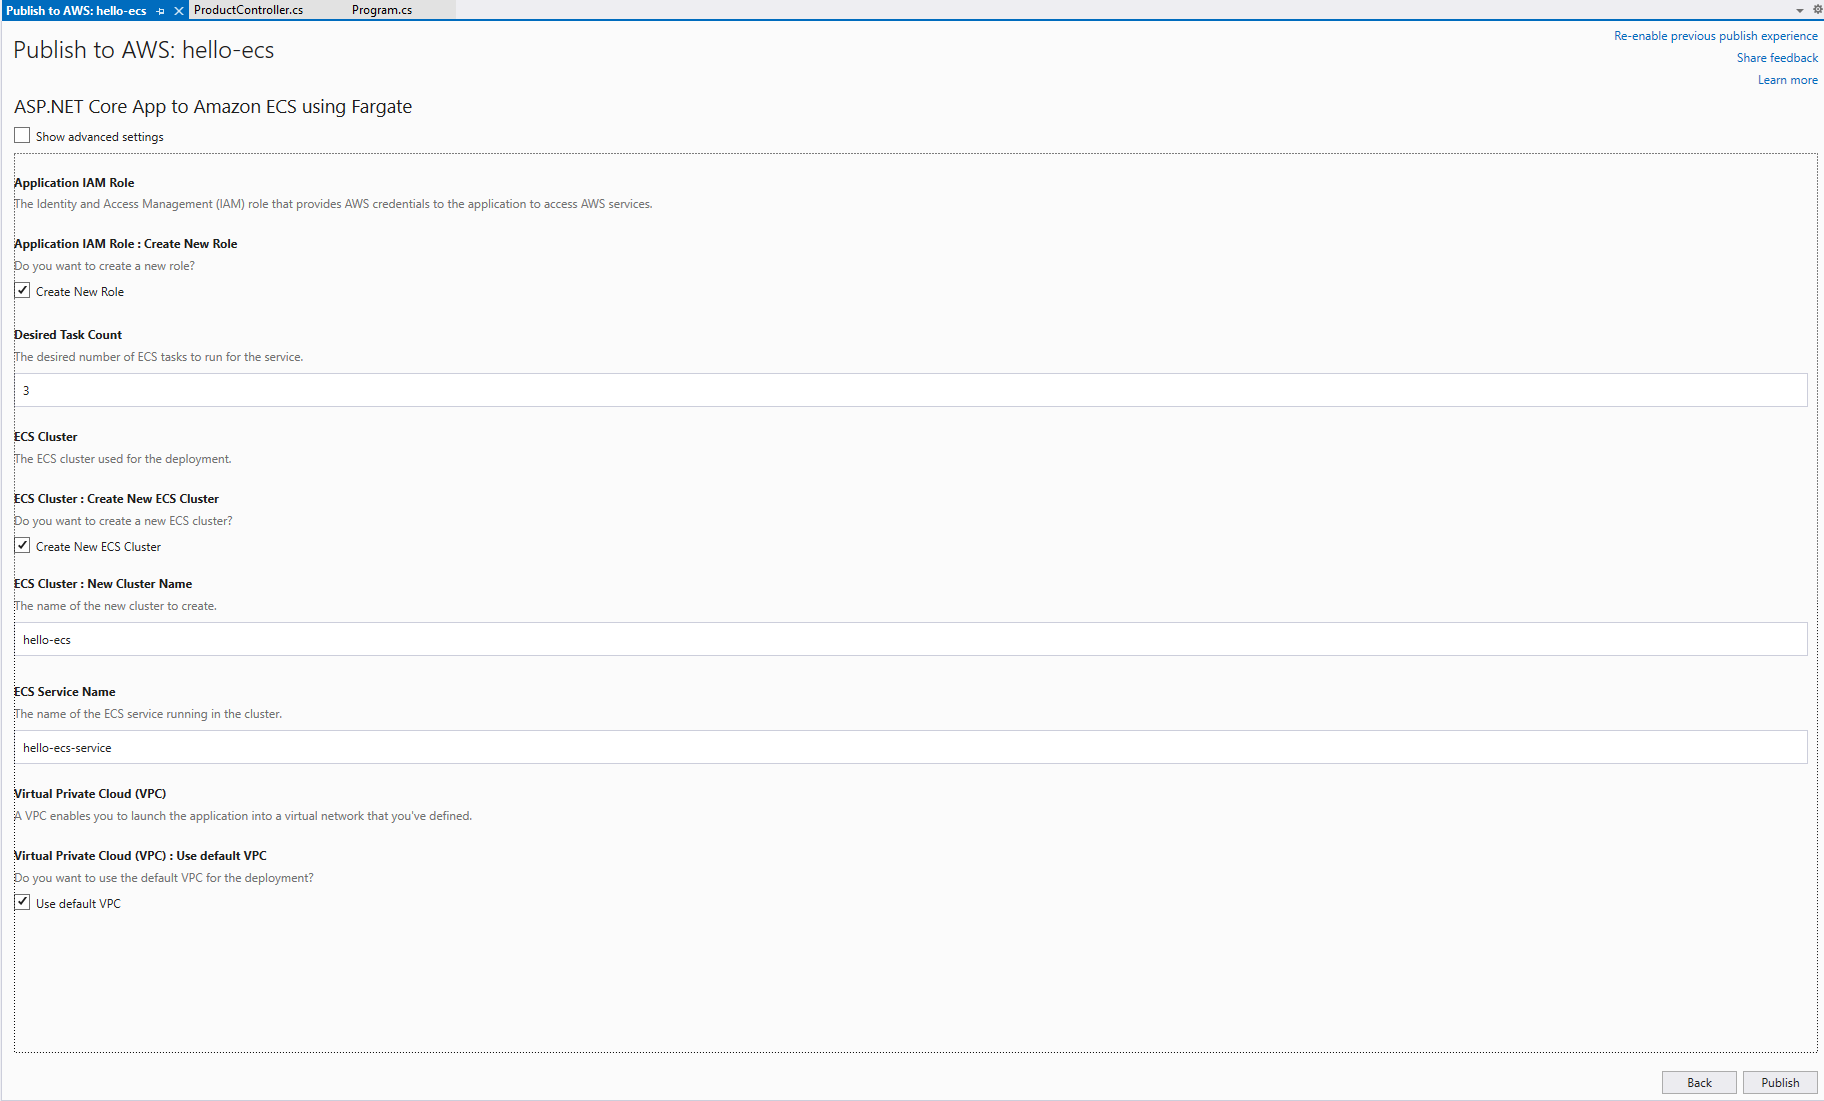
- Click the Publish button at lower right.
Wait while the publish action proceeds. The first-time publish takes longer because a new Amazon ECS service is also being created. During the Publish to AWS action, a Dockerfile is added to your project, a container is built and uploaded to Amazon ECR, a task definition is created, and an ECS cluster is created with a default service and task for your container.
 If any issues prevent the publish from succeeding, you'll need to diagnose them and take corrective action. If you receive a Docker error, check that you have version 17.05 or later. The detailed publish output is there for a reason: if something fails, you'll know exactly why. For example, you might see a CREATE_FAILED or DELETE_FAILED somewhere, with a message that your VS Toolkit user doesn't have a needed permission such as iam:CreateRole. If you get an error like that, you'll need to add or extend a policy with that permission and attach it to your VS Toolkit for AWS user. We anticipated those policies earlier in Step 2.
 The publish is complete when a green check mark is displayed at the top, and this appears at the end of the publishing log:
hello-ecs Published as ASP.NET Core App to Amazon ECS using Fargate

To the right is your service endpoint. In a browser, enter that URL with /Product/catalog at the end, and your service should respond. Congratulations, you've deployed a service to ECS!

Step 6: Review the ECS Artifacts in AWS
Let's examine what was created in the AWS console.
- In the AWS console, navigate to the Elastic Container Service area. You can enter ecs in the search box.
- At the top left of the Elastic Container Service area, you may have an option to choose between the old and new console experience. We're using the new experience here.

- On the left panel, click Clusters. You should see your hello-ecs cluster listed, with some number of tasks pending or running.
 Go back to that service URL and hit it a few times, then come back and refresh the view. These counts will change.
 See the info icon at right? You can click that if you need a review of ECS concepts. There are also documentation links on the side panel.

- Click on the hello-ecs link to view its detail. In the Cluster overview panel at top, under the heading Services is a Draining count and an Active count. Draining means a task is being terminated, and Active means a task is running. Under the heading Tasks, you'll see a count of Pending tasks and Running tasks.

5-ecs-cluster-detail.png](https://cdn.hashnode.com/res/hashnode/image/upload/v1636822679094/WqZIOSZW3.png)
- Below the Cluster overview panel is a tabbed area. The Services tab shows your services (one in our case) and their Amazon Resource Name (ARN), a visualization of tasks running, and a task definition name and a revision.
- The Tasks tab shows tasks that have been defined and whether they're running or stopped. Where did this come from? We talked earlier about the importance of task definitions, but somehow we got our service deployed without defining one. We'll talk about that in the next step.

- The Infrastructure tab shows your infrastructure—and it's empty! That's because we're using serverless Fargate.
- The Metrics page shows your CPU utilization, memory utilization, CPU reservation, and Memory reservation. You won't see very much here just yet, but we'll get another metrics view shortly.
- But wait, there's more! Go back to the Services tab and click on the hello-ecs-service link. This will bring to you a sub-level for the service with even more detail, with its own tab pages. You can get a little lost in the ECS console if you're not aware there's a cluster level and a service level.
- The Health and metrics area shows you service health activity from CloudWatch and notifications of service events.

- The Logs page shows you the logs for your containers that belong to this service.
- The Configuration and tasks tab displays your number of desired tasks, which defaulted to 3 when we published from Visual Studio. From here you can customize your task count or set up an auto-scaling policy. Below that is a list of your active and stopped tasks. As Fargate services requests, it will schedule new tasks and stop old ones on the serverless infrastructure.
Optional: Click Edit and change the Desired count to 2. Click Update, then note that the number of tasks drops to 2 on the Deployments tab.

Step 7: View Your Task Definition
The publish to AWS Fargate made a bunch of default decisions for us, including creating a task definition (holding our one container) and creating a service (holding our own task). Let's examine and change the task definition.
- Navigate to Task definitions on the left panel. It should list a task definition, with a name similar to helloecsRecipeAppTaskDefinitionXXXXXXX.
- Click on the task definition name. Now you see one or more versions of the task definition, with the top one marked ACTIVE. ECS keeps track of version changes to your tasks.

Click on the active task to view it. The task uses 0.25 of a virtual CPU and 0.5GB of task memory. You can change these to suit the needs of your service/tasks/containers. Click on the JSON tab to view the task definition as JSON.
Note: at the time of this writing, you have to switch back to the old console experience in order to change a task definition.

That's it, we're done! Congratulations on getting a web API project containerized and running in Amazon ECS using AWS Fargate.
Step 8: Deploy a Second Container as a New Task
This step is optional, and assumes you've already done the Hello, App Runner exercise, in which you created a container with a default web app. In this step, we'll use that to deploy a second container to our ECS service, so you can get a view of multiple containers running. We'll create a new task based on this container, then run it.
- In the AWS console, navigate to Elastic Container Registry.
- Locate the hello-apprunner container from the Hello, App Runner exercise and click it.
Click the icon next to Copy URI to copy the image URI to your clipboard, which will have a format similar to:
[account].dkr.ecr.[region].amazonaws.com/hello-apprunner/:XXXXXXXXXX

- Navigate to Elastic Container Service > Task Definitions.
- Click the Create new task definition button on the right.
- For Task definition family, enter website.
- Under Container, for Name, enter website.
- For Image URI, enter the URI you copied earlier (#3).
- Click the Next button.

- On the next page, under App environment, select AWS Fargate (serverless).
- Click the Next button at bottom right.

- Click the Create button, and wait for the task to be created.


- Navigate to Clusters on the left panel and click on hello-ecs.
- Select the Tasks tab.
- Click the Run new task button.
- Under Deployment configuration, for Family, select the website task you just created.
- Set desired tasks to 3.
- Click the Deploy button at lower right.
- Watch as ECS provisions the new task. Wait until you see website tasks with status Running in the Tasks panel (tip: you can enter "website" in the search box to shorten the tasks displayed).

The task for our website container is now running. It is not, however, accessible by public IP. To do that, we would need to put the task in its own service and set up a load balancer. We won't do that here, as this Hello, Cloud is getting a bit long, but you can follow these instructions to set up a load balancer if you're interested.
Step 9: Shut it Down
When you're finished with it, delete the hello-ecs cluster. You don't want to accrue charges for something you're not using. Before we can delete the entire cluster, we'll need to stop all active tasks.
- In the AWS console, switch to the classic ECS experience with the toggle switch at top left.
- navigate to Elastic Container Service > Clusters.
- Click the hello-ecs cluster.
- Click the hello-ecs-service service.
- Select the Configuration tab and click the Edit button at top right.
- Set Desired task count to 0 and save.
- Wait for no tasks to be active.
- On the left panel, click the toggle to select the classic ECS experience.
- Select Clusters on the left panel.
- Click the Delete Cluster button and confirm the delete.
Where to Go From Here
Containers, microservices, and serverless are the new renaissance for .NET applications. You can orchestrate a masterpiece with Amazon ECS and AWS Fargate.
In this "Hello, ECS" exercise, you published a web API project to Amazon ECS using AWS Fargate. The Publish to AWS action built a Linux container, uploaded it to ECR, and created an ECS cluster, service, task definition, and tasks for the container. You did all this from Visual Studio. You also learned how to view your ECS cluster in the AWS console. You added a second container, this time using the AWS console instead of Visual Studio.
Right now, you're either thinking "this is something I can really use!" or "boy, that was a lot of steps!" If you're "ECStatic" over the ECS model and concepts, you should learn more and get a firm grounding. Today's walk-through only provided a glimpse, and didn't touch upon many ECS features you may find valuable. Read the ECS Developer Guide and learn your way around it by practicing. Take the AWS Modernization Workshop for .NET.
If you're intrigued by containers but don't think you need ECS, look into AWS App Runner.
Further Reading
AWS Documentation
Amazon Elastic Container Service
AWS Fargate: Serverless compute for containers
Containerizing Complex Multi-tier Windows Applications using AWS App2Container
How can I configure Amazon ECS Service Auto Scaling on Fargate?
Training, Workshops and Videos
AWS Modernization Workshop for .NET
Video: How to deploy a .NET Application to Amazon ECS with AWS Copilot
Pluralsight Course: Fundamentals of Building .NET Applications on AWS by Julie Lerman


