Table of contents
- This episode: Containers. In this Hello, Cloud! blog series, we're covering the basics of AWS cloud services for newcomers who are .NET developers. If you love C# but are new to AWS, or to this particular topic, this should give you a jumpstart.
- Containers: What are they, and why use them?
- Our Hello, Container Project
- One-Time Setup
- Where to Go From Here
- Further Reading
This episode: Containers. In this Hello, Cloud! blog series, we're covering the basics of AWS cloud services for newcomers who are .NET developers. If you love C# but are new to AWS, or to this particular topic, this should give you a jumpstart.
In this post we'll introduce containers, discuss what they mean to .NET on AWS development, and create a "Hello, Cloud" Lambda function that uses a container. We'll do this step-by-step, making no assumptions other than familiarity with C# and Visual Studio. If you've never worked with containers, you'll get an appreciation for why they are so popular.
Containers: What are they, and why use them?
Wouldn't it be nice to package up your application, along with its configuration, runtime, and dependencies, all in one tidy bundle? That's what containers are, in a nutshell. They're wildly popular.
To understand containers, let's first talk about virtual machines so we can contrast them. In the days when physical servers were dominant, a server was a singular environment. It came with a certain amount of memory, storage, and networking hardware, ran a specific operating system, and served one organization. Then virtualization came along, which made it possible to emulate a computer in software. Now your "server" could be a virtual machine (VM), tailored with the operating system and resources your organization and application require. A software layer called a hypervisor creates, runs, and manages VMs and relates them to physical hardware, with high efficiency. The physical server can run multiple VMs for multiple tenants, which lowers overall infrastructure costs. Today, VMs are dominant in the enterprise, and foundational to cloud computing.
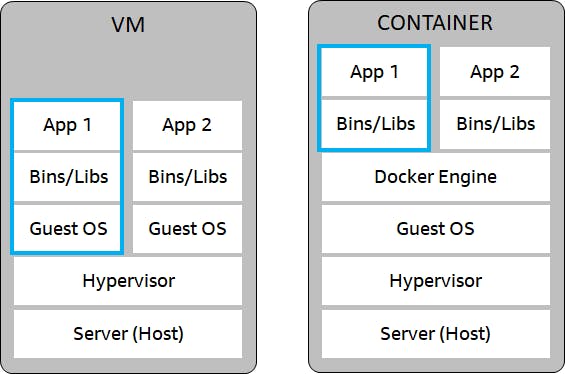
The virtual machine's little brother is the container. Containers are a way to package an app along with its dependencies, libraries, and settings. Multiple containers share a host operating system and run as isolated processes. Whereas VMs virtualize the hardware and are usually measured in gigabytes, containers virtualize the operating system and are usually measured in megabytes. That makes them lightweight, portable and efficient. Containers are particularly well-suited for microservices, with a shared philosophy of lightweight, independent software components.
More so than VMs, containers change the way developers work because they are designed as a unit of software deployment. Developers build containers and deploy them as part of their work.
Containers and virtual machines aren't an either-or choice. You can often use them together, giving you the best of both worlds. The many AWS services that support containers are running them on virtual machines.
Popular Amazon Services that Support Containers
Many AWS services support containers, and that simply reflects how popular containers have become. To narrow down which services are right for you, do some thinking about whether serverless is your objective, and whether you like everything being handled for you vs. having control over the technical details.
Amazon Elastic Container Registry (ECR) (ECR) is a container registry. If you're going to use containers on AWS, you'll be storing your containers here. Deployment to an AWS service will involve building a container and uploading it to ECR.
AWS App Runner makes it easy for developers to quickly deploy containerized web applications and APIs, at scale and with no prior infrastructure experience required.
Amazon Elastic Container Service (ECS) is a managed container orchestration service. That means, the service takes care of many of the operational details of running containers, including provisioning, secure isolation, and scaling. ECS supports Docker Linux containers as well as Windows containers. ECS offers simplicity, reducing the number of decisions you need to make.
Amazon Elastic Kubernetes Service (EKS) is another managed container service. Kubernetes offers a lot of flexibility and is supported by a large community.
AWS Fargate is a serverless way to use ECS or EKS. Fargate frees you from most decisions, handling server management and scaling automatically.
AWS Lambda is a serverless, event-driven compute service that can be used with or without containers (see Hello, Lambda for an introduction). Why use a container for something as simple as a Lambda function? One reason is size: the maximum size of a zip deployment package for AWS Lambda is 250MB but containers can be as large as 10GB in size. A second reason would be if your organization has standardized on containers and they are required for your CI/CD process.
Our Hello, Container Project
We'll use Visual Studio to create a simple "Hello, Lambda" function, deploy it to AWS as a container, and test it. Our Lambda function will take a string as input and return an upper-case version as output. We'll make use of both the Amazon ECR and AWS Lambda services.
The reason we're using a Lambda function is because they're one of the simplest AWS services to set up, which is appropriate for a Hello, World. In subsequent posts, we'll use containers with other services such as ECS and EKS.
One-Time Setup
To experiment with containers, AWS Lambda and .NET, you will need:
- An AWS account , and an understanding of what is included in the AWS Free Tier .
- Install Microsoft Visual Studio . You can use another editor, but this blog assumes VS.
- Install the AWS Toolkit for Visual Studio and configure it to access your AWS account.
- Install the Docker Desktop.
- Install the dotnet CLI lambda nuget packages :
dotnet new -i Amazon.Lambda.Templates
dotnet tool install -g Amazon.Lambda.Tools
Step 1: Create an ECR Repository
In this step, we'll create an Elastic Container Repository. If you already have one, note its name for later and skip these steps.
Navigate to the AWS console and sign in.
At top-right, select the AWS Region you want to be working in from the dropdown, typically one close to your location. We're going to use N. California.
Navigate to the AWS Elastic Container Registry section. You can enter "ECR" in the search bar to find it.
Click Create Repository. On the dialog, enter a name for your repository and take note of it for later. The name we've used in our examples is hellocloud. You'll replace "hellocloud" with your repository name as you follow the remaining steps. Click Create repository to create the repository.
Step 2: Create an IAM Role
We'll be creating our new AWS Lambda function through Visual Studio and the AWS Toolkit, but there's one artifact we must create in the AWS Console, an IAM role for the Lambda function.
In the AWS console, navigate to the Identity and Access Management (IAM) area. You can find it by entering "IAM" in the search bar.
- Choose Create role.
- Under Common use cases, choose Lambda.
- Click Next: Permissions.
- Under Attach permissions policies, select the AWS managed policies AWSLambdaBasicExecution and AWSXrayDaemonWriteAccess.
- Click Next: Tags.
- Click Next: Review.
- For role-name, enter lambda-role.
- Click Create role.
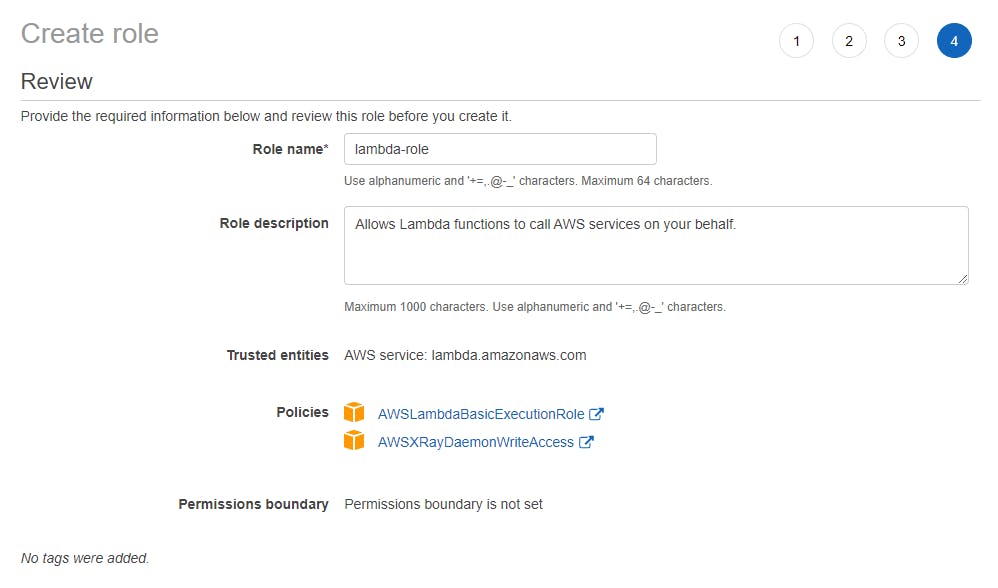 We now have a role named lambda-role.
Step 3: Create an IAM Policy
In order to fully leverage the AWS Toolkit's integration with AWS, including creating and publishing to services, you'll need to create an IAM policy that adds "PassRole" capability (here's why). In this step, you'll create a new policy in AWS.
- Navigate to the Identity and Access Management (IAM) area of the AWS Console. You can enter IAM in the search box to find it.
- Click Policies.
- Click Create Policy.
Click the JSON tab, and enter the policy JSON at the end of this step, replacing [account-number] with your AWS account number.

- Click Next:Tags.
- Click Next:Review.
- Enter the name IAMPassRole and click Create policy.
- Navigate to IAM > Users and select the username you use with the AWS Toolkit for Visual Studio (you created this user when you installed and configured the toolkit).
- Add the new IAMPassRole permission to the user and save your changes.
{
    "Version": "2012-10-17",
    "Statement": {
    "Sid": "PolicyStatementToAllowUserToPassOneSpecificRole",
    "Effect": "Allow",
    "Action": [ "iam:PassRole" ],
    "Resource": "arn:aws:iam::[account-number]:role/lambda-role"
    }
}
Your AWS Toolkit for Visual Studio user now has the permissions it needs to create and publish to Lambda functions.
Step 4: Create a New Lambda Project with Visual Studio
Now we're ready to write our C# function in Visual Studio.
Launch Visual Studio and select Create New Project.
Browse/search/filter for AWS Lambda Project (.NET Core - C#) template and select it. Then click Next.
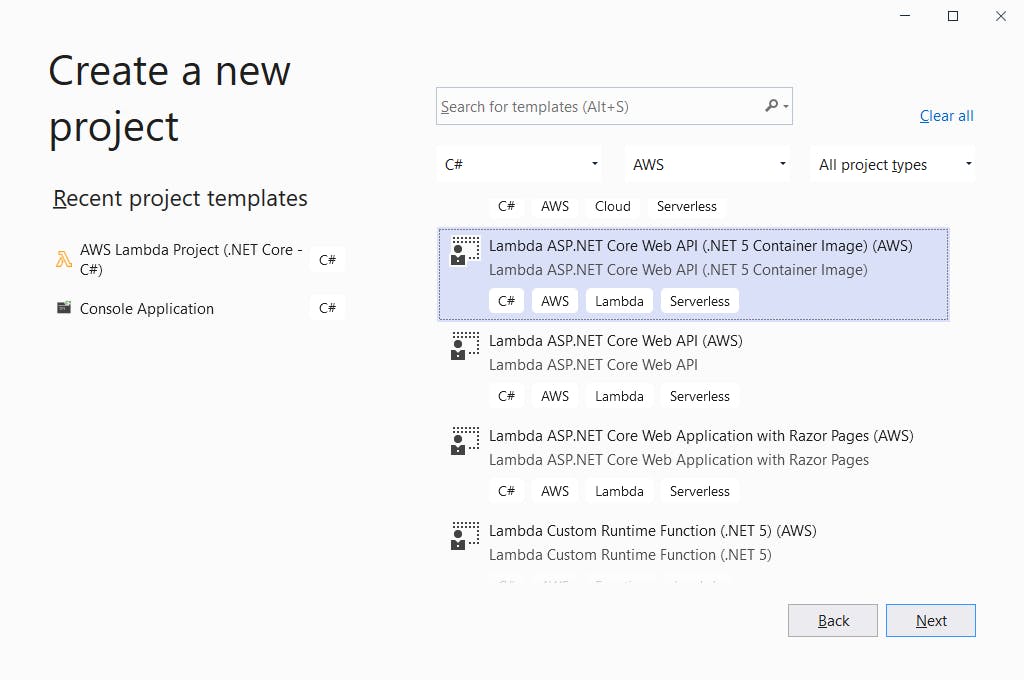
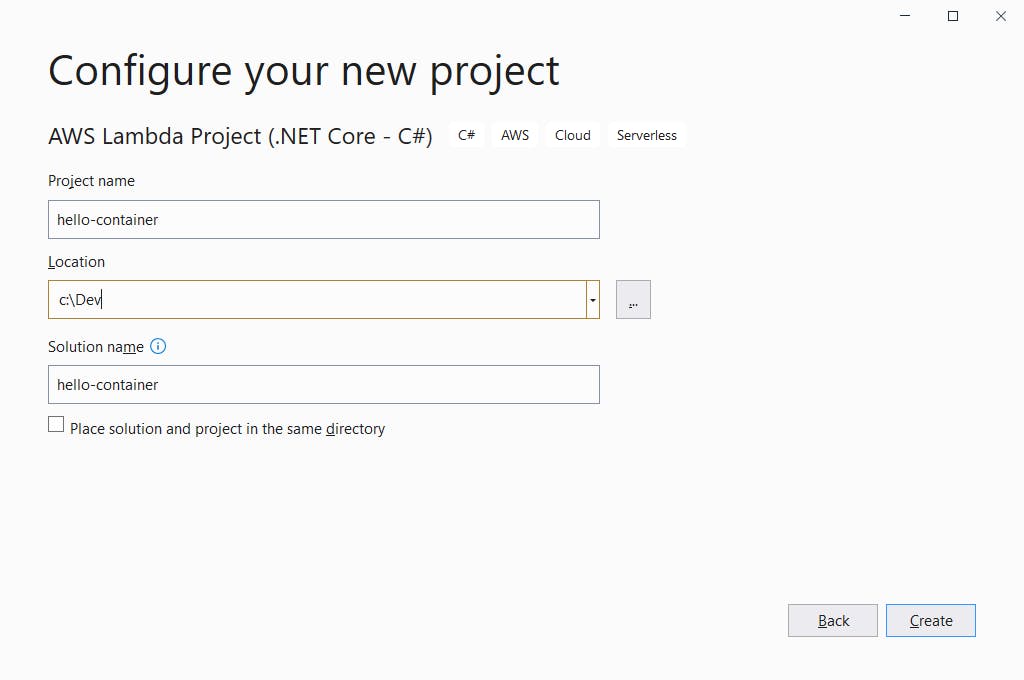
- On the next page, enter the Project name hello-container.
- Enter your preferred folder location.
- Click Create.
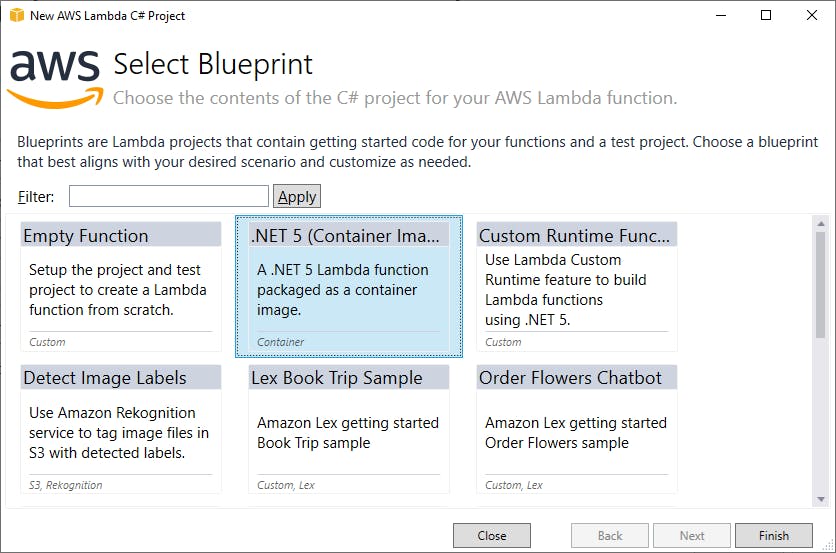
- On the Select Blueprint dialog, select the .NET 5 (Container Image) blueprint.
- Look in Solution Explorer to see what was created.
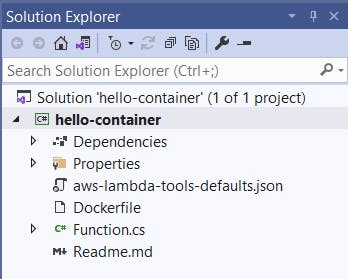 Take a brief look at each file to understand it.
The Dockerfile will build a container image when we publish. Double-click the Dockerfile file to view it. The comments provide some insight into what the Dockerfile commands are doing.
FROM public.ecr.aws/lambda/dotnet:5.0

WORKDIR /var/task

# This COPY command copies the .NET Lambda project's build artifacts from the host machine into the image.
# The source of the COPY should match where the .NET Lambda project publishes its build artifacts. If the Lambda function is being built
# with the AWS .NET Lambda Tooling, the `--docker-host-build-output-dir` switch controls where the .NET Lambda project
# will be built. The .NET Lambda project templates default to having `--docker-host-build-output-dir`
# set in the aws-lambda-tools-defaults.json file to "bin/Release/lambda-publish".
#
# Alternatively Docker multi-stage build could be used to build the .NET Lambda project inside the image.
# For more information on this approach checkout the project's README.md file.
COPY "bin/Release/lambda-publish"  .
The aws-lambda-tools-default.json file contains AWS Lambda deployment settings. That means you'll have less to enter when you use the Publish to AWS wizard.
Step 5: Code Your Lambda Function
Now we're ready to write our C# function in Visual Studio. The Function.cs file is the code for our Lambda function.
For this demonstration, we'll keep the default function, which merely returns upper- and lower-case versions of its input string.
using System;
using System.Collections.Generic;
using System.Linq;
using System.Threading.Tasks;

using Amazon.Lambda.Core;

// Assembly attribute to enable the Lambda function's JSON input to be converted into a .NET class.
[assembly: LambdaSerializer(typeof(Amazon.Lambda.Serialization.SystemTextJson.DefaultLambdaJsonSerializer))]

namespace hello_container
{
    public class Function
    {

        /// <summary>
        /// A simple function that takes a string and returns both the upper and lower case version of the string.
        /// </summary>
        /// <param name="input"></param>
        /// <param name="context"></param>
        /// <returns></returns>
        public Casing FunctionHandler(string input, ILambdaContext context)
        {
            return new Casing(input?.ToLower(), input?.ToUpper());
        }
    }

    public record Casing(string Lower, string Upper);
}
Step 6: Publish to AWS
Now we're going to publish to AWS. We'll create a new AWS Lambda as part of this process.
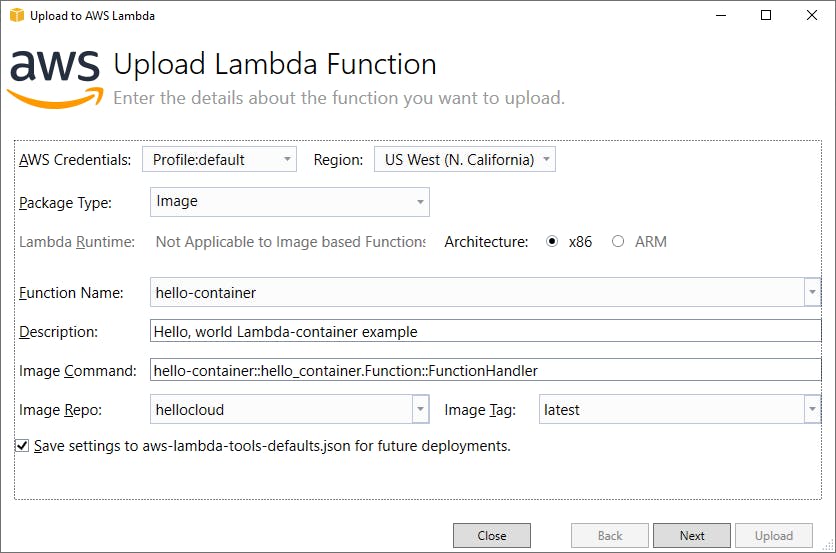
- In solution explorer, right-click the hello-container project and select Publish to AWS.
- Set the Package Type to Image. This indicates we'll be creating and uploading a container.
- For Function name enter hello-container.
- For Description, enter a description indicating this is a hello, world Lambda-container example.
- For Image Command, specify the ASSEMBLY::CLASS::FUNCTION function handler: hello-container::hello_container.Function::FunctionHandler
For Image Repo, select the repository name you created in Step 1.
Click Next.
- On the next dialog, for Role Name select lambda-role, the role we created in Step 2.
- Click Upload.
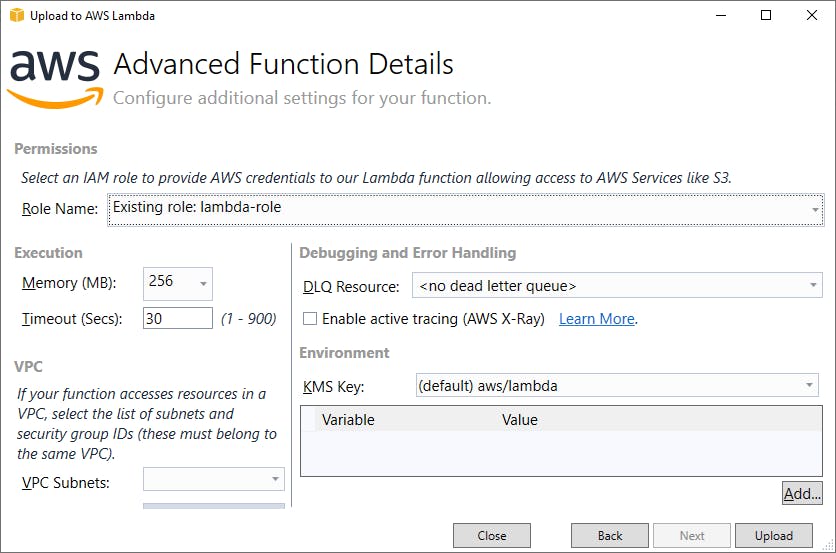
- Now, wait for the container to be created. If this is the first time around, container creation and upload will take a few minutes but future publishes will be faster because only differences are uploaded. You'll also see a command window running the Docker command as part of this process.
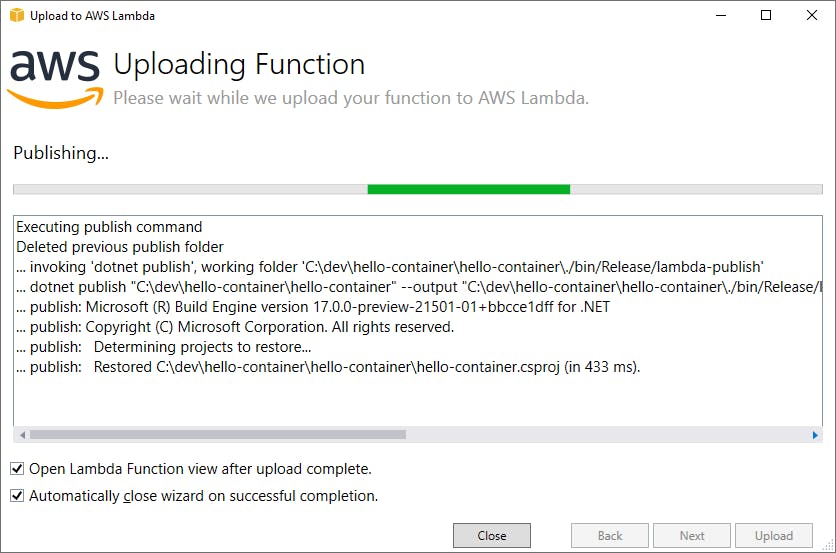 When the progress bar is fully green and you see "New lambda function created", publishing is complete. Click the Close button.
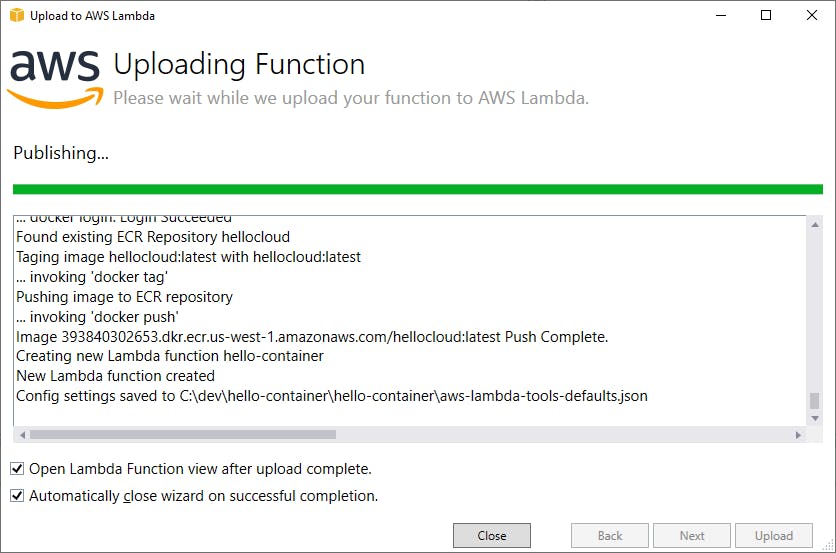 Voila, our function is deployed!
A lot just happened. A docker container was created and uploaded to AWS ECR. If the AWS Lambda function didn't already exist, it was created automatically. If it did exist, it is now using our latest container. You can see the details of what happened in the publish log.
Step 7: Inspect the Image and Lambda in AWS
Let's look in the AWS console to see what the publish did for us.
Verify container image
The publish action should have created a docker image and pushed it up to our ECR repository. To confirm that in the AWS console, navigate to the Elastic Container Registry (ECR). Click on your repository name to views its content. You should see an entry named latest that shows a recent push and a size. Our container image had a size of 144.87 MB.

Verify Lambda function
The publish action should have created a brand-new Lambda function named hello-container. To confirm that, navigate in the AWS console to the Lambda > Functions area. You should see hello-container. Click on the name to view the function. The details confirm this is an image-based Lambda function that was recently created.

Step 8: Test the Lambda Function
With our AWS Lambda function deployed, we can test it. Well do that from Visual Studio in this post, but be aware that there are 3 ways you can test your function:
A. In Visual Studio, using the Lambda function test tool.
B. Using the dotnet command:
dotnet lambda invoke-function hello-container --region us-west-1
--cli-binary-format raw-in-base64-out --payload "Contain Yourself!"
C. Using the AWS Console. When viewing your Lambda function, there is a Test tab where you can create test payloads and run tests.
We're using Visual Studio today.
Since we deployed with Visual Studio in Step 6, you should already be on the Lambda test page in Visual Studio. If not, you get get there by going to the AWS Explorer pane and double clicking on the hello-container Lambda function. If you don't see it, check that the right region is selected.
In the Sample Input large text box, enter "Contain Yourself!", or any test text you want to use.
Click the Invoke button.
Your function executes, and the output is shown at right in the Response area. We see upper- and lower-case versions of the input. Contain yourself, it worked!
{"Lower":"contain yourself!","Upper":"CONTAIN YOURSELF!"}
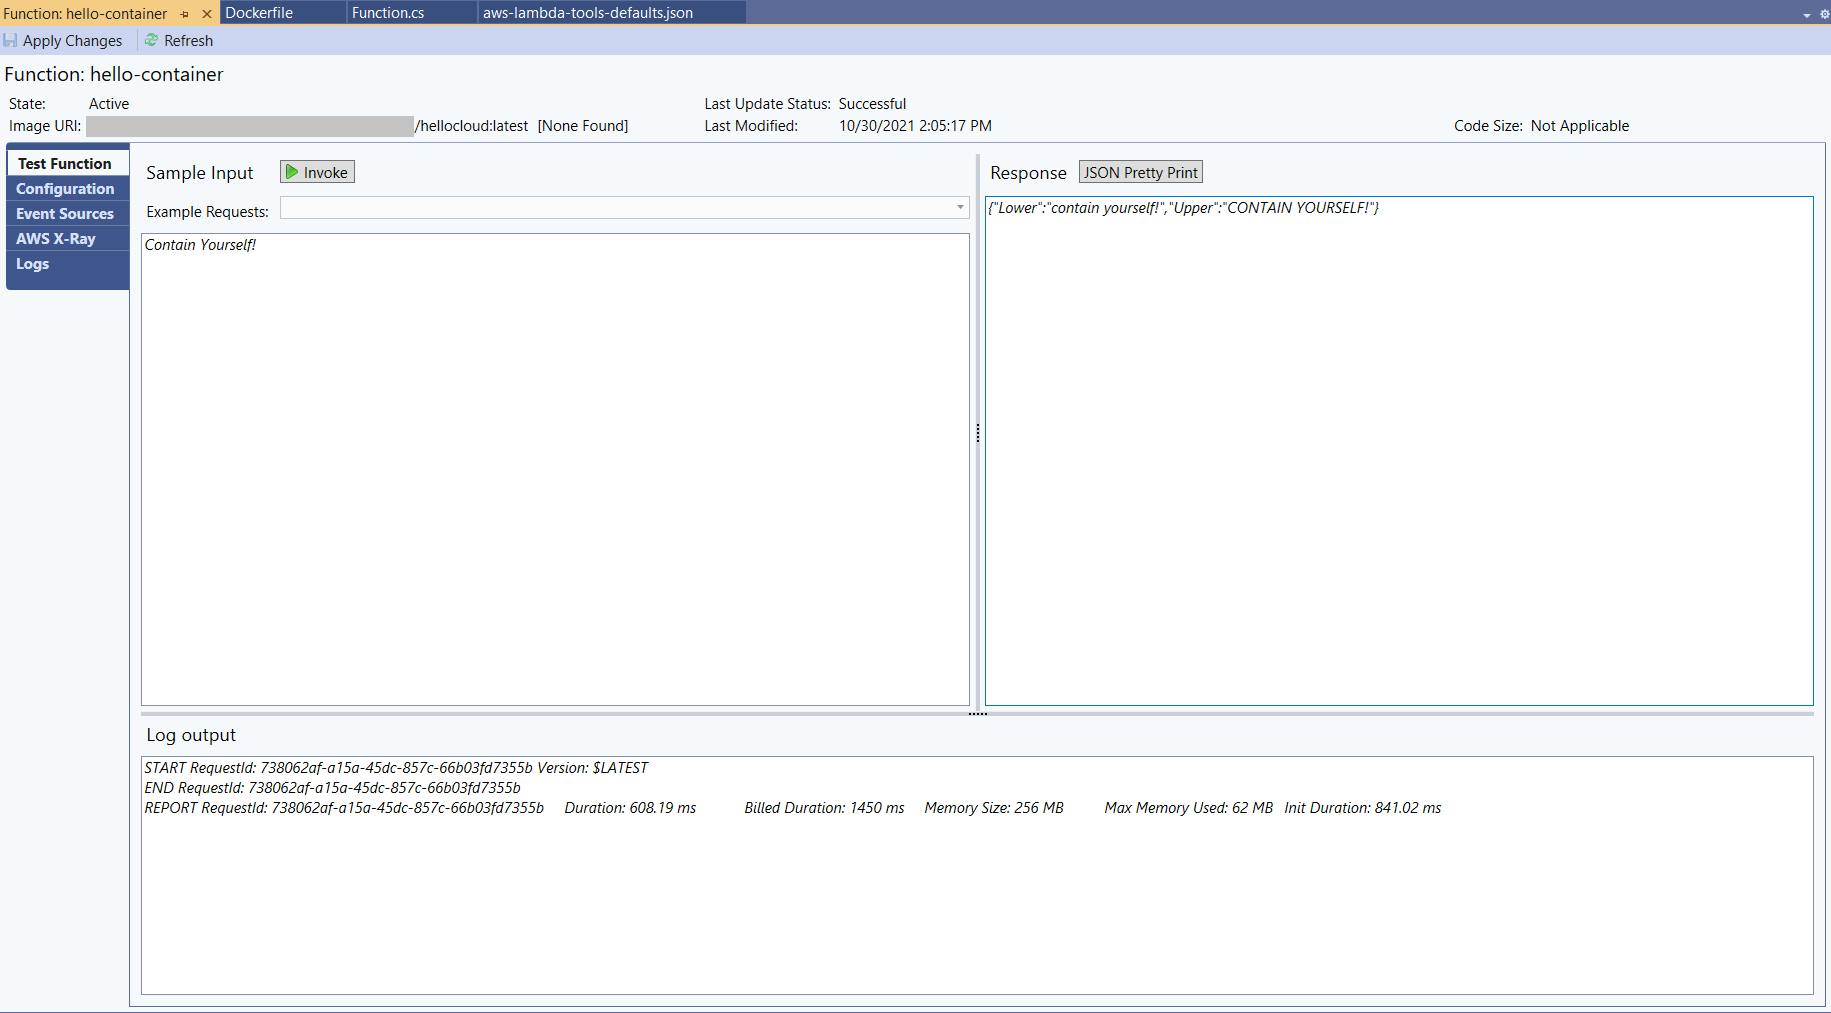
- Note the execution log at the bottom, which you can also view in the AWS console.
Congratulations! You've created a new Lambda function and deployed it as a container to AWS.
Where to Go From Here
If this was your first look at containers, this exercise should have been an eye-opener. Here are some reasons you might find working with containers rewarding. Consider:
- A Dockerfile, a small text file, contains the commands to build your container image.
- Containers are an order of magnitude smaller than VMs and are easy to work with.
- Containers contain everything your application needs, including dependencies and configuration.
- Containers are portable, easily moved between clouds and enterprises.
- Containers are supported by many AWS services.
- Containers and microservices pair well.
Learn more about docker, and how the docker CLI works. You can examine the output from the publishing step to see the docker commands that are being issued behind the scenes.
Today we walked through using a container with an AWS Lambda function. If you've got a web server or microservices, look into AWS App Runner, AWS ECS, AWS Fargate, and AWS EKS. We'll be exploring the use of containers with those other services in future posts.
Further Reading
AWS Documentation
Amazon ECS vs Amazon EKS: making sense of AWS container services
AWS Services
Amazon Elastic Container Registry (ECR)
Amazon Elastic Container Service (ECS)
Amazon Elastic Kubernetes Service (EKS)
Blog
