Hello, S3
Getting Started with .NET on AWS: Amazon Simple Storage Service

This episode: Amazon S3. In this Hello, Cloud blog series, we're covering the basics of AWS cloud services for newcomers who are .NET developers. If you love C# but are new to AWS, or to this particular service, this should give you a jumpstart.
In this post we'll introduce Amazon S3 and use it in a "Hello, Cloud" activity on the AWS console, followed by a programmatic example of using S3 in a .NET report program. We'll do this step-by-step, making no assumptions other than familiarity with C# and Visual Studio. We're using Visual Studio 2022 and .NET 6.
Amazon S3: What is it, and why use It?
Amazon Simple Storage Service (S3) is an object storage service. When we say object you can think file: S3 can store any kind of named data that would also make sense for a file, including documents, images, video, logs, messages, art, data files, code, and web pages. While storing files is a common use case, understand that S3 is not a block storage distributed file system (if you're looking for a literal shared file system, consider Amazon Elastic File System). S3 was the first AWS commercial cloud service, and it's an essential one that many other AWS services rely on. Fortunately, S3 is extremely trustworthy. Since its launch 15 years ago, S3 has scaled to more than 100 trillion objects.
Some core S3 concepts and terminology to understand are buckets, objects, and keys. Buckets are similar to file folders: they're the containers for your data objects. Objects are much like files: named blobs of content with metadata, such as documents, JSON files, images, videos, zip files, etc. Keys are like filenames: they're how you identify objects, and like filenames they can have a .type, as in "products.xml". Putting it all together, you might for example have a bucket for your web site named thumbnails, that contains 100 objects, all jpeg images, with keys like [employee-name].jpg and MeetTheTeam.jpg.
 Sounds an awful lot like a file system, right? There are differences. For example, you can't nest buckets in a hierarchy the way you can with folders in a local file system. A bucket can also act like a web server: if permissions are granted, its objects can be accessed online from a browser. If you have a web site with only static content, you can completely host it on S3 without any need for a compute service.
One of S3's hallmarks is its reliability. AWS describes it as "a highly durable storage infrastructure designed for mission-critical and primary data storage." S3 keeps your data safe by storing it multiple times in multiple availability zones. For example, a data center drive failure wouldn't result in data loss; S3 would simply fetch one of the other copies and silently initiate replacement of the failed drive. This is automatic and you wouldn't even be aware of it. In addition, you have the option to configure replication of your buckets to other regions, which might suit your DR needs.

There are several storage classes available in S3. S3 Standard, what we're focusing on today, has 4 9's of availability (99.99%) and a whopping 11 9's of durability (99.999999999%), storing your data redundantly across 3 availability zones. Other S3 storage classes include S3 Infrequent access, suitable for seldom-accessed content, and Amazon Glacier, suitable for low-cost data archiving. These other storage classes vary in durability, pricing, performance, and features.
Our Hello, S3 Project
We have two Hello, Cloud activities for S3. Part 1 explores working with buckets and objects in the AWS console. Part 2 is a .NET programmatic example, a monthly time and billing report program that uses S3 to hold employee timesheets as well as the report it generates. It uses the AWS SDK for .NET to interact with S3.
One-time Setup
To experiment with Amazon S3 and .NET, you will need:
- An AWS account, and an understanding of what is included in the AWS Free Tier.
- Microsoft Visual Studio 2022. If you're using an older version of Visual Studio you won't be able to use .NET 6.
- AWS Toolkit for Visual Studio. Configure the toolkit to access your AWS account and create an IAM user.
Part 1: Access S3 from the AWS Console
Step 1: Create a Bucket
In this step, you'll create a bucket that you can use for experimenting with S3.
- In a browser, go to the AWS management console and sign in. At top right, select the region you want to work in. We're using N. California.
- Navigate to the S3 area. You can enter s3 in the search box.
- Select Buckets from the left panel. Then click Create bucket.
- Under General configuration - Bucket name, enter a bucket name such as hello-cloud-s3.
- Uncheck the Block all public access checkbox and check the Turning off block all public access might result in this bucket and the objects becoming public checkbox. You should always be very careful about Internet exposure of your data, which is why the default is to block all public access. We're allowing it here because 1) we want to demonstrate Internet access to S3, and 2) because we're not working with real data.
- Click the Create bucket button at bottom.
 If you receive a Bucket with the same name already exists error, use a different name and try again. We're using the name hello-cloud-s3, but you can use any name you prefer. Remember to use your bucket name in the following steps whenever you see hello-cloud-s3 mentioned.
 - The bucket is created, and you should see it listed in the bucket list along with a confirmation message at top. Although we disabled block public access protection in the previous step, the bucket and its objects are not public.

Step 2: Upload Some Files
- On your local computer, find or create some dummy files you are comfortable uploading to S3 (nothing sensitive), such as text files or images. Click the hello-cloud-s3 link (or the bucket name you used) to view the bucket. You see no objects listed, because the new bucket is empty.

- Click the Upload button.
- Click the Add files button. A file selection dialog opens for your local file system.
- Select the files you designated for upload in #1 earlier. We're using two pictures from a Hawaiian vacation and a text file.
- Click Upload to upload the files.
- You'll get a confirmation page. Click Close.
- Your uploaded files now appear as objects in S3.

Step 3: View and Download Object
- Click the object name link of one of the files you uploaded. This takes you to a page with detail about the object.
- On the Properties tab, note that your object has a lot of metadata, including an owner, a region, a modification date, a size, a type, a key (name), an object URL, an Amazon Resource Name (ARN), and more. On the Permissions tab are permissions controlling who can do what with this object. Only you have access to the object at present. The Versioning tab can track multiple versions of your object, if you enable the optional versioning feature.
- Click the Open button at top. Your object opens in another browser tab.
- Back in the AWS console, click the Download button at top. The object is downloaded.

Step 4: Make Object Public and Access From a Browser
Now we'll make one of our objects public and see how it can be accessed from a browser, independent of the AWS console.
- Note the Object URL value in the top panel under Object overview, and copy it to the clipboard by clicking the copy icon.
- Enter this URL in another browser tab or window, and verify the response is an Access Denied message because this object is not yet public.

- Return to the AWS console browser tab. At top right, select Make public via ACL from the Object actions dropdown.
- Review the confirmation dialog, and if you're sure you want to make this data public, click Make public. Click Close to dismiss the confirmation page.

- Go to another browser tab or window, and again try entering the URL you tried in #2 earlier. This time, instead of an access denied, the browser is able to access your object.

Part 2: Access S3 Programmatically
In this activity, you'll write a .NET console program for an imaginary consulting company that reads employee timesheets as input, and generates a monthly time and billing report as output. Consultants upload their timesheets, indicating how many hours they worked each day on client projects. The report program reads the timesheets from S3, generates a report, and stores it in S3. The report helps the accounting department bill customers and run payroll. The diagram below illustrates our scenario. Both the input timesheets and output report are comma-separated values (CSV) files. Our code will interact with S3 via the AWS SDK for .NET.

Step 1: Set Permissions for the AWS User
The IAM user for your AWS toolkit user / AWS default profile needs a policy with the necessary permissions to interact with AWS services programmatically. In this step, you'll give that user the built-in PowerUserAccess policy, intended for developers. If you've done other exercises in the Hello, Cloud blog series, you may have already set up this permission.
Important: You should always follow the principle of least privilege when it comes to security. This blog series assumes you are working in your own developer account for learning purposes and not working with anything production-related. If you're using an organization-owned AWS account, you should coordinate with your security principal on IAM settings.
- In the AWS console, navigate to the Identity and Access Management (IAM) area of the AWS Console. You can enter iam in the search box to find it.
- Navigate to IAM > Users and select the username you use with the AWS Toolkit for Visual Studio (you created this user when you installed and configured the toolkit).
- If not already assigned, add the built-in PowerUserAccess permission. The PowerUserAccess permission provides developers full access to AWS services and resources, but does not allow management of users and groups.
Your AWS Toolkit for Visual Studio user now has the permissions it needs to interact with S3.
Step 2: Create an S3 Bucket with Timesheet Files
- Navigate to the AWS console and sign in.
- Set the region at top right to the region you want to be working in. We're using us-west-1 (N. California).
- Navigate to S3. You can enter s3 in the search bar.
- Select Buckets in the left panel.
- Click the Create bucket button at right.
- For Bucket name, enter a bucket name you want to use for time-and-billing. We're using time-and-billing. Replace that with your bucket name in the remaining steps.
- Click Create bucket at bottom. The new bucket is created and visible in the console.

- Click the bucket name link to view its contents. It is empty.
- On your local computer, create a text file named timesheet-john-smith.csv with the contents below at the end of this step.
- Create a second text file named timesheet-paul-jones.csv with the contents below.
- Create a third text file named timesheet-paula-rhodes.csv with the contents below.
- In the AWS console, navigate to S3 > Buckets, select the bucket you created above in #7, and click the Upload button. Select the 3 .csv files you just created and click the Upload button at bottom. Click Close to dismiss the confirmation dialog. The 3 .csv file objects should now be visible in the AWS console.

timesheet-john-smith.csv
Last,First,Date,Hours,Client,Project
Smith,John,11/01/2021,40,"Drake Insurance",ideation
Smith,John,11/02/2021,40,"Drake Insurance","wire-frame design"
Smith,John,11/03/2021,40,"Drake Insurance","front-end development"
Smith,John,11/04/2021,40,"Drake Insurance","front-end development"
Smith,John,11/04/2021,40,"Drake Insurance","front-end development"
timesheet-paul-jones.csv.csv
Last,First,Date,Hours,Client,Project
Jones,Paul,11/01/2021,8,"Blazing Ducks Sportswear","requirements gathering"
Jones,Paul,11/02/2021,8,"Blazing Ducks Sportswear","back-end development"
Jones,Paul,11/03/2021,8,"Blazing Ducks Sportswear","back-end development"
Jones,Paul,11/04/2021,8,"Blazing Ducks Sportswear","back-end development"
Jones,Paul,11/04/2021,4,"Blazing Ducks Sportswear","back-end development"
timesheet-paula-rhodes.csv
Last,First,Date,Hours,Client,Project
Rhodes,Paula,11/01/2021,8,"Drake Insurance","ideation"
Rhodes,Paula,11/02/2021,8,"Drake Insurance","wire-frame design"
Rhodes,Paula,11/03/2021,8,"Drake Insurance","front-end development"
Rhodes,Paula,11/04/2021,8,"Drake Insurance","front-end development"
Rhodes,Paula,11/05/2021,8,"Drake Insurance","front-end development"
Rhodes,Paula,11/08/2021,8,"Blazing Ducks Sportswear","front-end development"
Rhodes,Paula,11/09/2021,8,"Blazing Ducks Sportswear","front-end development"
Rhodes,Paula,11/10/2021,8,"Blazing Ducks Sportswear","front-end development"
Rhodes,Paula,11/11/2021,8,"Blazing Ducks Sportswear","front-end development"
Rhodes,Paula,11/12/2021,8,"Blazing Ducks Sportswear","sprint review"
Step 3: Create an End-of-Month Report Program
In this step, you'll create the .NET program that reads timesheets from S3 and outputs a time and billing report to S3.
- Open a command/terminal window.
- Create a development folder named hello-s3 and CD to it.
- Run the command dotnet new console to generate a .NET 6 console program.

- Launch Visual Studio and open the hello-s3 project.
- Add a package for the AWS SDK for .NET S3. In Solution Explorer, right-click hello-s3 project and select Manage NuGet Packages. On the Browse tab, find and add the the AWSSDK.S3 nuget package. Click Install. This will install both the AWSSDK.S3 and AWSSDK.Core packages.

- In the same way, add the LinqToCsvCore package (Apache license), which will simplify reading and writing CSV files.
- Edit the Program.cs file and replace its code with the code at the end of this step. Save your changes. The program start code instantiates the TimeAndBillingReport class, calling methods to read timesheets and generate a report.
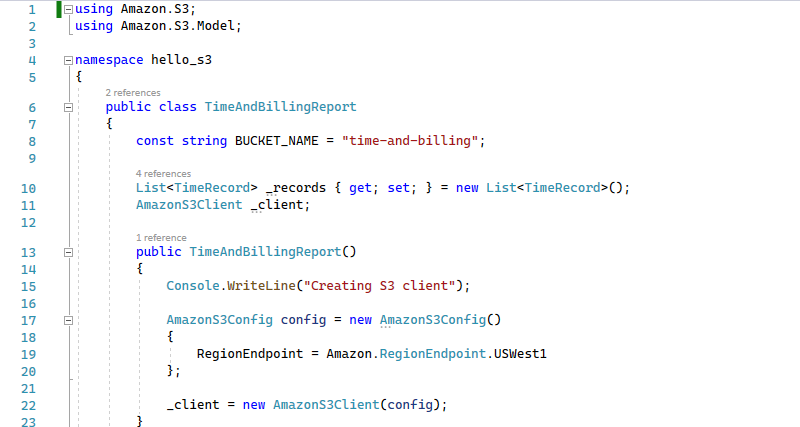
- In Solution Explorer, a) add a new class named TimeAndBillingReport.cs with the code at the end of this step. b) Find the const string BUCKET_NAME = "time-and-billing"; statement at line 13 and replace with the bucket name you created in Step 2. c) Save your changes. This class has methods to retrieve data from timesheet CSV files in S3, and to generate a report and save it in S3.
- In Solution Explorer, add a new class named TimeRecord.cs with the code at the end of this step. Save your changes. This class represents a timesheet record, and contains code for reading or writing timesheet CSV files using the LinqToCsv library.
- Build the project and resolve any errors.
We'll review the code more closely once we see it work.
Program.cs
using hello_s3;

var report = new TimeAndBillingReport();

Console.WriteLine("reading records");
await report.ReadTimesheetsFromBucket();

Console.WriteLine("creating report");
await report.GenerateReport();

Console.WriteLine("done");
TimeAndBillingReport.cs
using Amazon.S3;
using Amazon.S3.Model;

namespace hello_s3
{
    public class TimeAndBillingReport
    {
        const string BUCKET_NAME = "time-and-billing";

        List<TimeRecord> _records { get; set; } = new List<TimeRecord>();
        AmazonS3Client _client;

        public TimeAndBillingReport()
        {
            Console.WriteLine("Creating S3 client");

            AmazonS3Config config = new AmazonS3Config()
            {
                RegionEndpoint = Amazon.RegionEndpoint.USWest1
            };

            _client = new AmazonS3Client(config);
        }

        /// <summary>
        /// Read S3 timesheet CSV files from S3 and return as a TimeRecord collection.
        /// </summary>
        /// <returns></returns>
        public async Task ReadTimesheetsFromBucket()
        {
            _records = new List<TimeRecord>();

            Console.WriteLine("Listing objects in bucket");

            ListObjectsRequest Request = new ListObjectsRequest
            {
                BucketName = BUCKET_NAME,
            };

            ListObjectsResponse result;

            List<string> releases = new List<string>();
            do
            {
                result = await _client.ListObjectsAsync(Request);
                foreach (S3Object o in result.S3Objects)
                {
                    if (o.Key.Contains("timesheet", StringComparison.OrdinalIgnoreCase))
                    {
                        var response = await _client.GetObjectAsync(BUCKET_NAME, o.Key);
                        StreamReader reader = new StreamReader(response.ResponseStream);
                        string content = reader.ReadToEnd();
                        File.WriteAllText(o.Key, content);
                        _records.AddRange(TimeRecord.ReadCsvFile(o.Key));
                        File.Delete(o.Key);
                    }
                }
            }
            while (result.IsTruncated);
        }

        /// <summary>
        /// Generate monthly time and billing report. Creates file billing-report-[year]-[month].csv and uploaded to S3 bucket.
        /// </summary>
        /// <returns></returns>
        public async Task GenerateReport()
        {

            foreach (var record in _records)
            {
                Console.WriteLine($"date:{record.Date:yyyy-MM-dd} name:{record.LastName},{record.FirstName} hours:{record.Hours} client:{record.Client} project:{record.Project}");
            }

            var filename = $"billing-report-{DateTime.Today.Year}-{DateTime.Today.Month}.csv";

            Console.WriteLine("Creating " + filename);

            var sortedRecords = _records.OrderBy(r => r.Date).ThenBy(r => r.LastName).ThenBy(r => r.FirstName);

            TimeRecord.WriteCsvFile(filename, sortedRecords.ToList());

            await _client.PutObjectAsync(new PutObjectRequest { BucketName = BUCKET_NAME, Key = filename, ContentBody = File.ReadAllText(filename) });

            File.Delete(filename);
        }

    }
}
TimeRecord.cs
using LINQtoCSV;

namespace hello_s3
{
    public record class TimeRecord
    {
        [CsvColumn(Name = "Last", FieldIndex = 1)]
        public string LastName { get; set; } = string.Empty;
        [CsvColumn(Name = "First", FieldIndex = 2)]
        public string FirstName { get; set; } = string.Empty;
        [CsvColumn(Name = "Date", FieldIndex = 3, OutputFormat = "yyyy-MM-dd")]
        public DateTime Date { get; set; } = DateTime.MinValue;
        [CsvColumn(Name = "Hours", FieldIndex = 4)]
        public int Hours { get; set; } = 0;
        [CsvColumn(Name = "Client", FieldIndex = 5)]
        public string Client { get; set; } = string.Empty;
        [CsvColumn(Name = "Project", FieldIndex = 6)]
        public string Project { get; set; } = string.Empty;

        public TimeRecord() { }


        public static List<TimeRecord> ReadCsvFile(string filename)
        {
            var csvFileDescription = new CsvFileDescription
            {
                FirstLineHasColumnNames = true,
                IgnoreUnknownColumns = true,
                SeparatorChar = ',',
                UseFieldIndexForReadingData = false
            };

            var csvContext = new CsvContext();
            var records = csvContext.Read<TimeRecord>(filename, csvFileDescription);

            return records.ToList<TimeRecord>();
        }

        public static async void WriteCsvFile(string filename, List<TimeRecord> records)
        {
            var csvFileDescription = new CsvFileDescription
            {
                FirstLineHasColumnNames = true,
                IgnoreUnknownColumns = true,
                SeparatorChar = ',',
                UseFieldIndexForReadingData = false
            };

            var csvContext = new CsvContext();

            csvContext.Write<TimeRecord>(records, filename, csvFileDescription);
        }
    }
}
Step 4: Test the Report Program
Now we're ready to run our program. At this point you should have several timesheet files uploaded to the time-and-billing bucket from Step 2, and the program code entered and built from Step 3.
- Open a command/terminal window and navigate to where your hello-s3 code project is.
Enter dotnet run and watch the command run.

Return to the AWS console and open/refresh the list of bucket contents. A new report file should now be present named billing-report-[year]-[month].csv.

- Click on the billing report link in the object list, then click Download at top right.
- The CSV report downloads. Click to open it.
- Excel opens with the generated report.
 It worked! We've just witnessed our .NET console program retrieve timesheet CSV files from S3, generate a report, and store it in S3. The report we're viewing in Excel has all of the time entries from the individual S3 timesheet CSV files, ordered by date and name, which is useful for billing customers and administering payroll.
 - Close Excel.
Step 5: Review the Program Code
Now let's review the program code to understand how it works.
- In Visual Studio, open the Program.cs file for editing. This is minimal code, thanks to a .NET 6 / C# 10 feature, top-level statements. The program start code instantiates the TimeAndBillingReport class, calls its ReadTimesheetsFromBucket method to read timesheets from S3, and then its GenerateReport method to generate a report and store it in S3.

Open the TimeAndBillingReport.cs file for editing. This class knows how to talk to S3 using the AWS SDK for .NET, and references the Amazon.S3 namespaces. To interact with S3, we instantiate an AmazonS3Client named _client. This will use the AWS default profile to determine which account to access.
 The ReadTimesheetsFromBucket method scans our S3 bucket with the ListObjectsAsync SDK method. Since there can potentially be many objects in a bucket, a do-while loop is used to successively iterate through all of the objects in the bucket. This is a common SDK pattern.
 Inside the do-while loop, if the object's key (filename) includes "timesheet", we process it. This is important so we don't mistakenly process non-timesheet objects that might be in the bucket, including previous version of the report this program generates.
 Once we have an S3 object that looks like a timesheet, its contents are retrieved using the GetObjectAsync SDK method, which involves reading a stream from the response. What we need to do next is use the LinqtoCsv library to convert the CSV data into a TimeRecord collection. That library expects files, not S3 objects, so we save the current object to a file, call a static ReadCsvFile method in the TimeRecord class, add the results to an overall TimeRecord collection, and delete the temporary file.
The GenerateReport method sorts the collection of TimeRecord objects by date, last name, and first name, and then calls TimeRecord.WriteCsvFile to write a billing report CSV file using LinqToCsv. The billing report CSV file is then uploaded to S3 with the SDK's PutObjectRequest method. Lastly, the temporary local billing file is deleted.

- Open the TimeRecord.cs file in the editor. This class holds timesheet records as well as methods for reading and writing CSV files. The properties (LastName, FirstName, Date, Hours, Client, Project) have CvsColumn attributes indicating their header row name in the CSV and column position.
 The ReadCsvFile method accepts a filename parameter, and parses a local CSV file into a list of TimeRecords result. The LinqToCsv library does this work, guided by the TimeRecord class properties and attributes.
 The WriteCsvFile method writes a list of TimeRecord records to a file, again with LinqToCsv doing all the work.
Step 6: Shut it Down
When you're finished with it, delete the objects and buckets you created in Part 1 and Part 2 in the AWS console. You don't want to accrue charges for something you're not using.
- In the AWS console, navigate to Amazon S3 > Buckets.
- Click the hello-cloud-s3 bucket you created in Part 1, Step 1 (with the name you used).
- Select all of the objects and click Delete.
- Confirm the delete dialog and click Delete objects.
- From the Actions drop-down, select Delete and confirm.

- Click Close to dismiss the confirmation and verify that the bucket is empty.
- Repeat steps 1-6 for the "time-and-billing" bucket you created in Part 2 Step 1 (with the name you used).
Where to Go From Here
Great things are in store for you with S3, and you're already on your way. In Part 1, you learned how to interact with S3 from the AWS console, uploaded and downloaded files, and saw how to make an object publicly accessible over the Internet. In Part 2, you wrote .NET code to list, read and write S3 objects using the AWS SDK for .NET.
One of the nice things about S3 is that it's both powerful and approachable. The common use case of file storage in the cloud is easy to grasp and find uses for. However, don't stop there, or you'll be doing yourself a disservice. S3 can do so much more. An S3 event like an upload can trigger a Lambda function. That's really nice for applications like image resizing or content ingestion. Numerous AWS services work with S3. For example, Amazon Athena lets you analyze data in S3 (CSV, JSON, Parquet, and others) using SQL without having to set up a data warehouse. Amazon Machine Learning (ML) uses S3 for its repository.
To get comfortable with S3, use it. To take full advantage, read up on its many features and different classes of storage. If you do that, new use cases will suggest themselves. S3, combined with other AWS services, can enable everything from data lakes to video ingestion. Start working with S3 now, and take that off your bucket list.
Further Reading
AWS Documentation and Training
AWS SDK for .NET - Using Amazon Simple Storage Service Internet storage
AWS Blogs
Architecting for high availability on Amazon S3
AWS re:Invent Videos
Implementing a data lake on Amazon S3
Deep dive on Amazon S3 security and management
Deep Dive on Amazon S3 and Glacier Architecture
Community


