Table of contents
- This episode: Amazon Neptune. In this Hello, Cloud blog series, we're covering the basics of AWS cloud services for newcomers who are .NET developers. If you love C# but are new to AWS, or to this particular service, this should give you a jumpstart.
- Amazon Neptune: What is it, and why use It?
- Our Hello, Neptune Project
- One-time Setup
- Step 1: Create a Policy for the AWS Toolkit User
- Step 2: Create Neptune Database
- Step 3: Interact with Jupyter Notebook
- Step 4: Create Role for Lambda Function
- Step 5: Create Lambda Project in Visual Studio
- Step 6: Code Your Lambda Function
- Step 7: Publish Lambda
- Step 8: Try Out the Service
- Step 9: Shut it Down
- Where to Go From Here
- Further Reading
This episode: Amazon Neptune. In this Hello, Cloud blog series, we're covering the basics of AWS cloud services for newcomers who are .NET developers. If you love C# but are new to AWS, or to this particular service, this should give you a jumpstart.
In this post we'll introduce Amazon Neptune, a graph database service, and use it in a "Hello, Cloud" .NET program. We'll do this step-by-step, making no assumptions other than familiarity with C# and Visual Studio. We're using Visual Studio 2022 and .NET 6.
Amazon Neptune: What is it, and why use It?
Amazon Neptune is a graph database service. AWS describes it as "a fast, reliable, and fully managed graph database service". If your database familiarity is limited to relational databases or popular NoSQL databases, graph databases may be new to you. A graph database is a kind of purpose-built database for applications that deal with relationships.
Social networks, recommendation engines, fraud detection, and knowledge graphs like wikidata are examples of applications that need to traverse relationships in highly connected data sets. Modeling and efficiently querying relationships is challenging with mainstream database tools. Neptune can query billions of relationships in milliseconds.
Unlike many databases, you don't work with tables, rows, or columns in graph databases. Instead, you have vertices and edges. A vertex is a node, and an edge is a relationship between nodes. For example, in a social media app, vertices could represent people and posts, and edges could indicate a friend relationship or a like of a post. Both vertices and edges can have named properties.
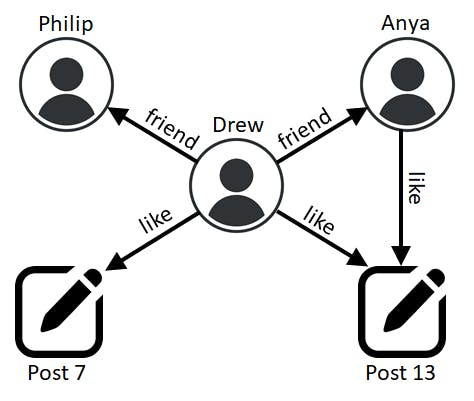
Neptune supports several different query languages. We'll be using the Gremlin query language in this post. Gremlin is a fluent interface that relies on method chaining, much like LINQ or jQuery. You can use essentially the same query language syntax in your .NET code with the Gremlin.Net NuGet package. You could use a Gremlin query like this one to find the titles of posts that Drew likes:
g.V().has("name", "Drew").out("like").values("title")
If you are used to another database query language such as SQL, recall that it took some time to become proficient. You can expect the same with Gremlin: it's powerful, but different, and it will take some time to learn its concepts and behaviors. Fortunately, your Neptune database comes with a handy query interface that includes tutorials. Amazon Neptune includes support for Jupyter Notebooks, a popular web-based development tool for interacting with and manipulating data that is used by many data scientists and engineers. They help you analyze and experiment with your data.
Our Hello, Neptune Project
Our Hello, Neptune project first creates a Neptune graph database in the AWS console and samples its Jupyter Notebook. We then write a .NET program that populates and queries data. Neptune only permits access from the same AWS VPC, so we'll be hosting today's .NET code in an AWS Lambda function.
One-time Setup
To work with Amazon Neptune, .NET, and AWS Lambda you will need:
- An AWS account, and an understanding of what is included in the AWS Free Tier.
- Microsoft Visual Studio 2022. If you're using an older version of Visual Studio you won't be able to use .NET 6.
- AWS Toolkit for Visual Studio. Configure the toolkit to access your AWS account and create an IAM user.
- Install the dotnet CLI lambda nuget packages :
dotnet new -i Amazon.Lambda.Templates
dotnet tool install -g Amazon.Lambda.Tools
Step 1: Create a Policy for the AWS Toolkit User
In order to publish to AWS from Visual Studio, you'll need the necessary permissions. In this step, you'll create a new policy in AWS, then add it to your AWS Toolkit for Visual Studio user. You created this user when you installed and configured the toolkit.
Important: You should always follow the principle of least privilege when it comes to security. This blog series assumes you are working in your own developer account for learning purposes and not working with anything production-related. If you're using an organization-owned AWS account, you should coordinate with your security principal on IAM settings.
- Sign in to the AWS console. Select the region at top right you want to be working in. We're using US West (N. California).
- Navigate to the Identity and Access Management (IAM) area of the AWS Console. You can enter iam in the search box to find it.
- Click Policies.
- Click Create Policy.
- Click the JSON tab, and enter the policy JSON at the end of this step, replacing [account-number] with your AWS account number.

- Click Next:Tags.
- Click Next:Review.
- Enter the name IAMPassRole and click Create policy.
- Navigate to IAM > Users and select the username you use with the AWS Toolkit for Visual Studio (you created this user when you installed and configured the toolkit).
- If not already assigned, add the built-in PowerUserAccess permission. The PowerUserAccess permission provides developers full access to AWS services and resources, but does not allow management of users and groups.
- Add the new IAMPassRole permission.
IAMPassRole policy JSON
{
    "Version": "2012-10-17",
    "Statement": {
    "Sid": "PolicyStatementToAllowUserToPassOneSpecificRole",
    "Effect": "Allow",
    "Action": [ "iam:PassRole" ],
    "Resource": "arn:aws:iam::[account-number]:role/lambda-role"
    }
}
Your AWS Toolkit for Visual Studio user now has the permissions it needs to create and publish to AWS Lambda.
Step 2: Create Neptune Database
In this step, you'll create a Neptune database in the AWS console. Simultaneously, we'll create a Jupyter Notebook for working with your data.
- In a browser, go to the AWS management console and sign in. At top right, select the region you want to work in. We're using N. California.
- Navigate to the Amazon Neptune area. You can enter neptune in the search box.
- Select Databases from the left panel. Then click Create database.
On the Create database page, enter or select the following:
a. Settings - DB cluster identifier: enter database-helloneptune.
b. Templates: select Development and Testing.
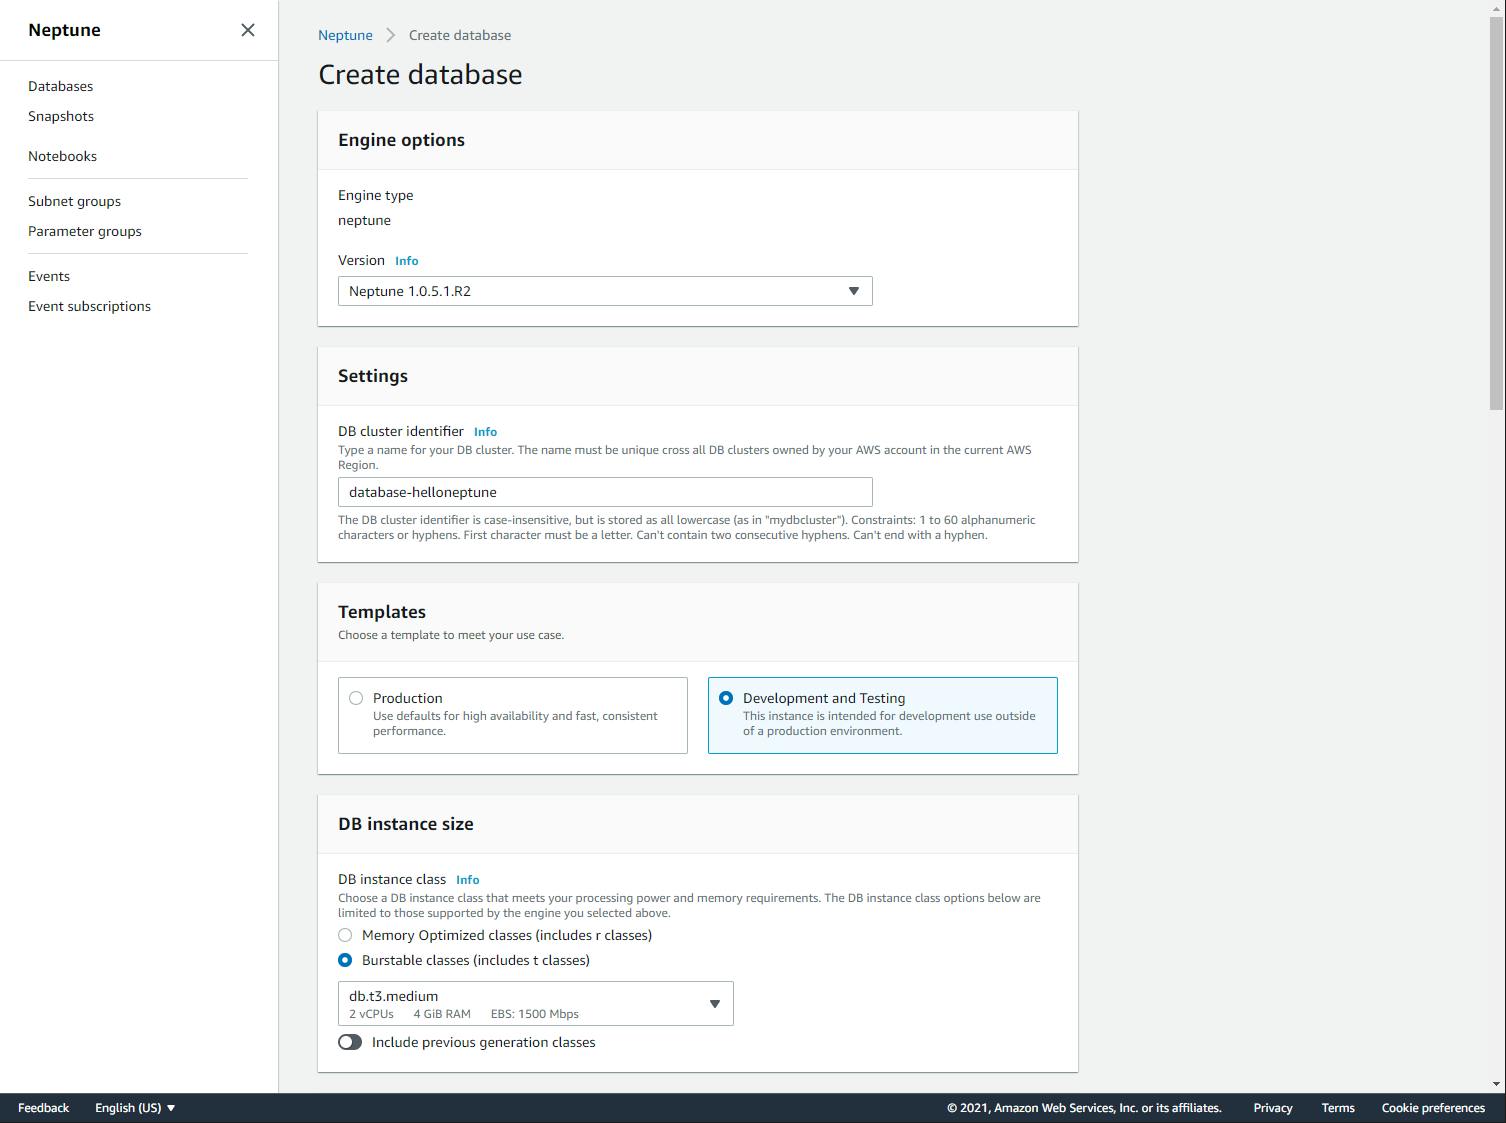
c. Notebook configuration - Notebook name: check Create notebook.
d. Notebook name - enter helloneptune.
e. IAM role: helloneptune
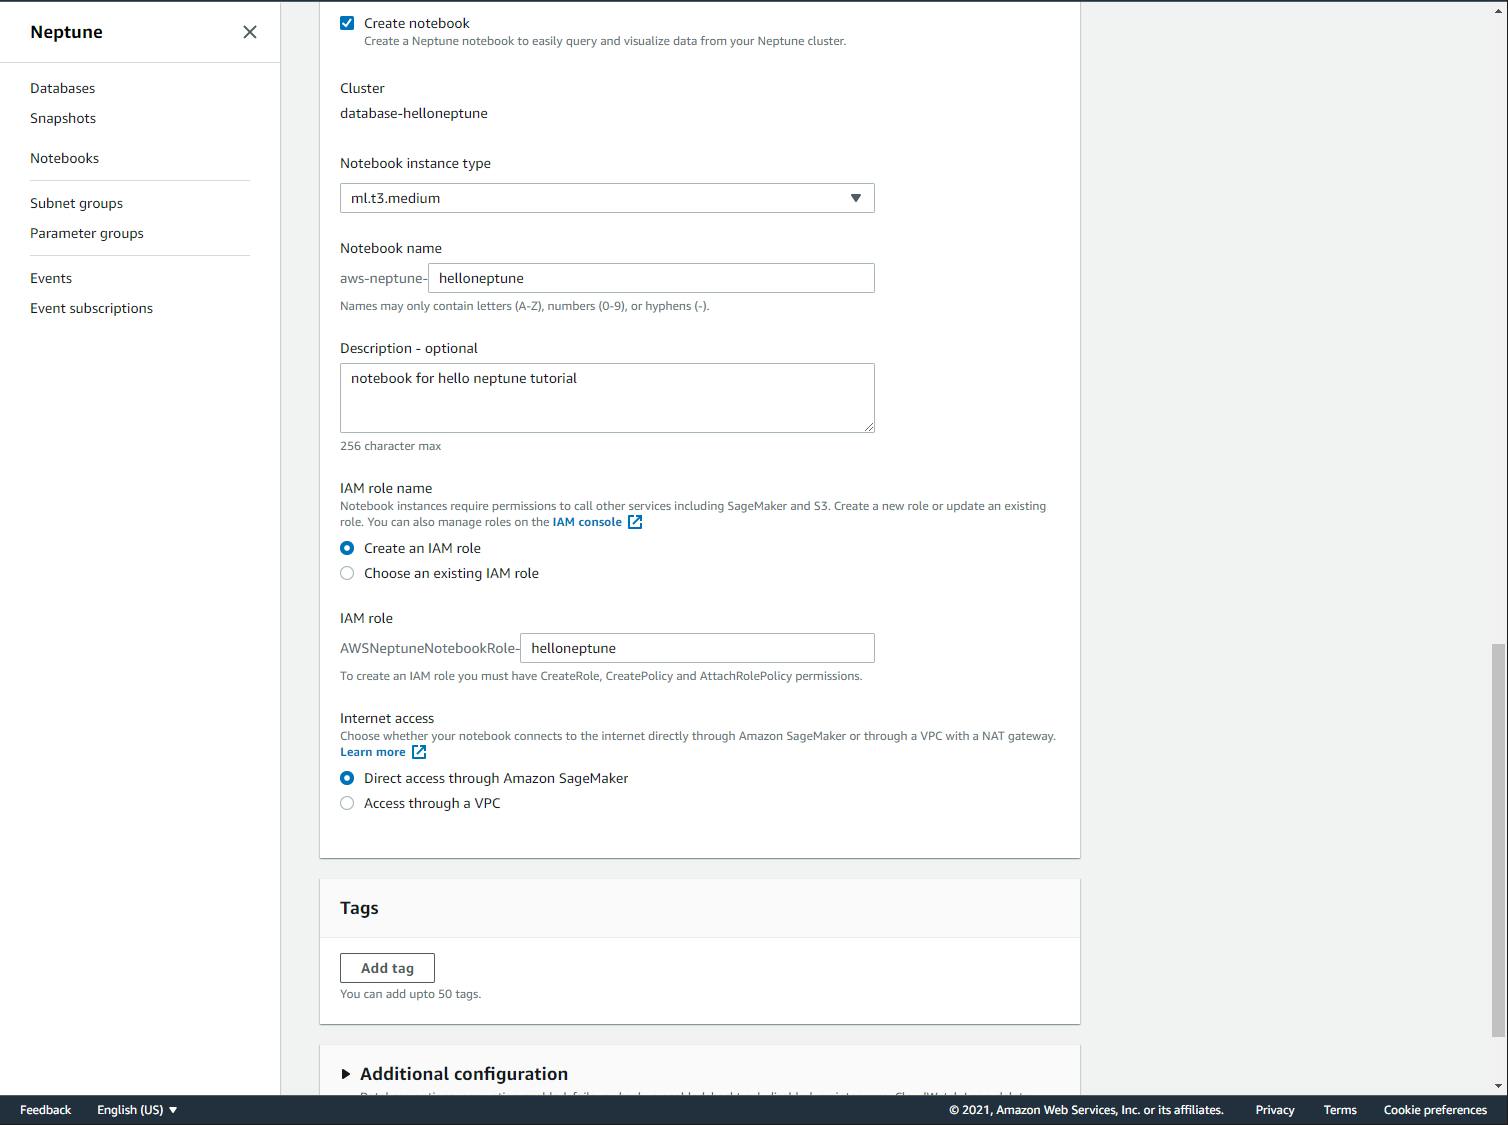 f. At the bottom of the page, click Create database. You are returned to the database view and see your database and an instance with a status of Creating.
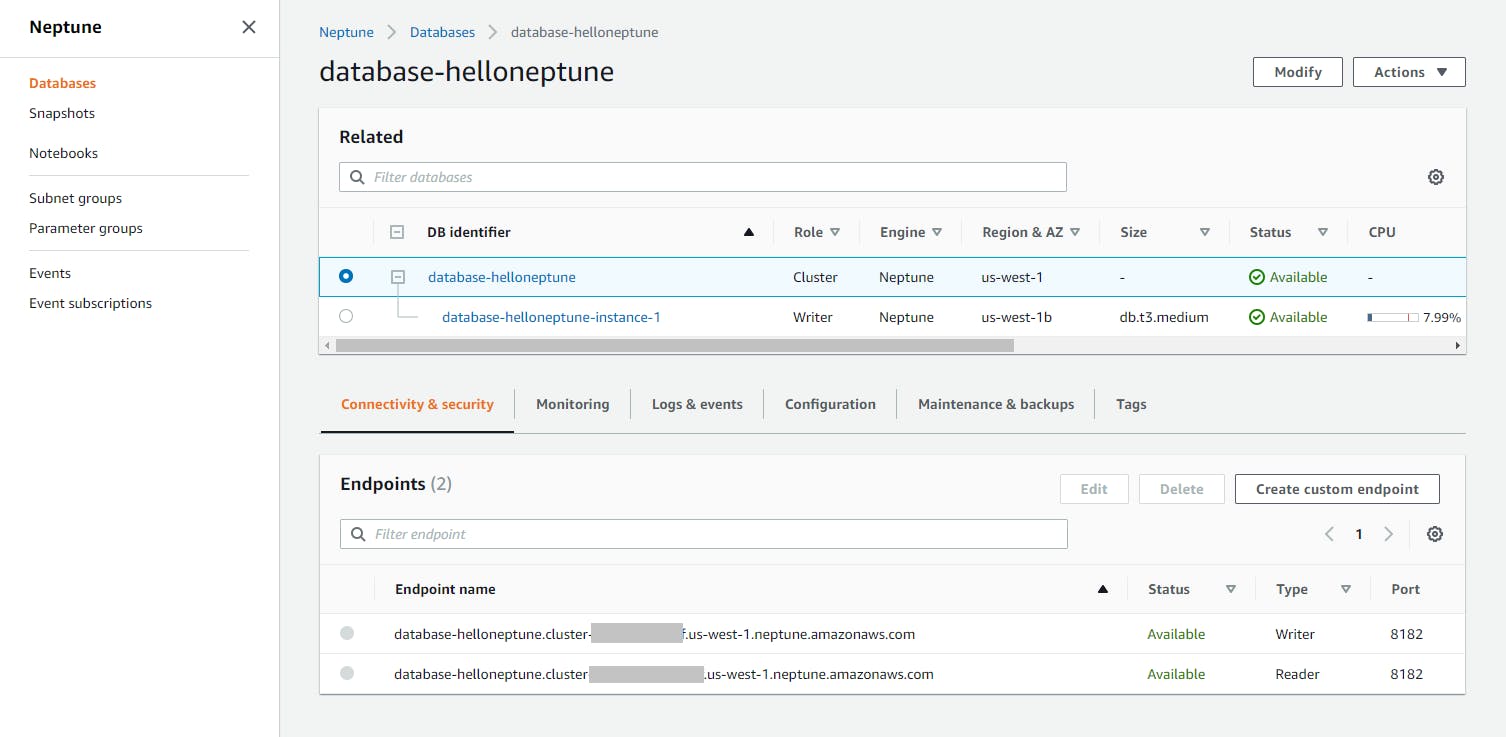
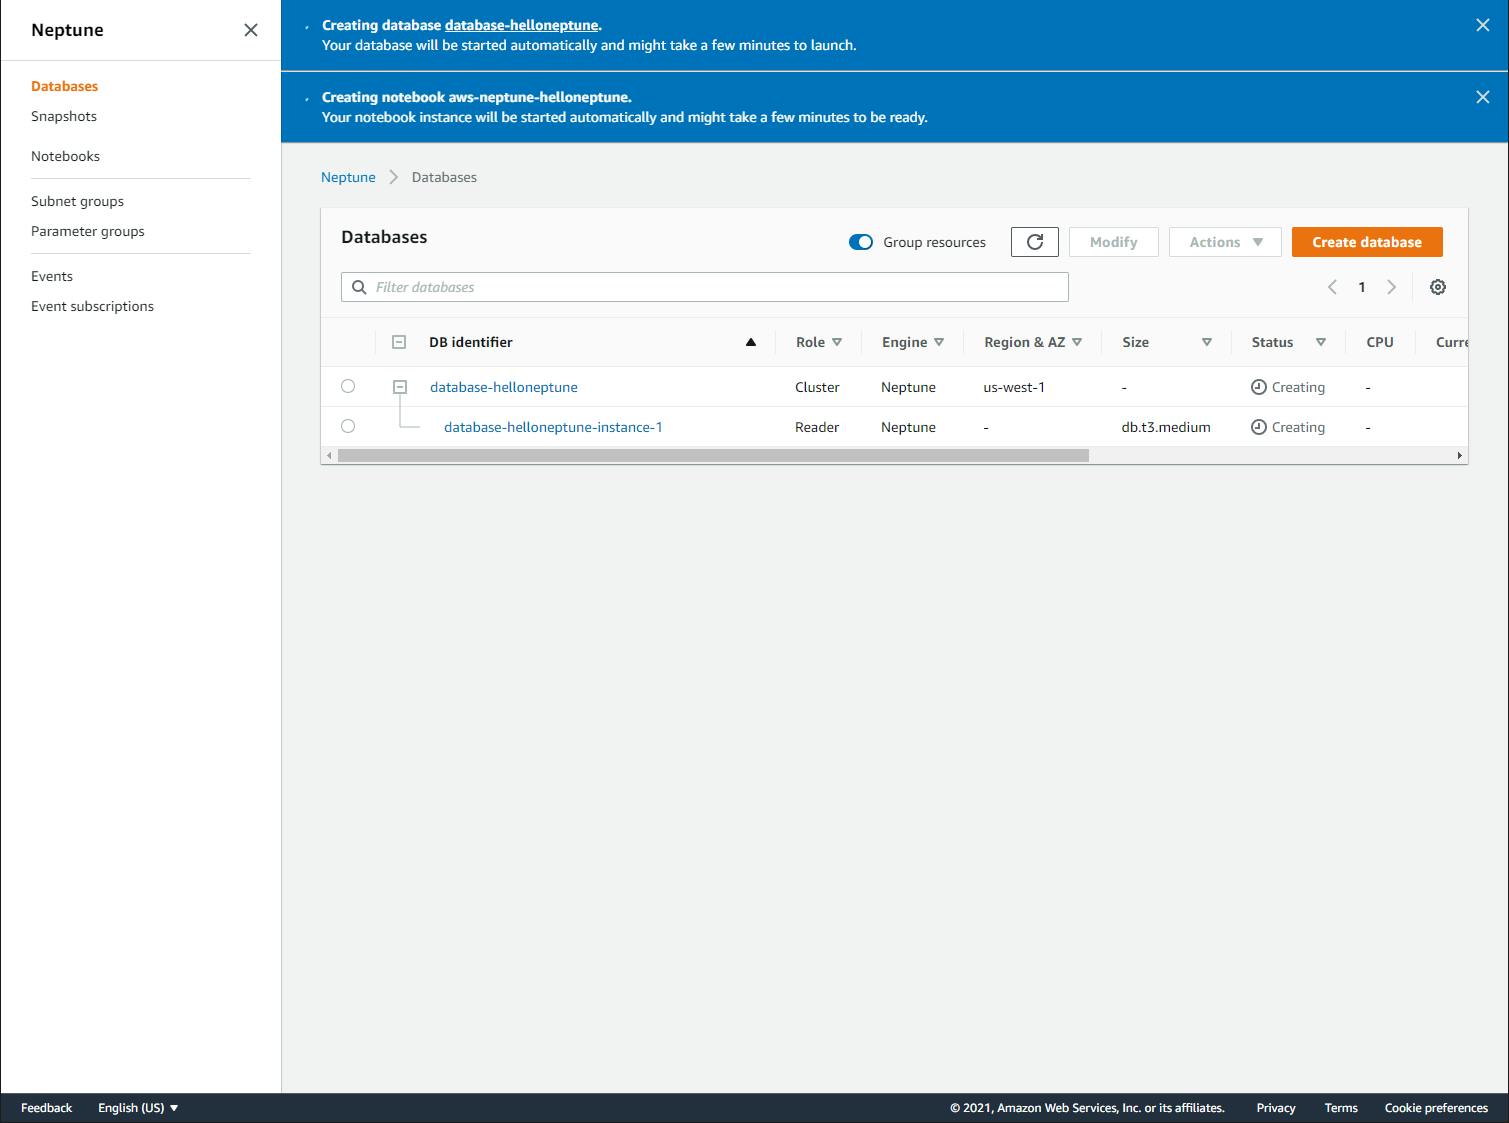 Wait until your see a Cluster and a Writer both with status Available.

- On the Databases view, locate the database instance name under the database and make a note of both the VPC and Availability Zone (under "Region & AZ"). Our Lambda function must be deployed to the same VPC in order to access the Neptune database.

- Click on the database name link and view the Endpoints panel. Make a note of the Writer endpoint name (URL) which you will use in a later step.
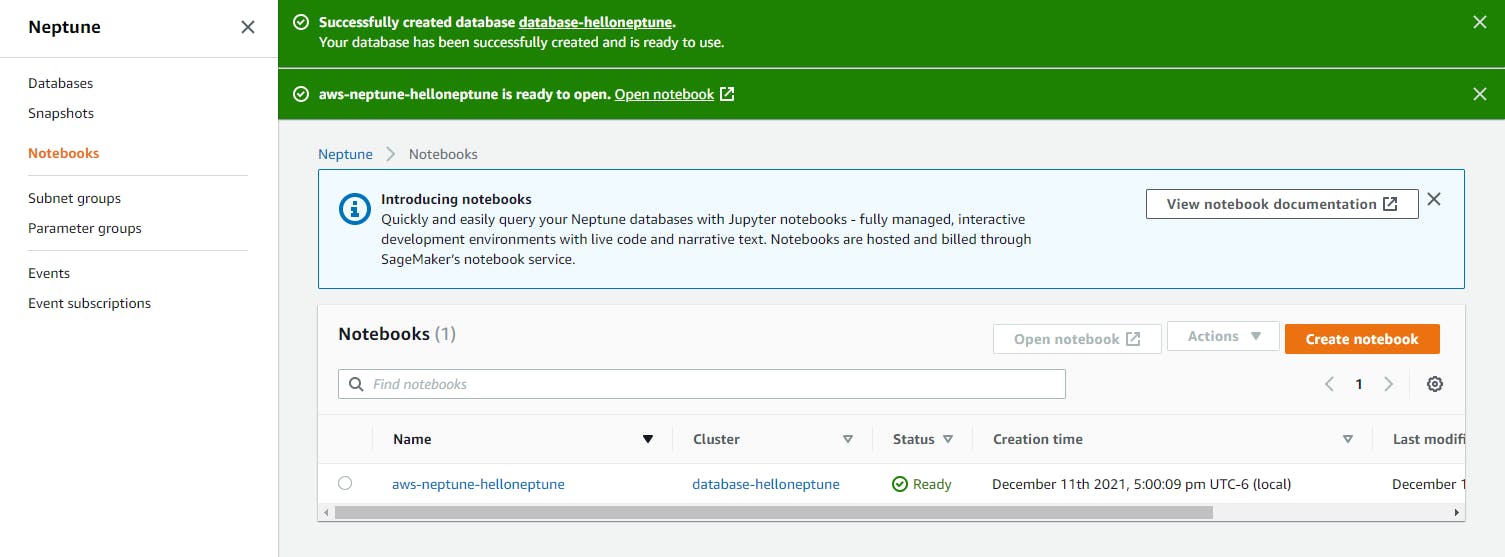
- Click Notebooks on the left panel and confirm it has a status of Ready.
Step 3: Interact with Jupyter Notebook
In this step, you'll use the Jupyter Notebook to add data to the database and query it using Gremlin.
- In the AWS console, navigate to the Neptune area and click Notebooks on the left panel (you should already be here if you just completed Step 2).
- Click on the notebook name, aws-neptune-helloneptune.
- Click the Open notebook button at top right, which opens in another browser tab.
- Click on the Neptune folder link, then on the 01-Getting-Started folder.
Read the getting started page, which has sections about queries you can run to insert and query data.
a. Go to the Issuing Gremlin Queries section.
b. Select the first query that adds vertices. Then click the Run toolbar button.
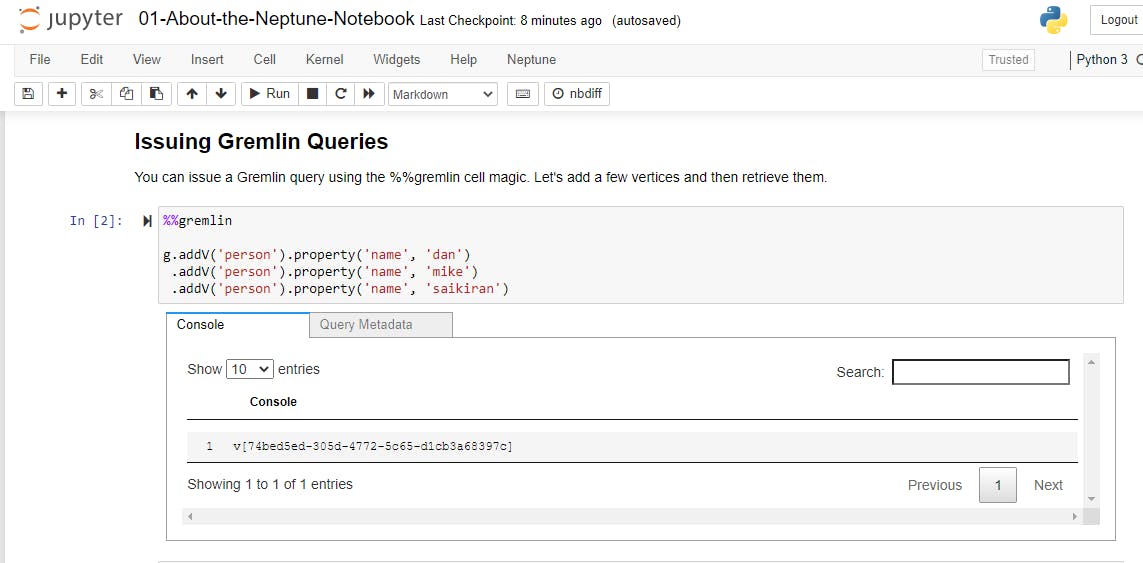
c. Select the next query,
g.V().limit(10)and click the Run toolbar button. 3 vertices are listed in the results.
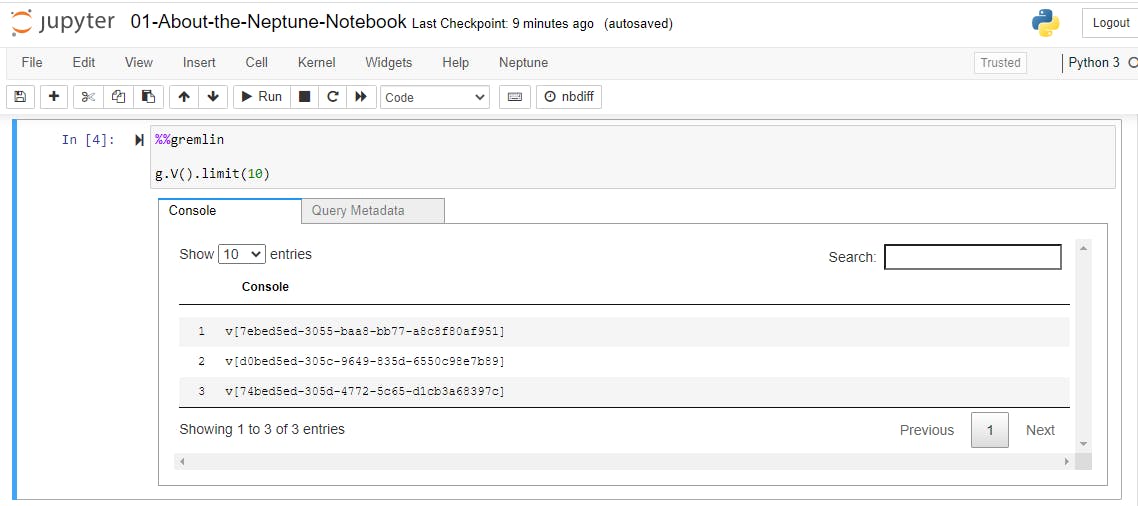
d. Select and run the next query,
g.V().valueMap().limit(10))This time the results show the data in the 3 vertices.
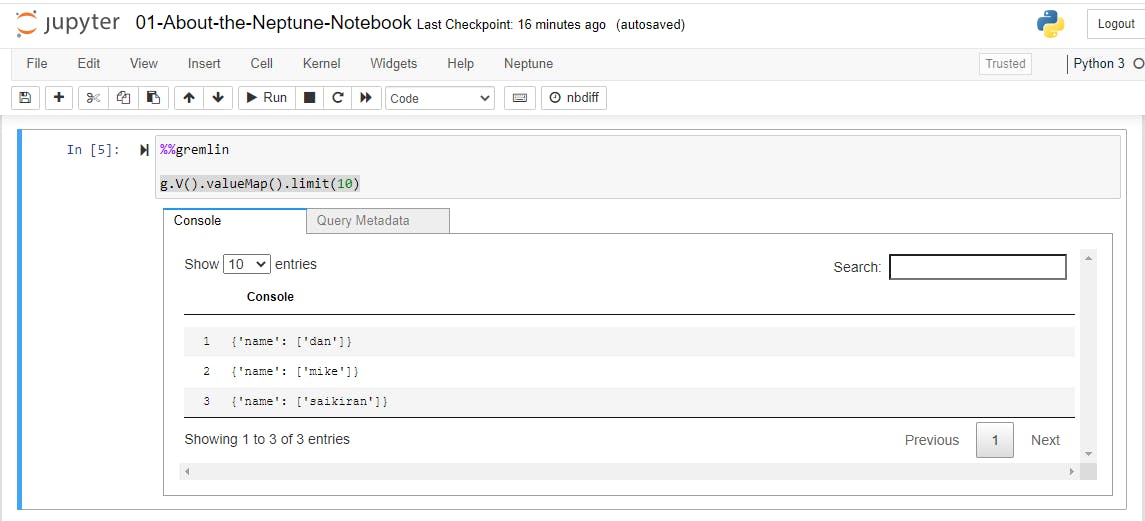
Optional: experiment with the other queries on this notebook page, or the other getting started pages, to get familiar with Gremlin.
Step 4: Create Role for Lambda Function
We'll now turn our attention to creating a .NET AWS Lambda Function to work with the Neptune database. In this step, you'll create a role for the Lambda function in the AWS console. If you already have a Lambda role you like to use, make sure it covers the permissions listed here.
- In the AWS console, navigate to the Identity and Access Management (IAM) area. You can find it by entering "IAM" in the search bar.
- Choose Create role.
- Under Common use cases, choose Lambda.
- Click Next: Permissions.
- Under Attach permissions policies, select the AWS managed policies AWSLambdaBasicExecution, AWSLambdaVPCAccessExecutionRole, and AWSXrayDaemonWriteAccess.
- Click Next: Tags.
- Click Next: Review.
- For role-name, enter lambda-role.
- Click Create role.
Step 5: Create Lambda Project in Visual Studio
In this step you'll create a .NET 6 AWS Lambda function project.
Launch Visual Studio and select Create New Project.
Browse/search/filter for AWS Lambda Project (.NET Core - C#) and select it. Then click Next.
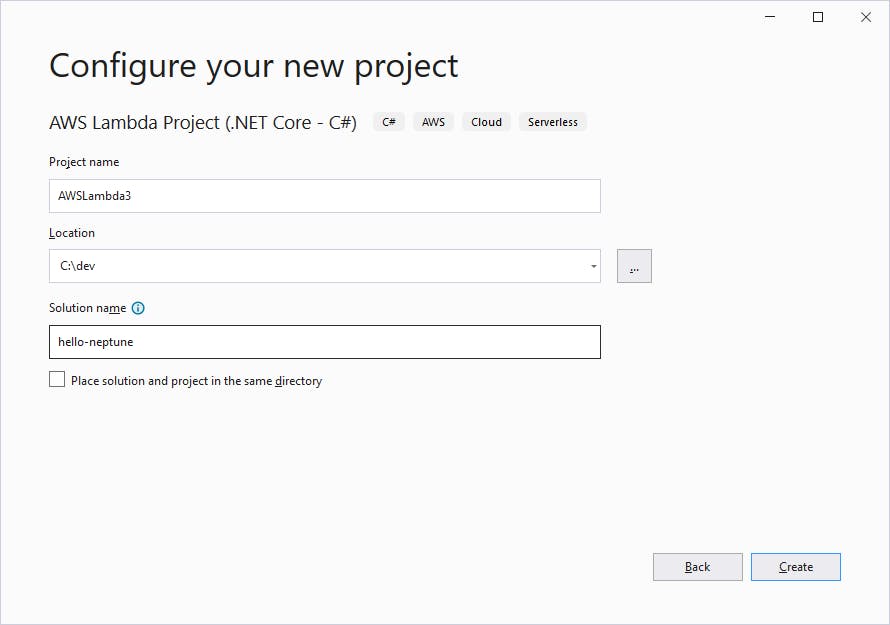
On the next page, enter the Project name hello-neptune.
Enter your preferred folder location.
Click Create.
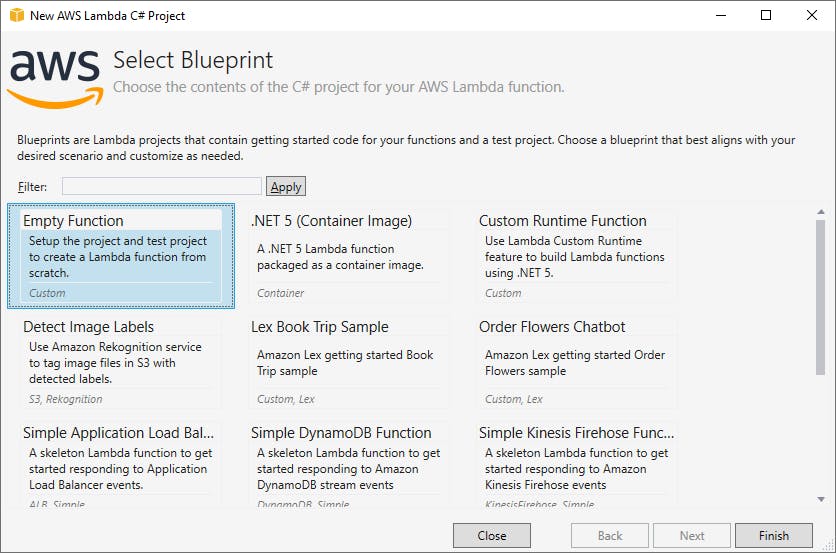
On the next page, select the Empty Function blueprint.
Click Finish.
Moments later, your project has been created.
Step 6: Code Your Lambda Function
Now we'll replace the generated Lambda function with our own code.
- Double click the Function.cs file to edit it.
- Replace the code in Function.cs with the version below, and save your changes.
- Build your project.
using System;
using Amazon.Lambda.Core;
using Gremlin.Net.Driver;
using Gremlin.Net.Driver.Remote;
using static Gremlin.Net.Process.Traversal.AnonymousTraversalSource;
using static Gremlin.Net.Process.Traversal.__;

// Assembly attribute to enable the Lambda function's JSON input to be converted into a .NET class.
[assembly: LambdaSerializer(typeof(Amazon.Lambda.Serialization.SystemTextJson.DefaultLambdaJsonSerializer))]

namespace helloNeptune
{

    public class Function
    {

        /// <summary>
        /// Populates and queries a Neptune graph database.
        /// </summary>
        /// <param name="input">one of the following: setup (init data), people (list all), direct (list direct reports), subs (list subordinates)</param>
        /// <param name="context">function context object used for logging</param>
        /// <returns></returns>
        public string FunctionHandler(string input, ILambdaContext context)
        {
            var endpoint = "database-helloneptune.cluster-cd7np9kwz0zf.us-west-1.neptune.amazonaws.com";

            try
            {
                var gremlinServer = new GremlinServer(endpoint, 8182, enableSsl: true);
                var gremlinClient = new GremlinClient(gremlinServer);
                var remoteConnection = new DriverRemoteConnection(gremlinClient, "g");
                var g = Traversal().WithRemote(remoteConnection);

                switch (input)
                {
                    case "setup":
                        context.Logger.LogLine("Dropping all edges");
                        g.E().Drop().Iterate();
                        context.Logger.LogLine("Dropping all vertices");
                        g.V().Drop().Iterate();

                        context.Logger.LogLine("Adding vertices");

                        var alice = g.AddV("person").Property("name", "Alice").Property("role", "Manager").Next();
                        var bob = g.AddV("person").Property("name", "Bob").Property("role", "Engineer").Next();
                        var justin = g.AddV("person").Property("name", "Justin").Property("role", "Writer").Next();
                        var ashok = g.AddV("person").Property("name", "Ashok").Property("role", "Intern").Next();
                        var jamal = g.AddV("person").Property("name", "Jamal").Property("role", "Intern").Next();

                        context.Logger.LogLine("Adding edges");

                        g.V(alice).AddE("manages").To(bob).Iterate();
                        g.V(alice).AddE("manages").To(justin).Property("weight", 0.5).Iterate();
                        g.V(justin).AddE("manages").To(ashok).Property("weight", 0.5).Iterate();
                        g.V(justin).AddE("manages").To(jamal).Property("weight", 0.5).Iterate();
                        break;
                    case "people":
                        {
                            context.Logger.LogLine("Listing all people");
                            var people = g.V()
                             .HasLabel("person")
                             .Project<object>("Name", "Role")
                                 .By("name")
                                 .By("role")
                             .ToList();

                            context.Logger.LogLine($"Name     Role");
                            foreach (var person in people)
                            {
                                context.Logger.LogLine($"{person["Name"],-8} {person["Role"],-8}");
                            }
                        }
                        break;
                    case "directs":
                        {
                            context.Logger.LogLine("Listing Alice's direct reports");
                            var people = g.V().Has("name", "Alice")
                                .Out("manages")
                             .Project<object>("Name", "Role")
                                 .By("name")
                                 .By("role")
                             .ToList();

                            context.Logger.LogLine($"Name     Role");
                            foreach (var person in people)
                            {
                                context.Logger.LogLine($"{person["Name"],-8} {person["Role"],-8}");
                            }
                        }
                        break;
                    case "subs":
                        {
                            context.Logger.LogLine("Listing Alice's subordinates");

                            var people = g.V().Has("name", "Alice")
                                .Repeat(Out("manages")).Times(2).Emit()
                                .Project<object>("Name", "Role")
                                .By("name")
                                .By("role")
                            .ToList();

                            context.Logger.LogLine($"Name     Role");
                            foreach (var person in people)
                            {
                                context.Logger.LogLine($"{person["Name"],-8} {person["Role"],-8}");
                            }
                        }
                        break;
                    default:
                        throw new InvalidOperationException($"Unrecognized function input: {input} - try setup, people, directs, subs");
                }
                context.Logger.LogLine("Successful");
                return "success";
            }
            catch (Exception e)
            {
                context.Logger.LogLine(e.ToString());
                return $"exception: {e}";
            }
        }
    }
}
This function is written to let an input parameter determine what the function does. An input of "setup" deletes any prior data in the database and sets up some sample vertices and edges representing employees and manager relationships. An input of "people" lists all people (vertices), "directs" lists all direct reports of a manager, and "subs" lists all subordinates of the manager.
Step 7: Publish Lambda
In this step, we'll publish the Lambda function to AWS. The first time you do this, a new AWS Lambda Function will be created.
- In Solution Explorer, right-click the hello-neptune project and select Publish to AWS.
- Set region to same region you used in Step 2 to create the Neptune database.
- Set Function name to hello-neptune.
Click Next.
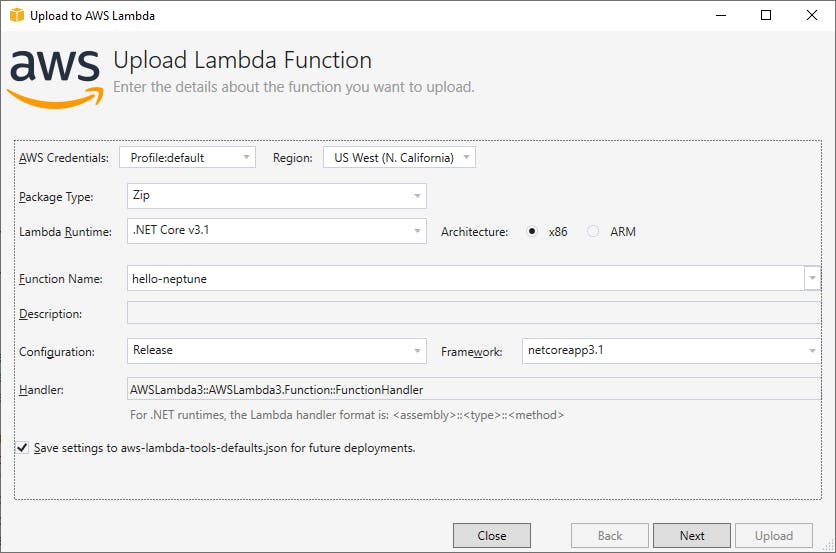
For role, select lambda-role, the role you created in Step 4.
- Select the same VPC and Subnet you recorded earlier in Step 2.
Click Upload to begin the publish.
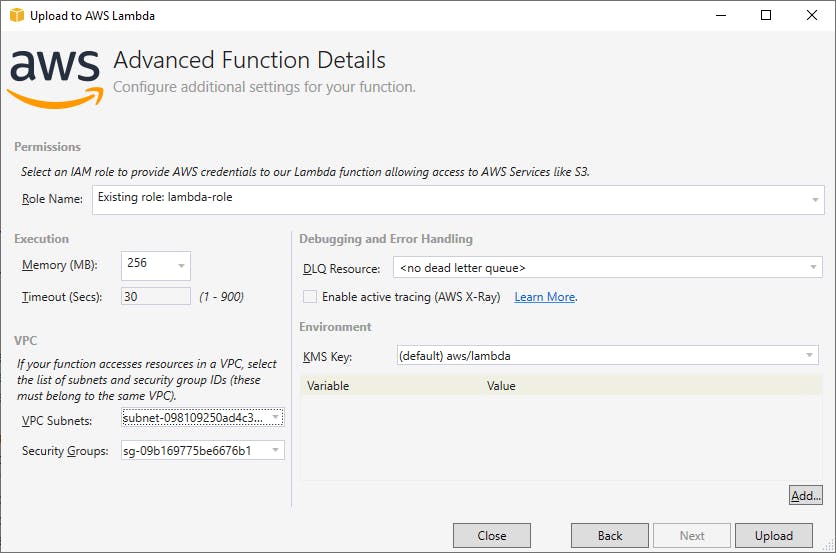
Wait for the publish action to complete, which will display a test page once completed. Your service is deployed when see New Lambda function created in the Visual Studio Output window and a test page for the hello-neptune Lambda function appears. If the test page says "Lambda update InProgress. You might invoke an earlier version.", wait for that message to disappear before proceeding.
Executing publish command
Deleted previous publish folder
... invoking 'dotnet publish', working folder 'C:\dev\hello-neptune\AWSLambda3\bin\Release\netcoreapp3.1\publish'
... dotnet publish --output "C:\dev\hello-neptune\AWSLambda3\bin\Release\netcoreapp3.1\publish" --configuration "Release" --framework "netcoreapp3.1" /p:GenerateRuntimeConfigurationFiles=true --runtime linux-x64 --self-contained false
... publish: Microsoft (R) Build Engine version 17.0.0+c9eb9dd64 for .NET
... publish: Copyright (C) Microsoft Corporation. All rights reserved.
... publish:   Determining projects to restore...
... publish:   Restored C:\dev\hello-neptune\AWSLambda3\AWSLambda3.csproj (in 228 ms).
... publish:   AWSLambda3 -> C:\dev\hello-neptune\AWSLambda3\bin\Release\netcoreapp3.1\linux-x64\AWSLambda3.dll
... publish:   AWSLambda3 -> C:\dev\hello-neptune\AWSLambda3\bin\Release\netcoreapp3.1\publish\
Zipping publish folder C:\dev\hello-neptune\AWSLambda3\bin\Release\netcoreapp3.1\publish to C:\dev\hello-neptune\AWSLambda3\bin\Release\netcoreapp3.1\AWSLambda3.zip
... zipping: Amazon.Lambda.Core.dll
... zipping: Amazon.Lambda.Serialization.SystemTextJson.dll
... zipping: AWSLambda3.deps.json
... zipping: AWSLambda3.dll
... zipping: AWSLambda3.pdb
... zipping: AWSLambda3.runtimeconfig.json
... zipping: Gremlin.Net.dll
... zipping: Polly.dll
... zipping: System.Runtime.CompilerServices.Unsafe.dll
... zipping: System.Text.Encodings.Web.dll
... zipping: System.Text.Json.dll
Created publish archive (C:\dev\hello-neptune\AWSLambda3\bin\Release\netcoreapp3.1\AWSLambda3.zip).
Creating new Lambda function hello-neptune
New Lambda function created
Config settings saved to C:\dev\hello-neptune\AWSLambda3\aws-lambda-tools-defaults.json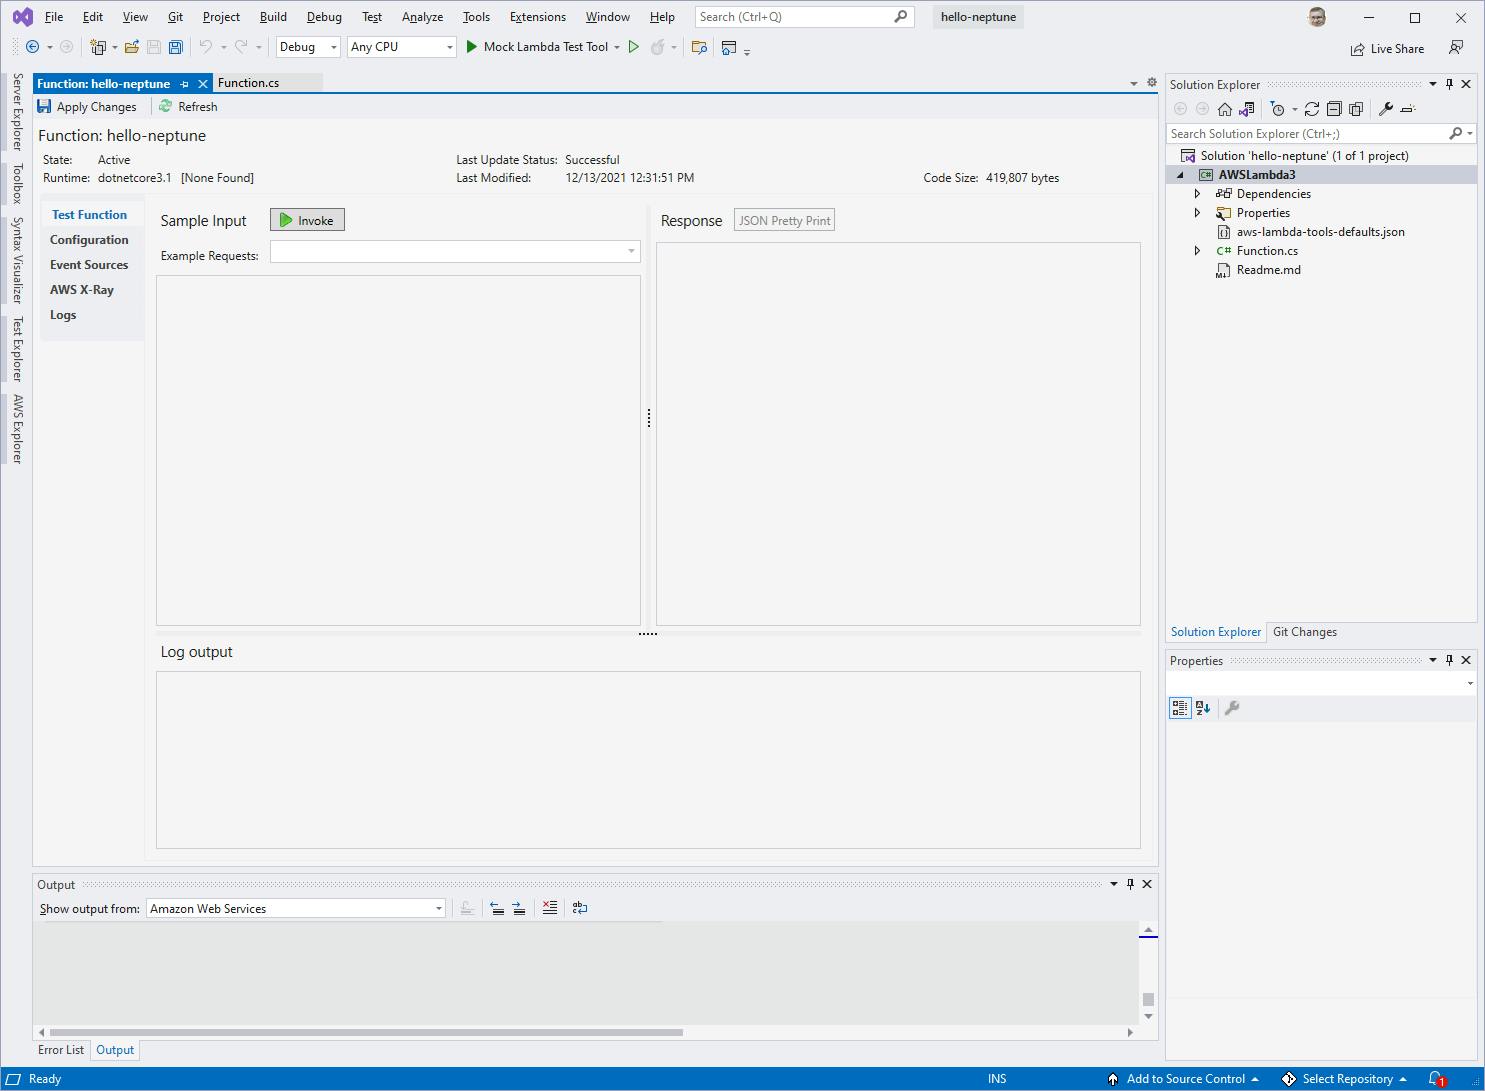
Step 8: Try Out the Service
Now, let's try out the service. The first thing we want to do is get some data into our database.
In the Visual Studio test page for the hello-neptune service, enter "setup" in the Sample Input text box (top left), which will instruct the function to delete any prior data and initialize the database with some employees and manager relationships.
Click the Invoke button. Your function will run in AWS, and you'll see output in the Log output pane. If successful, you'll see something like this.
START RequestId: 95ac8c8c-6c29-4e12-8146-03ffd3b82766 Version: $LATEST
Dropping all edges
Dropping all vertices
Adding vertices
Adding edges
Successful
END RequestId: 95ac8c8c-6c29-4e12-8146-03ffd3b82766
REPORT RequestId: 95ac8c8c-6c29-4e12-8146-03ffd3b82766    Duration: 231.54 ms    Billed Duration: 232 ms    Memory Size: 512 MB    Max Memory Used: 91 MB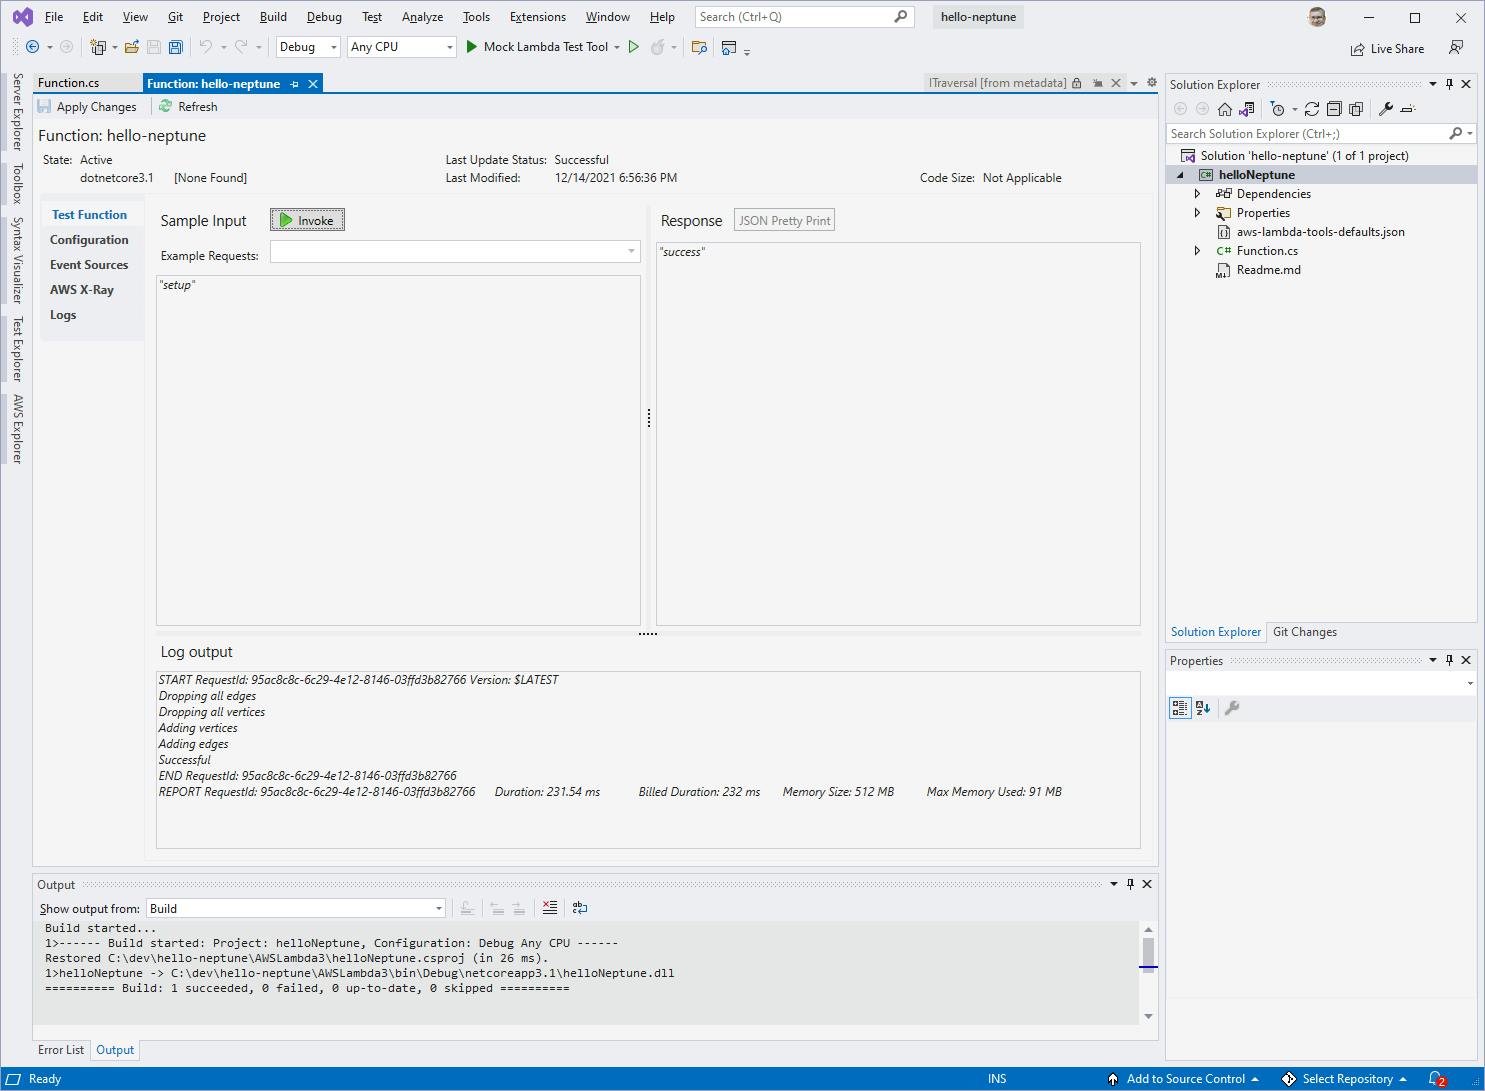
Here's the code that just ran in Function.cs:
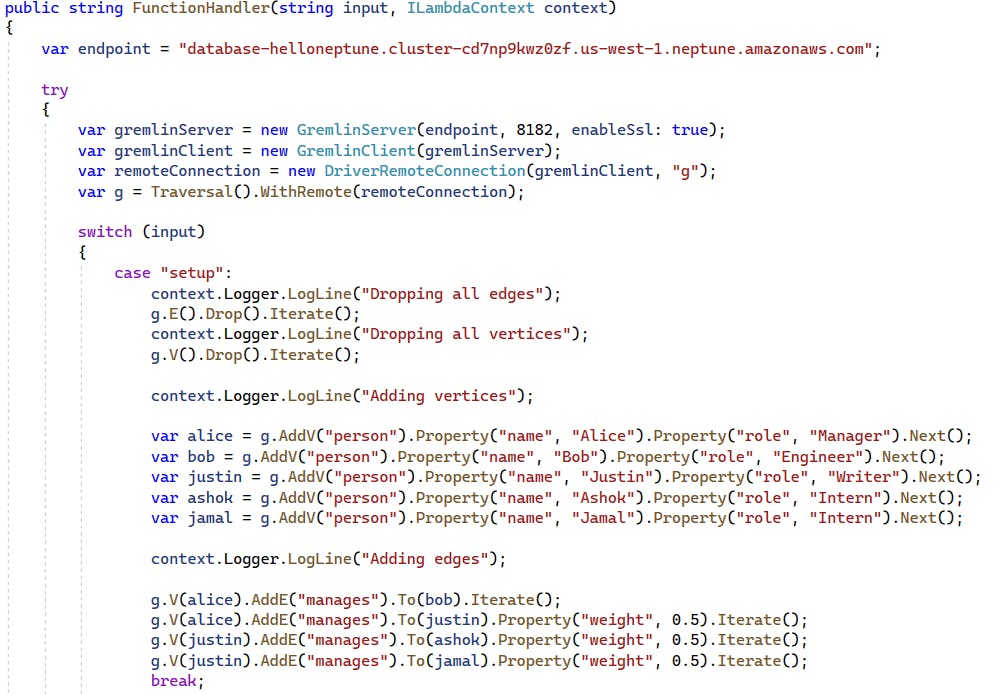
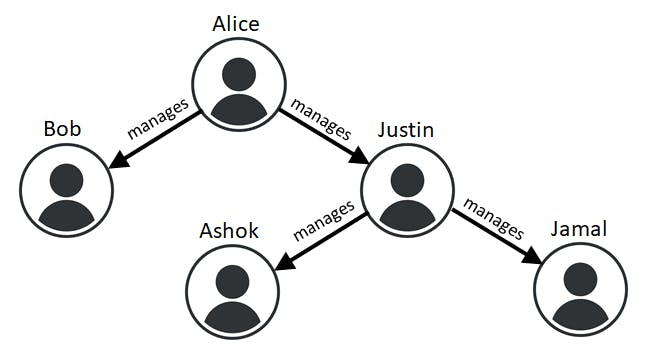
The code creates a Graph Traversal Source object, g, which is used throughout the action code. The input parameter ("setup") is used to branch in a switch case statement to get to the code to initialize the database. The code first deletes any existing vertices (nodes) and edges (relationships). Next, 5 person vertices are added: Alice, Bob, Justin, Ashok, and Jamal. Lastly, manager relationships are established: Alice manages Bob and Justin. Justin manages Ashok and Jamal. The output we see in Visual Studio is the code's log messages. The diagram below shows the vertices and edges that now exist.
Change the input pane to "people" and click Invoke. You see a list of all vertices (people) with their name and role properties listed.
START RequestId: 5c1988bb-9402-4c62-ab55-f1672956f545 Version: $LATEST
Listing all people
Name   Role
Bob      Engineer
Ashok    Intern
Alice    Manager
Jamal    Intern
Justin   Writer
Successful
END RequestId: 5c1988bb-9402-4c62-ab55-f1672956f545
REPORT RequestId: 5c1988bb-9402-4c62-ab55-f1672956f545    Duration: 2396.83 ms    Billed Duration: 2397 ms    Memory Size: 512 MB    Max Memory Used: 88 MB    Init Duration: 171.38 ms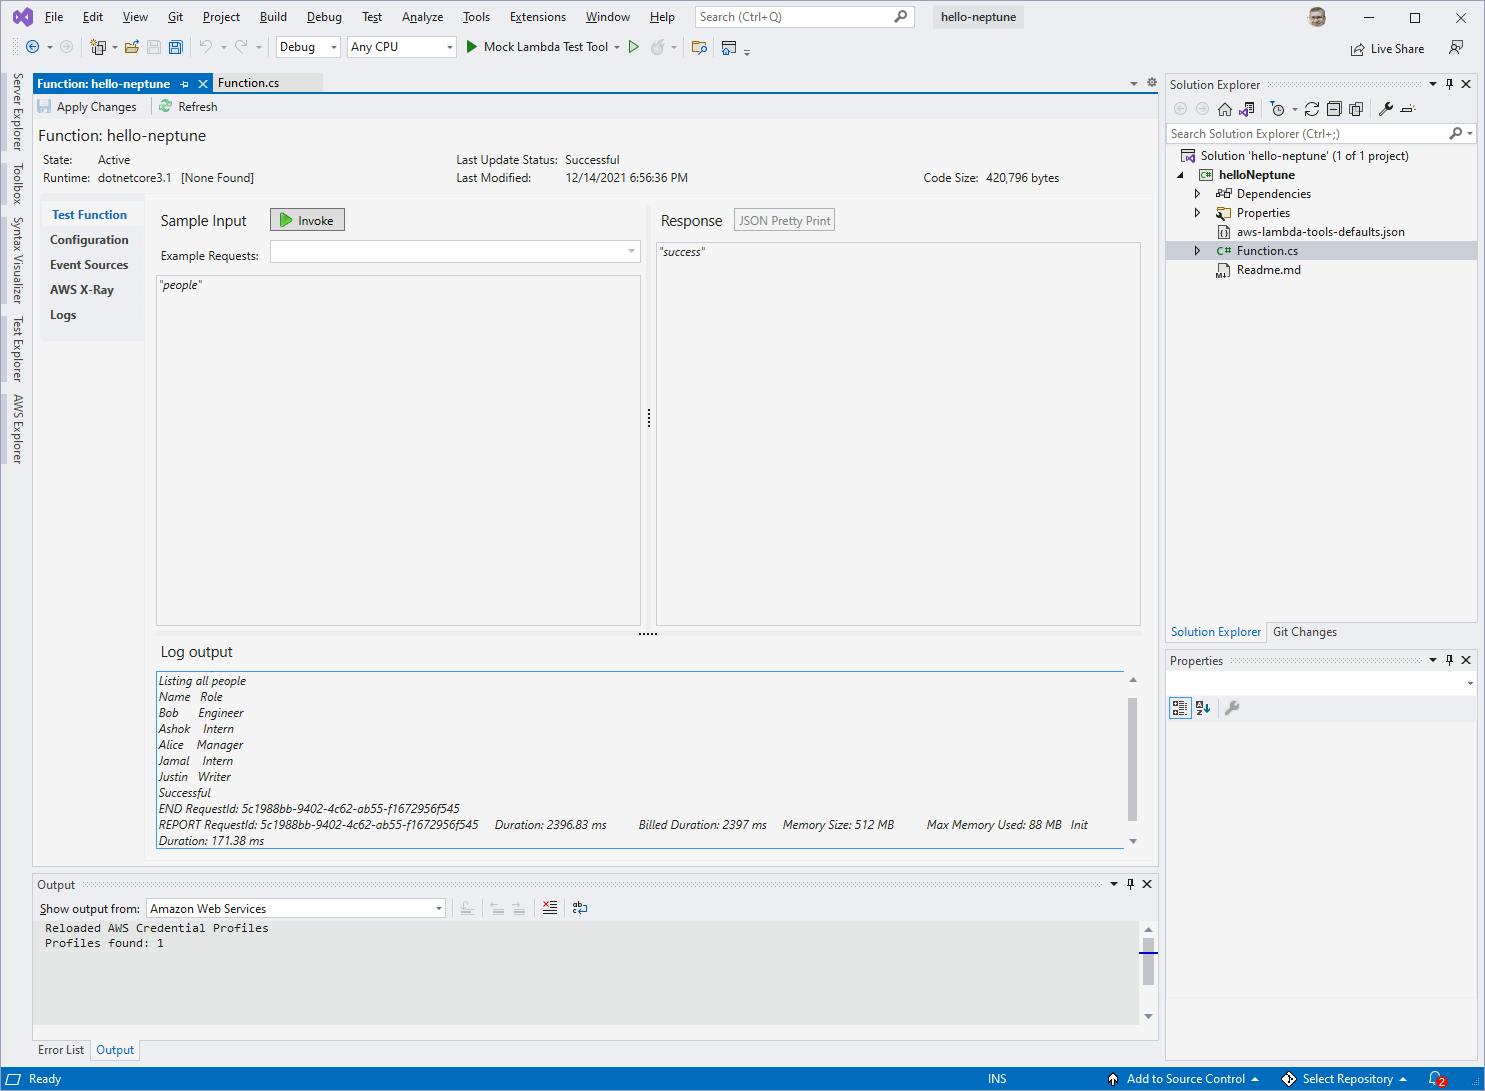
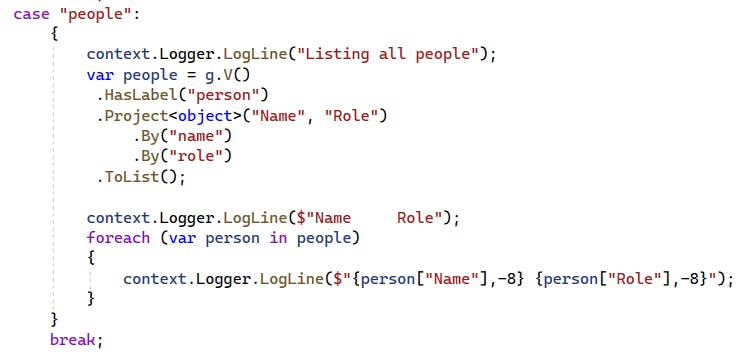
The code selects all vertices of type "person" and projects list of objects with the name and role properties. A foreach loop then logs the object data.
Change the input pane to "directs" and click Invoke. This time you see a lit of Alice's direct reports, Bob and Justin.
START RequestId: f97ff9bd-0bb1-407c-b1fd-fa627fc0b5a8 Version: $LATEST
Listing Alice's direct reports
Name   Role
Bob      Engineer
Justin   Writer
Successful
END RequestId: f97ff9bd-0bb1-407c-b1fd-fa627fc0b5a8
REPORT RequestId: f97ff9bd-0bb1-407c-b1fd-fa627fc0b5a8    Duration: 39.98 ms    Billed Duration: 40 ms    Memory Size: 512 MB    Max Memory Used: 92 MB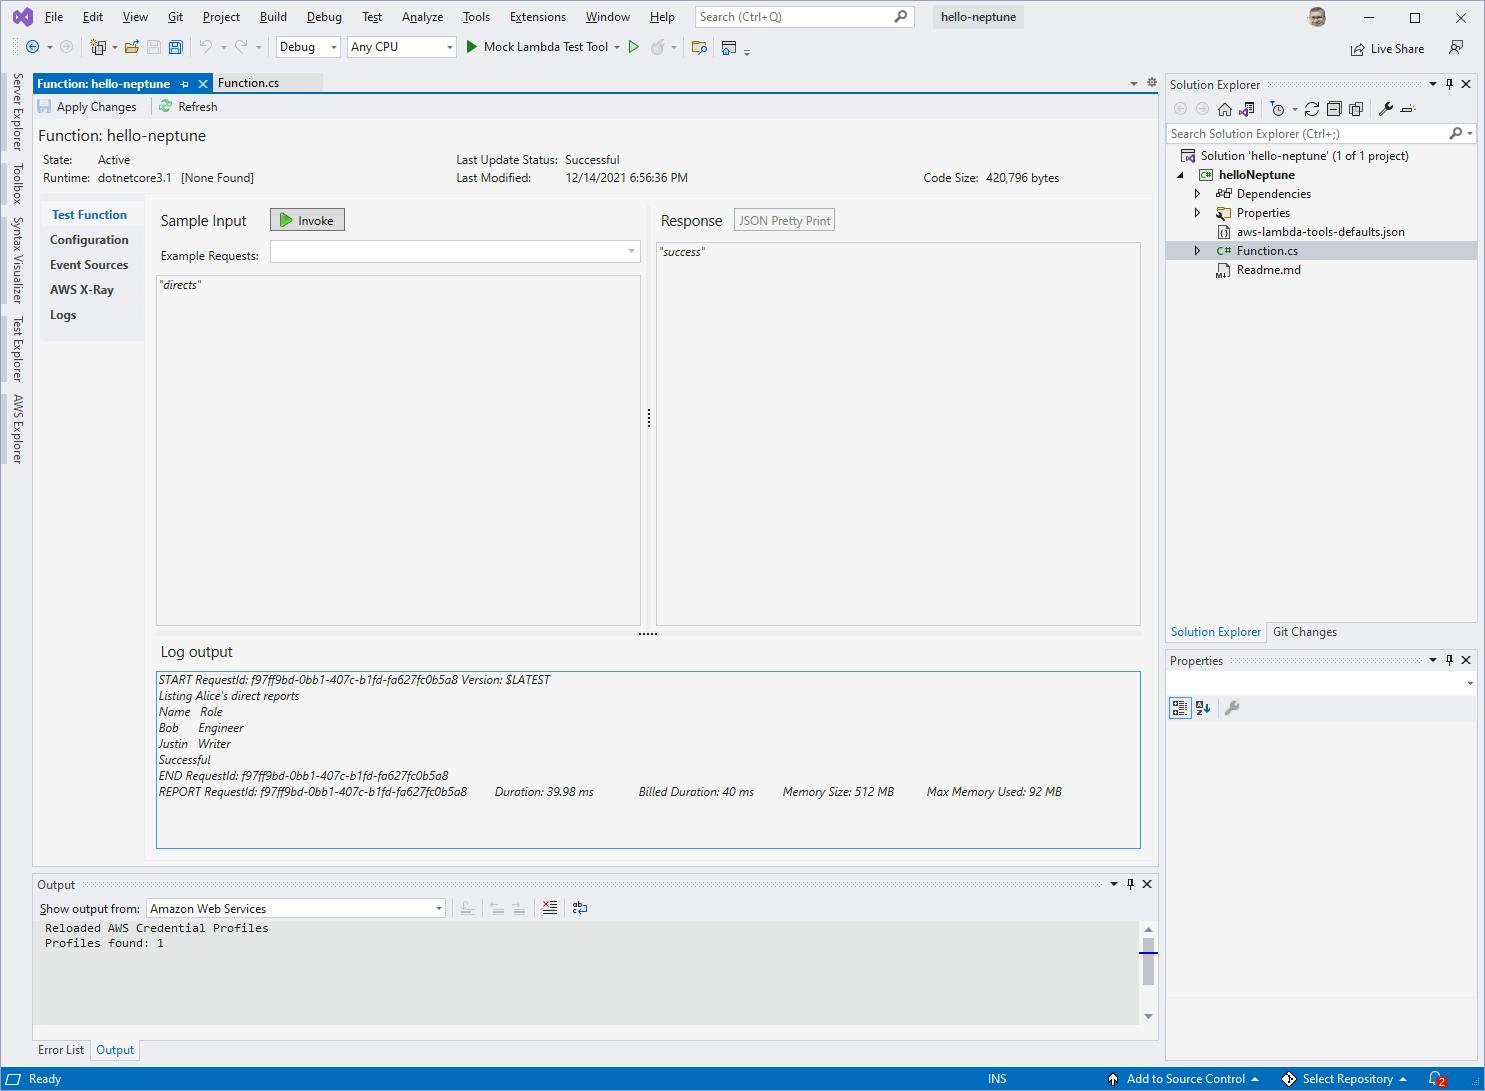
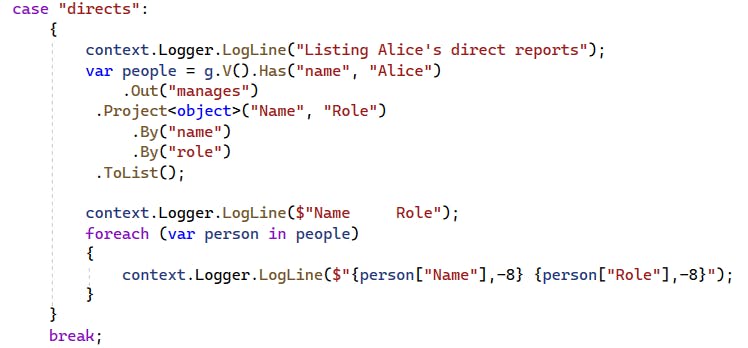
This query code adds a .Out("manages") method, which finds vertices the root note (Alice) has a "manages" relationship with.
Change the input pane to "subs" and click Invoke. This time you see all subordinates of Alice, Bob, Justin, Ashok, and Jamal.
START RequestId: daad09b8-c372-4a8b-b9c5-0b02fb1d55a2 Version: $LATEST
Listing Alice's subordinates
Name   Role
Bob      Engineer
Justin   Writer
Ashok    Intern
Jamal    Intern
Successful
END RequestId: daad09b8-c372-4a8b-b9c5-0b02fb1d55a2
REPORT RequestId: daad09b8-c372-4a8b-b9c5-0b02fb1d55a2    Duration: 247.59 ms    Billed Duration: 248 ms    Memory Size: 512 MB    Max Memory Used: 93 MB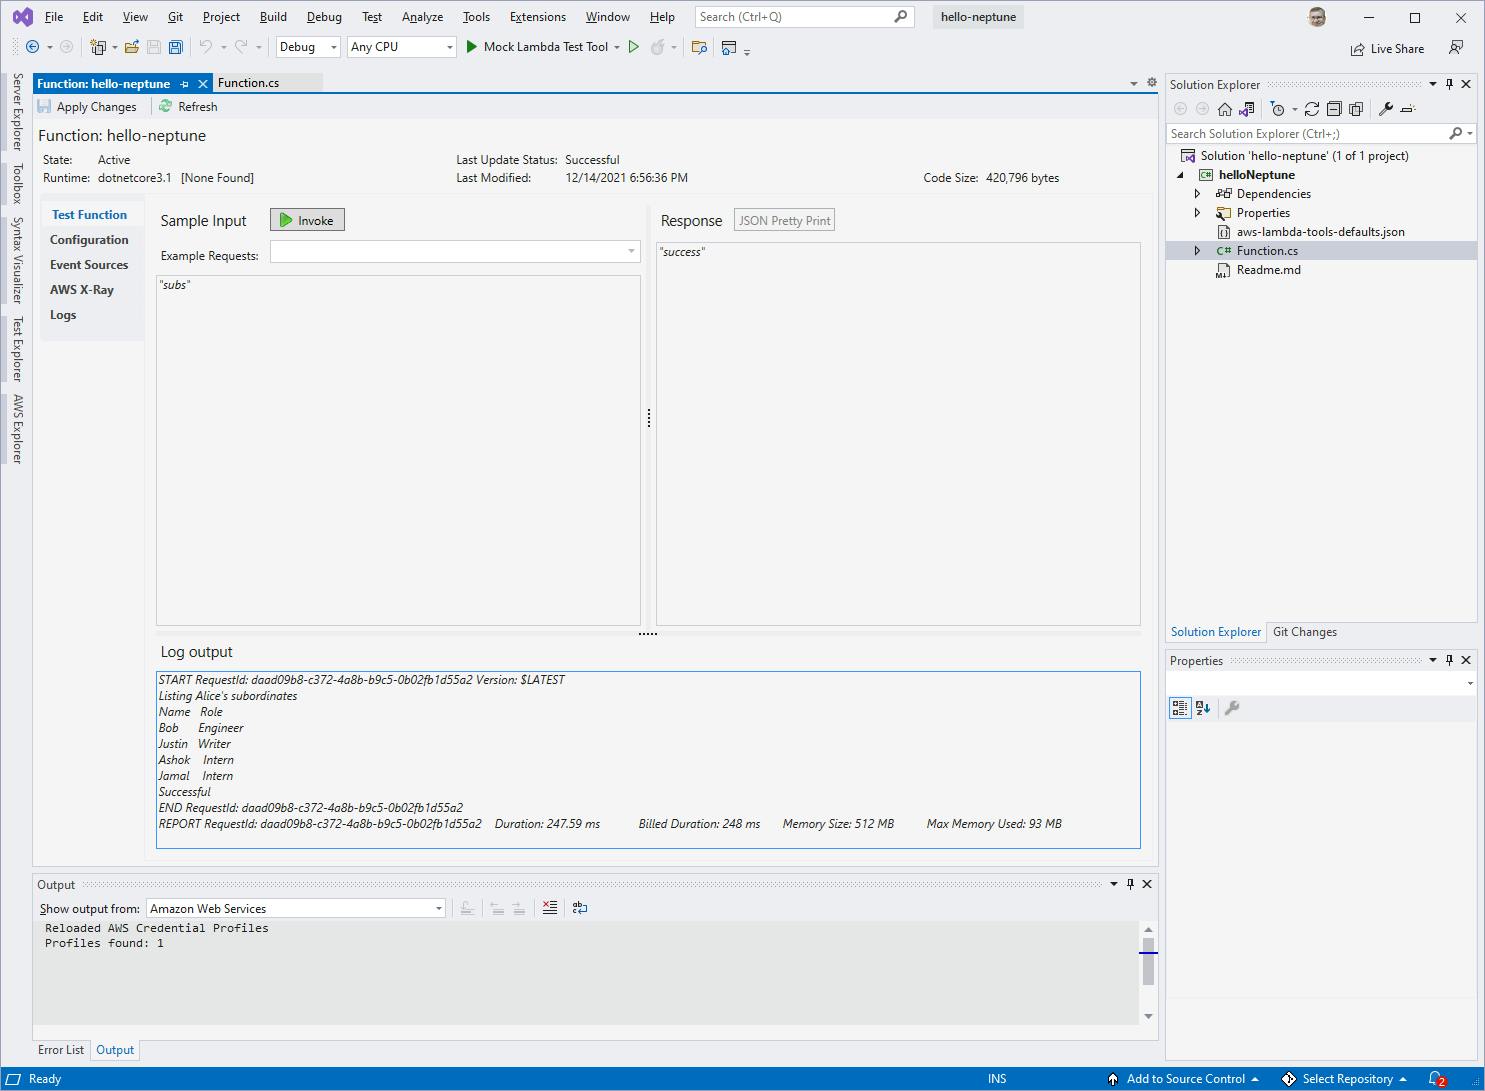
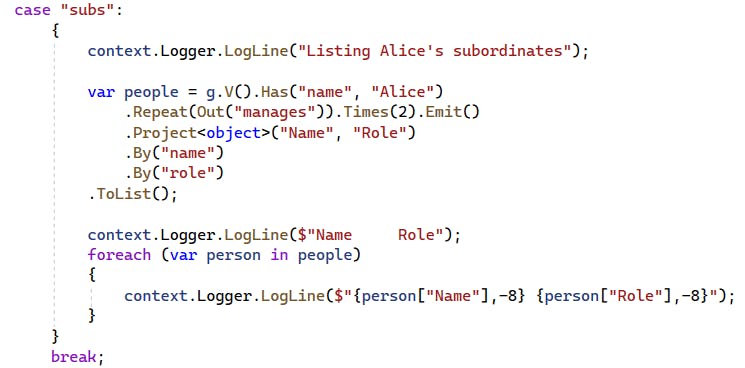
This query code uses a Repeat(...) function to apply the .Out("manages") method across multiple levels, finding all employees who are subordinates of Alice, whether direct managed by her or not.
Congratulations. You've populated and queries an Amazon Neptune graph database from .NET code.
Step 9: Shut it Down
When you're finished with it, delete the database you created in the AWS console. You don't want to accrue charges for something you're not using.
- In the AWS console, navigate to Amazon Neptune > Notebooks.
- Select the hello-neptune notebook.
- From the Actions drop down at top right, select Stop. Wait for the Status to go to Stopped.
From the Actions drop down, select Delete and confirm the delete. Wait for the notebook to delete.

In the AWS console, navigate to Amazon Neptune > Databases.
Repeat steps 2-4 for the database instance.

Where to Go From Here
In this tutorial, you learned about graph databases. For certain kinds of applications, graph databases are a natural fit and general-purpose databases are challenging. You created an Amazon Neptune database and worked with a Jupyter Notebook, adding and querying data. You created a .NET AWS Lambda function with code to setup and query organization data and manager relationships. If you're new to graph databases, you've now seen one in action and have an introduction to what they're like to work with.
Invest in developing Gremlin skills until you have a good understanding of how to add vertices and edges and traverse them in different ways. Take advantage of your Jupyter Notebook: go through the tutorials, then experiment on your own.
Further Reading
AWS Documentation and Training
Introduction to Amazon Neptune-Graph Database
Getting started with graph databases
Video: Getting Started with Amazon Neptune
Access the Amazon Neptune Cluster via Neptune Notebook
Apache
Introduction to Graph Computing
The Gremlin Graph Traversal Machine and Language
Community
