Table of contents
- This episode: AWS Elastic Beanstalk. In this Hello, Cloud blog series, we're covering the basics of AWS cloud services for newcomers who are .NET developers. If you love C# but are new to AWS, or to this particular service, this should give you a jumpstart.
- Our Hello, Beanstalk Project
- One-time Setup
- Part 1: Deploy a Web API Project to Beanstalk
- Part 2: Work with Multiple Environments
- Where to Go From Here
- Further Reading
This episode: AWS Elastic Beanstalk. In this Hello, Cloud blog series, we're covering the basics of AWS cloud services for newcomers who are .NET developers. If you love C# but are new to AWS, or to this particular service, this should give you a jumpstart.
In this post we'll introduce AWS Elastic Beanstalk and use it to host a simple .NET "Hello, Cloud" web API project. We'll do this step-by-step, making no assumptions other than familiarity with C# and Visual Studio. In Part 1, we'll deploy to a development environment. In Part 2, we'll deploy to a production environment with a load balancer and auto-scaling.
Elastic Beanstalk: What is it, and why use It?
AWS Elastic Beanstalk (hereafter "Beanstalk") is a compute service, one of many options for hosting your code on AWS. It's an easy-to-use service that's a good fit for web servers, APIs, and microservices. Why is it named Beanstalk? Think of Jack and the Beanstalk: after Jack buried the magic beans, a beanstalk grew and grew until it reached into the sky. Beanstalk elastically scales your application as needed for your traffic. Happily, this beanstalk can scale both up and down, to optimize cost efficiency.
Why does this service exist? Well, the lowest level of do-it-yourself compute service in AWS is the Elastic Cloud Compute service, or EC2. You can control each and every detail in EC2. Some developers and IT people like it that way. There are additional AWS compute services that use EC2 as their foundation and offer various levels of abstraction and degrees of management, known as managed services. Beanstalk is one of them.
Maybe you'd like some of those details handled for you, without giving up control. If that's you, Beanstalk might interest you. You upload your code to Beanstalk, and it takes care of provisioning cloud assets, setting up your load balancer, auto-scaling in response to traffic, and application health monitoring. However, all of your compute and network resources are also visible in the AWS console where you can get at them if you need to. Best of all, it doesn't cost anything extra to use Beanstalk: you're only charged for the resources you use from EC2 and other services.
AWS offers many lanes for compute these days, and that includes newer popular ways of working like containers and serverless. If you're not quite ready to jump into that, or simply prefer familiar patterns, Beanstalk is right for you. If you've been running on-premise .NET web apps, you can migrate to Beanstalk pretty easily without the need to radically alter your application. Even if your modernization path eventually takes you to other compute services, Beanstalk can serve as an easy first step to migrate your workloads to AWS. Or, you can choose to stay on Beanstalk. Beanstalk can handle complex and mission-critical applications and you won't outgrow it.
Beanstalk supports both .NET Framework and modern .NET applications. It can both run your legacy .NET Framework apps on Windows and your modern .NET apps on Linux. In addition to .NET, you can also run Java, Node.js, PHP, Ruby, Python, Go, and Docker web applications on Beanstalk.
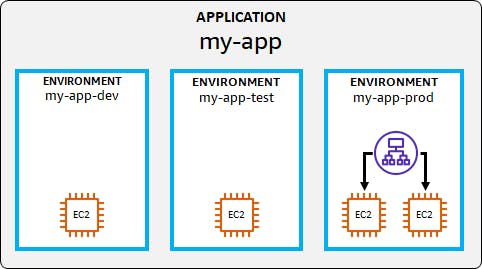
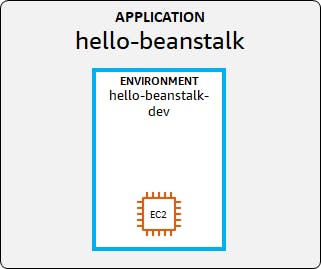
Two key concepts in Beanstalk are applications and environments. You can think of a Beanstalk application as the AWS project workspace for your .NET application. The application in turn contains environments, such as development, test, and production. Each environment runs some version of your software, and may be single-instance or multi-instanced with a load balancer. For application updates, Beanstalk supports a rich collection of deployment models, including all-at-once, rolling, blue-green, immutable, and traffic splitting.
Our Hello, Beanstalk Project
We’re going to create a default .NET 6 Web API project, see it work locally, then migrate it to Beanstalk—where we’ll run it on Linux. The tutorial is divided into two parts. In Part 1, you’ll create a service and deploy it to Elastic Beanstalk in a single-instance development environment. In Part 2, you’ll create a staging environment and a load-balanced production environment for your service.
One-time Setup
To experiment with AWS Elastic Beanstalk and .NET, you will need:
An AWS account, and an understanding of what is included in the AWS Free Tier.
Install Microsoft Visual Studio. You can use another editor, but this blog assumes VS.
Install the AWS Toolkit for Visual Studio and configure it to access your AWS account.
Part 1: Deploy a Web API Project to Beanstalk
Step 1: Create a Policy for the AWS Toolkit User
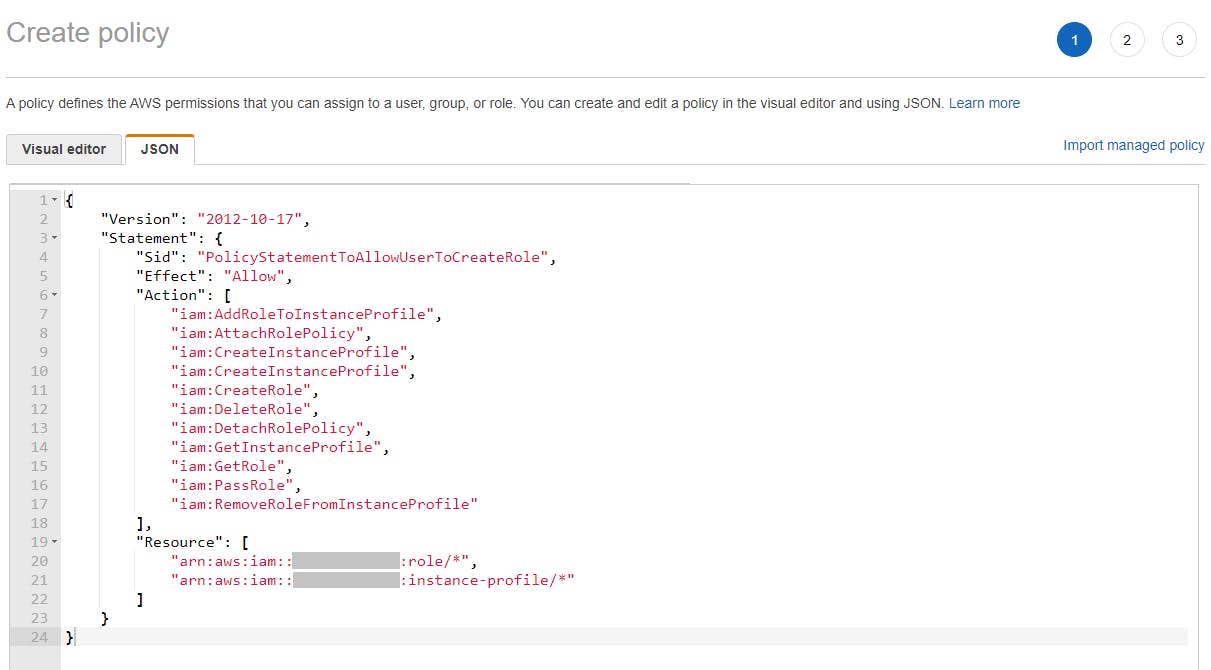
In order to fully take advantage of the AWS Toolkit's integration with AWS, including creating and publishing Beanstalk applications, you'll need to create an IAM policy that adds the necessary permissions for role and instance profile actions. In this step, you'll create a new policy in AWS, then add it to your AWS Toolkit for Visual Studio user.
Important: You should always follow the principle of least privilege when it comes to security. This blog series assumes you are working in your own developer account for learning purposes and not working with anything production-related. If you're using an organization-owned AWS account, you should coordinate with your security principal on IAM settings.
Sign in to the AWS console. Select the region at top right you want to be working in (usually what's nearest your location). I'm using us-west-2 (Oregon).
Navigate to the Identity and Access Management (IAM) area of the AWS Console. You can enter IAM in the search box to find it.
Click Policies.
Click Create Policy.
Click the JSON tab, and enter the policy JSON at the end of this step, replacing [account-number] with your AWS account number.
Click Next:Tags.
Click Next:Review.
Enter the name IAMPublish and click Create policy.
Navigate to IAM > Users and select the username you use with the AWS Toolkit for Visual Studio (you created this user when you installed and configured the toolkit).
If not already assigned, add the built-in PowerUserAccess permission. The PowerUserAccess permission provides developers full access to AWS services and resources, but does not allow management of users and groups.
Add the new IAMPublish permission.
{
    "Version": "2012-10-17",
    "Statement": {
        "Sid": "PolicyStatementToAllowUserToCreateRole",
        "Effect": "Allow",
        "Action": [
            "iam:AddRoleToInstanceProfile",
            "iam:AttachRolePolicy",
            "iam:CreateInstanceProfile",
            "iam:CreateInstanceProfile",
            "iam:CreateRole",
            "iam:DeleteRole",
            "iam:DetachRolePolicy",
            "iam:GetInstanceProfile",
            "iam:GetRole",
            "iam:PassRole",
            "iam:RemoveRoleFromInstanceProfile"
        ],
        "Resource": [
            "arn:aws:iam::[account-number]:role/*",
            "arn:aws:iam::[account-number]:instance-profile/*"
        ]
    }
}
Your AWS Toolkit for Visual Studio user now has the permissions it needs to create and publish to Beanstalk.
Step 2: Create Web API Project
In this step you'll create a sample .NET 6 Web API project using the dotnet command.
Open a command/terminal window and create a folder for the project. CD to the folder.
Use the dotnet new command below to create a default Web API .NET 6 project.
dotnet new webapi -n hello-beanstalk -f net6.0
Step 3: Build and Test the Local Service
In this step you'll build and test the service locally in Visual Studio.
Open the hello-beanstalk project you just created in Visual Studio.
Click the Run button -or- press F5 to build and run the project.
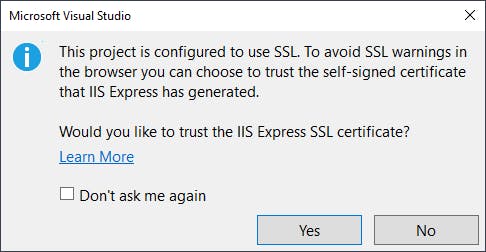
You may get prompted about whether to accept a local SSL certificate so you don't get SSL warnings. Accept this if you're comfortable with it; I am, since this is just a demo and nothing production-related. If you opt not to, you can expect browser SSL warnings in the next step.
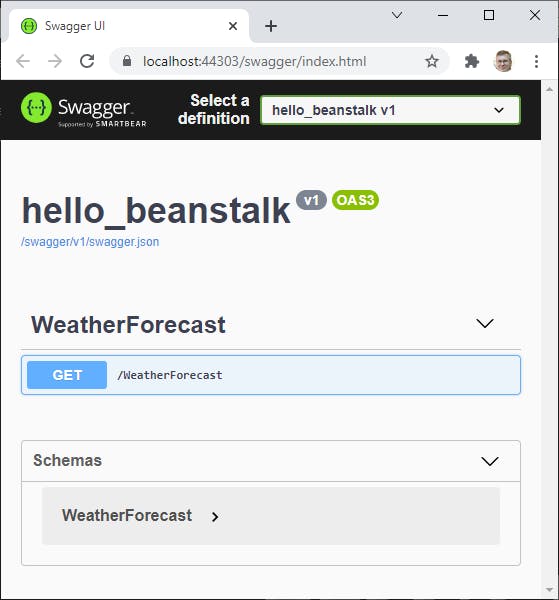
The service should come up in your browser, defaulting to a Swagger view of its simple API, which has just one action: /WeatherForecast.
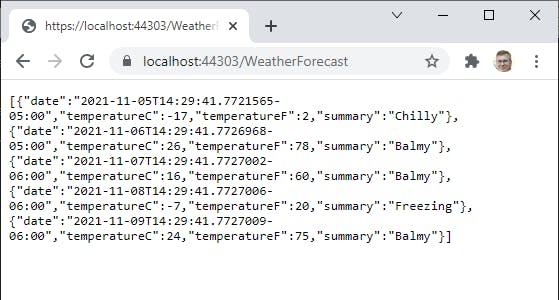
In your browser, change the URL path after the port to /WeatherForecast and press ENTER. The service is now processing our action and returning a JSON response with weather forecast data.
Stop debugging.
This is a very simple service, but it will do for a Hello, Cloud project. Let's move it to Beanstalk.
Step 4: Deploy the .NET Project to Beanstalk
Next, we'll both create the Beanstalk service and deploy it to AWS right from Visual Studio.
In Visual Studio, view the AWS Explorer page and set the region to match the one you selected in the AWS console.
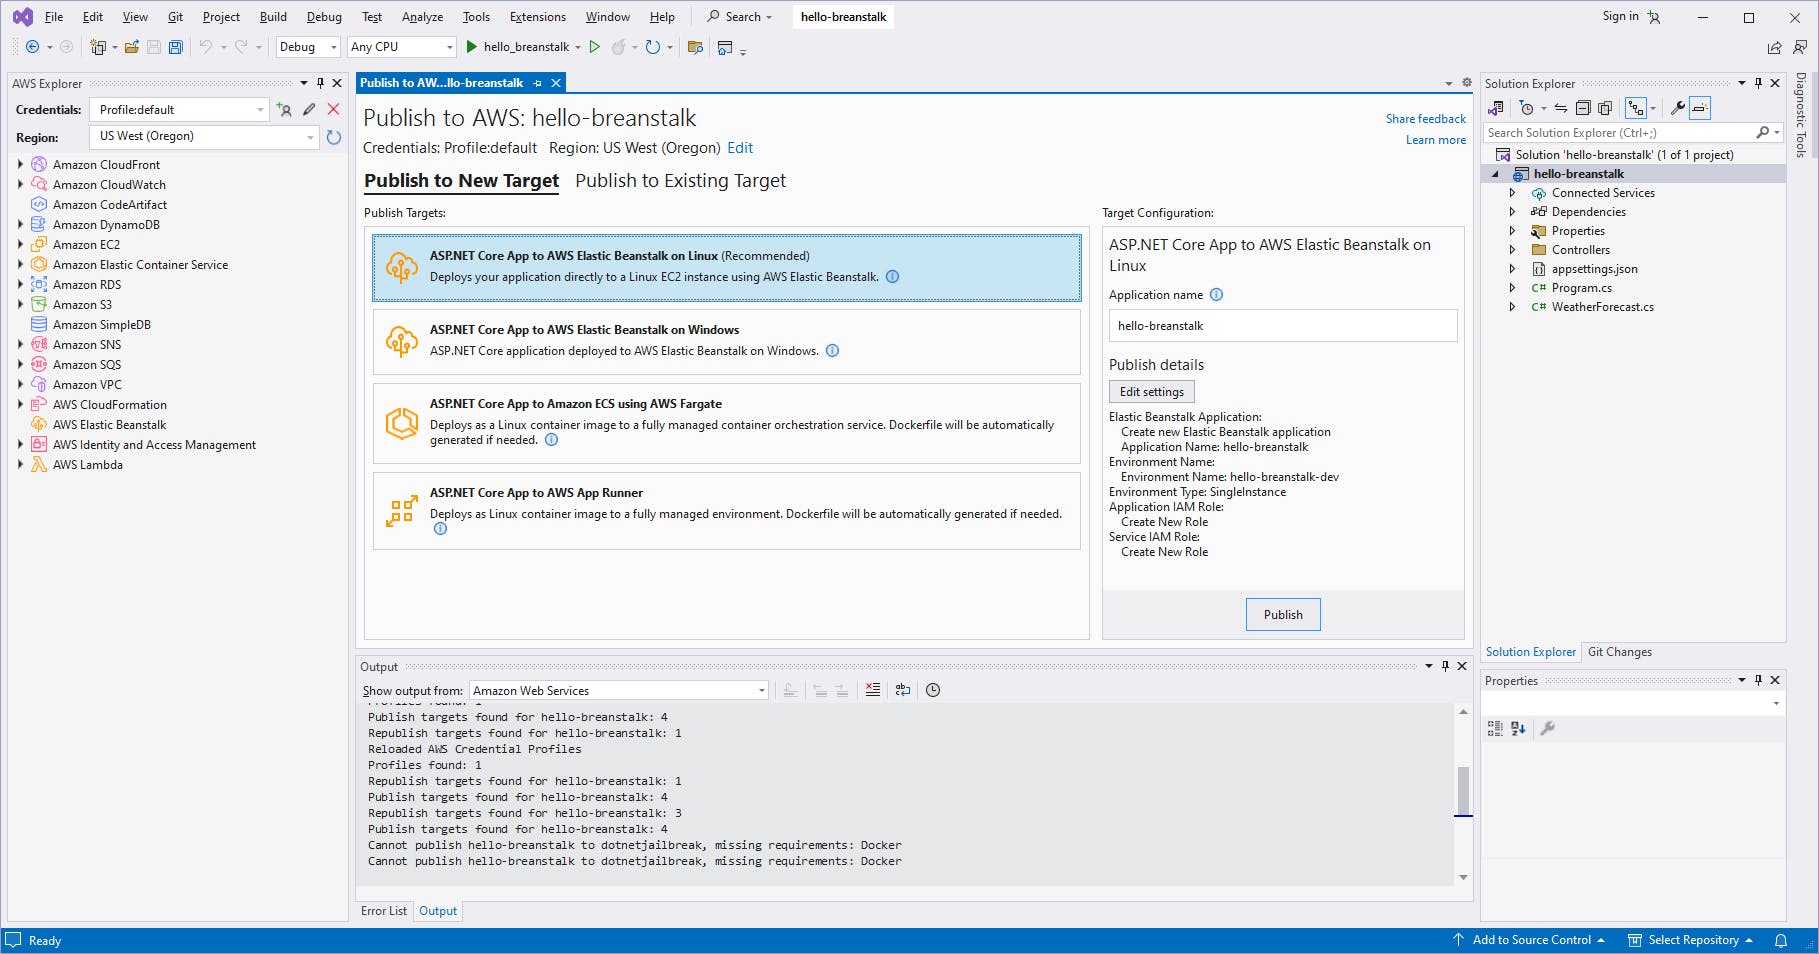
In Solution Explorer, right-click the hello-beanstalk project and select Publish to AWS. If you don't have that choice, select Publish to AWS Elastic Beanstalk.
On the Publish to New target tab, select ASP.NET Core App to AWS Elastic Beanstalk on Linux.
In the Target Configuration panel to the right, set Application name to hello-beanstalk.
Read through the Publish details text and take note of what the publish action will do. A new Beanstalk application will be created, named hello-beanstalk. A new environment will be created, hello-beanstalk-dev, with a single compute instance. The toolkit will create a new IAM role for the application and a new IAM role for the service. The toolkit will use AWS CloudFormation to do much of this work.
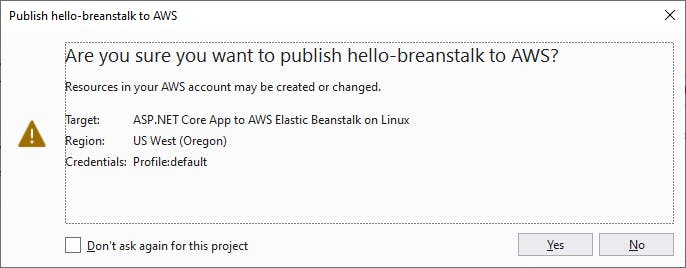
Click the Publish button at lower right. Confirm the Are you sure you want to publish hello-beanstalk to AWS? prompt. Whoops, I misspelled beanstalk. Ah well, I'll fix that another time. For now, let's continue.
Wait while the publish action proceeds. If any issues crop up, deal with them and start the publish over.
If any issues prevent the publish from succeeding, you'll need to diagnose them and take corrective action. The publish output is very detailed for a reason: if something fails, you'll know exactly why. For example, you might see a CREATE_FAILED or DELETE_FAILED somewhere, with a message that your VS Toolkit user doesn't have a needed permission such as iam:CreateRole. If you get an error like that, you'll need to add or extend a policy with that permission and attach it to your VS Toolkit for AWS user. We anticipated those policies earlier in Step 1.
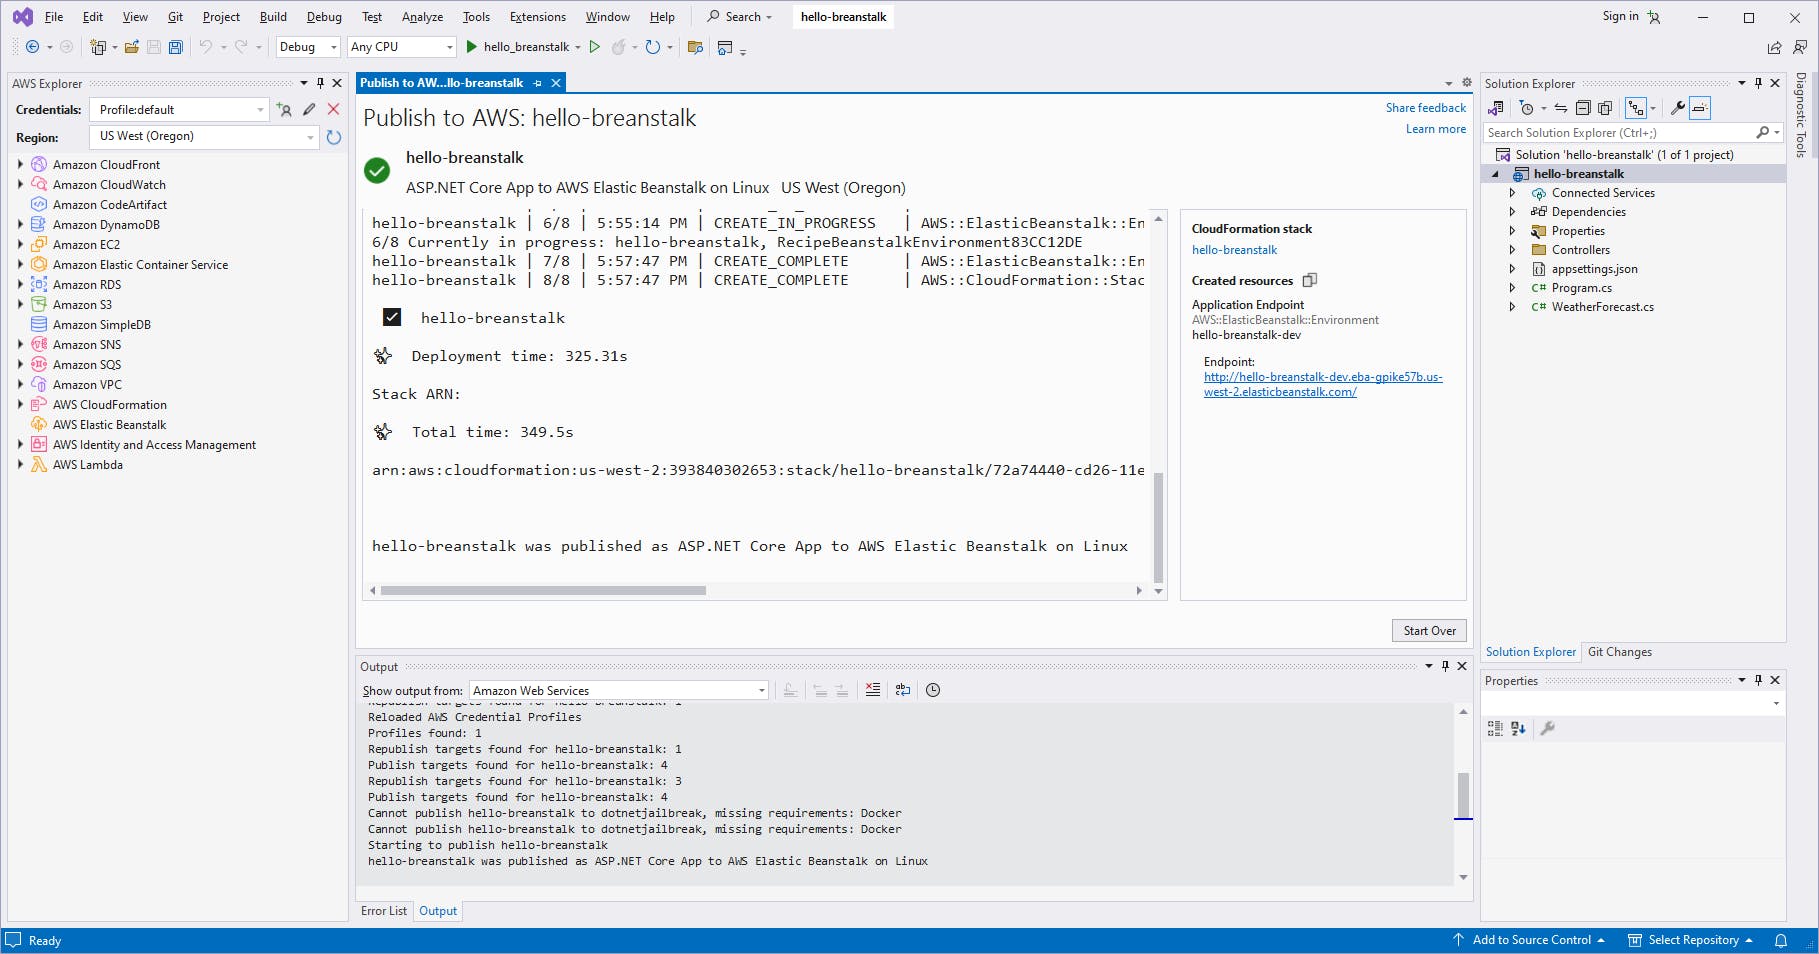
The publish is complete when a green check mark is displayed at the top, and this appears at the end of the publishing log:
hello-beanstalk Published as ASP.NET Core App to AWS Elastic Beanstalk on Linux
Step 5: Visit the New Beanstalk Application in the AWS Console
Our Beanstalk application hello-beanstalk now contains one environment, hello-beanstalk-dev. Let's view it in the AWS console and take it for a spin.
In the AWS console, navigate to Elastic Beanstalk > Applications. If you were already there, refresh the view.
You should see hello-beanstalk listed as an application.

Click on the application name to view its environments. You should see an environment named hello-beanstalk-dev, with Health state OK.

Find the URL for the application, which you'll find under the Domain column, and copy it to the clipboard.
In another browser tab, enter the URL with /WeatherForecast at the end of the path. You should get a response with weather forecast JSON data.

Congratulations, old bean! You did it!
Step 6: Update Your Application
Let's add another action to the controller.
Open WeatherForecastController.cs and enter the code at the end of this step, below the Get method. This action will return a summary text of today's weather.
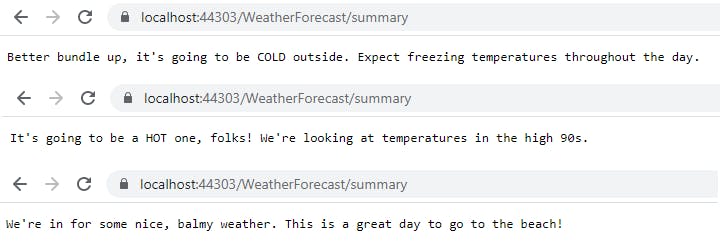
Build and run the project. In the browser, add /WeatherForecast/summary to the path to test the new action.
Stop debugging.
You now have an updated web service with two actions, /WeatherForecast and /WeatherForecast/summary.
[Route("summary")]
[HttpGet()]
public string Summary()
{
    var random = new Random();
    return random.Next(3) switch
    {
        0 => "It's going to be a HOT one, folks! We're looking at temperatures in the high 90s.",
        1 => "Better bundle up, it's going to be COLD outside. Expect freezing temperatures throughout the day.",
        _ => "We're in for some nice, balmy weather. This is a great day to go to the beach!"
    };
}
Step 7: Deploy Update
Now we'll publish our updated service to the Beanstalk dev environment.
If you still have the earlier publish window open in Visual Studio, close it.
In Visual Studio Solution Explorer, again right-click the hello-beanstalk project and select Publish to AWS.
The Publish dialog appears. This time, select the Publish to Existing target tab because we're updating an existing Beanstalk application. You can see in the details to the right that this will deploy to the same application and environment we specified earlier.
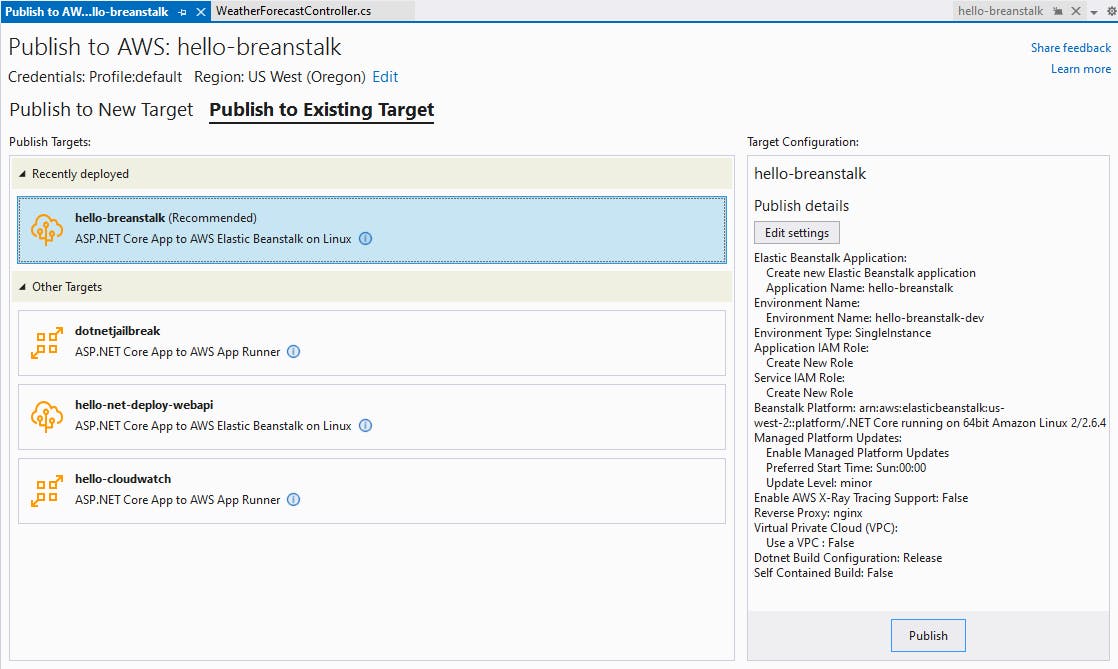
Click Publish, confirm the Are you sure prompt, and wait for the deployment to complete.
If you visit the Elastic Beanstalk > Applications area, you'll see hello-beanstalk's Last modified date has changed. Click on hello-beanstalk-dev, the development environment, for a list of recent events, confirming that you did indeed publish an update.
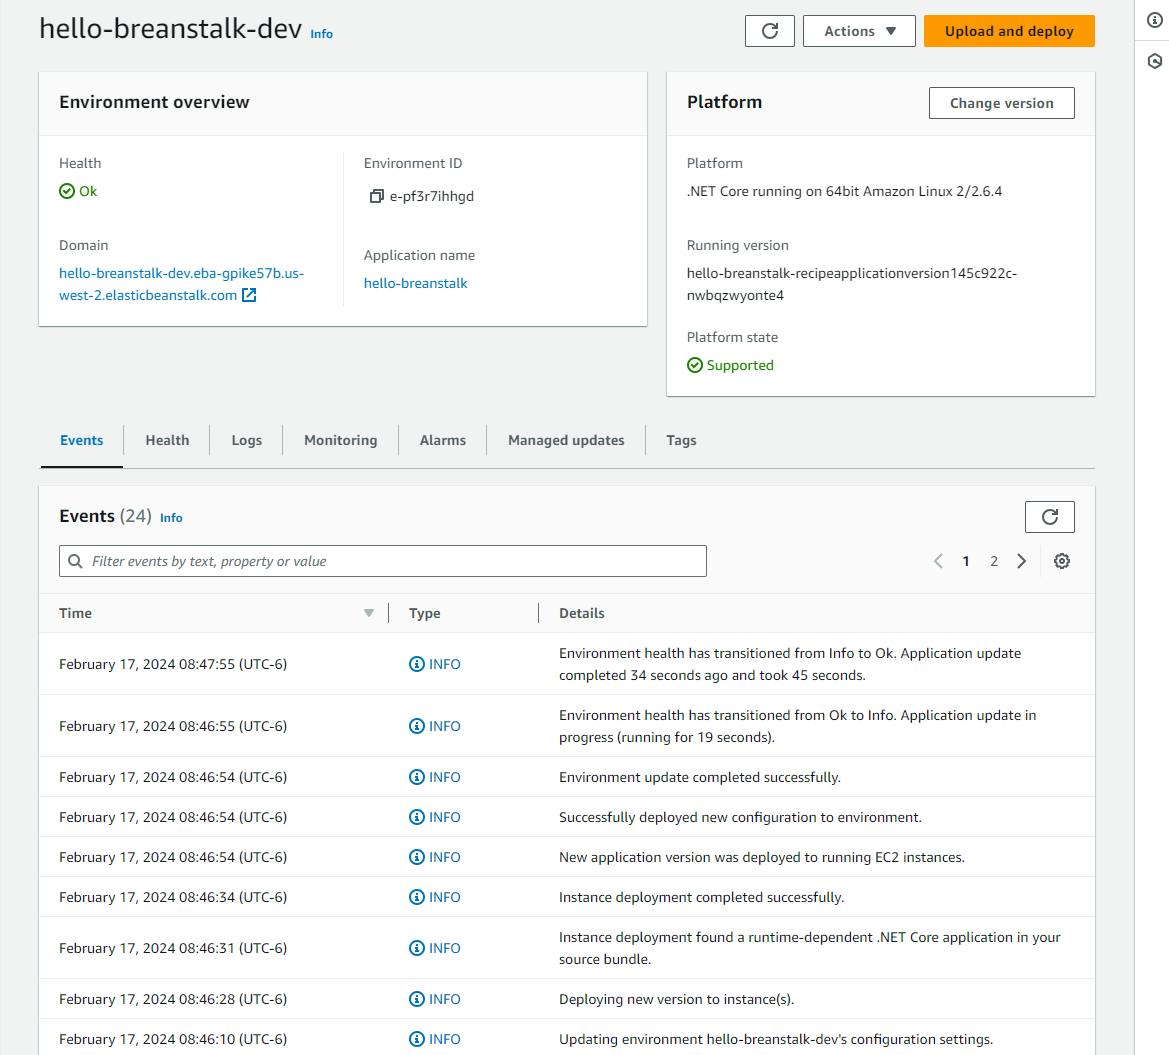
Now, let's test that our new action works in our AWS deployment. Note the URL at the top of the page and browse to it in another tab, adding path /WeatherForecast/summary. You should get a summary of the weather. Refresh a few times, and you should get varying responses.

Congratulations, you've now updated a Beanstalk application.
Important: if you skip Part 2 of this tutorial, be sure to perform the steps in Part 2 Step 6 to delete the hello-beanstalk application.
Part 2: Work with Multiple Environments
In this second part of our tutorial, we'll create additional environments two different ways, and deploy to a production environment.
Step 1: Update Our Code to Version 2
The default weather forecast app is rather simplistic - the descriptions don't even match the temperatures. Let's replace it with a better version, albeit still randomly generated.
Edit WeatherForecastController.cs and replace it with the code below.
Build and run the service. Try the new /WeatherForecast and /WeatherForecast/summary actions.
using System;
using System.Collections.Generic;
using System.Linq;
using System.Threading.Tasks;
using Microsoft.AspNetCore.Mvc;
using Microsoft.Extensions.Logging;

namespace hello_beanstalk.Controllers
{
    [ApiController]
    [Route("[controller]")]
    public class WeatherForecastController : ControllerBase
    {
        private static readonly string[] Summaries = new[]
        {
            "Freezing", "Bracing", "Chilly", "Cool", "Mild", "Warm", "Balmy", "Hot", "Sweltering", "Scorching"
        };

        private readonly ILogger<WeatherForecastController> _logger;

        public WeatherForecastController(ILogger<WeatherForecastController> logger)
        {
            _logger = logger;
        }

        [HttpGet]
        public WeatherForecast[] Get()
        {
            DateTime today = DateTime.Today;
            return new WeatherForecast[] {
                GetDailyForecast(today),
                GetDailyForecast(today.AddDays(1)),
                GetDailyForecast(today.AddDays(2)),
                GetDailyForecast(today.AddDays(3)),
                GetDailyForecast(today.AddDays(4)),
                GetDailyForecast(today.AddDays(5)),
                GetDailyForecast(today.AddDays(6))
            };
        }

        [Route("summary")]
        [HttpGet()]
        public string Summary()
        {
            var forecast = GetDailyForecast(DateTime.Today);
            return $"{forecast.Date.DayOfWeek}: {forecast.TemperatureF} degrees F - {forecast.Summary}";
        }

        private WeatherForecast GetDailyForecast(DateTime date)
        {
            var random = new Random();
            var temp = random.Next(70) + -20;

            return new WeatherForecast
            {
                Date = date,
                TemperatureC = temp,
                Summary = temp switch
                {
                    < -20 => "Freezing",
                    < -10 => "Bracing",
                    < 0 => "Chilly",
                    < 10 => "Cool",
                    < 15 => "Mild",
                    < 20 => "Warm",
                    < 30 => "Balmy",
                    < 35 => "Hot",
                    < 40 => "Sweltering",
                    _ => "Scorching"
                }
            };
        }
    }
}
Step 2: Add a Health Check Controller
When running in a load-balanced production environment, Beanstalk will monitor application health. In this step, you will add a health check controller and action to give Beanstalk a way to check that our service is available.
In Solution Explorer, copy the WeatherForecastController.cs file, and name the copy HealthCheckController.cs.
Open HealthCheckController.cs in the editor and replace its contents with the code at the end of this step.
Build and run the service.
Test the browser URL with no path. You should get a health check confirmation message.

using Microsoft.AspNetCore.Mvc;

namespace hello_beanstalk.Controllers
{
    [ApiController]
    [Route("")]
    public class HealthCheckController : ControllerBase
    {
        [HttpGet]
        public string Get()
        {
            return "WeatherForecast service OK";
        }
    }
}
Step 3: Clone a Staging Environment
So far, what we've published has gone to a Dev environment. In this step, we'll create a second environment for Staging, this time using the AWS console. Before we do that, let's take a moment to understand environments, and then we'll create a new one. In the AWS console, navigate to the hello-beanstalk-dev environment and explore the left panel.
Click on Configuration to view the details of your configuration. The dev environment is a single instance environment without a load balancer.
Click on Health to view your health monitoring, including HTTP error counts.
Click on Monitoring to see health, CPU, and network I/O over time. How do we get to a Staging or Production environment? Let's create a Staging environment.
Return to the Elastic Beanstalk > Environments area.
Select the radio button for the existing hello-beanstalk-dev development environment and select Clone environment from the Actions drop-down.
After a brief wait, a Clone environment form will appear.
Under New environment - Environment name, enter hello-beanstalk-staging.
Click the Clone button.
Wait while the new environment is created. You'll see an Environment successfully launched message at the top of the console and a green check mark with Health Ok when it's finished. You now have a second environment named hello-beanstalk-staging.
Test the new environment by entering its URL in a browser, adding /WeatherForecast at the end of the path.
In the AWS console, navigate back to Elastic Beanstalk > Environments, and notice that two environments are now listed.

You now have two environments, dev and staging, running the same version of our service. If you want to, you can switch their URLs in the console, which is one technique you can use for promoting environments.
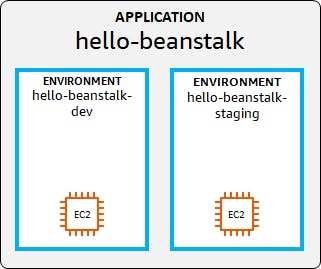
As you work with Elastic Beanstalk, read the developer guide and experiment with different ways of working. Another option for deployment is to upload a zipped deployment package in the AWS console.
Step 4: Deploy to Production Environment
Let's publish our updated service, this time to a new Production environment. Up until now, the publish action has assumed the development environment. This time, we'll tell it to target our new production environment. Up until now, we've been working with single-instance environments. Now, we'd like a multi-instance, load-balanced environment.
In Visual Studio Solution Explorer, right-click the hello-beanstalk project and select Publish to AWS.
On the Publish to Existing Target tab, select ASP.NET Core App to AWS Elastic Beanstalk on Linux.
In the panel to the right, click Edit settings.
Under General, clear the Create new Elastic Beanstalk application check box.
Under Elastic Beanstalk Application : Application Name, select hello-beanstalk from the application name dropdown.
Under Environment Name, set the name to hello-beanstalk-prod.
Under Environment Type, select Load Balanced.
Click the Publish button and confirm the prompt.

Wait for publishing to complete. This may take a few minutes, as AWS CloudFormation allocates the load balancer and instances. If you're curious what's happening, you can go to CloudFormation in the AWS console and watch the events as the CloudFormation stack runs. You can also visit the EC2 area to view the EC2 instances allocated.
Step 5: Test the Production Environment
Let's review the Production environment in the AWS console and test it. We now have 3 environments in our application:
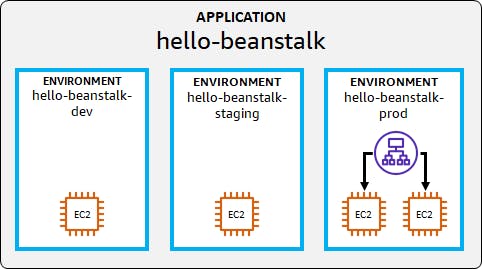
In the AWS console, navigate to (or refresh) Elastic Beanstalk > Environments.
Three environments should be listed: hello-beanstalk-dev, -staging, and -prod, all with a green Health Ok indicator.

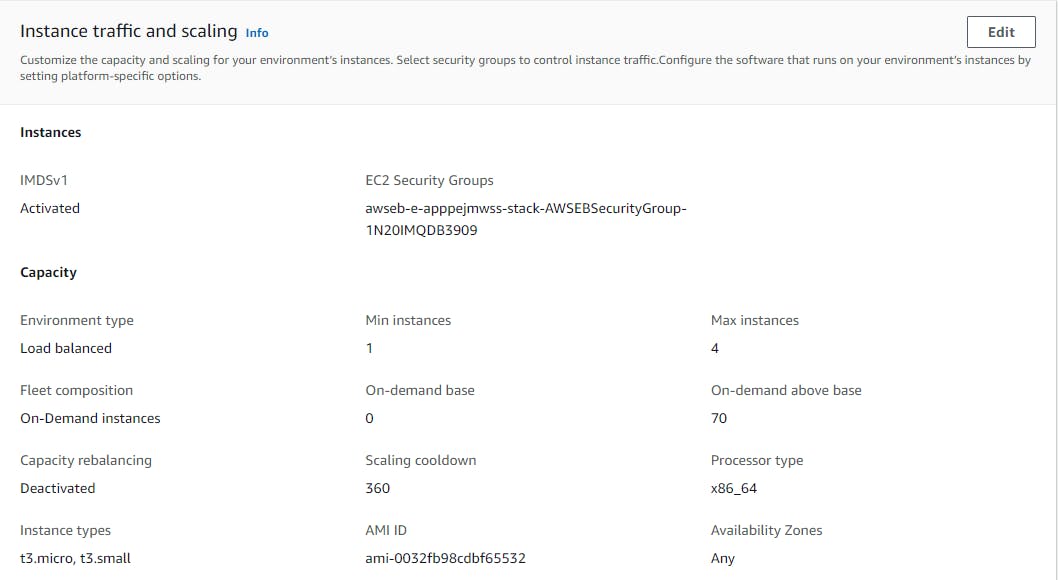
Click on the production environment name (hello-beanstalk-prod), then select Configuration from the left panel. Notice that there is a load balancer in the configuration and that instances will scale between 1 and 4 depending on network output. Elastic Beanstalk will scale the environment based on a metric. The default triggers scale when the average outbound network traffic from each instance is higher than 6 MB or lower than 2 MB over five minutes. You can set the scaling metric and thresholds to suit your needs, based on latency, disk I/O, CPU utilization, or request count.
Return to Environment and click the production URL. You get the health check response of
WeatherForecast service OK
Add /WeatherForecast to the path and verify your weather forecast endpoints work. You're now accessing your service over a load balancer.
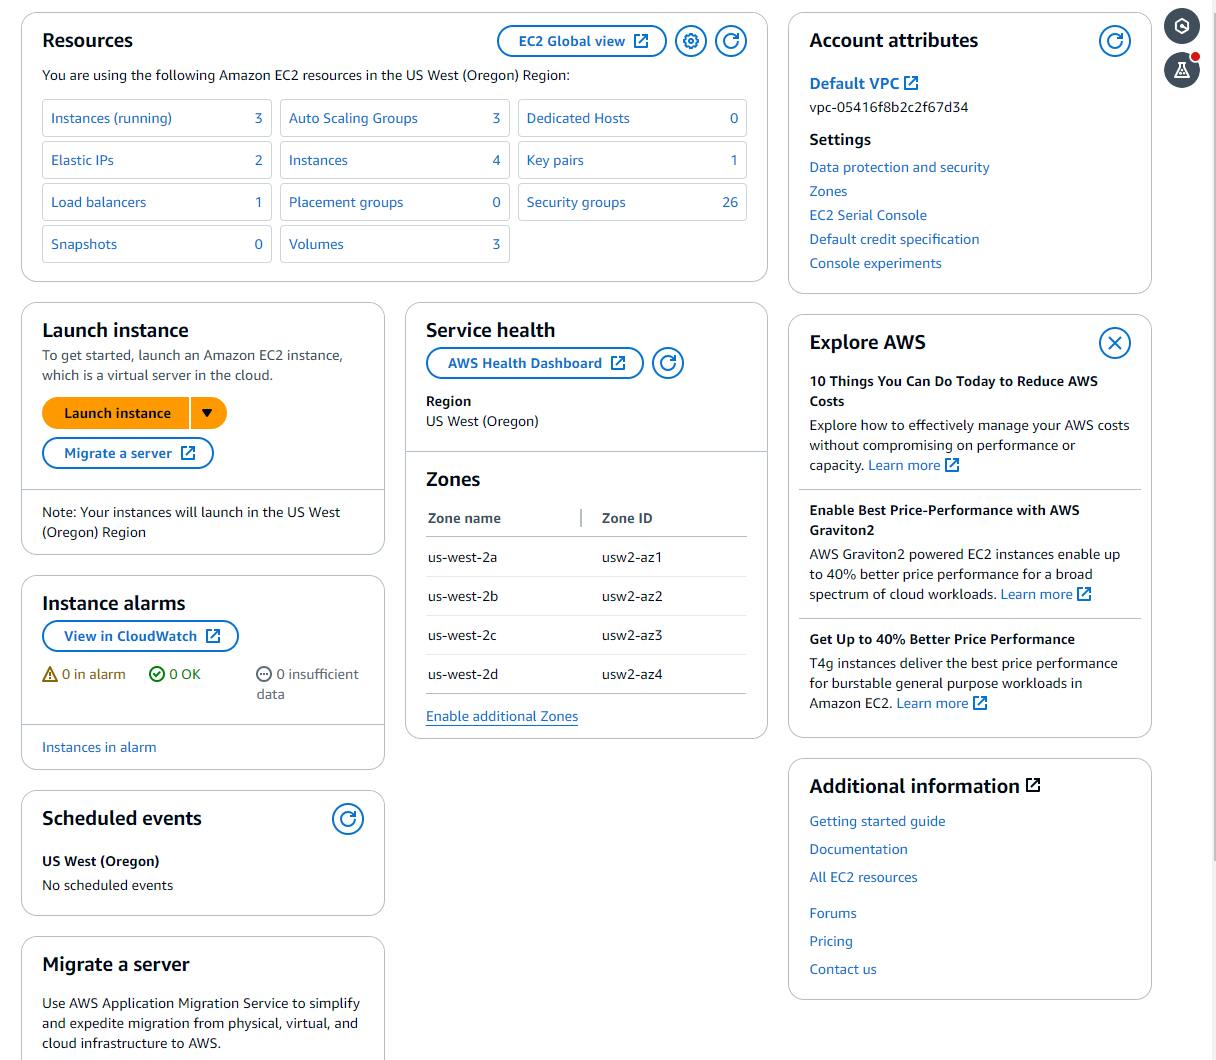
Optional: view EC2 artifacts. If you're interested in the EC2 and network assets that were created by Beanstalk, feel free to navigate to EC2 in the AWS console and view the artifacts. This is one of the strengths of Beanstalk: it's a managed service, but you have full visibility and control over the EC2 artifacts.
Step 6: Shut it Down
Now that you're finished with it, delete the hello-beanstalk application/environments. You don't want to accrue charges for something you're not using.
In the AWS console, navigate to Elastic Beanstalk > Applications.
Select the hello-beanstalk application.
From the Actions drop-down, select Delete application.
Wait for the application to terminate. This action will also terminate the environments you created earlier.
Wait for confirmation that the Beanstalk > Applications and Beanstalk > Environments views show no assets.
Where to Go From Here
In this tutorial, you learned about the AWS Elastic Beanstalk service and deployed a hello, world .NET Web API project to Beanstalk. The AWS Toolkit for Visual Studio allowed you to create and deploy .NET apps to a Beanstalk application and environment.
If you completed Part 2, you also learned how to set up multiple environments. You used cloning to copy an environment. You created a production environment with multiple instances and a load balancer. Consider:
You did not have to change the .NET application in order to use Beanstalk, other than adding a health check action.
Although many details were handled for you, you are able to inspect and change them in the AWS console, including machine type and autoscaling rules.
The .NET app is running on Linux, but you didn't have to learn anything about Linux.
Beanstalk can run both legacy .NET framework apps on Windows as well as modern .NET apps on Linux.
To work with Beanstalk, you'll want to learn about the different ways you can deploy and promote environments. You'll want to understand how to override the defaults to specify your preferred VM instance type, autoscaling rules, load balancer configuration, and SSL certificate. Experiment to gain confidence in deployment, configuration, and monitoring.
Further Reading
AWS Documentation
What is AWS Elastic Beanstalk?
Getting Started using Elastic Beanstalk
Blue-Green Deployments with Elastic Beanstalk
Videos
How to Setup CI-CD for a .NET Application with AWS CodePipeline and AWS Elastic Beanstalk
.NET Deployment options with AWS Elastic Beanstalk
Code Samples
Deploying ASP.NET Core Applications to AWS Elastic Beanstalk from Visual Studio
Blog
This post was updated on February 16, 2024 to update the AWS console instructions and use .NET 6.
