Hello, App Runner VPC Connector!
Getting Started with .NET on AWS: AWS App Runner and VPC Connectors
Table of contents
- This episode: AWS App Runner and VPC Connectors. In this Hello, Cloud blog series, we're covering the basics of AWS cloud services for newcomers who are .NET developers. If you love C# but are new to AWS, or to this particular service, this should give you a jumpstart.
- VPC Connector : What is it, and why use It?
- Our Hello, App Runner VPC Connector Project
- Where to Go From Here
- Further Reading
This episode: AWS App Runner and VPC Connectors. In this Hello, Cloud blog series, we're covering the basics of AWS cloud services for newcomers who are .NET developers. If you love C# but are new to AWS, or to this particular service, this should give you a jumpstart.
In this post we'll introduce App Runner's VPC Connector feature and use it in a "Hello, Cloud" .NET program to access a DynamoDB table. We'll do this step-by-step, making no assumptions other than familiarity with C# and Visual Studio. We're using Visual Studio 2022 and .NET 6.
VPC Connector : What is it, and why use It?
"Eventually everything connects – people, ideas, objects. The quality of the connections is the key to quality per se." —Charles Eams
AWS App Runner is a fully-managed, easy to use service for hosting web applications. We first took a look at it in Hello, App Runner. By default, an App Runner application can only access public endpoints. What if your App Runner site needs to connect to another AWS service, such as RDS, DynamoDB, or S3? App Runner's VPC Connector is the feature that makes this possible, and it can do so without the need to expose those services publicly.
A VPC Connector associates your App Runner service with a Virtual Private Cloud (VPC) by creating a VPC endpoint. If you also set up VPC endpoints for other service(s) you want to access, your App Runner service can access them.
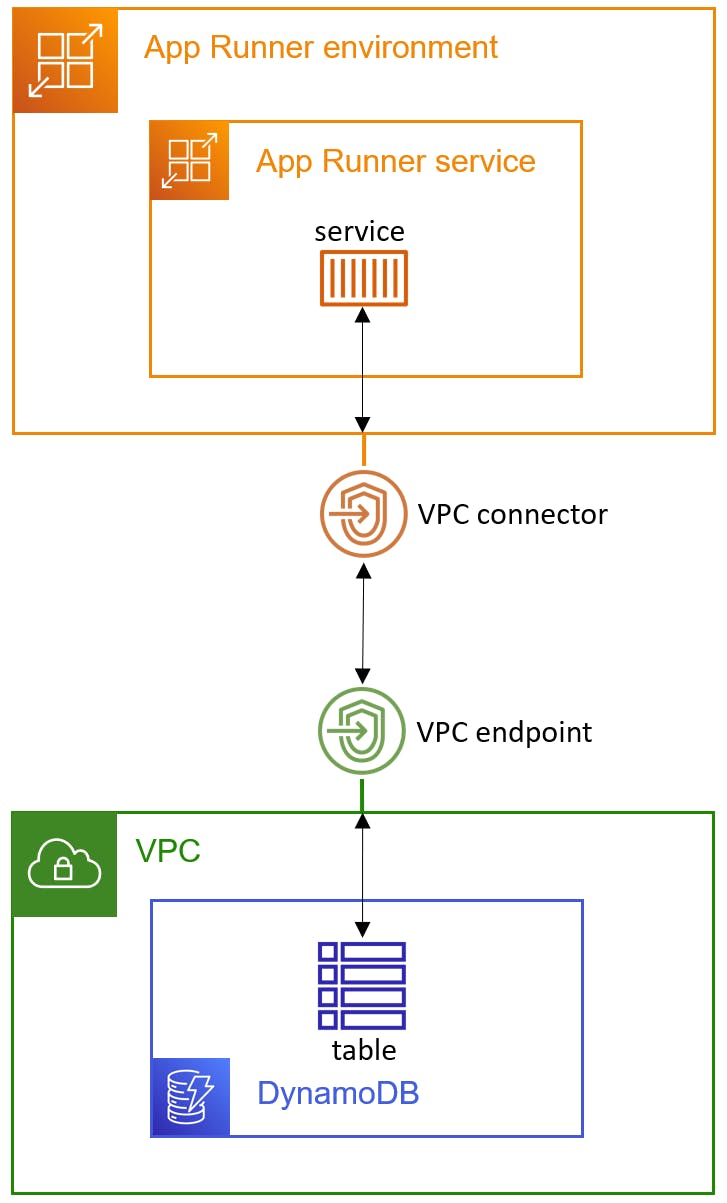
Although hosting a web application in App Runner is extremely easy, and doesn't require an understanding of AWS infrastructure, that changes when you need to connect to other AWS services. You'll have to know something about VPC, subnets, and security groups, plus familiarity with the other service(s) you want to connect to.
Our Hello, App Runner VPC Connector Project
Our Hello, Cloud project uses App Runner and DynamoDB. We're going to create a .NET web API project, which generates a mock weather forecast API. We'll then upgrade that to read weather data from a DynamoDB table. We'll create our App Runner service with a VPC connector, and a VPC endpoint for our DynamoDB table, allowing them to connect.

One-time Setup
For any of the tutorials in the Hello, Cloud series you need the following:
- An AWS account, and an understanding of what is included in the AWS Free Tier.
- Microsoft Visual Studio 2022. If you're using an older version of Visual Studio you won't be able to use .NET 6. If you use a different IDE, you may have to find alternatives to some tutorial steps.
- AWS Toolkit for Visual Studio. You'll need to configure the toolkit to access your AWS account and create an IAM user. Your default AWS profile will be linked to this user when running programs from the command line.
Step 1: Create DynamoDB table
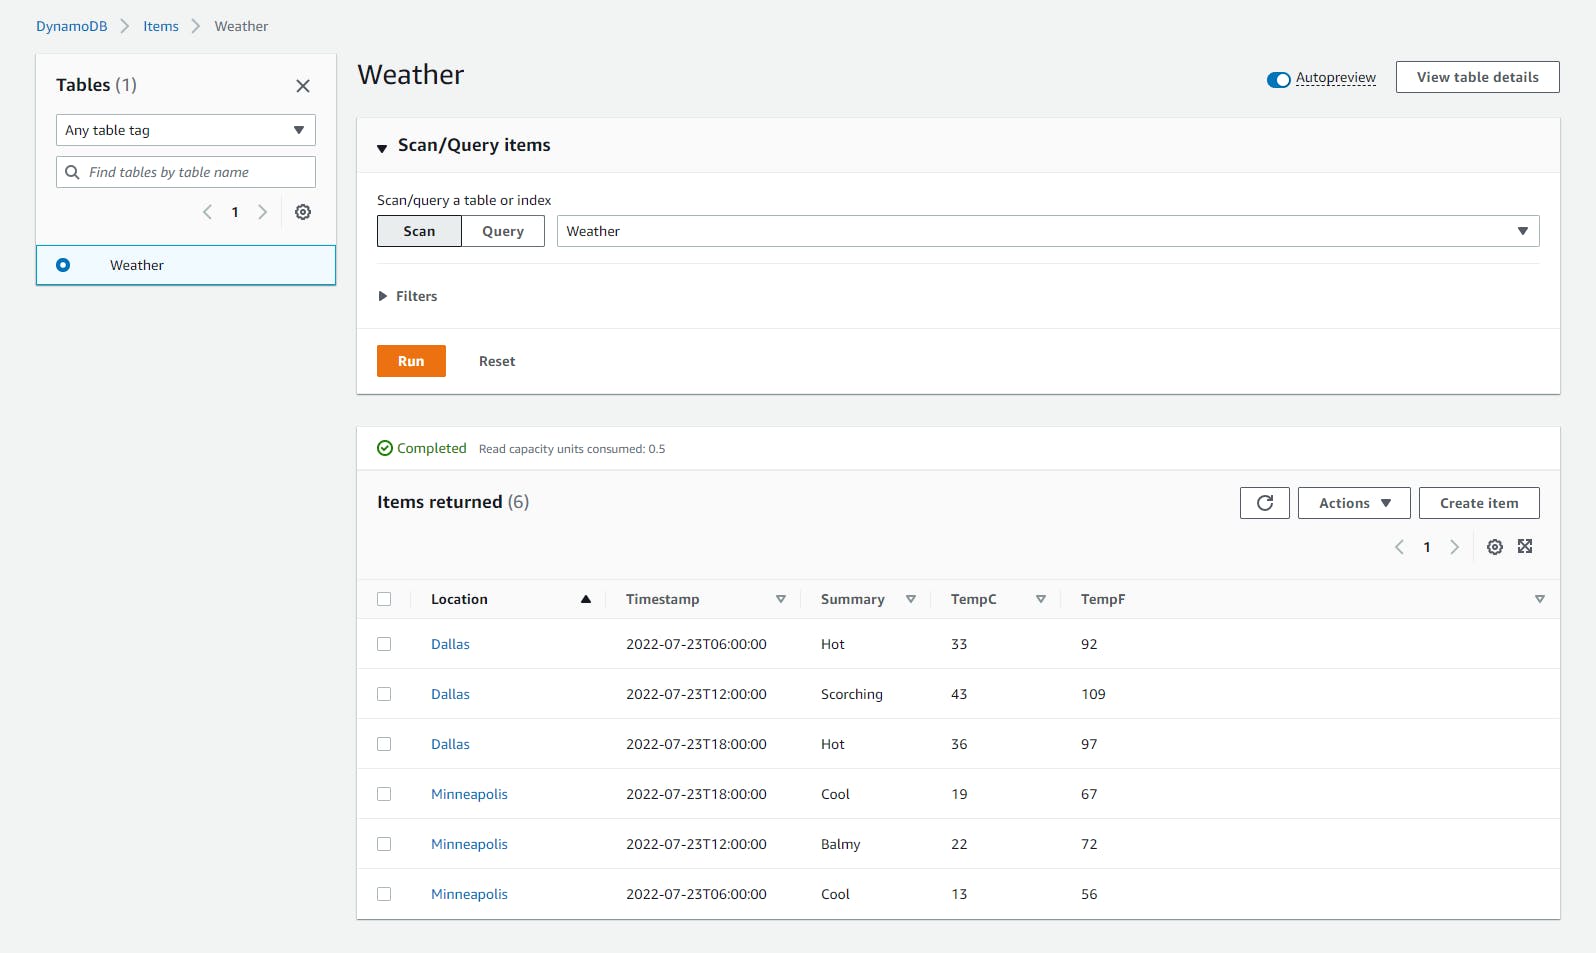
In this step, you'll create a DynamoDB table named Weather and create some data records.
In a browser, sign in to the AWS management console.
At top right, set the region you want to work in. Choose a region that supports App Runner and DynamoDB. We're using us-east-1 (N. Virginia).
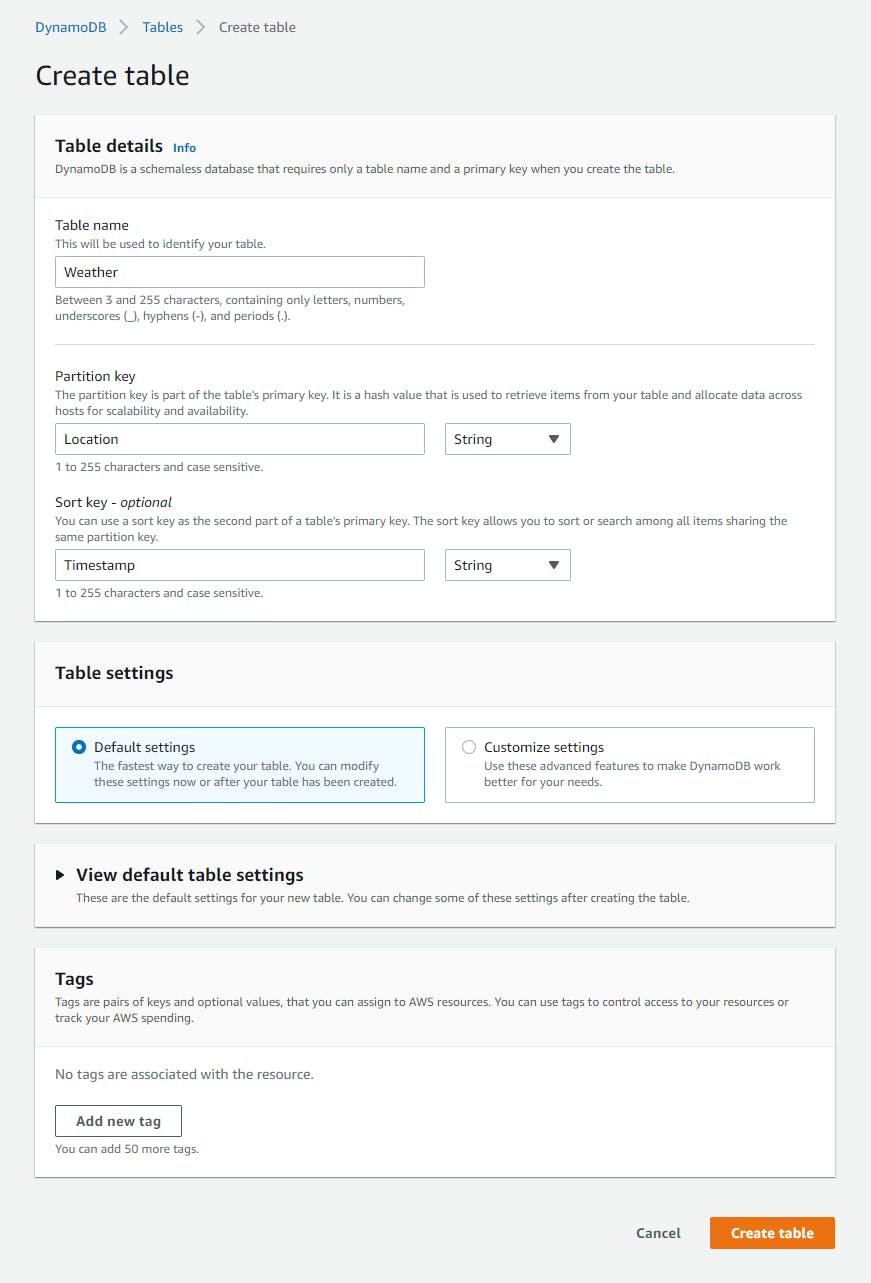
Navigate to Amazon DynamoDB and click Create table:
A. Table name: Weather.
B. Partition key: Location.
C. Sort key: Timestamp.
D. Click Create table.
Click on the Weather table name to get to its detail page, then click Explore table items.
Click Create item and add an item with the following attributes: Location Dallas, Timestamp 2022-07-23T06:00:00. Click Create item. Click the record to add more attributes. Click Add new attribute to add attributes
TempC(Number) 33,TempF(Number) 92, andSummary(String) Hot. Click Create item. Finally, click Save changes.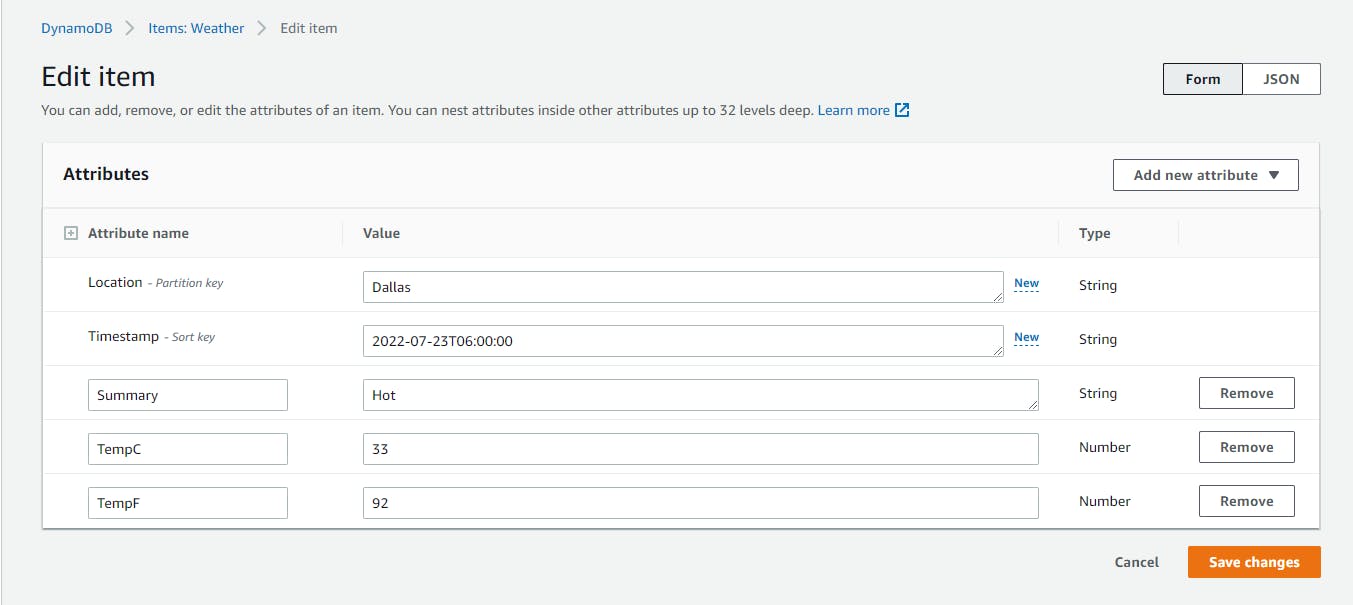
Add more items. Add each item by choosing Duplicate Item from the Actions dropdown.
A. Create an item with attributes
LocationDallas,Timestamp2022-07-23T12:00:00,TempC43,TempF109, andSummaryScorching.B. Create an item with attributes
LocationDallas,Timestamp2022-07-23T18:00:00,TempC36,TempF97, andSummaryHot.C. Create an item with attributes
LocationMinneapolis,Timestamp2022-07-23T06:00:00,TempC13,TempF56, andSummaryCool.D. Create an item with attributes
LocationMinneapolis,Timestamp2022-07-23T12:00:00,TempC22,TempF72, andSummaryBalmy.E. Create an item with attributes
LocationMinneapolis,Timestamp2022-07-23T18:00:00,TempC19,TempF67, andSummaryBalmy.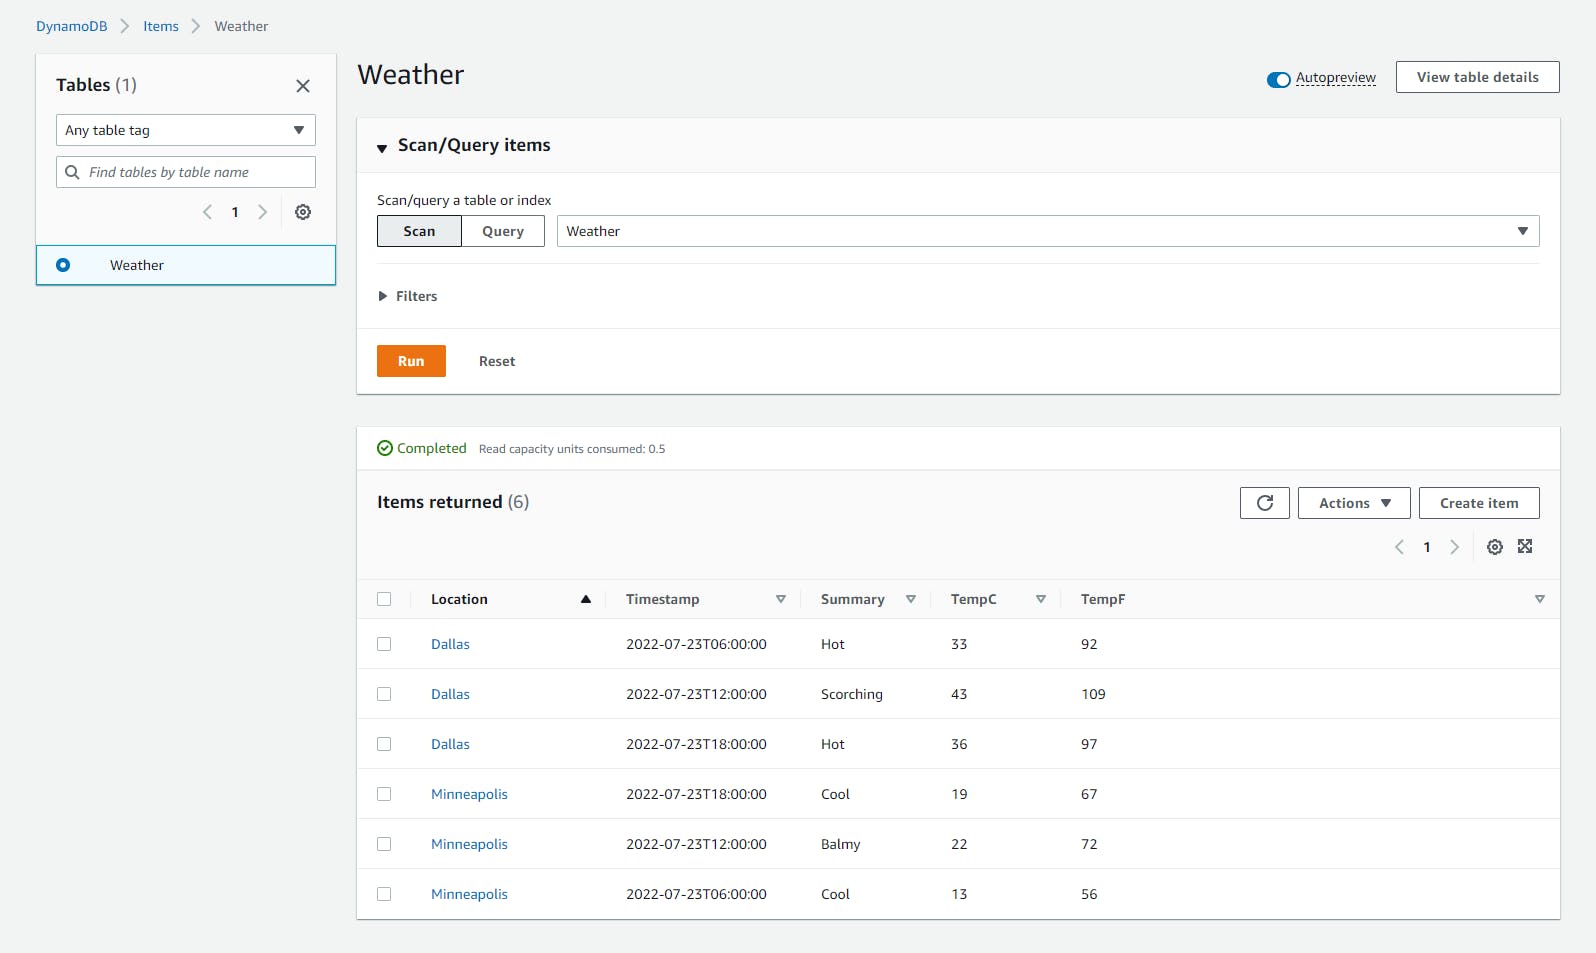
Step 2: Create .NET Web API project
In this step, you'll use the dotnet new command to create a Web API project, and update its code to retrieve data from the DynamoDB table.
Open a command/terminal window and CD to a development folder.
Run the
dotnet newcommand below to create a new Web API project namedHelloAppRunnerVpc.dotnet new webapi -n HellpAppRunnerVpc
Open the HelloAppRunnerVpc project in Visual Studio 2022.
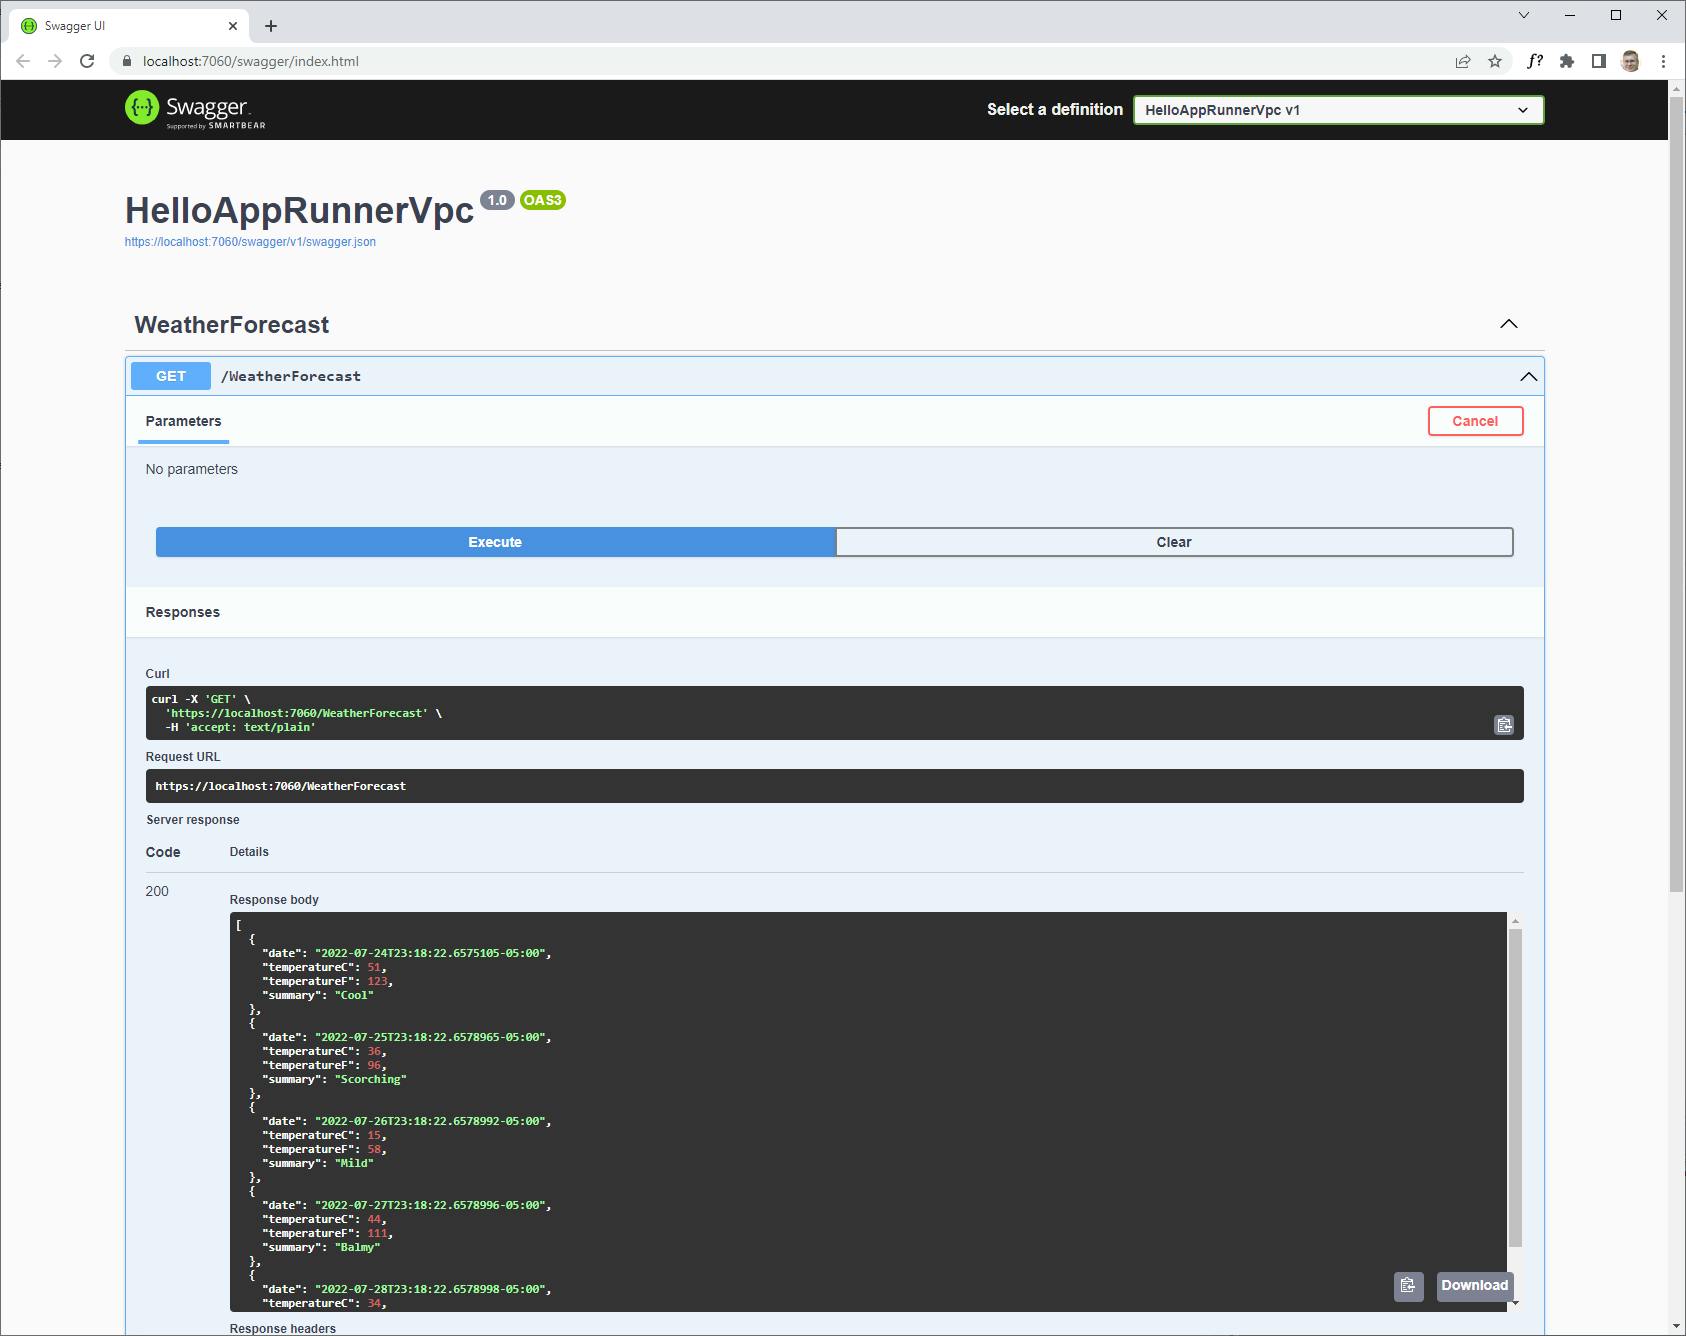
The generated project is a WeatherForecast API, very commonly used in .NET samples. To try it, press F5 and test it with Swagger. You'll see the service has a /WeatherForecast action that returns mock weather data JSON. Stop the program from running.
In AWS Explorer, set the same region you chose in Step 1.
In Solution Explorer, right-click the
HelloAppRunnerVpcproject and select Manage NuGet Packages.... Search for and install the AWSSDK.DynamoDBv2 package.Open Program.cs in the code editor, and remove or comment out the
app.UseHttpsRedirection();statement.Open
WeatherForecast.csand replace it with the code below at the end of this step.Open
WeatherForecastController.csin theControllersfolder, and replace with the code below. Replace [region] with the region you are working in. This code implements a health check method at the root of the service, and a WeatherForecast method at /WeatherForecast that takes a location parameter and retrieves data for it from the DynamoDBWeathertable. It performs a table scan to find records whose partition key matches the location. The results are output as an array of JSON records.Save your changes and ensure the project builds.
WeatherForecast.cs
namespace HelloAppRunnerVpc;

public class WeatherForecast
{
    public DateTime Date { get; set; }

    public int TemperatureC { get; set; }

    public int TemperatureF { get; set; }

    public string? Summary { get; set; }
}
WeatherForecastController.cs
using Amazon;
using Amazon.DynamoDBv2;
using Amazon.DynamoDBv2.DocumentModel;
using Microsoft.AspNetCore.Mvc;

namespace HelloAppRunnerVpc.Controllers;

[ApiController]
[Route("")]
public class WeatherForecastController : ControllerBase
{
    static readonly RegionEndpoint region = RegionEndpoint.[region];

    private readonly ILogger<WeatherForecastController> _logger;

    public WeatherForecastController(ILogger<WeatherForecastController> logger)
    {
        _logger = logger;
    }

    [HttpGet("")]
    public string GetHealthcheck()
    {
        return "Healthcheck: Healthy";
    }


    [HttpGet("WeatherForecast")]
    public async Task<IEnumerable<WeatherForecast>> GetWeatherForecast(string location = "Dallas")
    {
        List<WeatherForecast> forecasts = new List<WeatherForecast>();

        try
        {
            _logger.LogInformation($"00 enter GET, location = {location}");

            var client = new AmazonDynamoDBClient(region);
            Table table = Table.LoadTable(client, "Weather");

            var filter = new ScanFilter();
            filter.AddCondition("Location", ScanOperator.Equal, location);

            var scanConfig = new ScanOperationConfig()
            {
                Filter = filter,
                Select = SelectValues.SpecificAttributes,
                AttributesToGet = new List<string> { "Location", "Timestamp", "TempC", "TempF", "Summary" }
            };

            _logger.LogInformation($"10 table.Scan");

            Search search = table.Scan(scanConfig);

            List<Document> matches;
            do
            {
                _logger.LogInformation($"20 table.GetNextSetAsync");
                matches = await search.GetNextSetAsync();
                foreach (var match in matches)
                {
                    forecasts.Add(new WeatherForecast
                    {
                        Date = Convert.ToDateTime(match["Timestamp"]),
                        TemperatureC = Convert.ToInt32(match["TempC"]),
                        TemperatureF = Convert.ToInt32(match["TempF"]),
                        Summary = Convert.ToString(match["Summary"])
                    });
                }
            } while (!search.IsDone);

            _logger.LogInformation($"30 exited results loop");

        }
        catch (Exception ex)
        {
            _logger.LogError(ex, "90 Exception");
        }

        _logger.LogInformation($"99 returning {forecasts.Count} results");

        return forecasts.ToArray();
    }
}
Step 3: Test locally
In this step, you'll test the Web API locally and confirm data retrieval from DynamoDB.
Press F5 and wait for the app to build and launch in a browser.
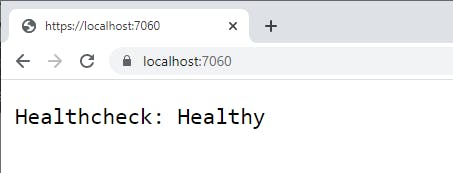
In the browser, remove the Swagger path from the URL to hit the service root, and you should see a health check message. App Runner will regularly ping the site to check health.
Add /WeatherForecast?location=Dallas to the end of the URL path. You should see weather forecast data JSON appear, with values you created in the DynamoDB table in Step 1.

Change the URL path to end in /WeatherForecast?location=Minneapolis. Now you see figures for that city.

Try another location name, and you see an empty response because there is no data for it in the table.
Stop the program from running.
Although it was straightforward for our app to access DynamoDB when testing locally, that won't be the case in the cloud, because App Runner is restricted to public endpoints by default. We'll have to take the extra steps of adding a VPC connector for App Runner and a matching VPC endpoint for DynamoDB.
Step 4: Publish Web API project to ECR
In this step, you'll use Publish to AWS to containerize your project and push the container to Amazon Elastic Container Registry (ECR).
In Visual Studio, set the region in AWS Explorer to the region you want to work in. We're using us-east-1 (N. Virginia). Be sure to select a region that supports both App Runner and DynamoDB.
In Solution Explorer, right-click the HelloAppRunnerVpc project and select Add > Docker Support, Target OS Linux. A Dockerfile is added to the project.
Again right-click the HelloAppRunnerVpc project, and select Publish to AWS.
In the Publish to AWS wizard, select the Publish to New Target tab and select Container Image to Amazon Elastic Container Registry (ECR).
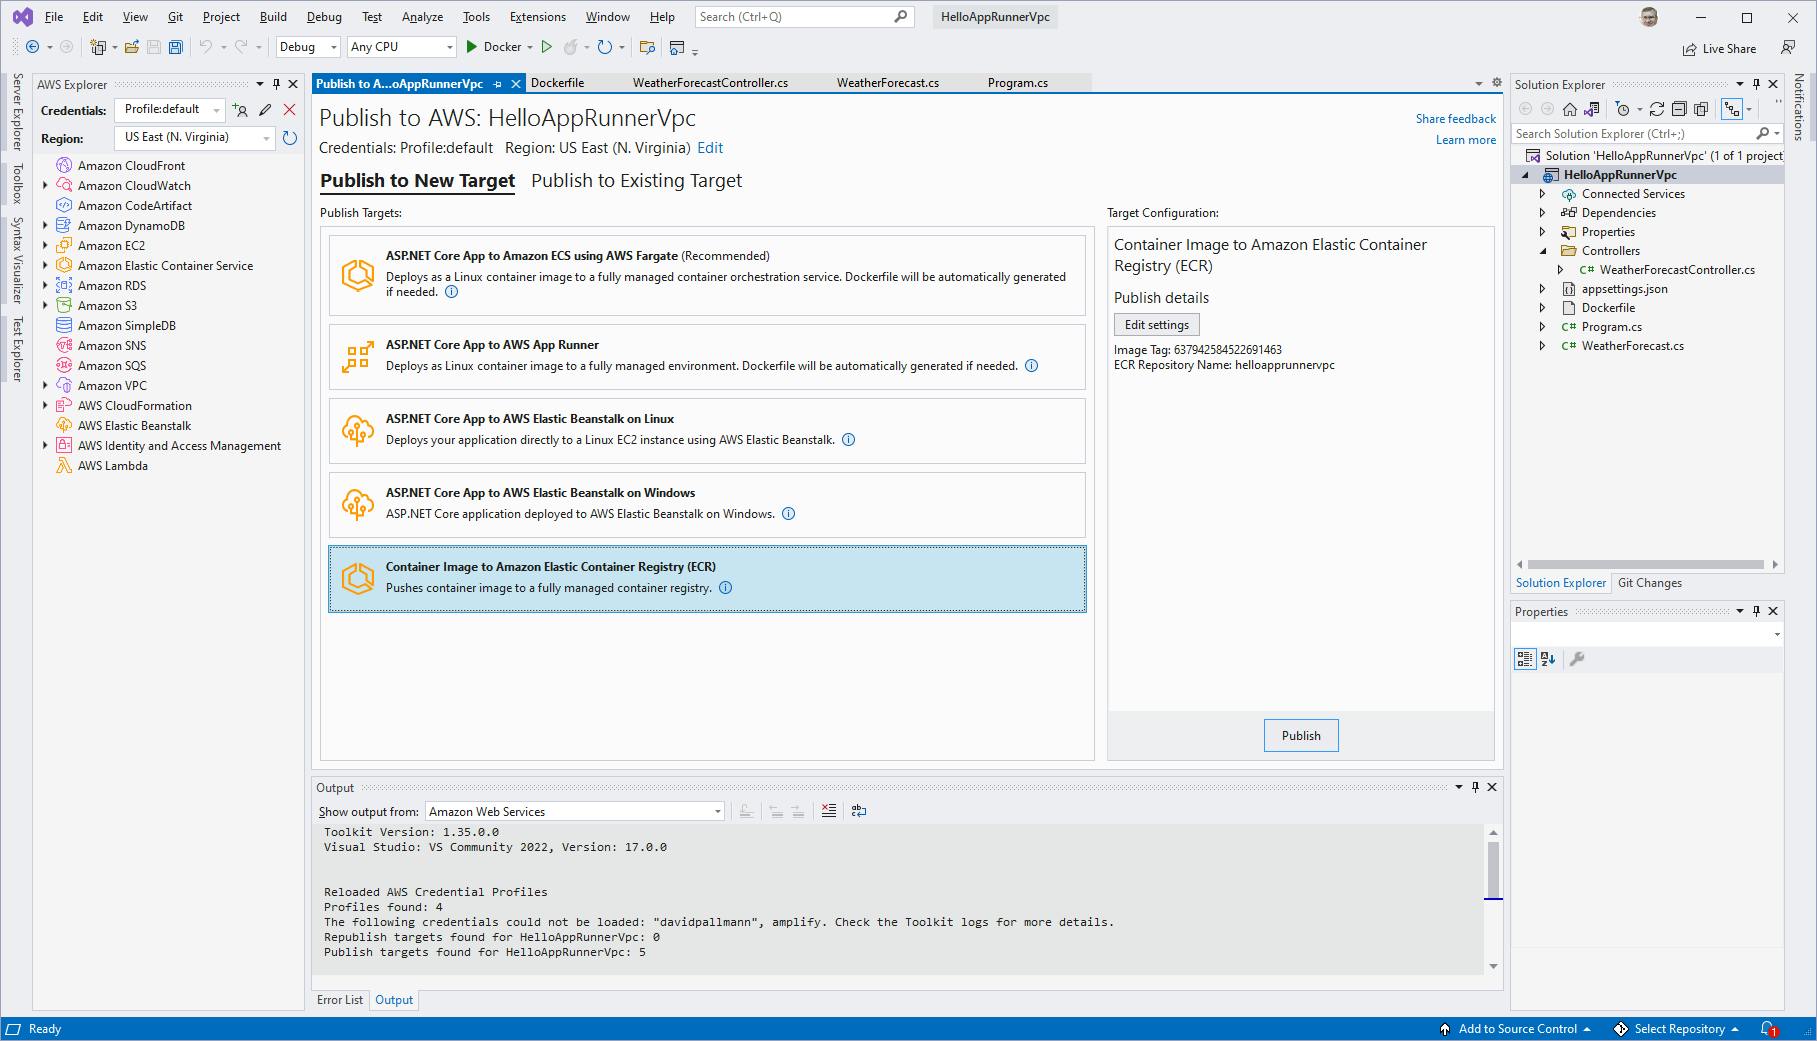
Click the Edit settings button at right, and set the container image tag to latest.
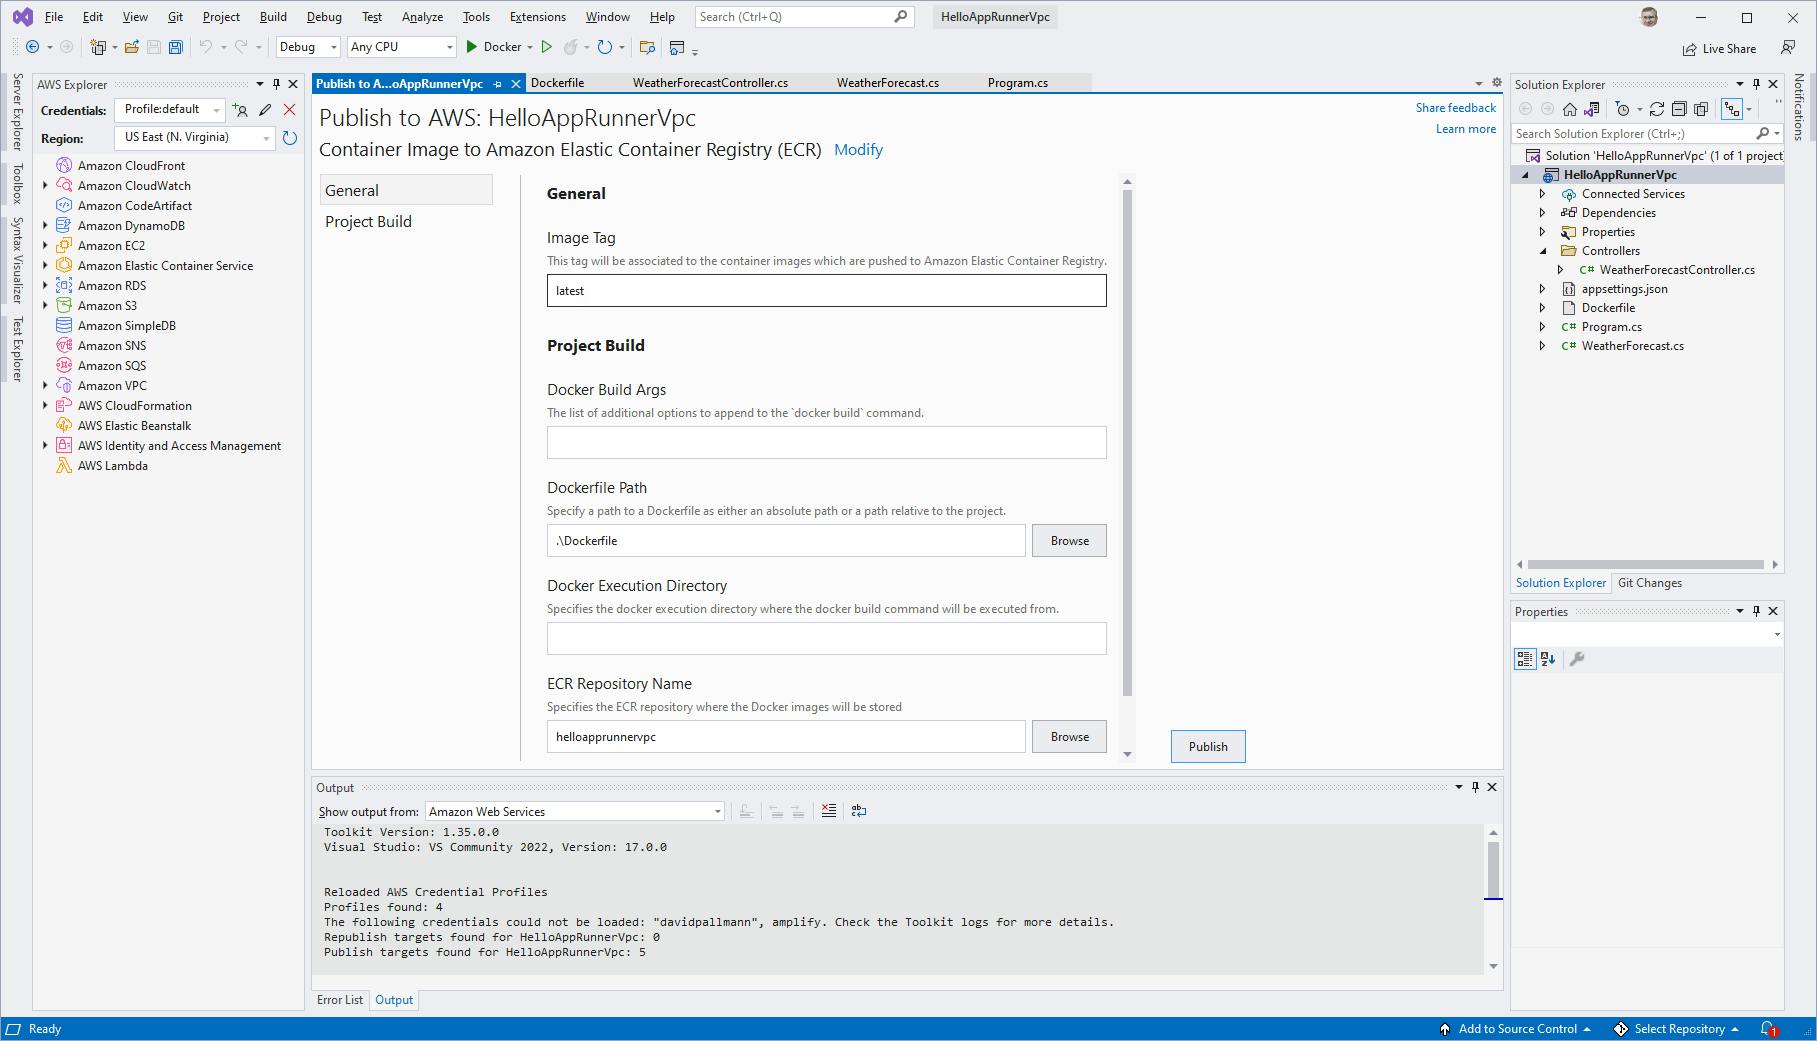
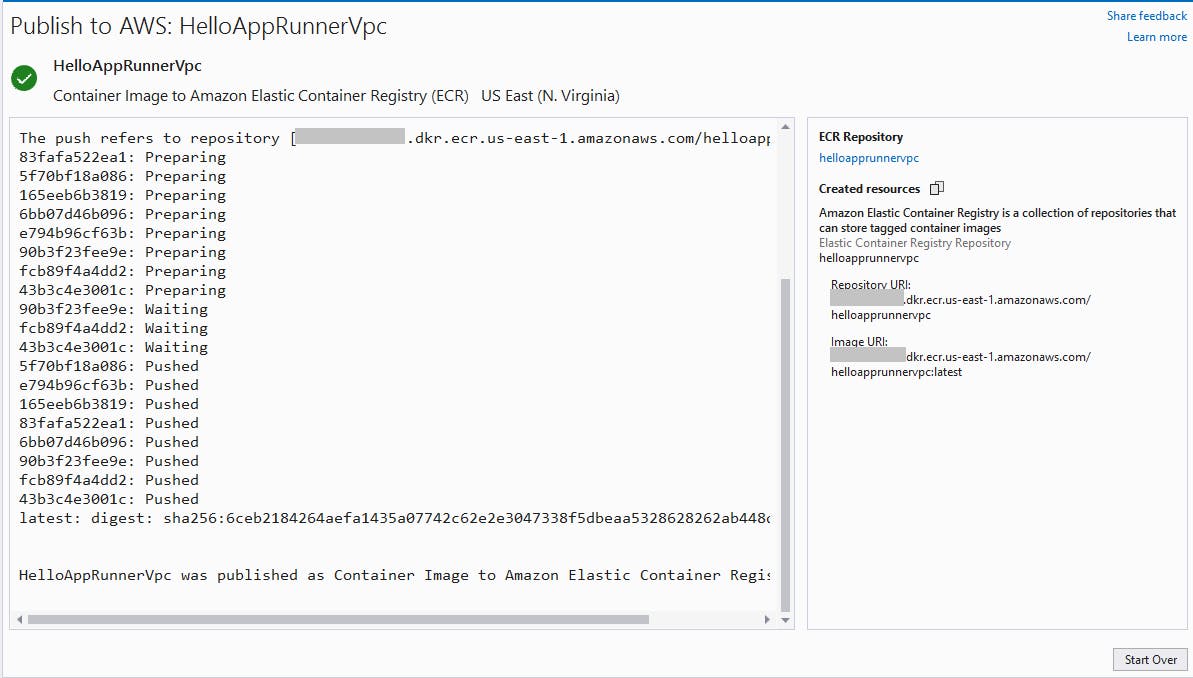
Click Publish, then review and confirm the target and region. Wait for the container to be created and deployed, which will take a couple of minutes.
Step 5: Create IAM Role
In this step, you'll use the AWS console to create an IAM role allowing the App Runner EC2 instances to access the DynamoDB table.
Browse to the AWS management console, sign in. At top right, select the same region you used in Step 4.
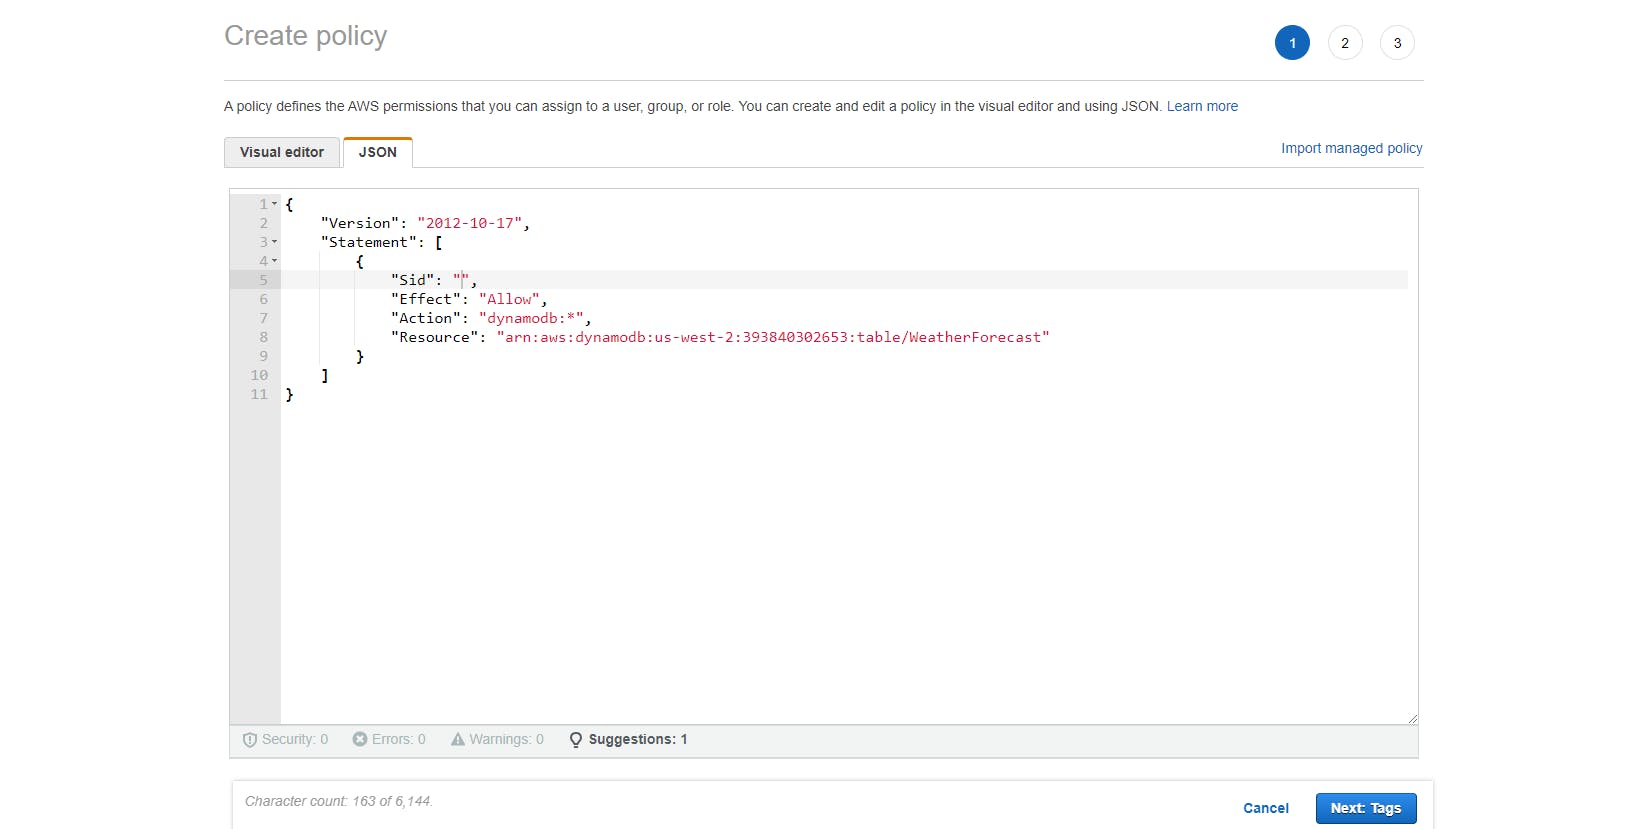
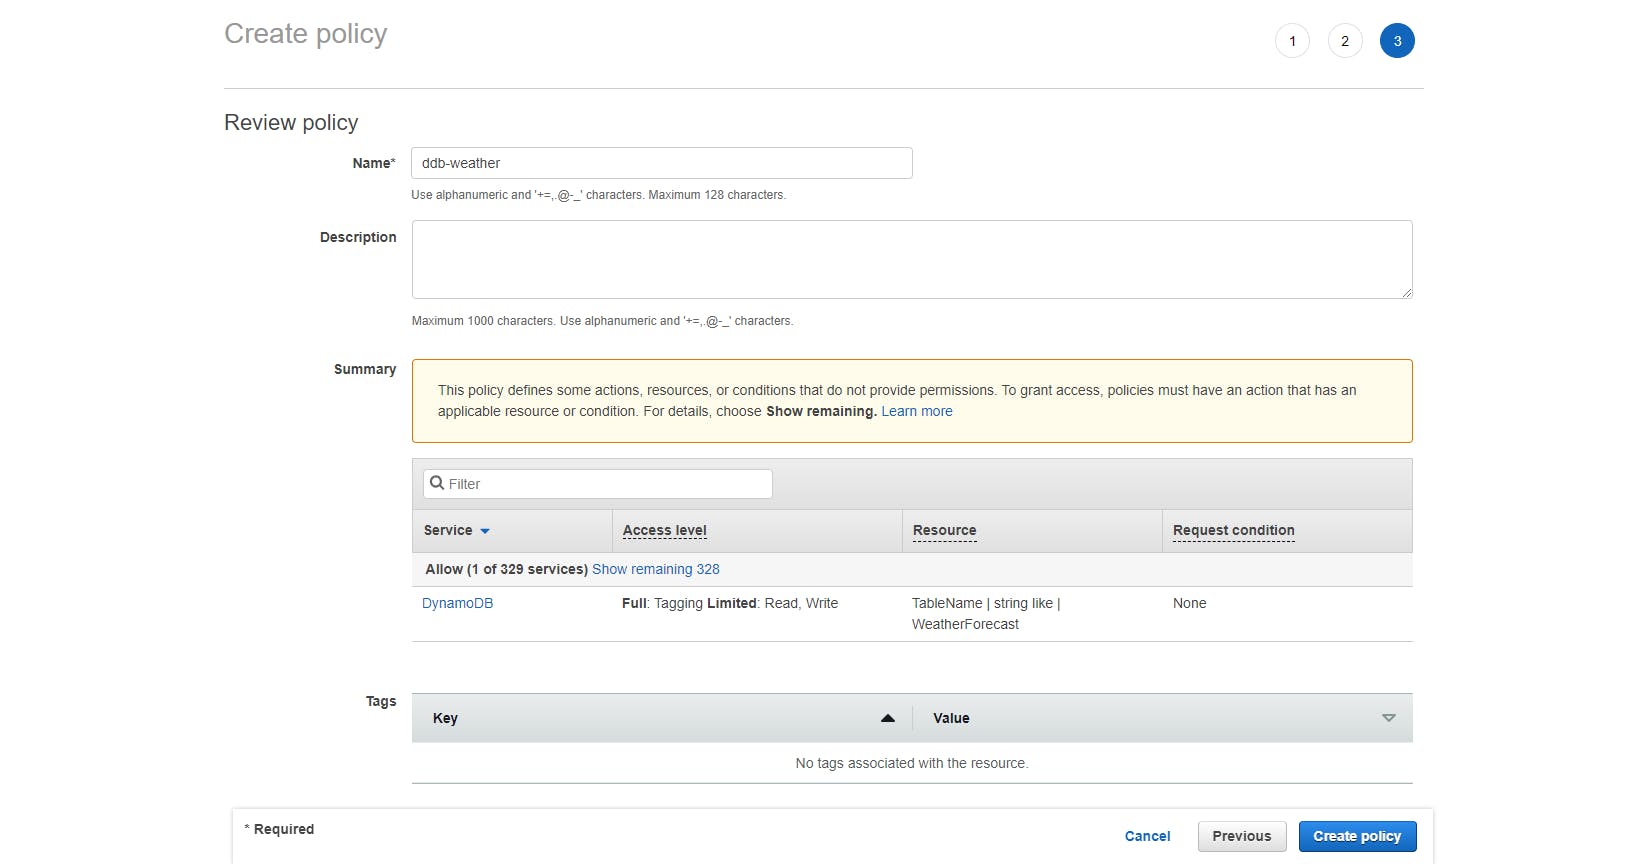
Create a policy that allows access to the
WeatherDynamoDB table:A. Navigate to Identity and Access Management (IAM)
B. Select Policies from the left pane and click Create policy.
C. Create the policy and enter the JSON below at the end of this step, replacing [account] with your 12-digit AWS account number, and [region] with your region (we used
us-east-1).D. Click Next: Tags and Next: Review. Name the policy ddb-Weather and click Create policy.
Create a role for App Runner EC2 instances:
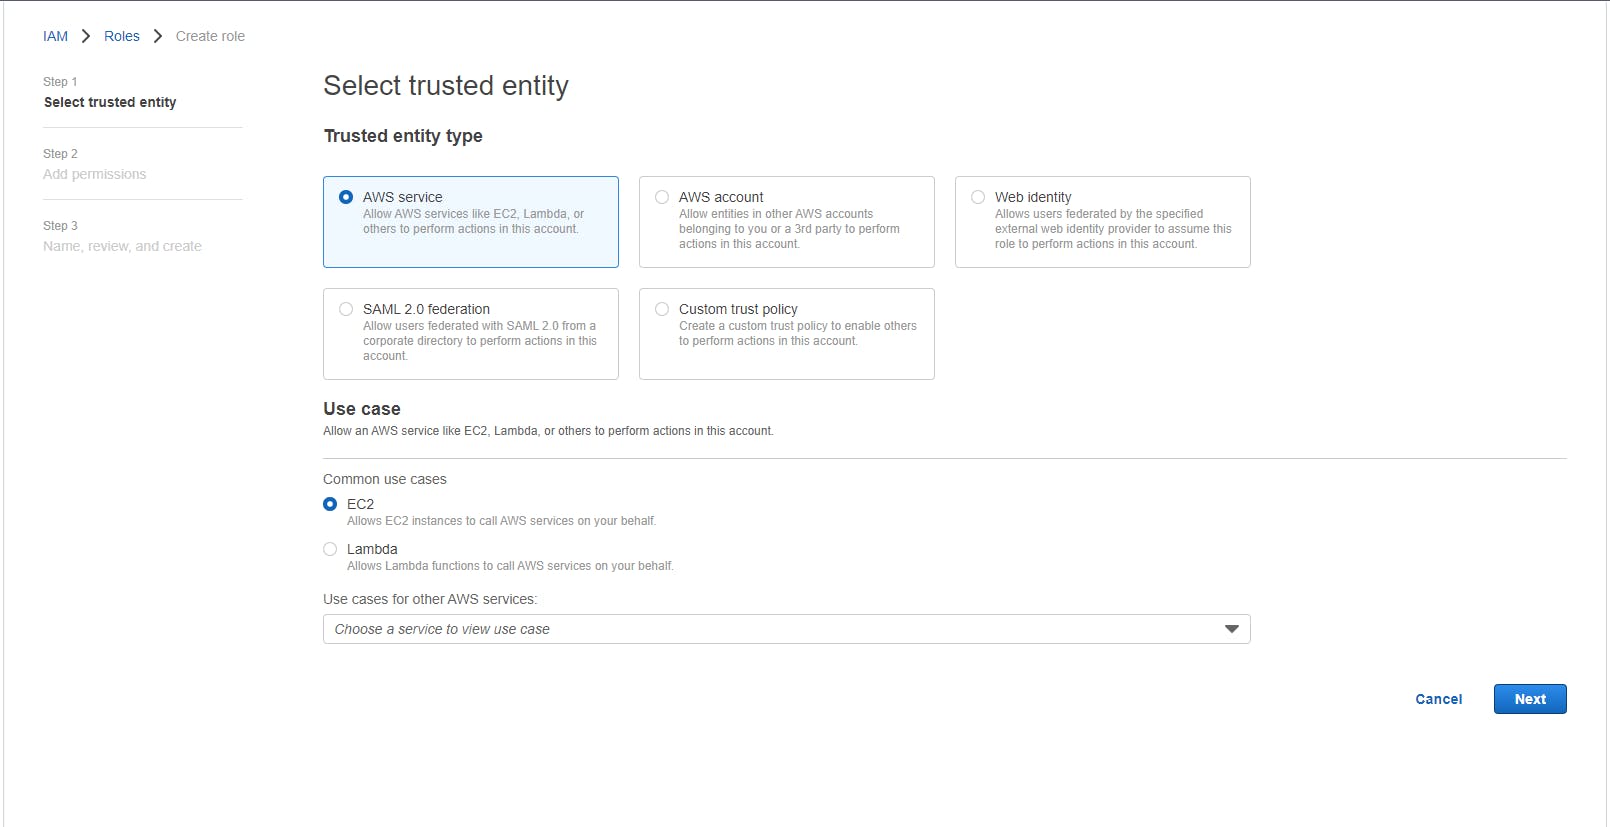
A. Select Roles from the left pane and click Create role.
B. For Trusted entity type, select AWS service.
C. For Use case, select EC2 and click Next.
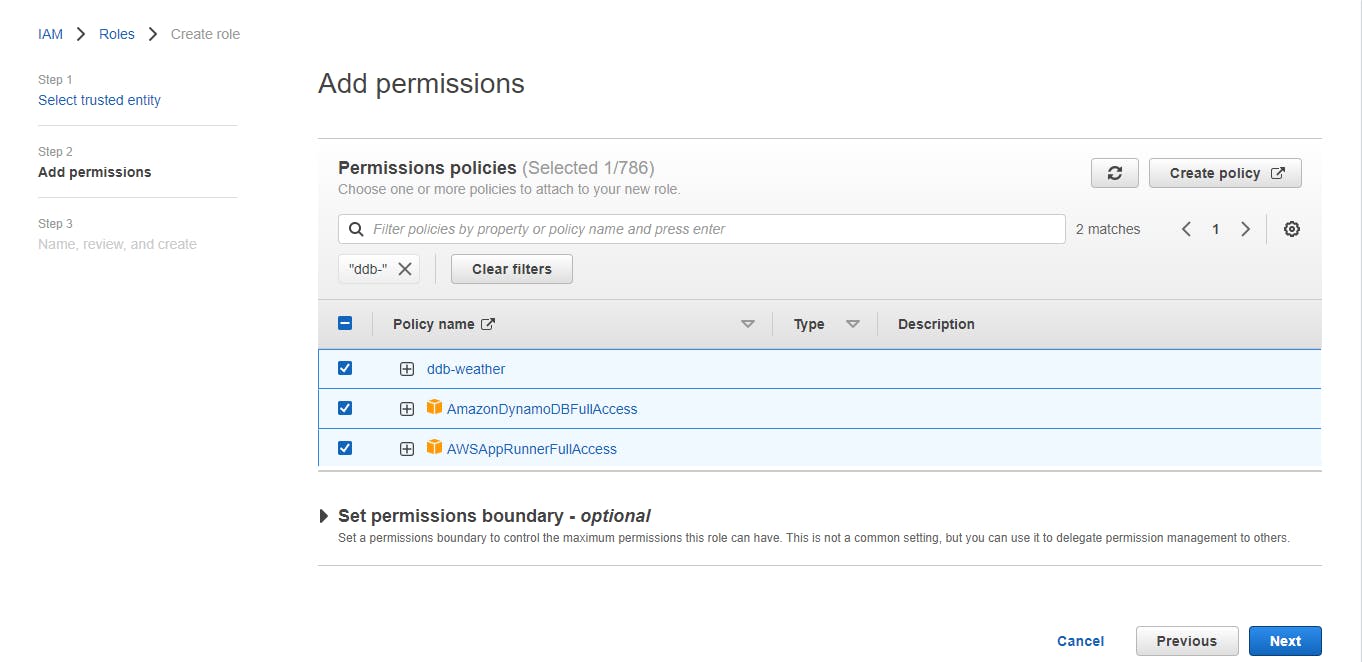
D. Search for and select these permissIons: ddb-Weather, AmazonDynamoDBFullAccess, and AWSAppRunnerFullAccess. Then Click Next.
E. For Trust relationships, replace with the JSON below at the end of this step.
F. Name the role
AppRunnerInstanceDynamoDBand click Create role.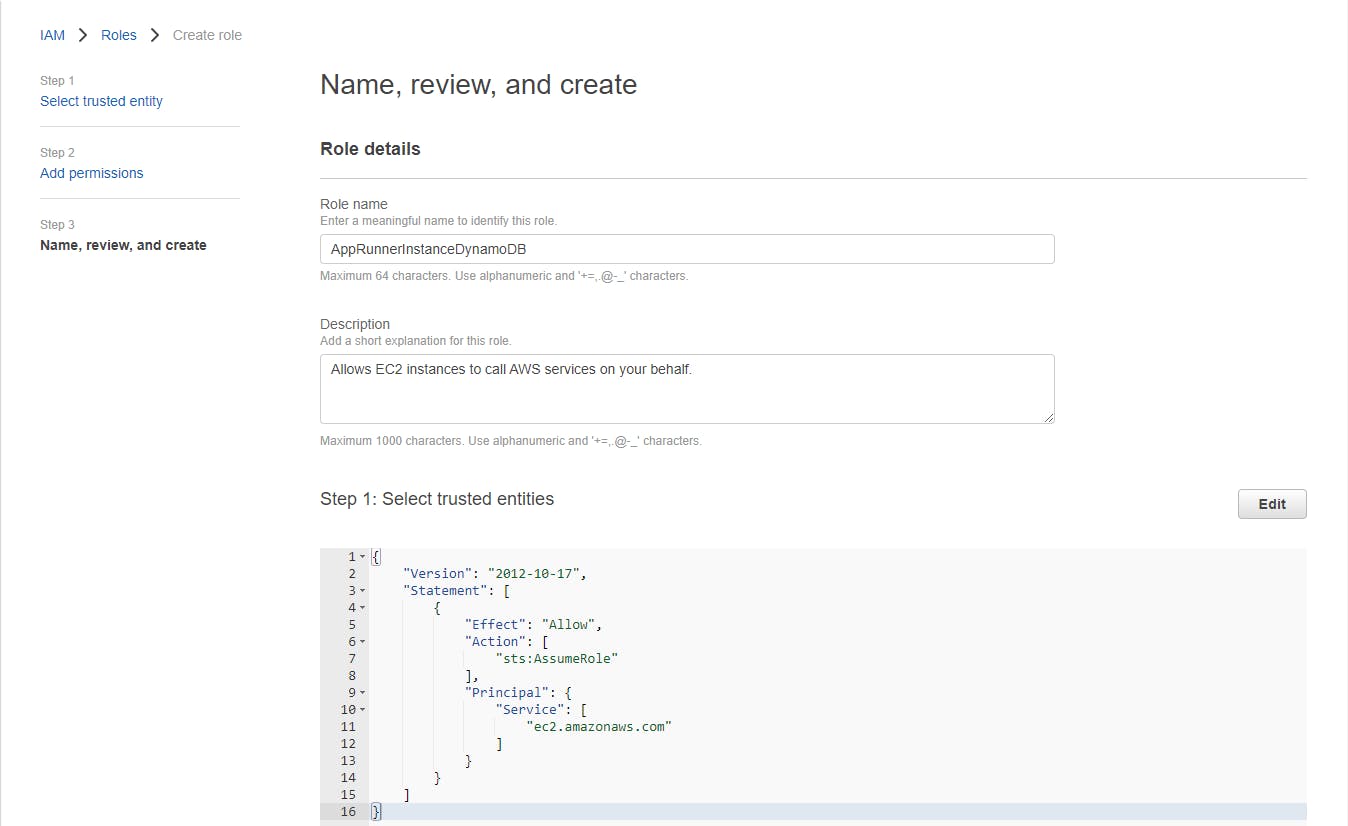
JSON for policy ddb-weather
{
    "Version": "2012-10-17",
    "Statement": [
        {
            "Sid": "",
            "Effect": "Allow",
            "Action": "dynamodb:*",
            "Resource": "arn:aws:dynamodb:[region]:[account]:table/Weather"
        }
    ]
}
Trust relationships JSON for role AppRunnerInstanceDynamoDB
{
    "Version": "2012-10-17",
    "Statement": [
        {
            "Effect": "Allow",
            "Principal": {
                "Service": [
                    "ec2.amazonaws.com",
                    "tasks.apprunner.amazonaws.com"
                ]
            },
            "Action": "sts:AssumeRole"
        }
    ]
}
Step 6: Create App Runner service
In this step, you'll create the App Runner service and a VPC connector.
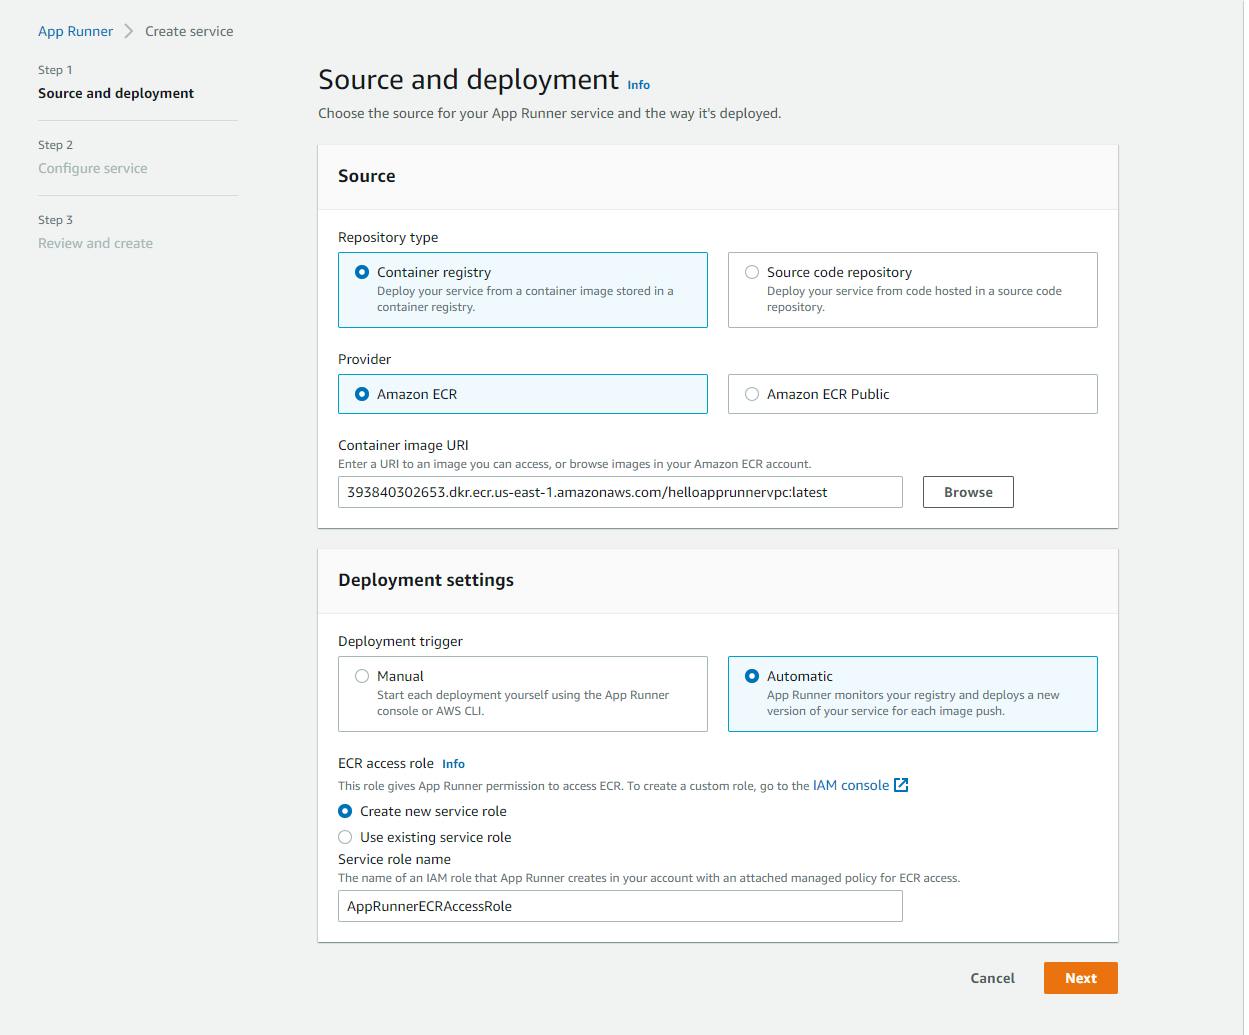
In the AWS console, navigate to AWS App Runner and click Create service.
A. Repository type: Container registry.
B. Provider: Amazon ECR.
C. Click Browse and select the container you deployed to ECR in Step 4.
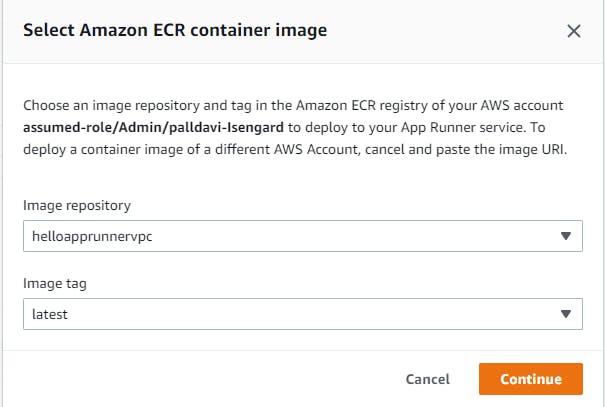
D. For Deployment settings trigger, select Automatic.
E. For ECR access role, select Create new service role.
F. Click Next.
On the Configure service page,
A. Service name: HelloAppRunnerVpc.
B. Port: 80.
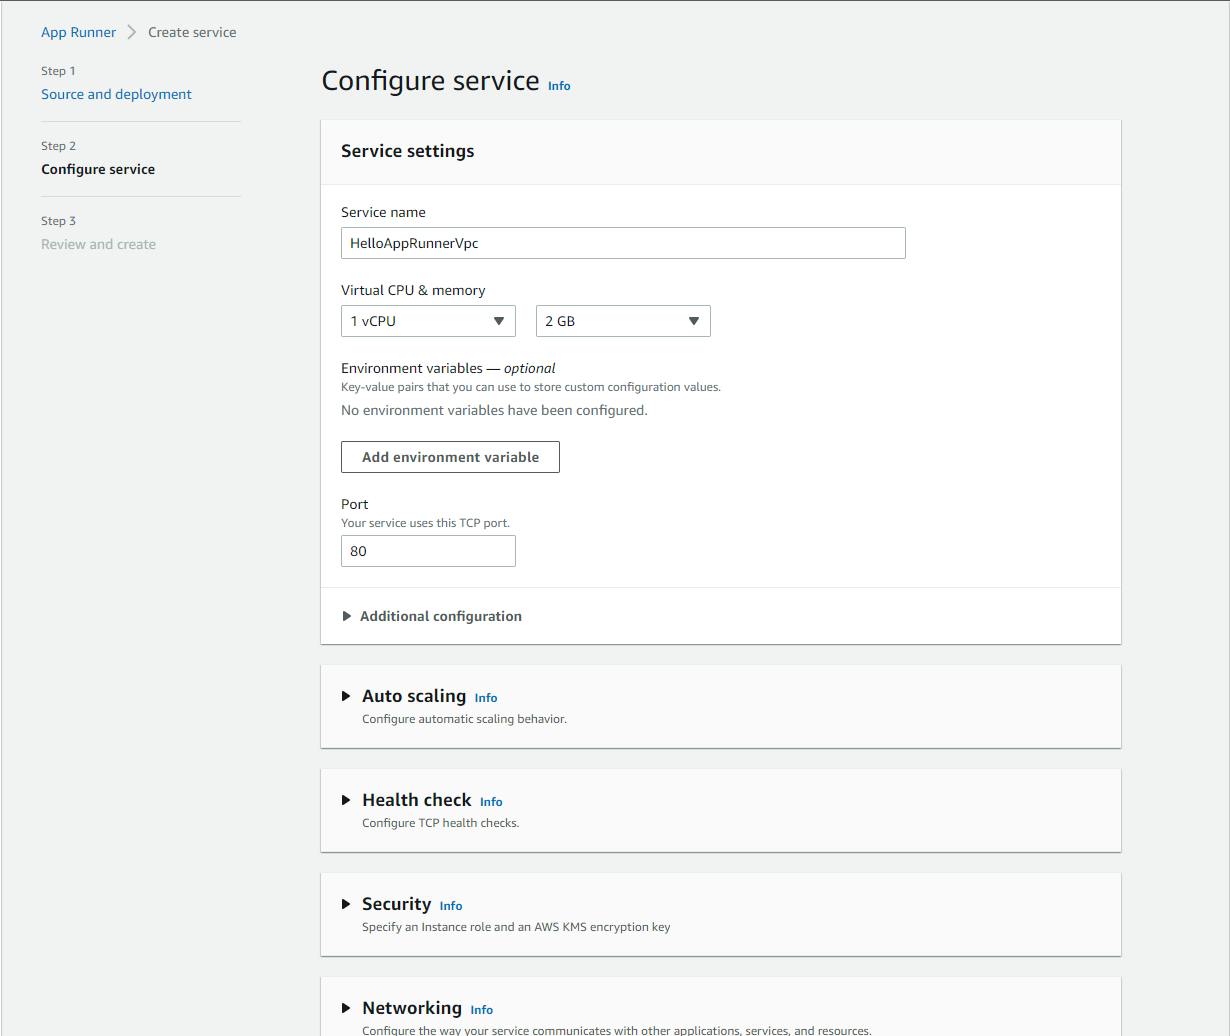
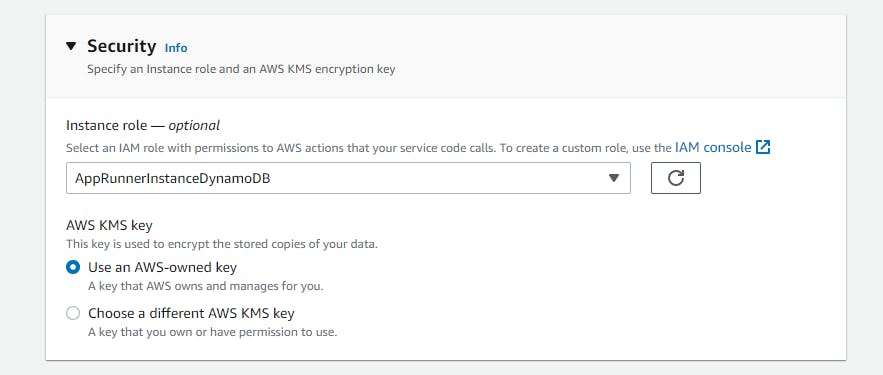
Expand the Security section and set Instance role to AppRunnerInstanceDynamoDB.
Expand the Networking section and create a VPC connector:
A. Under Networking, select Custom VPC.
B. Under VPC connector, click Add new.
C. VPC connector name: AppRunnerDynamoDB.
D. VPC: select your default VPC.
E. Subnets: select all subnets.
F. Security groups: select your default security group.
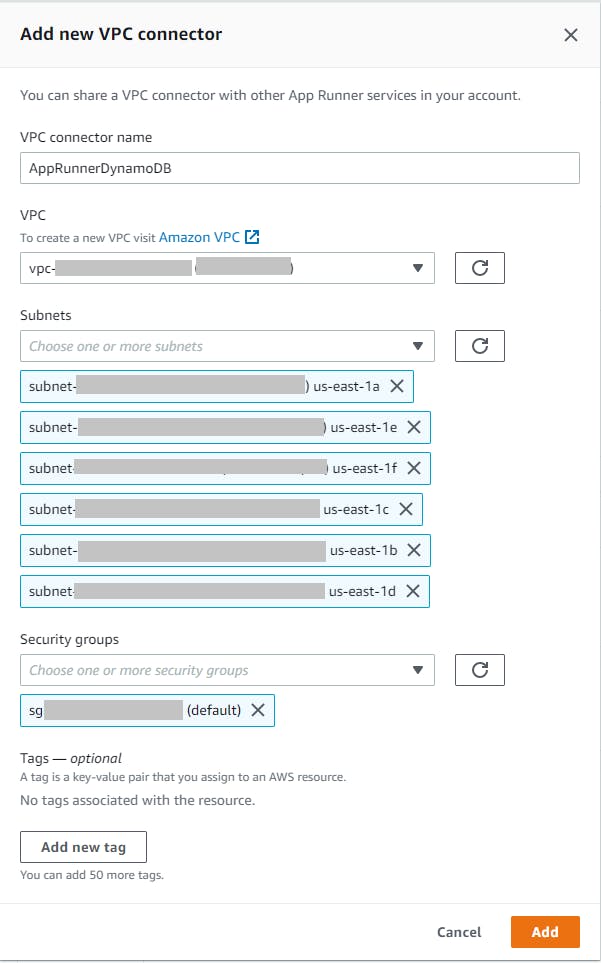
G. Click Add. If you get an error message that one of your subnets doesn't support App Runner services, remove it from the Subnets list and click Add again.
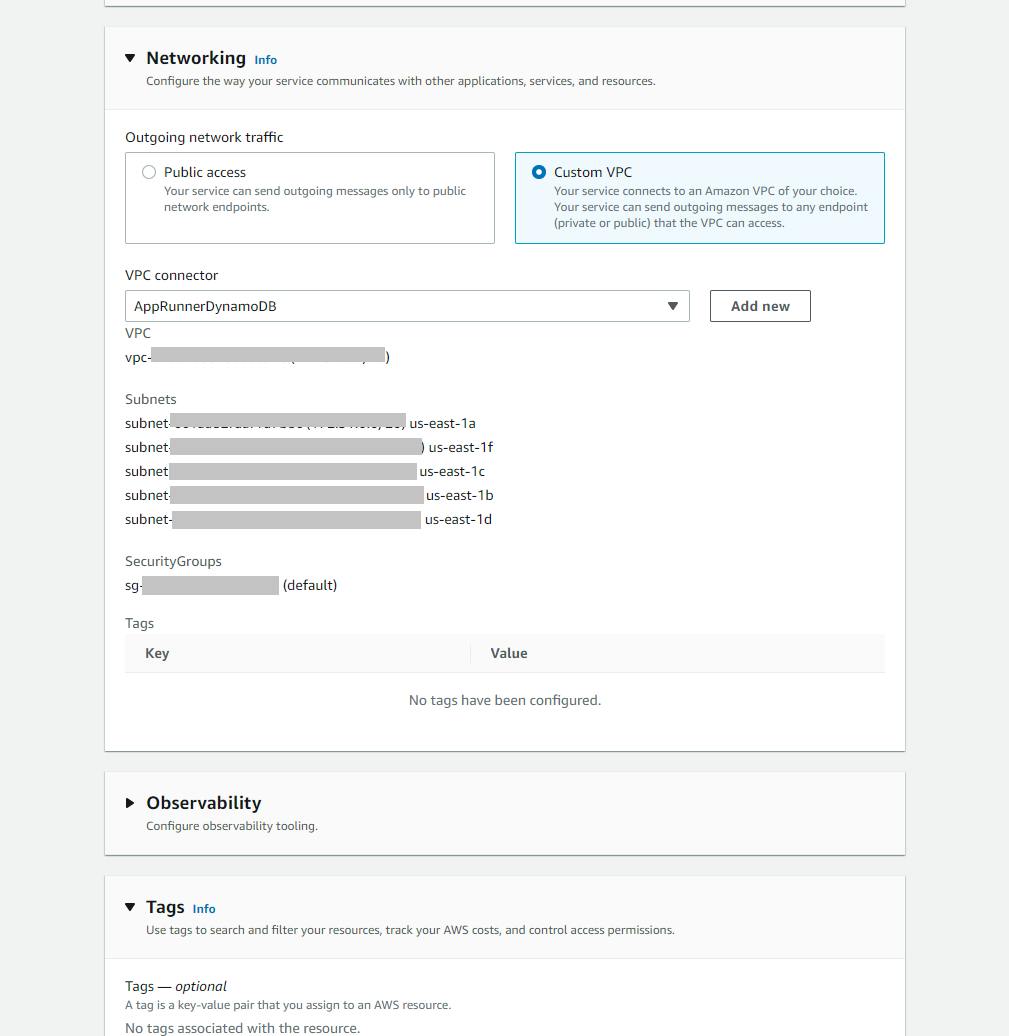
H. Click Next and Create & deploy.
Wait for deployment, which will take several minutes. This is a good time for a bio break.
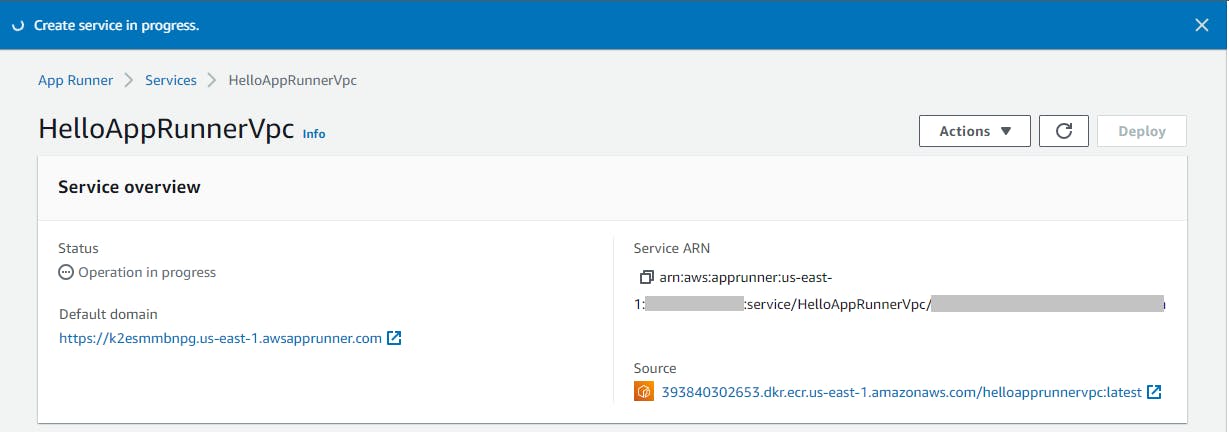
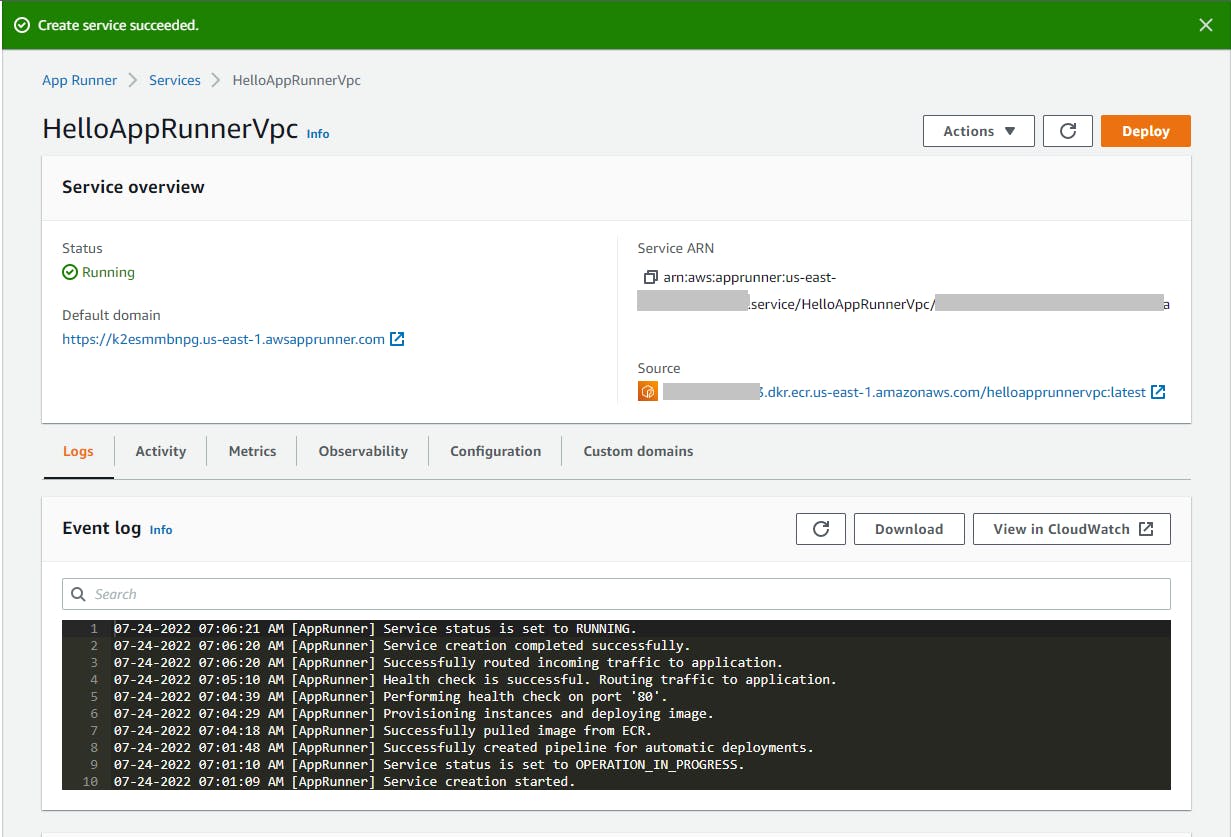
When service deployment is complete, you'll see a Create service succeeded message. Record the default domain URL. Refresh the Event log, and you should see confirmation the service is running.
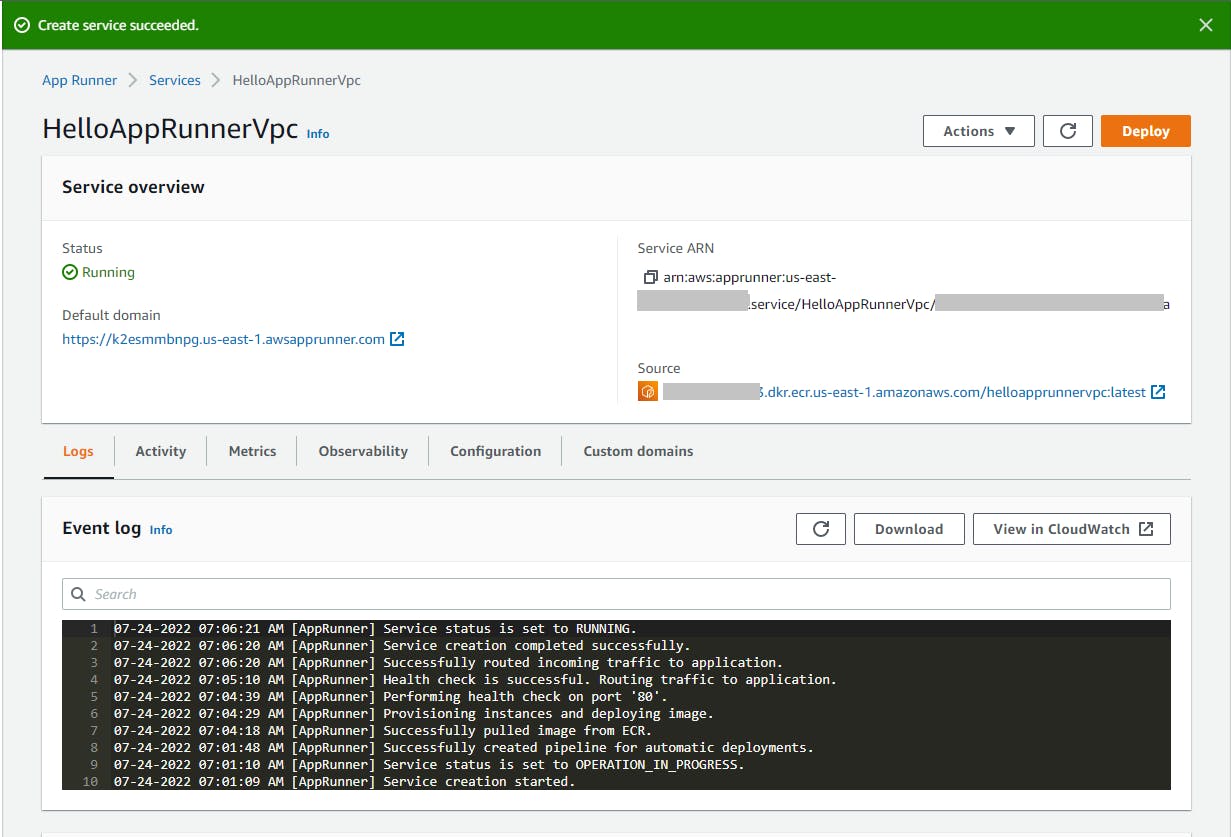
Browse to the URL, and you should see your health check. Our service is hosted in App Runner, but it isn't yet able to access DynamoDB. We've created the App Runner VPC connector, but we still need to create a matching VPC endpoint for DynamoDB.

Step 7: Create a VPC Endpoint for DynamoDB
In this step, you'll create a VPC endpoint for DynamoDB.
In the AWS console, navigate to VPC.
Select Endpoints from the left panel and click Create endpoint.
Name: vpc-endpoint-dynamodb.
Service category: select AWS service.
Service: enter DynamoDB in the search box and select com.amazonaws.region.dynamodb.
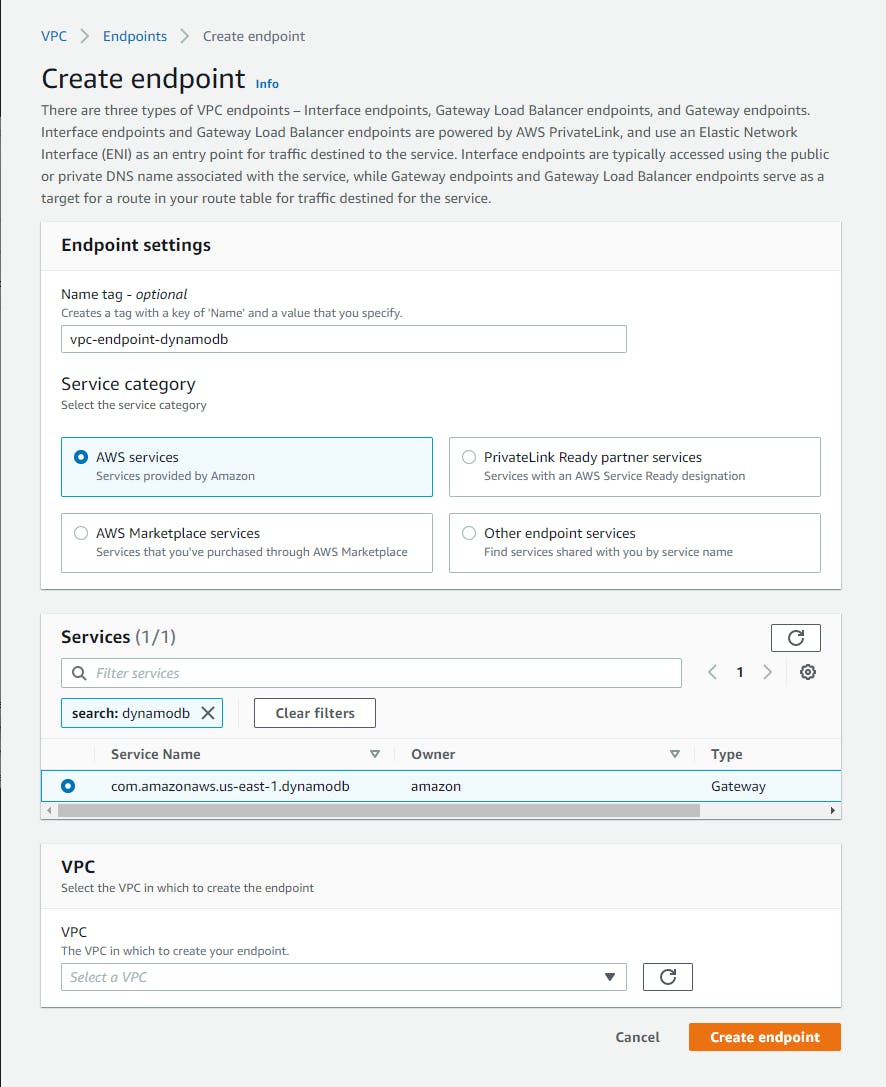
VPC: select your default VPC.
Route tables: select the Main route table.
Click Create endpoint.

Step 8: Test in the Cloud
Now we're ready to put it all together and test our Web API in the cloud.
In a browser, visit the service URL you recorded in Step 6. You see the health check response.

Add /WeatherForecast?location=Dallas at the end of the path. Now you see records from Dallas that you entered in Step 1.

Change the end of the path to /WeatherForecast?location=Minneapolis, and you see records for that location.

Congratulations! Your App Runner service is talking to DynamoDB!
Step 9: Shut it Down
When you're all done with the project, shut it down. You don't to accrue charges for something you're not using.
In the AWS console, navigate to App Runner and delete the
HelloAppRunnerVpcservice.Navigate to DynamoDB and delete the
Weathertable.Navigate to ECR and delete the
helloapprunnervpccontainer image.
Where to Go From Here
App Runner is really easy to get started with. When you start needing to integrate to other AWS services, it's time to start learning about AWS infrastructure concepts. In this tutorial, you hosted a Web API in App Runner and configured access to DynamoDB. To achieve that, you had to create a policy granting permission to a DynamoDB table, a role for App Runner's EC2 instances, a VPC connector for the App Runner service, and a VPC endpoint for DynamoDB. You encountered subnets and security groups.
This tutorial did not go over CDK infrastructure-as-code for VPC endpoints, something you'll want to explore for a real project. To go further, think about what other services you might want to integrate with your App Runner applications. Perhaps S3 storage, or a different database. Read about the services, understand their networking defaults and options, and build something.
Further Reading
AWS Documentation
New for App Runner - VPC Support
Enabling VPC access for outgoing traffic
Using App Runner with VPC endpoints
Dive Deep on AWS App Runner VPC Networking
AWS SDK for .NET Documentation
Videos
AWS App Runner VPC Support - Launch Demo
App Runner VPC Integration demo using the AWS CDK
Blogs
Serverless on AWS with CDK #1: App Runner with VPC Integration
