Table of contents
- This episode: Amazon Translate and Neural Machine Translation. In this Hello, Cloud blog series, we're covering the basics of AWS cloud services for newcomers who are .NET developers. If you love C# but are new to AWS, or to this particular service, this should give you a jumpstart.
- Amazon Translate : What is it, and why use It?
- Our Hello, Translate Project
- One-time Setup
- Step 1: Set Permissions for the AWS Toolkit User
- Step 2: Use Amazon Translate in the AWS Console
- Step 3: Create a .NET Program that Uses Translate
- Step 4: Run the Program and Test Real-time Translation
- Step 5: Create an S3 Bucket for Batch Processing
- Step 6: Create a Policy and Role for Data Access
- Step 7: Run the Program and Test Batch Translation Processing
- Step 8: Shut it Down
- Where to Go From Here
- Further Reading
This episode: Amazon Translate and Neural Machine Translation. In this Hello, Cloud blog series, we're covering the basics of AWS cloud services for newcomers who are .NET developers. If you love C# but are new to AWS, or to this particular service, this should give you a jumpstart.
In this post we'll introduce Amazon Translate and use it in a "Hello, Cloud" .NET program to perform language translation. We'll do this step-by-step, making no assumptions other than familiarity with C# and Visual Studio. We're using Visual Studio 2022 and .NET 6.
Amazon Translate : What is it, and why use It?
"Communication is the key to success in any business." —Lee Brown
Ever since the Tower of Babel, communication has been a challenge. As globalization increases, so does the need to communicate effectively across regions, cultures, and languages.
Amazon Translate (hereafter "Translate") is a service that performs automated language translation. AWS describes it as "a neural machine translation service that delivers fast, high-quality, affordable, and customizable language translation." With Translate, you can add localization to your web site and make such things as content feeds, reviews, and comments available in a user's preferred language. Translate supports 75 languages.
Translate uses neural networks trained for language translation. Machine translation will result in a small amount of translation imperfection. You should evaluate your translation needs carefully, and decide whether you need to combine automated machine translation with light human editing. Translate can translate high volumes of text that might overwhelm human translators.
You can perform translation in real-time, passing Translate a request with text to be translated, source language, and destination language.
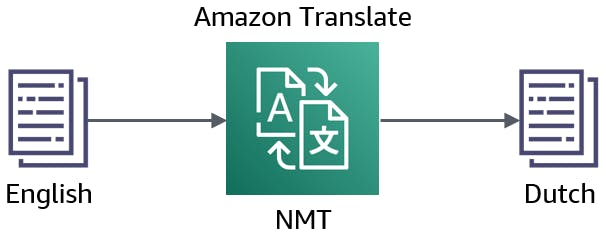
You can also perform translation in batches on files in S3 using jobs, known as Asynchronous Batch Processing. You upload a set of documents to an S3 input folder, start a batch translation job, and retrieve results from an S3 output folder. In addition to plain UTF-8 text, Translate can also translate documents such as .docx, .xlsx, and .pptx files.

Amazon Translate provides features for customizing your translations. You can mask profanity in the translation output. You can define custom terminology and define how you want specific terms to be translated. The active custom translation feature allows you to influence the style, tone, and word choice by providing sample translations.
Amazon Translate can put translation in reach, whether you're targeting a global audience or simply need to support a second language. Automated translation with Translate is about 1,000x cheaper than professional human translation. The AWS Free Tier gives you 2 million characters free per month, which makes it easy to experiment with.
Amazon Translate combines well with other AWS machine learning services. For example, you can use Amazon Textract to extract text from PDF documents or images, then feed the text to Translate for translation, and then pass the translated text to Amazon Comprehend for sentiment analysis or convert to speech with Amazon Polly.
Our Hello, Translate Project
After getting familiar with Amazon Translate in the AWS Console, you'll write a .NET 6 program that invokes Translate to translate text files from and to any supported language. We'll first do this in real-time, then see how to translate documents with a batch job.
One-time Setup
For any of the tutorials in the Hello, Cloud series you need the following:
- An AWS account, and an understanding of what is included in the AWS Free Tier.
- Microsoft Visual Studio 2022. If you're using an older version of Visual Studio you won't be able to use .NET 6. If you use a different IDE, you may have to find alternatives to some tutorial steps.
- AWS Toolkit for Visual Studio. Configure the toolkit to access your AWS account and create an IAM user. Your default AWS profile will be linked to this user when running programs from the command line.
Step 1: Set Permissions for the AWS Toolkit User
In order to perform this tutorial, your AWS Toolkit User / default AWS profile needs the necessary permissions for Amazon Translate operations. In this step, you'll update permissions for your AWS Toolkit for Visual Studio user.
Important: You should always follow the principle of least privilege when it comes to security. This blog series assumes you are working in your own developer account for learning purposes and not working with anything production-related. If you're using an organization-owned AWS account, you should coordinate with your security principal on IAM settings.
Sign in to the AWS console.
Navigate to the Identity and Access Management (IAM) area of the AWS Console. You can enter iam in the search box to find it.
Click Users on the left panel and select the username you use with the AWS Toolkit for Visual Studio (you created this user when you installed and configured the toolkit).
If not already assigned, add the built-in PowerUserAccess permission. The PowerUserAccess permission provides developers full access to AWS services and resources, but does not allow management of users and groups.
Find and attach the TranslateFullAccess permission.
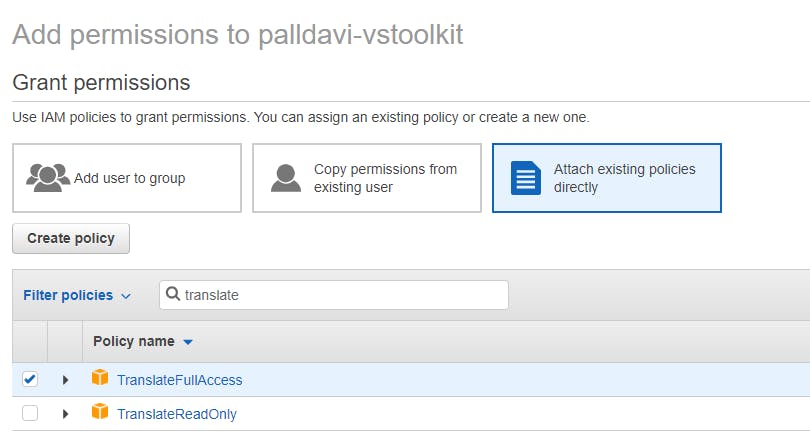
Your AWS Toolkit for Visual Studio user now has the permissions it needs to perform real-time Translate operations. We'll add more permissions for batch jobs in a later step.
Step 2: Use Amazon Translate in the AWS Console
In this step, you'll get some experience working with Translate interactively.
Go to the AWS Console and select a region nearest you that supports Amazon Translate (check availability here). We're using US-West-2 (Oregon).
Navigate to Amazon Translate. You can enter translate in the search box.
In the left panel, click Real-time translation. A real-time translation form appears.
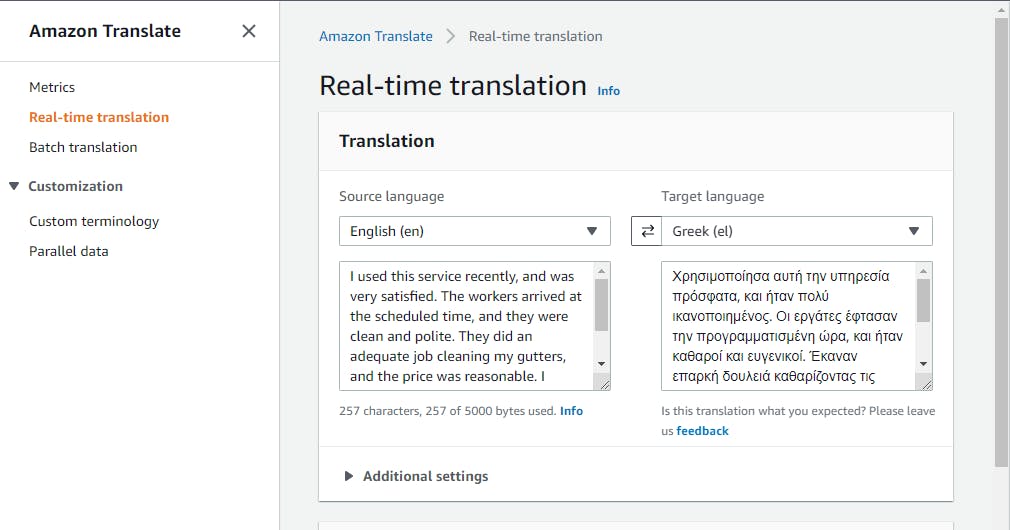
On the Translation pane, select Source language, Target language, and enter source text. You see a translation appear on the right. We translated a service review from English to Greek below.
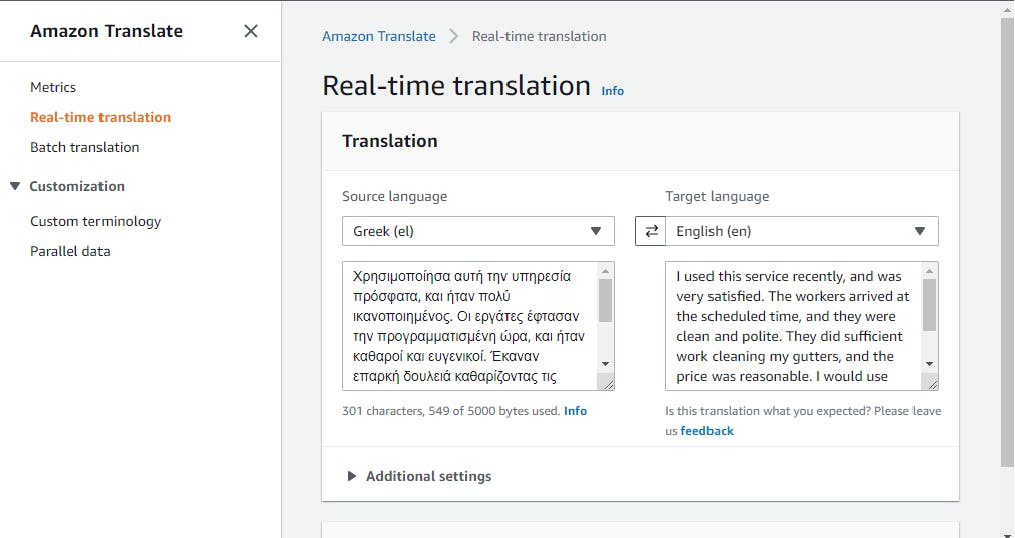
Click the middle button to reverse the translation. The Greek translation is translated back into English. In this instance, meaning has been preserved well.
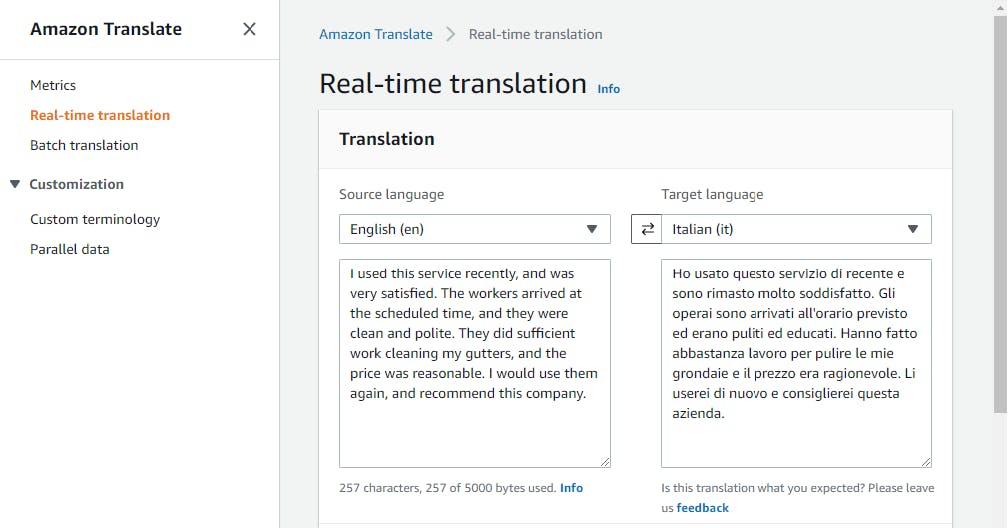
Experiment with a variety of text and source/destination language combinations to get a feel for Amazon Translate. Note the two-letter language codes used to specify source and destination. You'll be specifying these language codes in your code (language code reference).
Now that we understand what Amazon Translate can do, let's use it programmatically.
Step 3: Create a .NET Program that Uses Translate
In this step, we'll create a .NET console program and use it to invoke Translate on various text files.
Open a command/terminal window and CD to a development folder.
Enter the dotnet new command below to create a .NET 6 console program.
dotnet new console -n hello-translate
Launch Visual Studio and open the hello-translate project.
In Solution Explorer, right-click the hello-translate project and select Manage Nuget Packages.... Find and install the AWSSDK.Translate package.
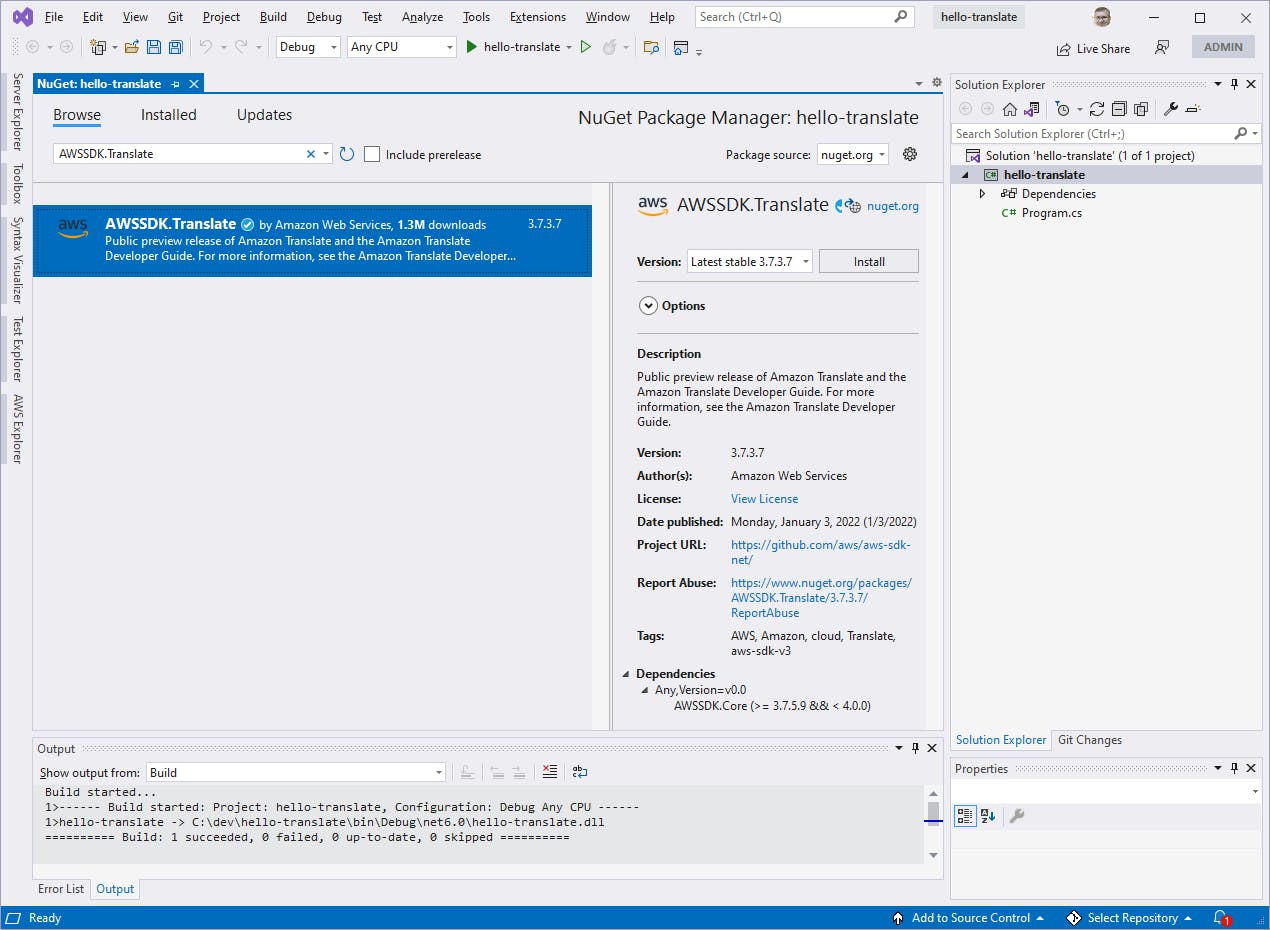
Replace Program.cs with the code at the end of this step. Set region to the Amazon region code for your region. For example, for the region of Oregon we specify RegionEndpoint.USWest2.
In Solution Explorer, right-click the hello-translate project and select Add Class. Add a class named TranslateHelper.cs. Open it in the editor and replace it with the code at the end of this step. This is where our code will be interacting with Amazon Translate via the AWS SDK for .NET.
Save your changes and build the program.
Program.cs
using Amazon;
using hello_translate;

RegionEndpoint region = RegionEndpoint.USWest2;

Console.OutputEncoding = System.Text.UnicodeEncoding.Unicode;

var translateHelper = new TranslateHelper(region);

if (args.Length == 3)
{
    await translateHelper.TranslateText(sourceLang: args[0], targetLang: args[1], text: args[2]);
}
else if (args.Length == 4)
{
    await translateHelper.TranslateBatch(sourceLang: args[0], targetLang: args[1], bucketName: args[2], docType: args[3]);
}
else
{
    Console.WriteLine("For real-time translation of local text files:");
    Console.WriteLine("Usage: dotnet run -- [sourceLanguageCode] [destLanguageCode] [filename]");
    Console.WriteLine("Ex:    dotnet run -- en de \"Hello there. My name is David.\"");
    Console.WriteLine("Ex:    dotnet run -- fr ru data\\frenchText.txt");
    Console.WriteLine("For batch translation of S3 documents (using the bucket configured in the program):");
    Console.WriteLine("Usage: dotnet run -- [sourceLanguageCode] [destLanguageCode] [s3-uri] txt|html|docx|xlsx|pptx");
    Console.WriteLine("Ex:    dotnet run -- en fr s3://hello-translate docx");
}
TranslateHelper.cs
using Amazon;
using Amazon.S3;
using Amazon.Translate;
using Amazon.Translate.Model;

namespace hello_translate
{
    public class TranslateHelper
    {
        const string DataAccessRoleArn = "arn:aws:iam::[aws-account]:role/translate-s3";

        private RegionEndpoint _region { get; set; }
        private AmazonTranslateClient _translateClient { get; set; }
        private AmazonS3Client _s3Client { get; set; }

        public TranslateHelper(RegionEndpoint region)
        {
            _region = region;
            _translateClient = new AmazonTranslateClient(_region);
            _s3Client = new AmazonS3Client(_region);
        }

        /// <summary>
        /// Translate text.
        /// </summary>
        /// <param name="sourceLang">source language code</param>
        /// <param name="targetLang">target language code</param>
        /// <param name="text">text to translate</param>
        /// <returns>translated text</returns>
        public async Task<string> TranslateText(string sourceLang, string targetLang, string text)
        {
            if (text.Contains("\\"))
            {
                text = File.ReadAllText(text);
            }
            Console.WriteLine($"--- {sourceLang} ---");
            Console.WriteLine(text);

            var request = new TranslateTextRequest
            {
                Text = text,
                SourceLanguageCode = sourceLang,
                TargetLanguageCode = targetLang
            };

            var response = await _translateClient.TranslateTextAsync(request);

            Console.WriteLine($"--- {targetLang} ---");
            Console.WriteLine(response.TranslatedText);

            return response.TranslatedText;
        }

        /// <summary>
        /// Translate documents using a batch job. Input and output folders are named with the source/target language codes.
        /// </summary>
        /// <param name="sourceLang">source language code</param>
        /// <param name="targetLang">target language code</param>
        /// <param name="bucketName">S3 URI, minus the folder, for source/target documents</param>
        /// <param name="docType">document type - docx | xlsx | pptx | html | txt</param>
        public async Task TranslateBatch(string sourceLang, string targetLang, string s3Uri, string docType)
        {
            if (s3Uri != null && !s3Uri.EndsWith("/")) s3Uri += "/";
            var inputConfig = new InputDataConfig()
            {
                S3Uri = $"{s3Uri}{sourceLang}",
                ContentType = docType switch
                {
                    "docx" => "application/vnd.openxmlformats-officedocument.wordprocessingml.document",
                    "xlsx" => "application/vnd.openxmlformats-officedocument.spreadsheetml.sheet",
                    "pptx" => "application/vnd.openxmlformats-officedocument.presentationml.presentation",
                    "htm" => "text/html",
                    "html" => "text/html",
                    "txt" => "text/plain",
                    _ => "text/plain"
                },
            };

            var outputConfig = new OutputDataConfig()
            {
                S3Uri = $"{s3Uri}{targetLang}",
            };

            var request = new StartTextTranslationJobRequest()
            {
                InputDataConfig = inputConfig,
                OutputDataConfig = outputConfig,
                SourceLanguageCode = sourceLang,
                TargetLanguageCodes = new List<string> { targetLang },
                DataAccessRoleArn = DataAccessRoleArn
            };

            Console.WriteLine($"Start batch translation - S3 input folder: {inputConfig.S3Uri}, S3 output folder: {outputConfig.S3Uri}");

            var response = await _translateClient.StartTextTranslationJobAsync(request);

            if (response.HttpStatusCode == System.Net.HttpStatusCode.OK)
            {
                Console.WriteLine($"Job {response.JobId} is running - status: {response.JobStatus}");
            }
            else
            {
                Console.WriteLine($"Error: {response.HttpStatusCode} {response.JobStatus}");
            }

        }
    }
}
The code is short, so let's take a moment to understand it. This program can be used for 1) real-time translation or 2) batch processing of documents in S3, specified by the command line arguments. The code is simple to understand. The TranslateHelper class does all the work. Program.cs instantiates TranslateHelper, passing an AWS region to its constructor. It then calls the appropriate method, TranslateText or TranslateBatch. In TranslateHelper.cs, the constructor creates an AmazonTranslateClient.
For real-time translation, we invoke the TranslateText method of TranslateHelper. That method checks the text parameter, which may contain text or a filename. If it contains a slash or backslash, it's taken as a filename and the source text is loaded from that file. A TranslateTextAsync SDK method performs the actual translation. We give that a TranslateTextRequest with source text, source language code, and destination language code. The TranslateTextResponse we receive back contains a TranslatedText property with the translation. Easy-peasy.
Batch job processing of an S3 folder of documents is slightly more involved, and we still have a step coming up to create a bucket and configure permissions for that. The code in our TranslateBatch method accepts source/target language codes, a bucket name, and a doc type, which can be docx, xslx, pptx (Microsoft Office documents), html (HTML page), or txt (text). The StartTextTranslationJobAsync method kicks off the job. We pass it a StartTextTranslationJobRequest with the URI of our input S3 bucket/folder, the document content type, the output S3 bucket/folder, source/target language codes, a role for accessing the S3 bucket/objects, and a name for our job. We get back a StartTextTranslationJobResponse, whose JobId can be used to check job status. Our program kicks off the batch job but doesn't wait for it, as batch jobs can take quite some time. We can check completion and see our results in the AWS console.
We're now ready to try out the first action, real-time translation. We still have some setup work to do before we can try batch processing, which we'll get to in a later step.
Step 4: Run the Program and Test Real-time Translation
In this step, we'll run our program and test real-time translation. Our program expects these command line arguments:
dotnet run -- [sourceLanguageCode] [destLanguageCode] [text|filename]
Open a command/terminal window and CD to the project folder.
Enter this command to translate "Do you speak French?" from English to French:
dotnet run -- en fr "Do you speak French?"The translation appears: "Parlez-vous français ?".

Try other text and source/target language codes.
Now, create a .txt file and put your source text in the file.
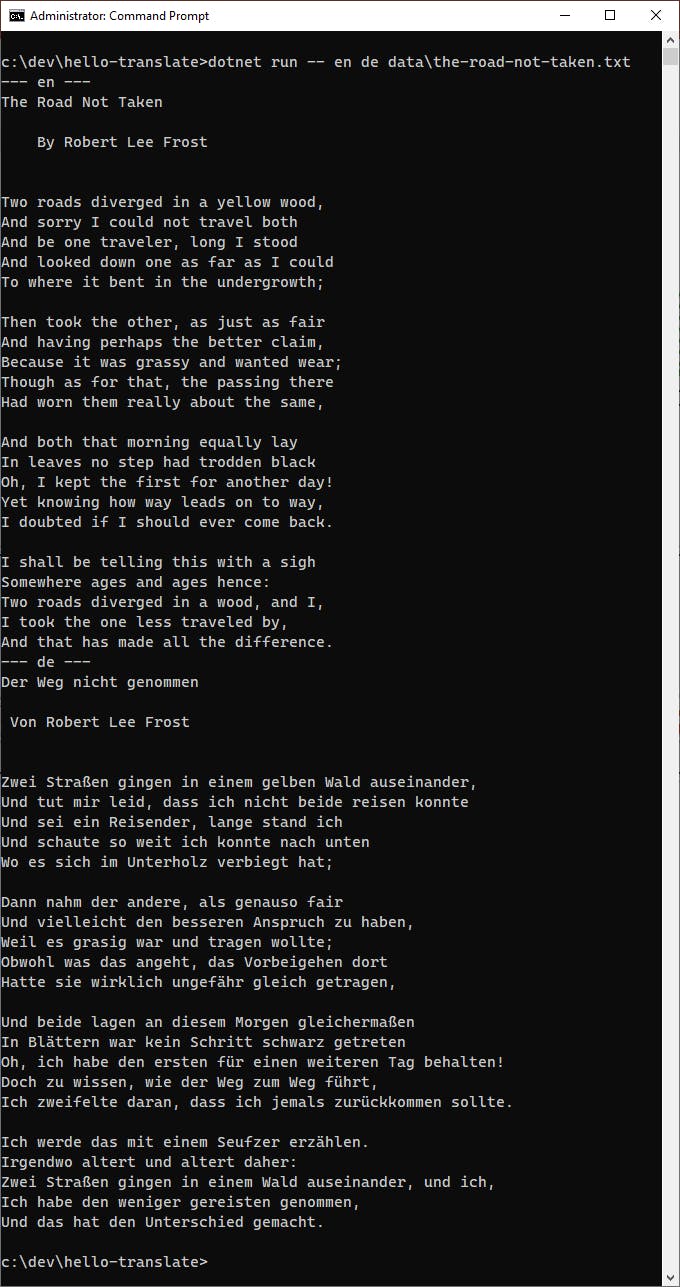
Run the command again, this time specifying source language code, target language code, and text filename. The translation is displayed. Here is how our service review from Step 2 looks, translated to German:

Try some other text examples, with longer and different kinds of text. We translated this public-domain short story from English to Spanish:
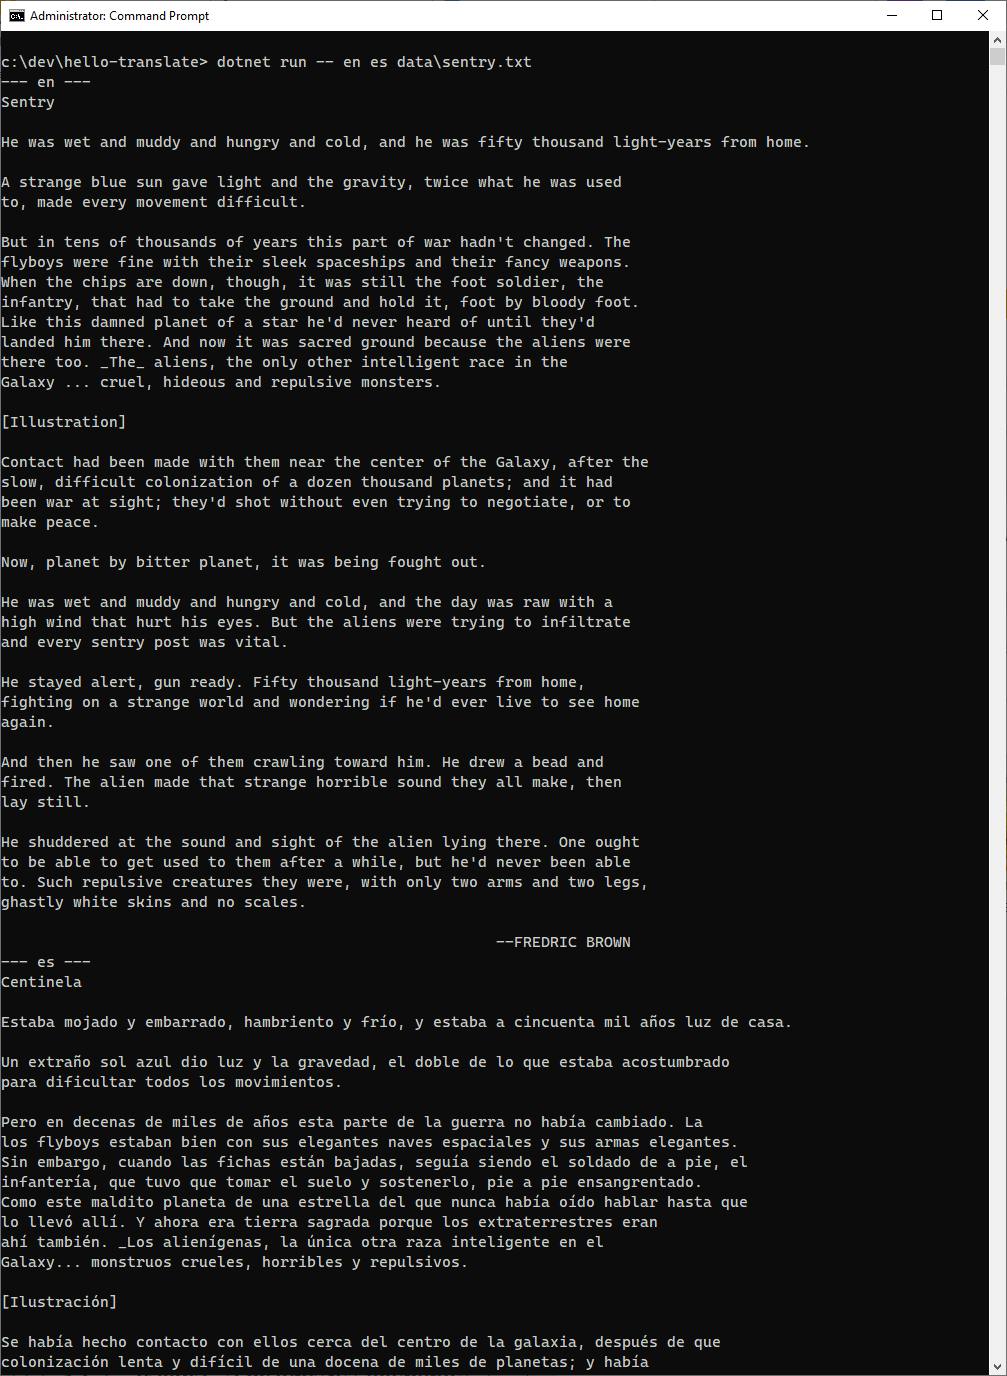
Congratulations, you've performed neural language translation in .NET code using Amazon Translate!
Step 5: Create an S3 Bucket for Batch Processing
In this step we'll create an S3 bucket for batch processing jobs with Amazon Translate. You would find this mode appropriate when you have many things to translate, or want to translate a batch of document files, such as Microsoft Office documents.
In the AWS console, navigate to Amazon S3. You can enter s3 in the search bar.
Click Create bucket and create a bucket named hello-translate (if name is in use, try a variation).
View the bucket. On the Objects tab, click Create folder and create a folder named en. This will be the input folder for documents.
Click the en/ folder to see its detail. Select the Properties tab and make a note of the S3 URI for the input folder. Ours is s3://hello-translate/en.
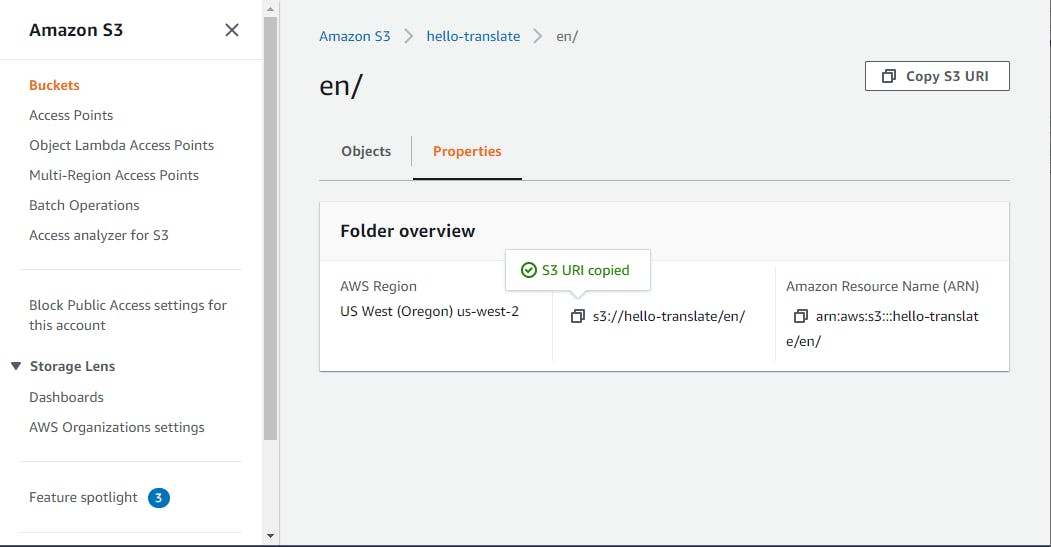
Go back up a level to the hello-translate bucket. Click Create Folder to add another folder and name it fr. This will be our output folder for translated documents.
Click the fr/ folder to see its detail. Select the Properties tab and record the S3 URI for the output folder. Ours is s3://hello-translate/fr.
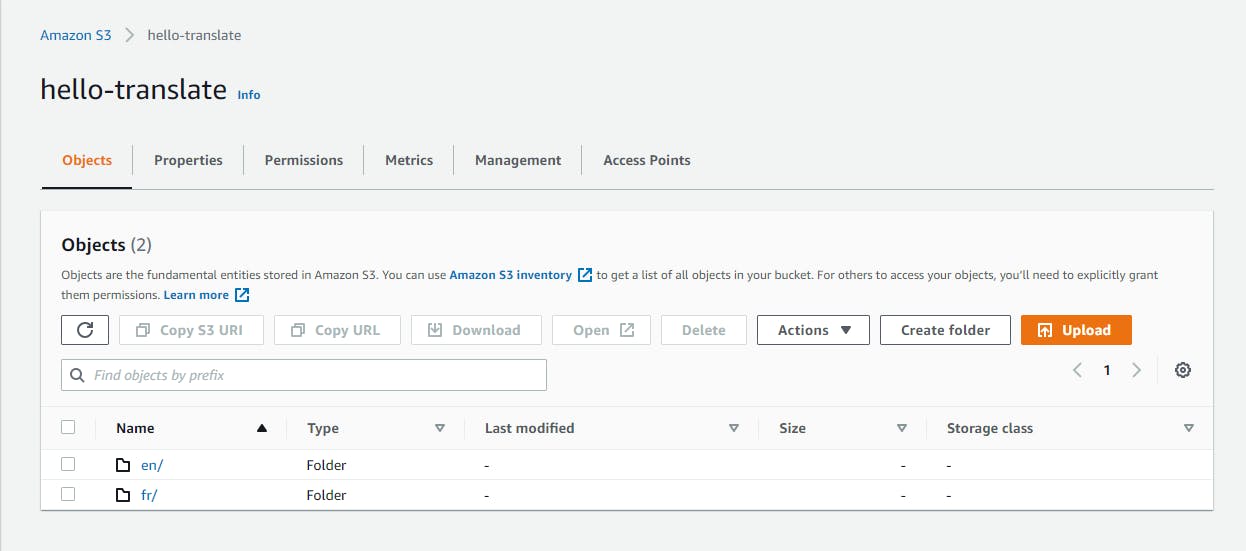
You now have an S3 bucket with an en (English) and fr (French) folder. Feel free to add additional folders now or down the road for other language codes.
Step 6: Create a Policy and Role for Data Access
Now we need to configure permissions, and this step is a bit involved. In this step you'll configure a policy, role, and trust relationship, which will allow Amazon Translate to access your S3 bucket when executing a batch processing job.
In the AWS console, navigate to Identity and Access Management. You can enter iam in the search bar.
On the left panel, click Policies.
Click Create Policy. On the Create policy page, enter/select the following:
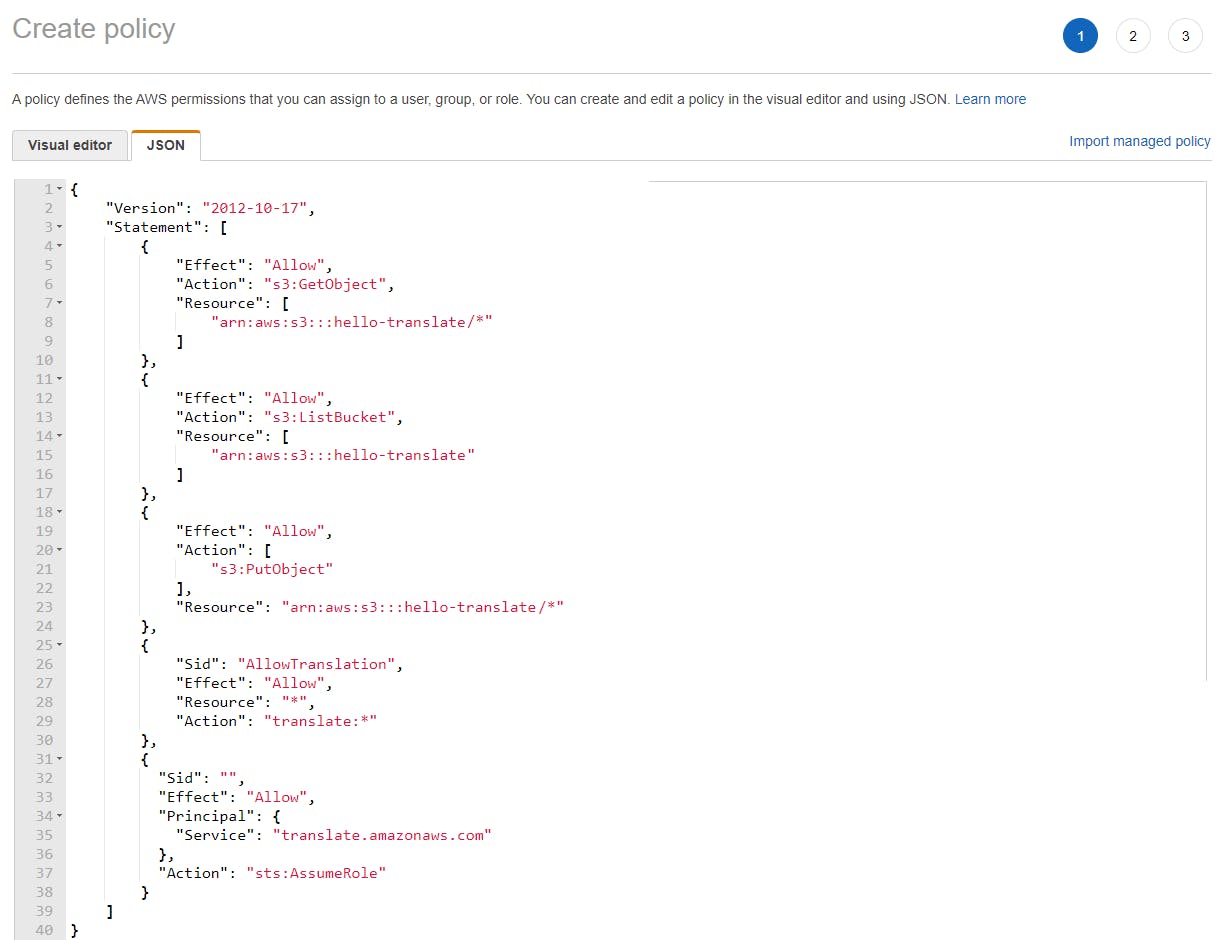
a. Select the JSON tab and replace it with the JSON at the end of this step, replacing hello-translate with the S3 bucket name you created in Step 5.
b. Click the Next: Tags and Next: Review buttons.
c. Enter policy name translate-s3.
d. click Create policy.

Once we attach it to a role, this policy will permit Amazon Translate to read your S3 bucket/objects and create objects.
On the left panel, select Roles.
Click Create role. On the Create role page, enter/select the following:
a. In the search box, enter translate-s3 and check it.
b. Click Next: Tags.
c. Select EC2. Why EC2? There is no Amazon Translate service listed on this page. EC2 is what you need to use.
d. Click Next: Permissions, Next: Tags, and Next: Review.
e. For role name, enter translate-s3.
f. Click Create role.
Select the new translate-s3 role to view its detail. Find and note the new role's Amazon Resource Name (ARN).
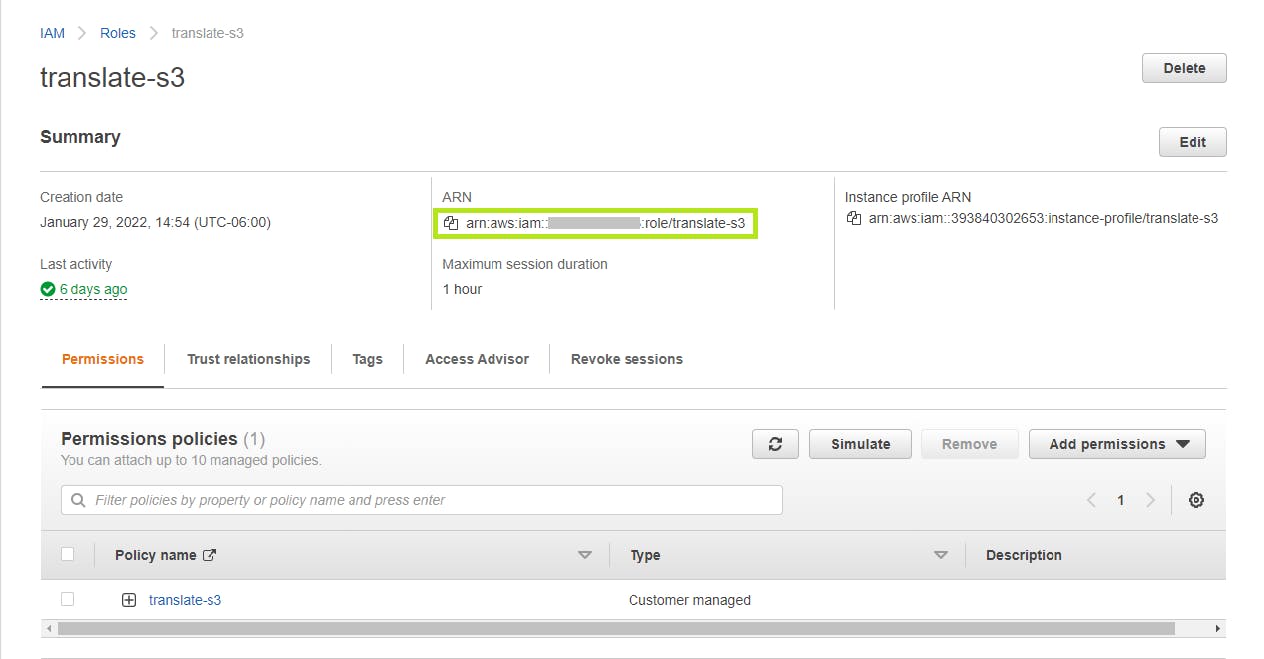
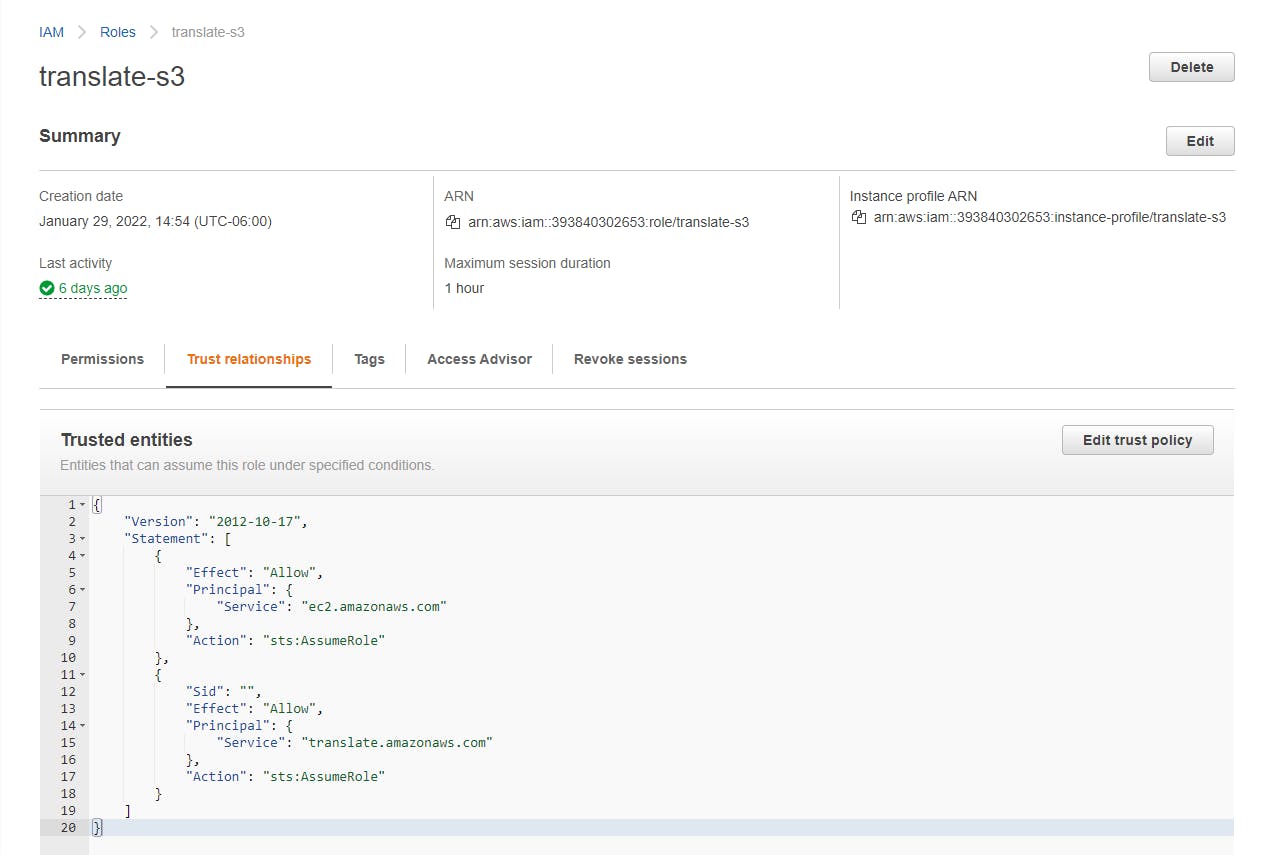
Select the Trust relationships tab and enter/select the following:
a. In the Trusted entities edit box, enter the trust relationship JSON at the end of this step. This gives the Amazon Translation service and the EC2 instances it controls permission to assume roles.
b. Click Update policy.
translate-s3 policy JSON
{
    "Version": "2012-10-17",
    "Statement": [
        {
            "Effect": "Allow",
            "Action": "s3:GetObject",
            "Resource": [
                "arn:aws:s3:::hello-translate/*"
            ]
        },
        {
            "Effect": "Allow",
            "Action": "s3:ListBucket",
            "Resource": [
                "arn:aws:s3:::hello-translate"
            ]
        },
        {
            "Effect": "Allow",
            "Action": [
                "s3:PutObject"
            ],
            "Resource": "arn:aws:s3:::hello-translate/*"
        },
        {
            "Sid": "AllowTranslation",
            "Effect": "Allow",
            "Resource": "*",
            "Action": "translate:*"
        }
    ]
}
Trust relationship JSON
{
    "Version": "2012-10-17",
    "Statement": [
        {
            "Effect": "Allow",
            "Principal": {
                "Service": "ec2.amazonaws.com"
            },
            "Action": "sts:AssumeRole"
        },
        {
            "Sid": "",
            "Effect": "Allow",
            "Principal": {
                "Service": "translate.amazonaws.com"
            },
            "Action": "sts:AssumeRole"
        }
    ]
}
Step 7: Run the Program and Test Batch Translation Processing
In this step you'll update and run the .NET program, and test batch translation processing of Microsoft Word documents. Expect that batch jobs may take some time. Batch jobs are long-running operations whose execution time is affected by the size of the dataset and resource availability.
In Visual Studio, open TranslateHelper.cs in the editor and set the constant DataAccessRoleArn to the ARN you just recorded in Step 6.
Save your changes and build the program.
Next we need some source documents for the translation. Find or create one or more Microsoft Word documents containing English text, saved as .docx files. We're using one document, a poem by Robert Frost in the public domain, the Road Not Taken, in file frost.docx.

In the AWS console, navigate to Amazon S3 > your bucket > en folder.
Upload your Microsoft Word test document(s) to the en folder.
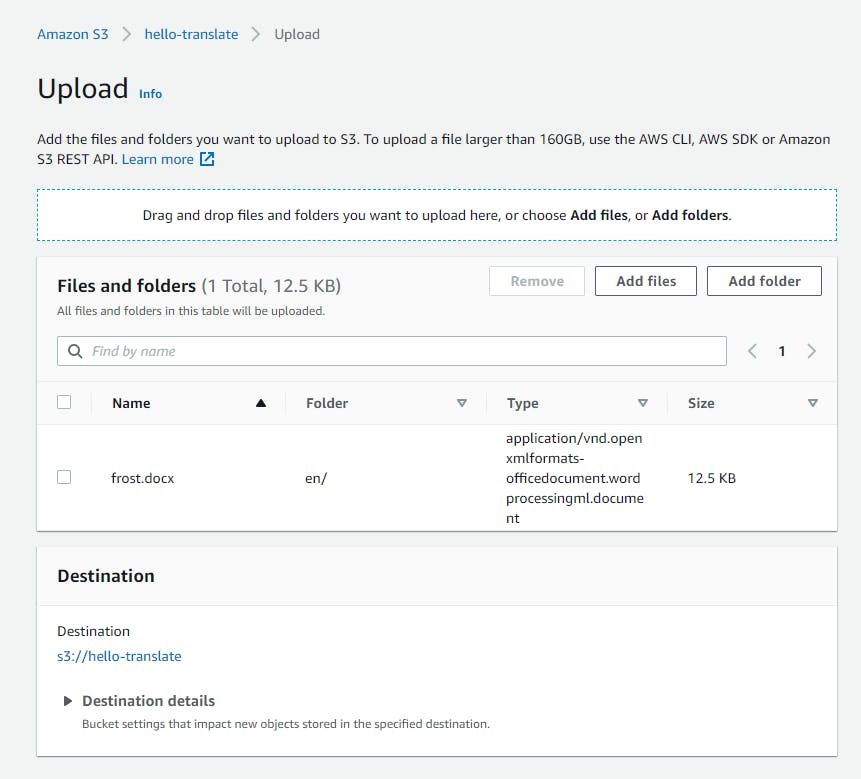
Open a command/terminal window and CD to the project folder.
Run your program with dotnet run -- and these 4 command line arguments: 1) source language en, 2) target language fr, 3) the URI of your S3 bucket (without the folder part), and 4) the document type docx.
dotnet run -- en fr s3://hello-translate docxNow the program runs. The output should confirm an Amazon Translate job has been kicked off and show its job Id. The job will run asynchronously, and we'll have to check on it (manually in the AWS console or with code) to know when it's finished.

If you receive a permissions error, check that you full performed Steps 5 and 6, or consult this Troubleshooting Amazon Translate Identity and Access page.
In the AWS console, navigate to Amazon Translate and select Batch translation from the left panel. You should see your batch job listed, with a status of In progress.

Periodically return to check the status of your batch job. Wait until its status is Completed.
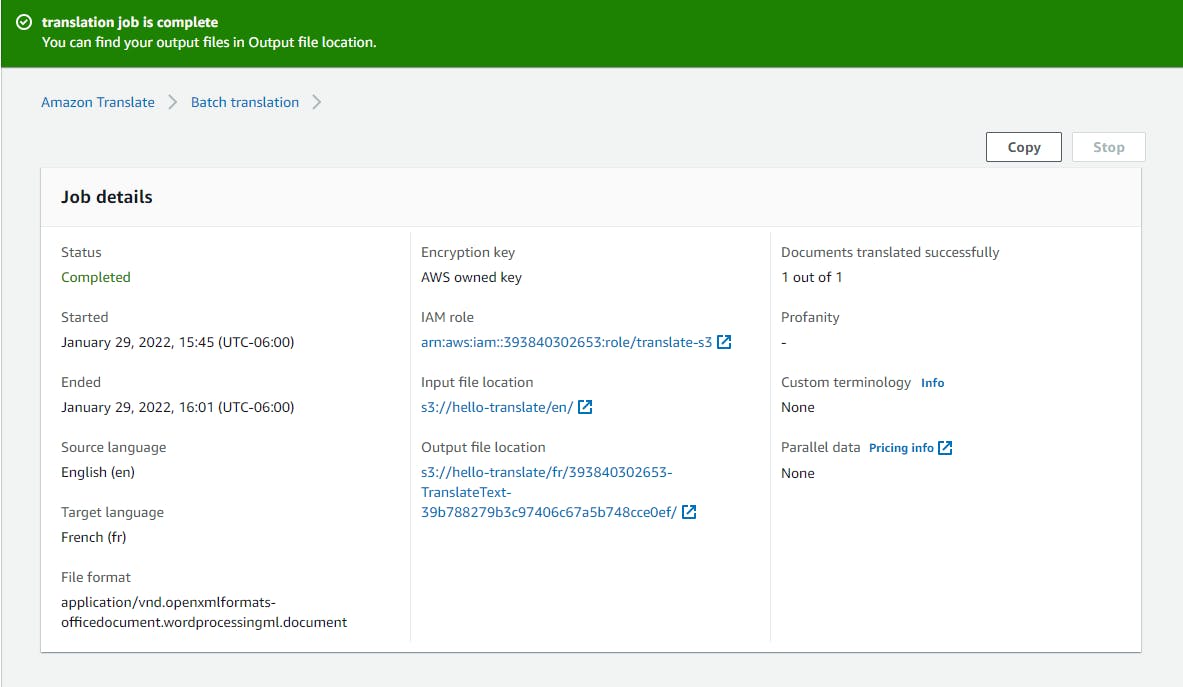
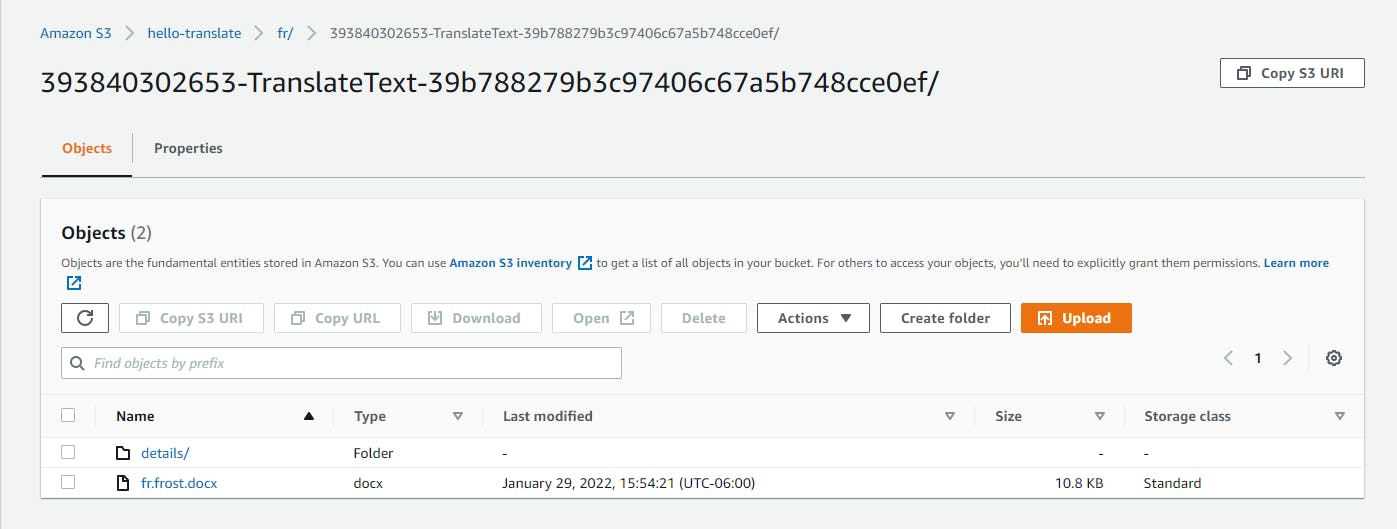
In the AWS console, navigate to Amazon S3 > your bucket > the fr folder. Within a sub-folder, you should see copies of your documents, with their names prefixed by "fr.". There should be the same number of output documents as there were input documents.
There's also a folder named details, which contains a job summary including an error count.
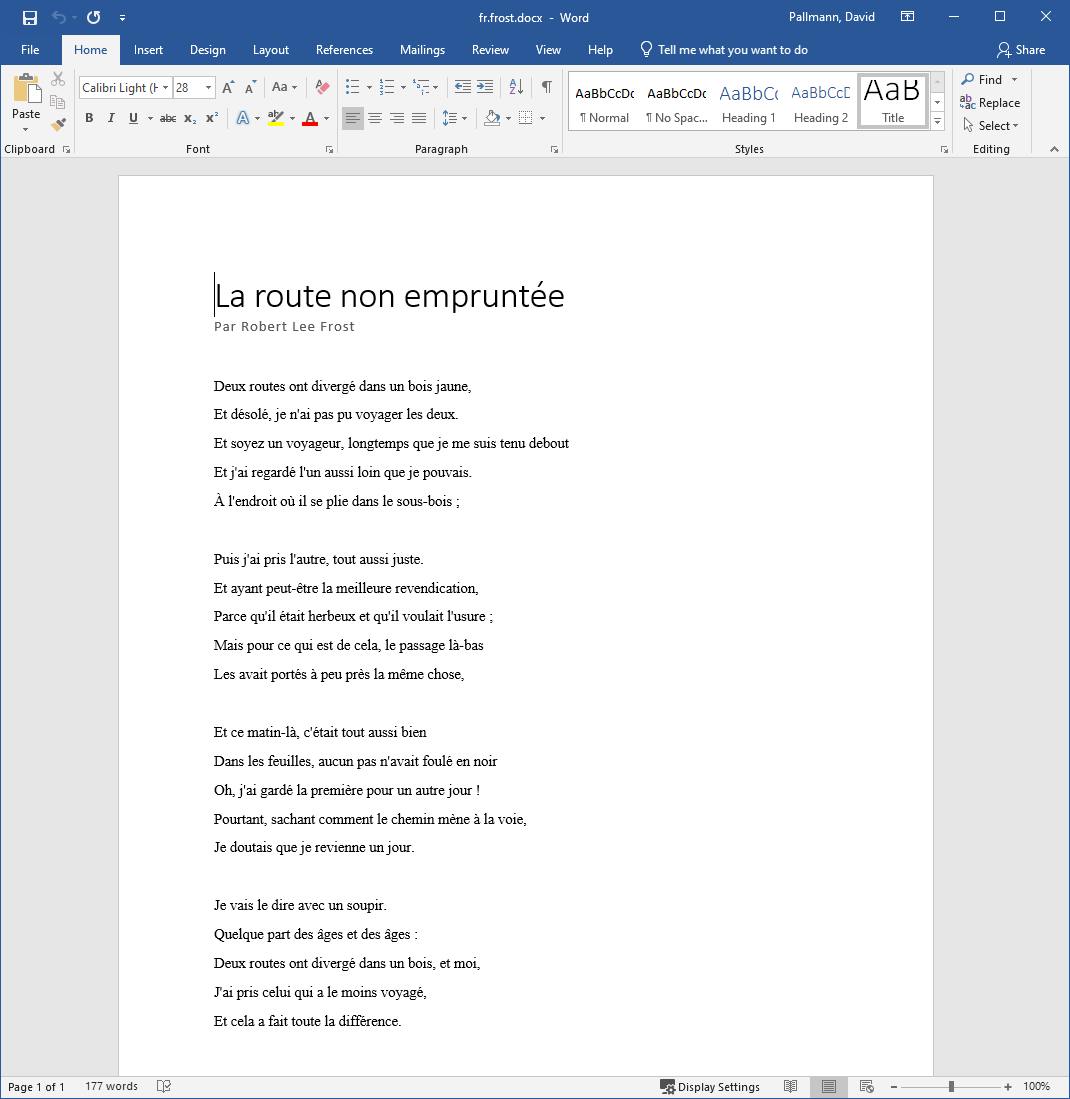
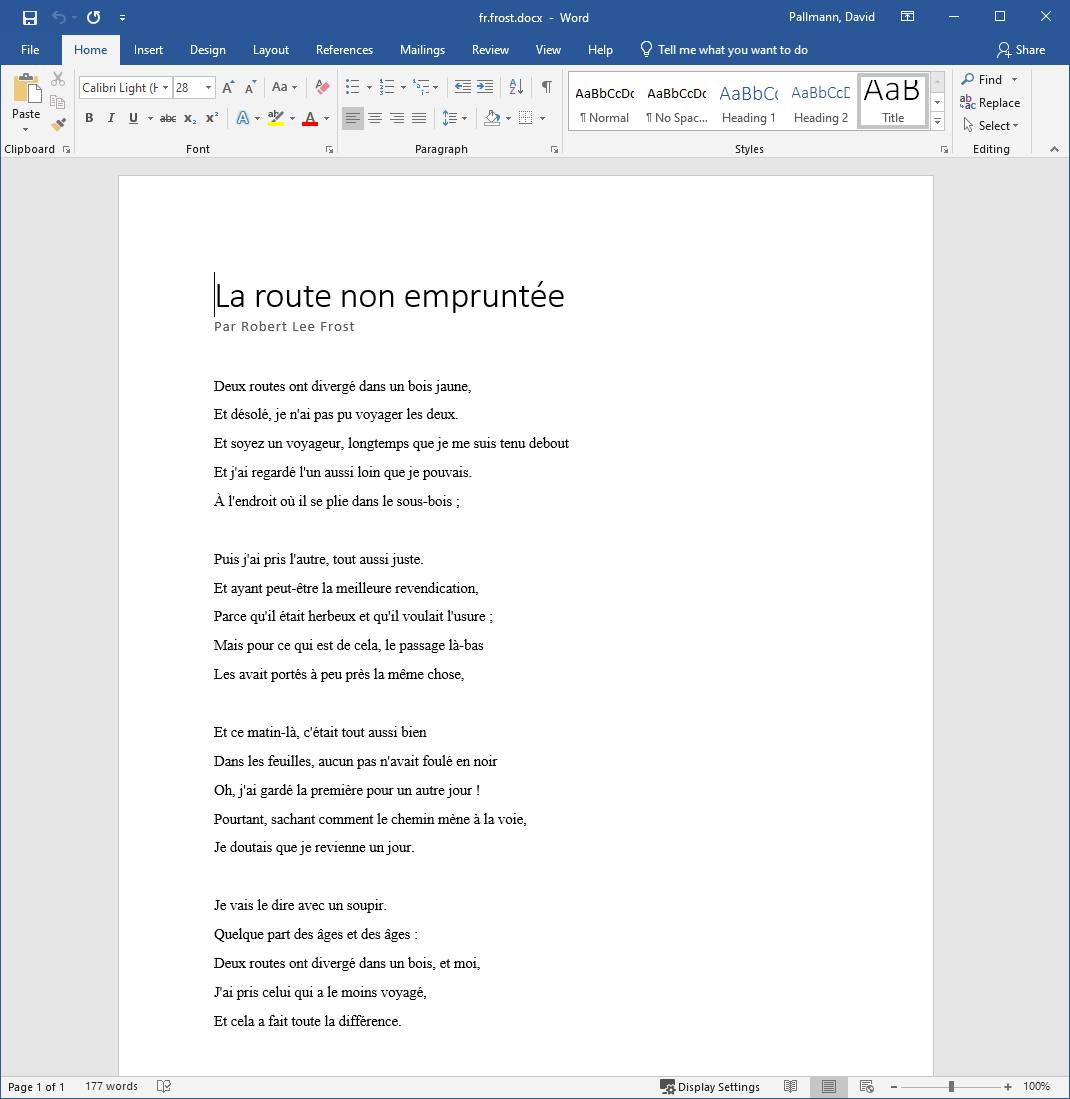
{"sourceLanguageCode":"en","targetLanguageCode":"fr","charactersTranslated":"1038","documentCountWithCustomerError":"0","documentCountWithServerError":"0","inputDataPrefix":"s3://hello-translate/en/","outputDataPrefix":"s3://hello-translate/fr/xxxxxxxxxx-TranslateText-xxxxxxxxxxx/","details":[{"sourceFile":"frost.docx","targetFile":"fr.frost.docx","auxiliaryData":{}}]}Review your translated document(s) by downloading them from the S3 console and opening them in Microsoft Word. Here's what our French translation of The Road Not Taken looks like:
Try other batch jobs and languages. Remember to create the S3 bucket folder for your source and target languages, delete previous documents, and upload new source documents.
Step 8: Shut it Down
When you're completely finished with hello-translate, follow this step to delete AWS resources. You don't want to be charged for things you're no longer using.
In the AWS console, navigate to Amazon Translate and select Batch translation. If you have any jobs still in progress that you wish to interrupt, select each one and click the Stop button at top right. Wait for confirmation that the jobs are stopped.
In the AWS console, navigate to Amazon S3. Delete the objects in your S3 bucket, and then the bucket itself.
Where to Go From Here
Can we talk? Your applications can leverage Amazon Translate for high-quality, affordable language translation. In this tutorial, you learned how Amazon Translate works. You experimented with it in the AWS console, then wrote .NET code to work with it. You translated text in real-time with the AWS SDK for .NET. You then used batch processing to translate Microsoft Word documents in S3. The code was simple.
To move forward with Translate, identify your translation needs. Do you need full automation, or automation plus human review? Investigate the features we did not cover in this tutorial: profanity masking, custom terminology, and active custom translation.
Further Reading
AWS Documentation
Amazon Translate Developer Guide
Amazon Translate Languages and Codes
Asynchronous Batch Processing with Amazon Translate
Running a Batch Translation Job
Videos
Using Amazon Translate, Amazon Polly, and Amazon Rekognition with .NET by Thorr Giddings
Blogs
Power your website with on-demand translated reviews using Amazon Translate
