
Hello, SNS!
Getting Started with .NET on AWS: Amazon Simple Notification Service


Table of contents
- This episode: Amazon SNS. In this Hello, Cloud blog series, we're covering the basics of AWS cloud services for newcomers who are .NET developers. If you love C# but are new to AWS, or to this particular service, this should give you a jumpstart.
- Amazon SNS: What is it, and why use It?
- Publish-Subscribe Messaging
- Our Hello, SNS Project
- One-time Setup
- Step 1: Set Permissions for the AWS Toolkit User
- Step 2: Create an SNS Topic
- Step 3: Create an SQS subscription
- Step 4: Create an Email Subscription
- Step 5: Create a .NET 6 Console Program for Sending and Receiving Notifications
- Step 6: Publish an SNS Notification
- Step 7: Receive Notification as an SQS Subscriber and Email Subscriber
- Step 8: Shut It Down
- Where to Go From Here
- Further Reading
This episode: Amazon SNS. In this Hello, Cloud blog series, we're covering the basics of AWS cloud services for newcomers who are .NET developers. If you love C# but are new to AWS, or to this particular service, this should give you a jumpstart.
In this post we'll introduce Amazon SNS and use it in a "Hello, Cloud" .NET program. We'll do this step-by-step, making no assumptions other than familiarity with C# and Visual Studio. We're using Visual Studio 2022 and .NET 6.
Amazon SNS: What is it, and why use It?
“The absence of a message sometimes is a presence of one.” ― Hasse Jerner
Amazon Simple Notification Service (SNS) is a messaging service for connecting applications with other applications, or with people. AWS describes SNS as "a fully managed messaging service for both application-to-application (A2A) and application-to-person (A2P) communication."
Publish-Subscribe Messaging
Many kinds of communication involve two parties, such as a telephone call or a web request-reply. What if you want to communicate something to many parties, perhaps anyone who is interested? Other forms of communication can broadcast to many parties, such as a radio station or a television channel.
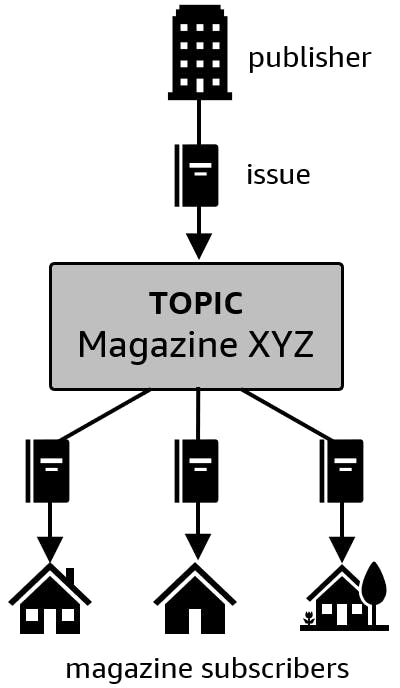
Publish-subscribe, or pub-sub, is a communication pattern for sending messages to many parties, without the sender needing to know who the recipients are. Senders of information are called publishers, receiving parties are called subscribers, and the "channel" for communication is called a topic. It's easy to understand the terminology if you think of magazines: the magazine is the topic, a new magazine issue is published, and copies go to every subscriber.
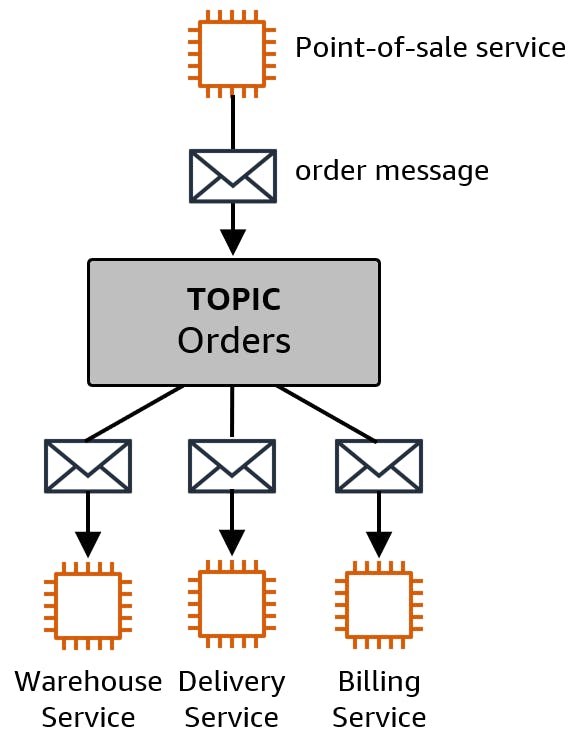
For example, you might have a point-of-sale service send a notification every time a new order is placed. A variety of other services are interested in new orders, and subscribe to this notification. The warehouse service can update its inventory. The delivery service can schedule order delivery. The billing service can bill the customer.
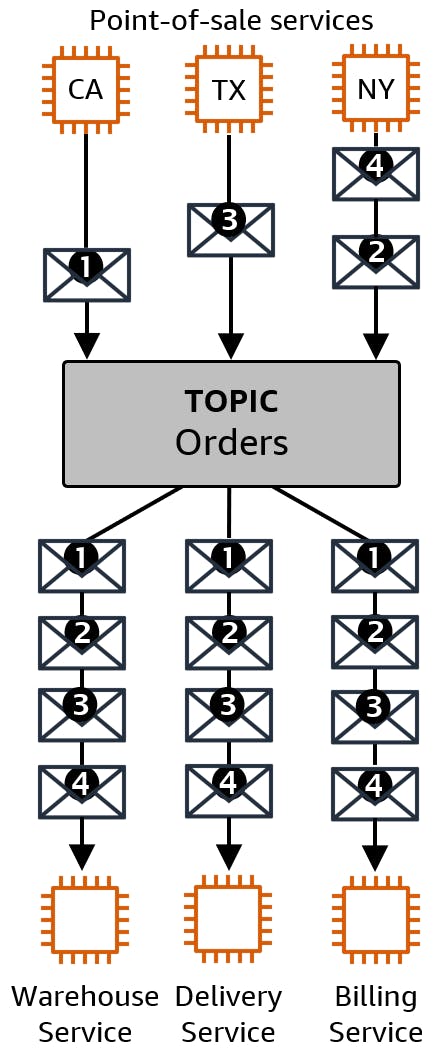
This may seem like a 1:many arrangement, but it's actually many:many. There can be multiple publishers providing data to a topic. Expanding the above example, we could have point-of-sale services across multiple locations sending order messages over the same topic. Adding more publishers isn't disruptive to subscribers, they continue to receive messages over the topic they're subscribed to. Adding more subscribers isn't disruptive either.
There are many benefits to this arrangement:
- Decoupled: publishers and subscribers don't need to know about each other's existence.
- Simple: pub-sub eliminates the need for point-to-point connections between applications. Instead, applications communicate over a common pub-sub topic.
- Flexible: adding or dropping publishers and subscribers is easy and painless, and doesn't require updates to other applications.
Amazon SNS
Amazon Simple Notification Service supports application-to-application (A2A) and application-to-person (A2P) notifications. For A2A notifications, SNS topic subscriptions can send notifications to your HTTP/S endpoints, as well as various AWS services including Amazon SQS queues, Kinesis Data Firehose, and Lambda functions. For A2P notifications, SNS topic subscriptions can send notifications to human beings via email, SMS text messages, or mobile push notifications. SNS and SQS are frequently used together, combining the flexibility of pub-sub messaging with a durable message store to hold notification messages until you're ready to process them. You can also use SNS notifications to trigger serverless functions.
There are two kinds of SNS topics, Standard and FIFO. Standard topics perform best, but don't guarantee message order and it's possible a message may be received more than once. If you use Standard topics, make sure your message processing is idempotent (able to process a message multiple times with the same result). FIFO topics guarantee strict ordering, with lower limits and throughput, at a higher cost. You'll want to study the pricing model, as rates vary for different kinds of notifications.
| Standard Topic | FIFO Topic | |
| Maximum throughput | Nearly unlimited | 300 messages/sec |
| Ordering | Best-effort | Strict ordering |
| Delivery | at least once | exactly once |
| Account limit - topics | up to 100,000 | up to 1,000 |
| Account limit - subscriptions per topic | 12.5M | 100 |
Our Hello, SNS Project
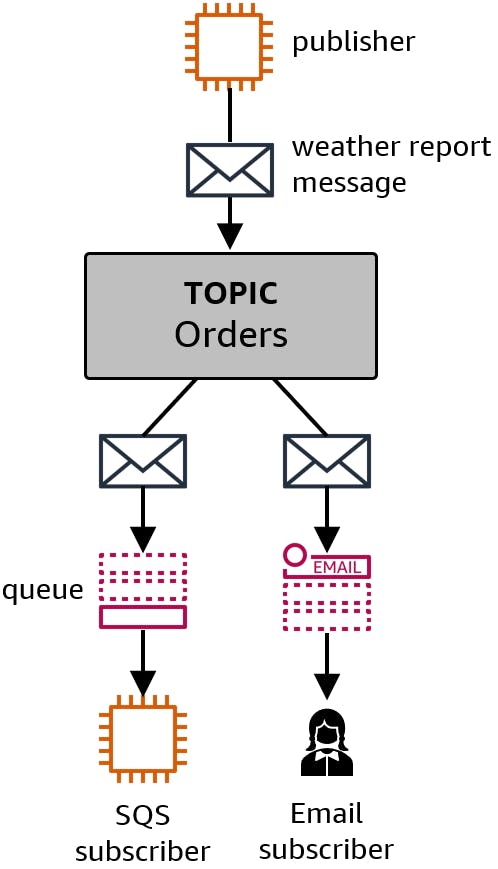
We’re going to create a topic in the AWS console and configure a subscription for an SQS queue. Then, we'll create a .NET 6 console program that can 1) send notifications (a publisher), and 2) receive notifications via SQS (a subscriber). We'll also add a second subscription for human notification by email. Each notification we publish will result in two subscriber notifications.
One-time Setup
To experiment with SNS and .NET, you will need:
- An AWS account, and an understanding of what is included in the AWS Free Tier.
- Microsoft Visual Studio 2022. If you're using an older version of Visual Studio you won't be able to use .NET 6.
- AWS Toolkit for Visual Studio. Configure the toolkit to access your AWS account and create an IAM user.
Step 1: Set Permissions for the AWS Toolkit User
In order to perform this tutorial, your AWS Toolkit User / default AWS profile needs the necessary permissions for SNS messaging operations. In this step, you'll update permissions for your AWS Toolkit for Visual Studio user.
Important: You should always follow the principle of least privilege when it comes to security. This blog series assumes you are working in your own developer account for learning purposes and not working with anything production-related. If you're using an organization-owned AWS account, you should coordinate with your security principal on IAM settings.
- Sign in to the AWS console. Select the region at top right you want to be working in. We're using US West (N. California).
- Navigate to the Identity and Access Management (IAM) area of the AWS Console. You can enter iam in the search box to find it.
- Click Users on the left panel and select the username you use with the AWS Toolkit for Visual Studio. You created this user when you installed and configured the toolkit.
- If not already assigned, add the built-in PowerUserAccess permission. The PowerUserAccess permission provides developers full access to AWS services and resources, but does not allow management of users and groups.
Your AWS Toolkit for Visual Studio user now has the permissions it needs to perform SNS and SQS operations.
Step 2: Create an SNS Topic
In this step, you'll create an SNS topic.
- In the AWS console, navigate to Simple Notification Service. You can enter sns in the search bar.
- Select Topics from the left panel and click the Create topic button.
On the Create topic page, enter/select the following:
a. Type: Standard
b. Name: weather
c. Display name: weather reports
Leave the other settings defaulted but take note of what you can control.
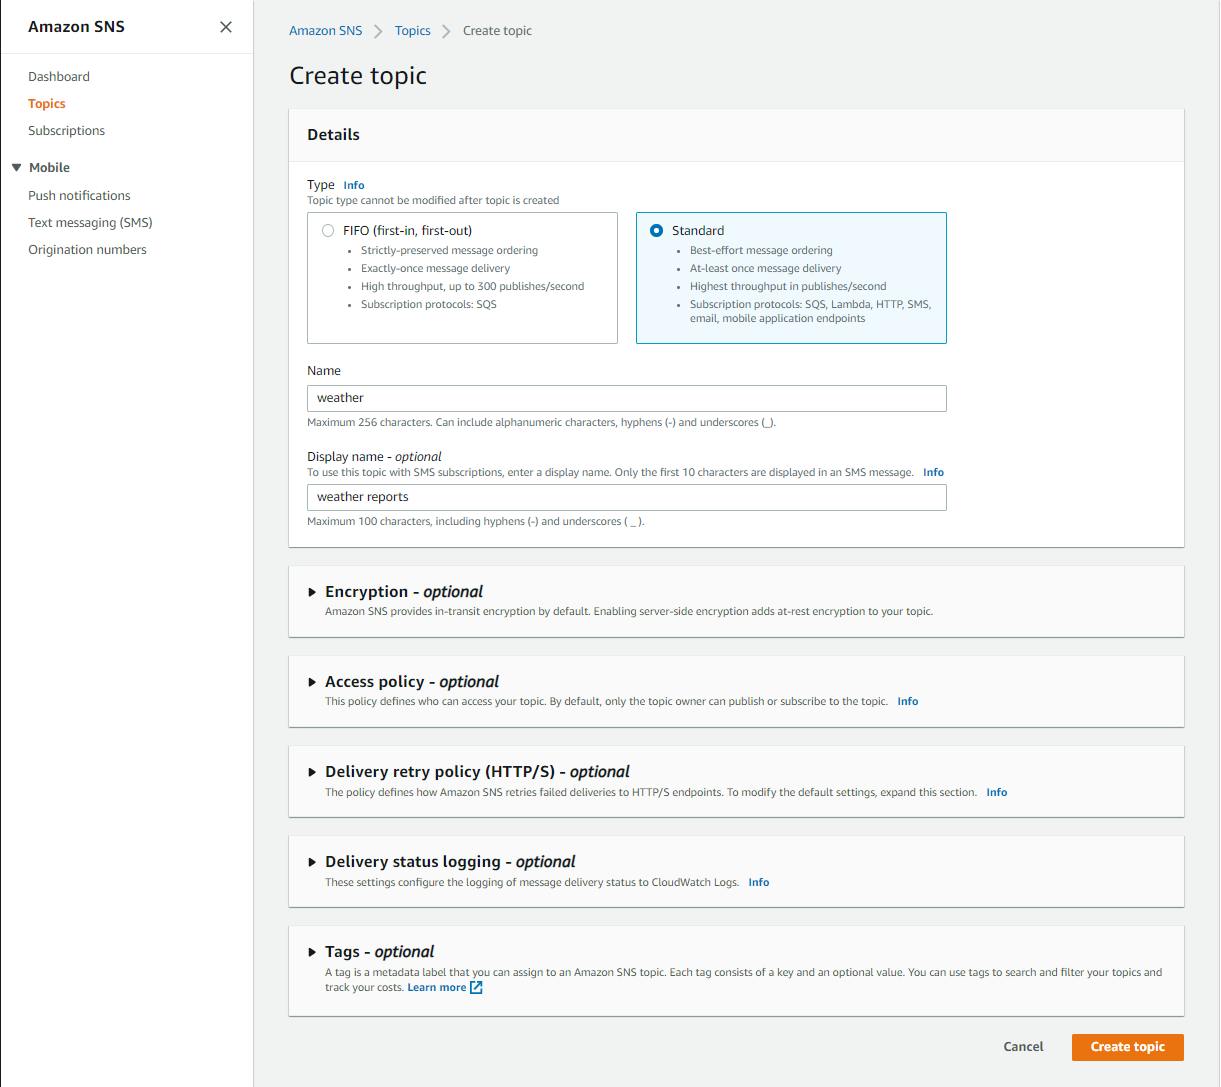
Click the Create topic button at the bottom of the page, and wait for a confirmation message that the topic has been created.
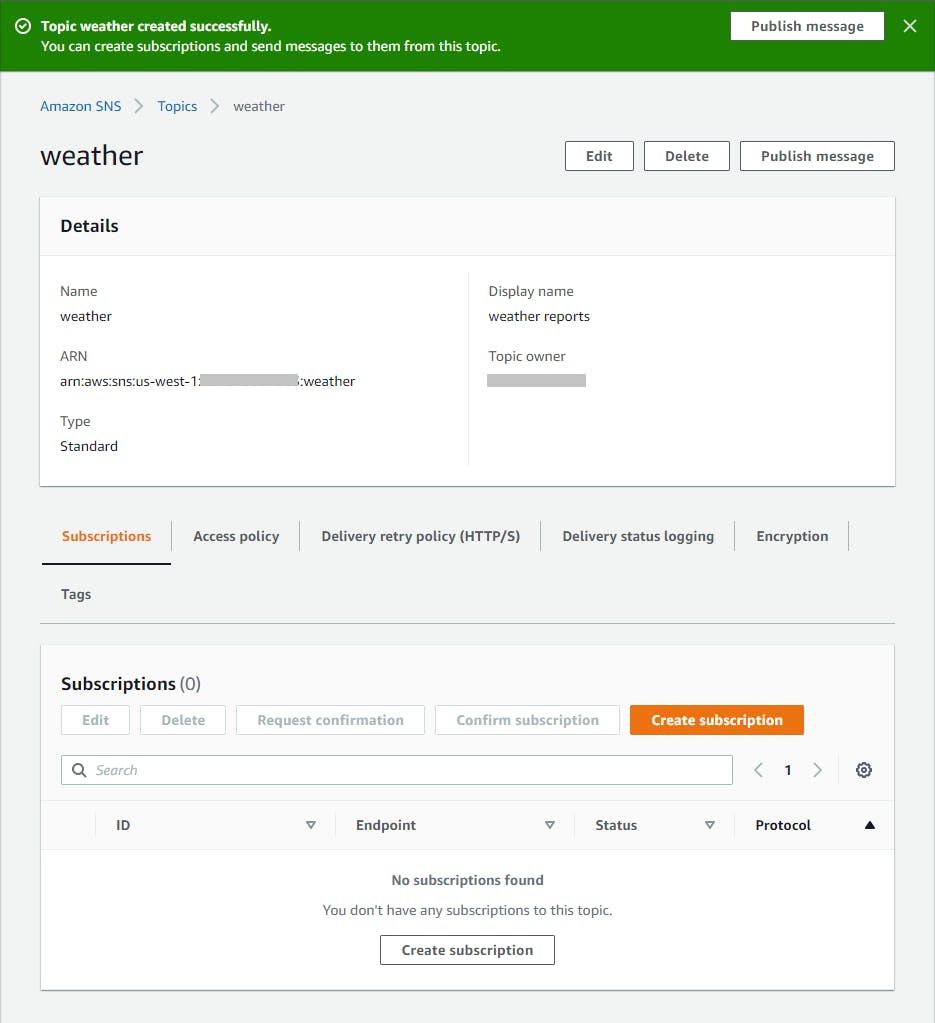
Record the topic ARN, which our .NET program will need.
Step 3: Create an SQS subscription
Now we'll create an SQS queue and subscribe it to the weather topic.
- In the AWS console, navigate to Simple Queue Service. You can enter sqs in the search bar.
- Select Queues from the left panel and click the Create queue button.
On the Create queue page, enter/select the following:
a. Type: Standard
b. Name: weather
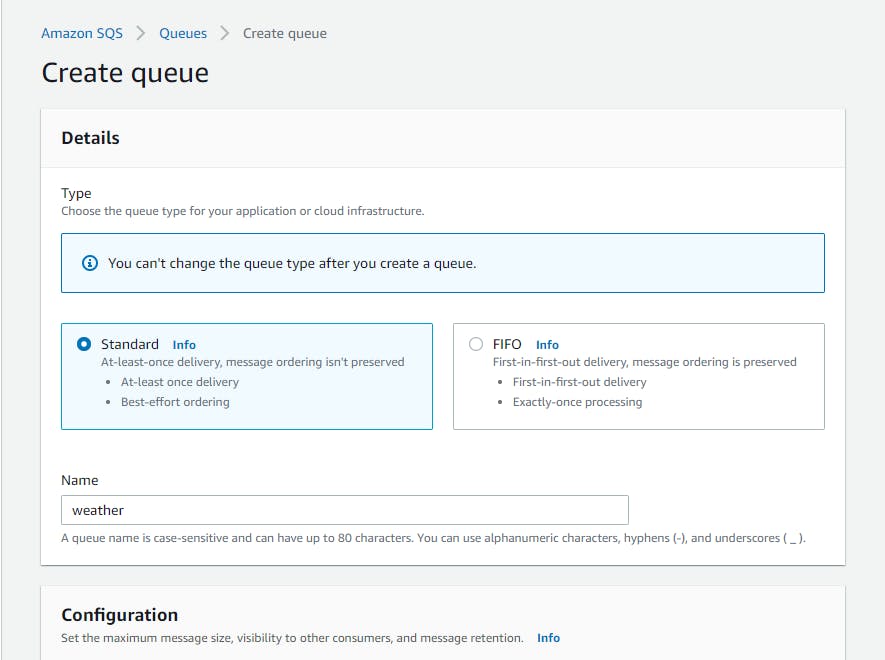
Click the Create queue button at the bottom of the page, and wait for a confirmation message that the queue has been created.
We need to give the SNS topic permission to send messages to the SQS queue. On the queue detail page, navigate to the Access policy tab.
In the Access policy (Permissions) panel, click Edit, and add the statement below to the policy, using your topic ARN you recorded in Step 2 #5. Then click Save.
,{
   "Sid": "allowSnsSqsWeather",
   "Effect": "Allow",
   "Principal": "*",
   "Action": "sqs:SendMessage",
   "Resource": "*",
   "Condition": {
     "ArnEquals": {
       "aws:SourceArn": "arn:aws:sns:[region]:[account-number]:weather"
     }
   }
 }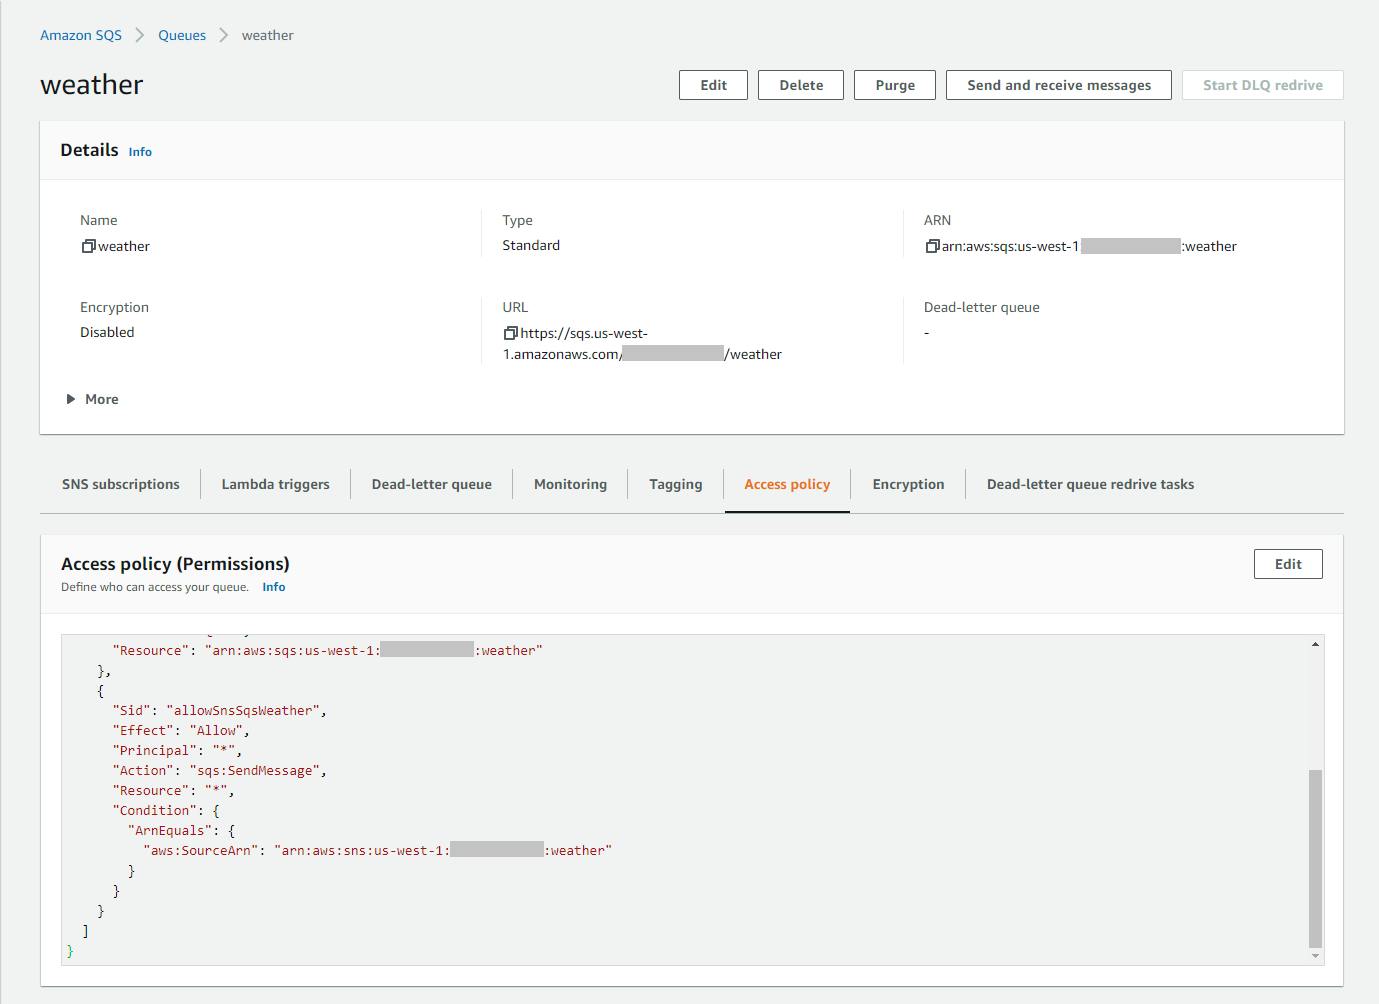
Now we'll add the subscription. Navigate back to SNS > Topics.
Click on the weather topic to see its detail, then click Create subscription.
On the Create subscription page, enter/select the following:
a. Protocol: sqs
b. Endpoint: arn:aws:sqs:[region]:[account]weather
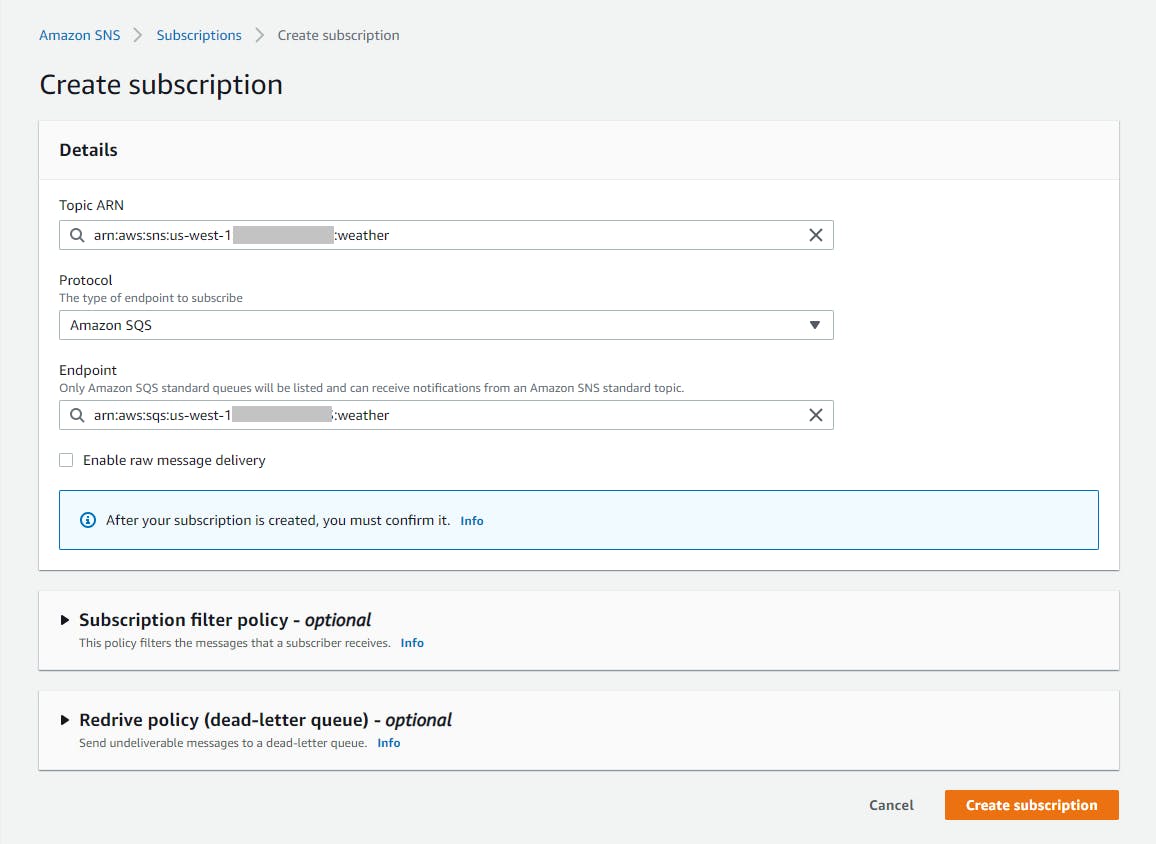
Click Create subscription and wait for a confirmation message that the subscription has been created.
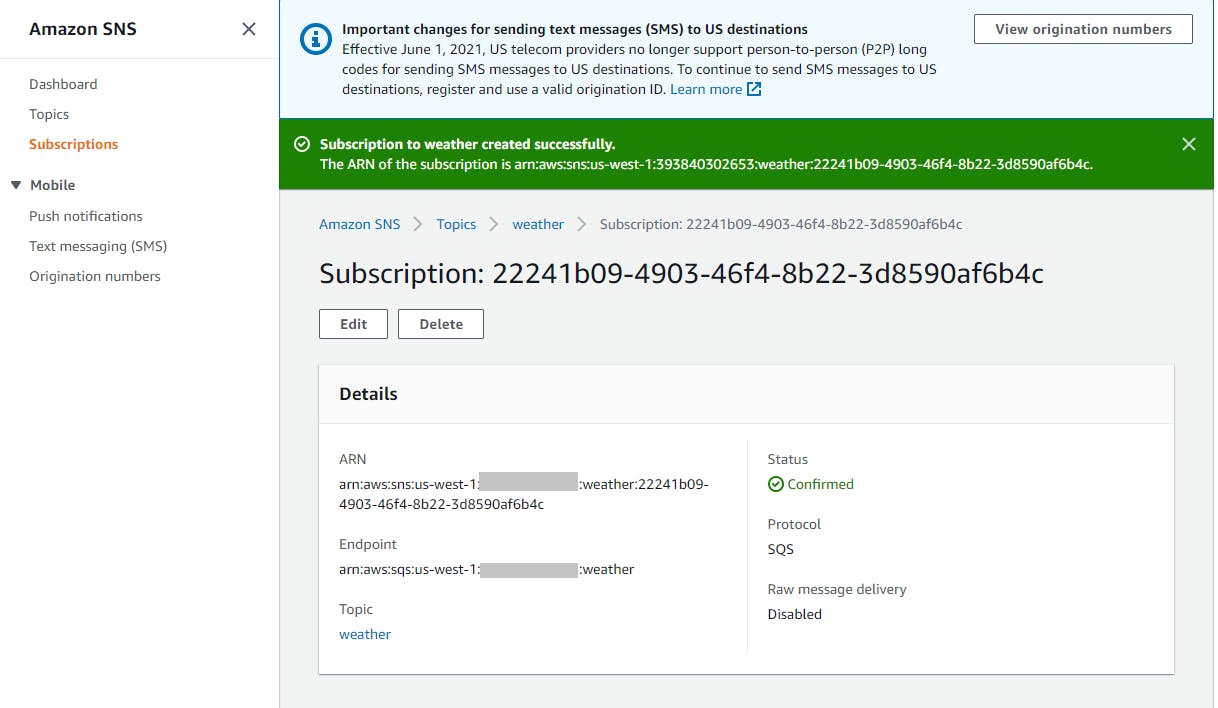
You now have an SQS queue named weather subscribed to the SNS topic weather.
Step 4: Create an Email Subscription
In this step, you'll add a second subscription, this one for an email address.
In the AWS console, navigate back to SNS > Subscriptions > weather.
Click the Create subscription button at top right.
On the Create subscription dialog, enter/select the following:
a. Topic ARN: select arn:aws:sns:[region][account]:weather
b. Protocol: select Email
c. Endpoint: enter your email address
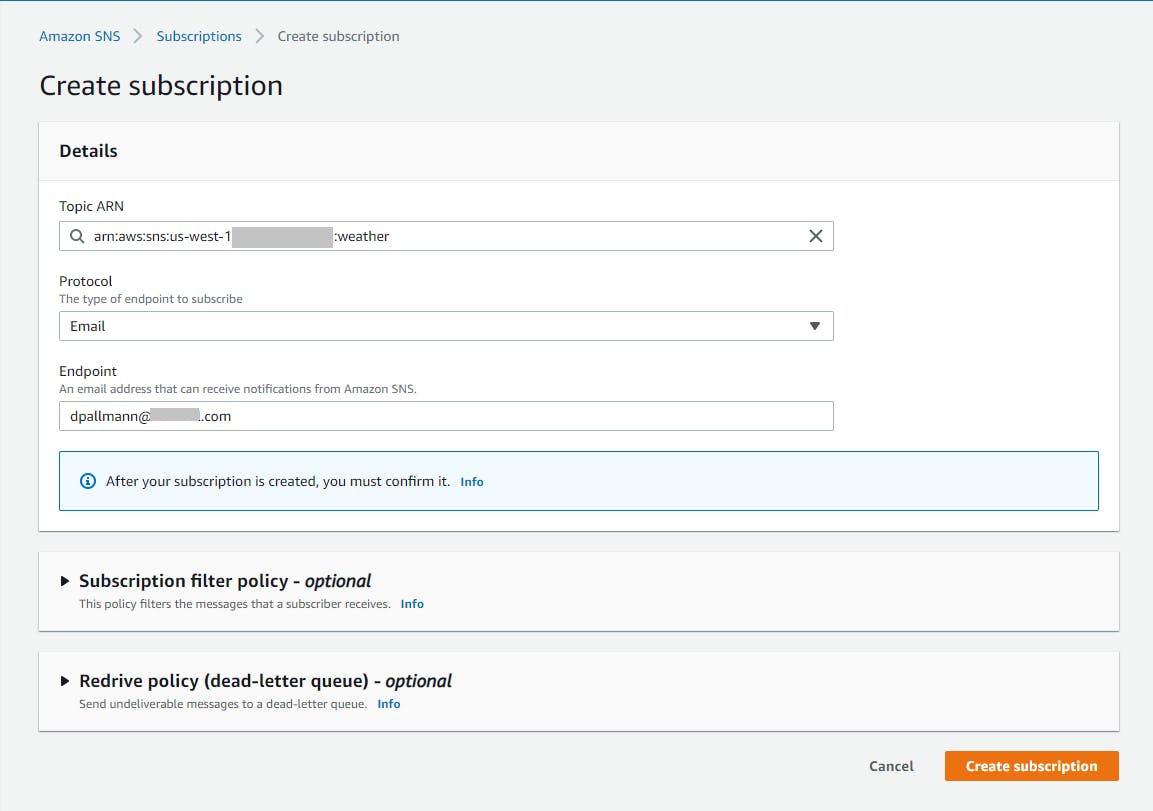
Click Create subscription and wait for a confirmation message that the subscription has been created. Notice that the status is Pending confirmation. Some subscriptions require confirmation.
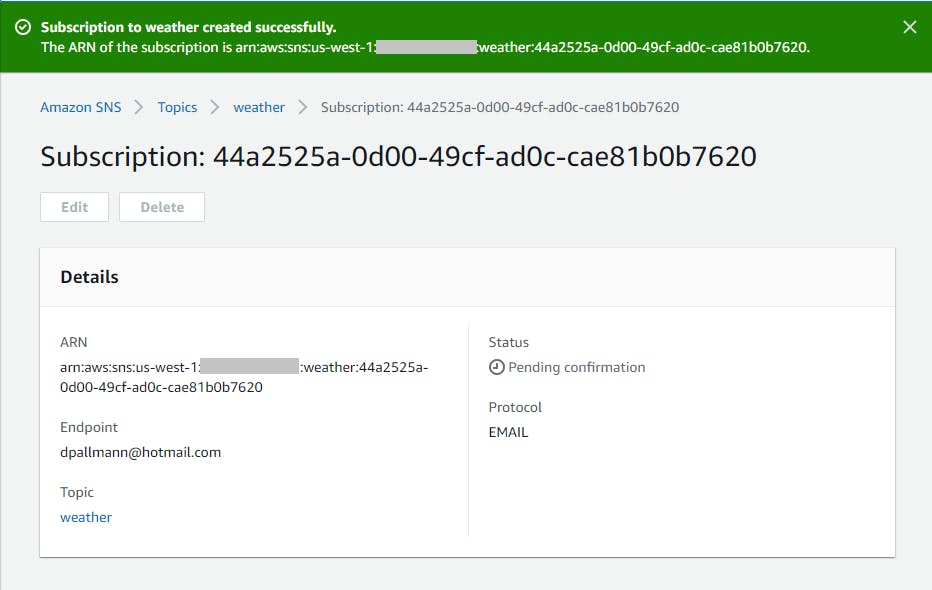
In your email client, look for the message requesting confirmation of the subscription. Open the message.
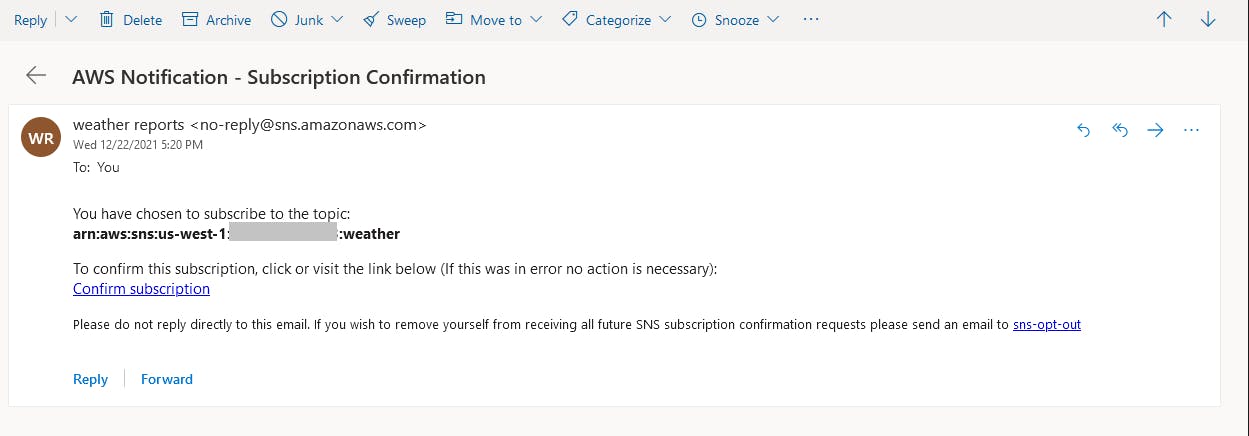
Click the Confirm subscription link. You go to a page with a Subscription confirmed message.

Back in the AWS console, refresh the email subscription page. The status should now show Confirmed.

You now have a second subscription to the weather topic for email notifications.
Step 5: Create a .NET 6 Console Program for Sending and Receiving Notifications
In this step, we'll create a .NET console program that can act as a publisher or an SQS subscriber.
Open a command/terminal window and CD to your development root folder.
Enter the dotnet new console command below to create a new .NET 6 console program named hello-sns.
dotnet new console -n hello-sns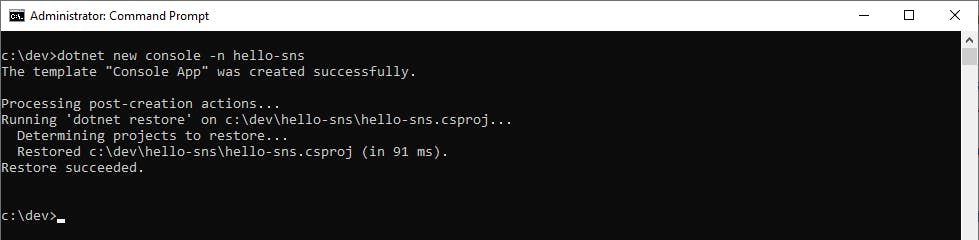
Launch Visual Studio and open the hello-sns project.
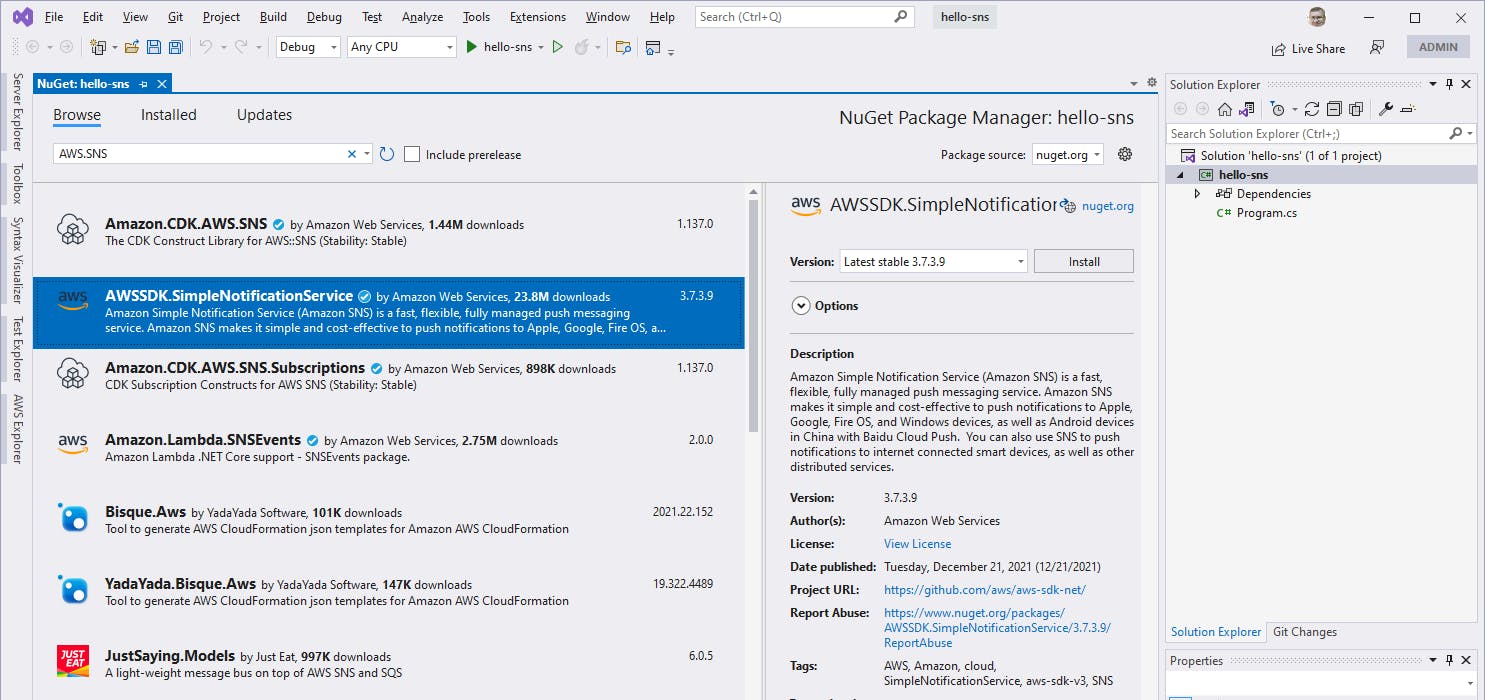
In Solution Explorer, right-click the hello-sns project and select Manage NuGet Packages....
Find, select, and install these NuGet packages:
a. AWSSDK.SimpleNotificationService
b. AWSSDK.SQS
Open Program.cs in the code editor, and replace it with the code below at the end of this step. Replace [account] and [region] with your AWS account number and region. Save your changes and build the project.
This code looks for a command line action of "publisher" or "subscriber". The Publisher() method uses an AmazonSimpleNotificationServiceClient client, invoking the PublishAsync method to publish a message on an SNS topic. The Subscriber() method uses an AmazonSQSClient client to receive SQS messages with ReceiveMessageAsync, then delete them with DeleleMessageAsync.
Program.cs
using Amazon;
using Amazon.SimpleNotificationService;
using Amazon.SimpleNotificationService.Model;
using Amazon.SQS;
using Amazon.SQS.Model;

namespace helloSNS
{
    class Program
    {
        const string TopicARN = "arn:aws:sns:[region]:[account]:weather";
        static RegionEndpoint Region = Amazon.RegionEndpoint.[region];

        static async Task Main(string[] args)
        {
            var action = args.Length == 0 ? string.Empty : args[0];

            switch (action)
            {
                case "publisher":
                    await Publisher();
                    break;
                case "subscriber":
                    await Subscriber();
                    break;
                default:
                    Console.WriteLine("Usage: specify action on command line - dotnet run -- <action> (publisher or subscriber)");
                    break;
            }
        }

        static async Task Publisher()
        {
            Random rand = new Random();
            var city = (new string[] { "Seattle", "San Francisco", "Dallas", "Denver", "Boston", "New York", "Miami" })[rand.Next(7)];
            var temp = rand.Next(100) + 20;

            string message = $"{DateTime.Now.ToShortTimeString()} {city} {temp} degrees F";

            var notificationClient = new AmazonSimpleNotificationServiceClient(region: Region);

            var request = new PublishRequest
            {
                Message = message,
                TopicArn = TopicARN
            };

            try
            {
                Console.WriteLine("Publishing...");
                var response = await notificationClient.PublishAsync(request);

                if (response.HttpStatusCode == System.Net.HttpStatusCode.OK)
                {
                    Console.WriteLine("Message sent to topic:");
                    Console.WriteLine(message);
                }
                else
                {
                    Console.WriteLine($"HTTP status {response.HttpStatusCode}");
                }
            }
            catch (Exception ex)
            {
                Console.WriteLine("Exception in publish action:");
                Console.WriteLine(ex.Message);
            }
        }
        static async Task Subscriber()
        {
            Console.WriteLine("Connecting to SQS");

            var client = new AmazonSQSClient(region: Region);
            var queueUrl = (await client.GetQueueUrlAsync("weather")).QueueUrl;

            Console.WriteLine("Listening for messages");

            var request = new ReceiveMessageRequest()
            {
                QueueUrl = queueUrl,
                MaxNumberOfMessages = 10,
                WaitTimeSeconds = 10
            };

            while (true)
            {
                var response = await client.ReceiveMessageAsync(request);

                if (response.HttpStatusCode == System.Net.HttpStatusCode.OK)
                {
                    var messages = response.Messages;
                    if (messages.Count > 0)
                    {
                        Console.WriteLine($"{messages.Count} messages received");
                        foreach (var msg in messages)
                        {
                            Console.WriteLine(msg.Body);
                        }

                        Console.WriteLine($"Deleting queue messages");
                        foreach (var msg in messages)
                        {
                            await client.DeleteMessageAsync(queueUrl, msg.ReceiptHandle);
                        }
                    }
                }
                else
                {
                    Console.WriteLine($"HTTP status {response.HttpStatusCode}");
                }
            }

        }

    }
}
Step 6: Publish an SNS Notification
In this step, you'll run the .NET program in the role of a publisher to send an SNS notification.
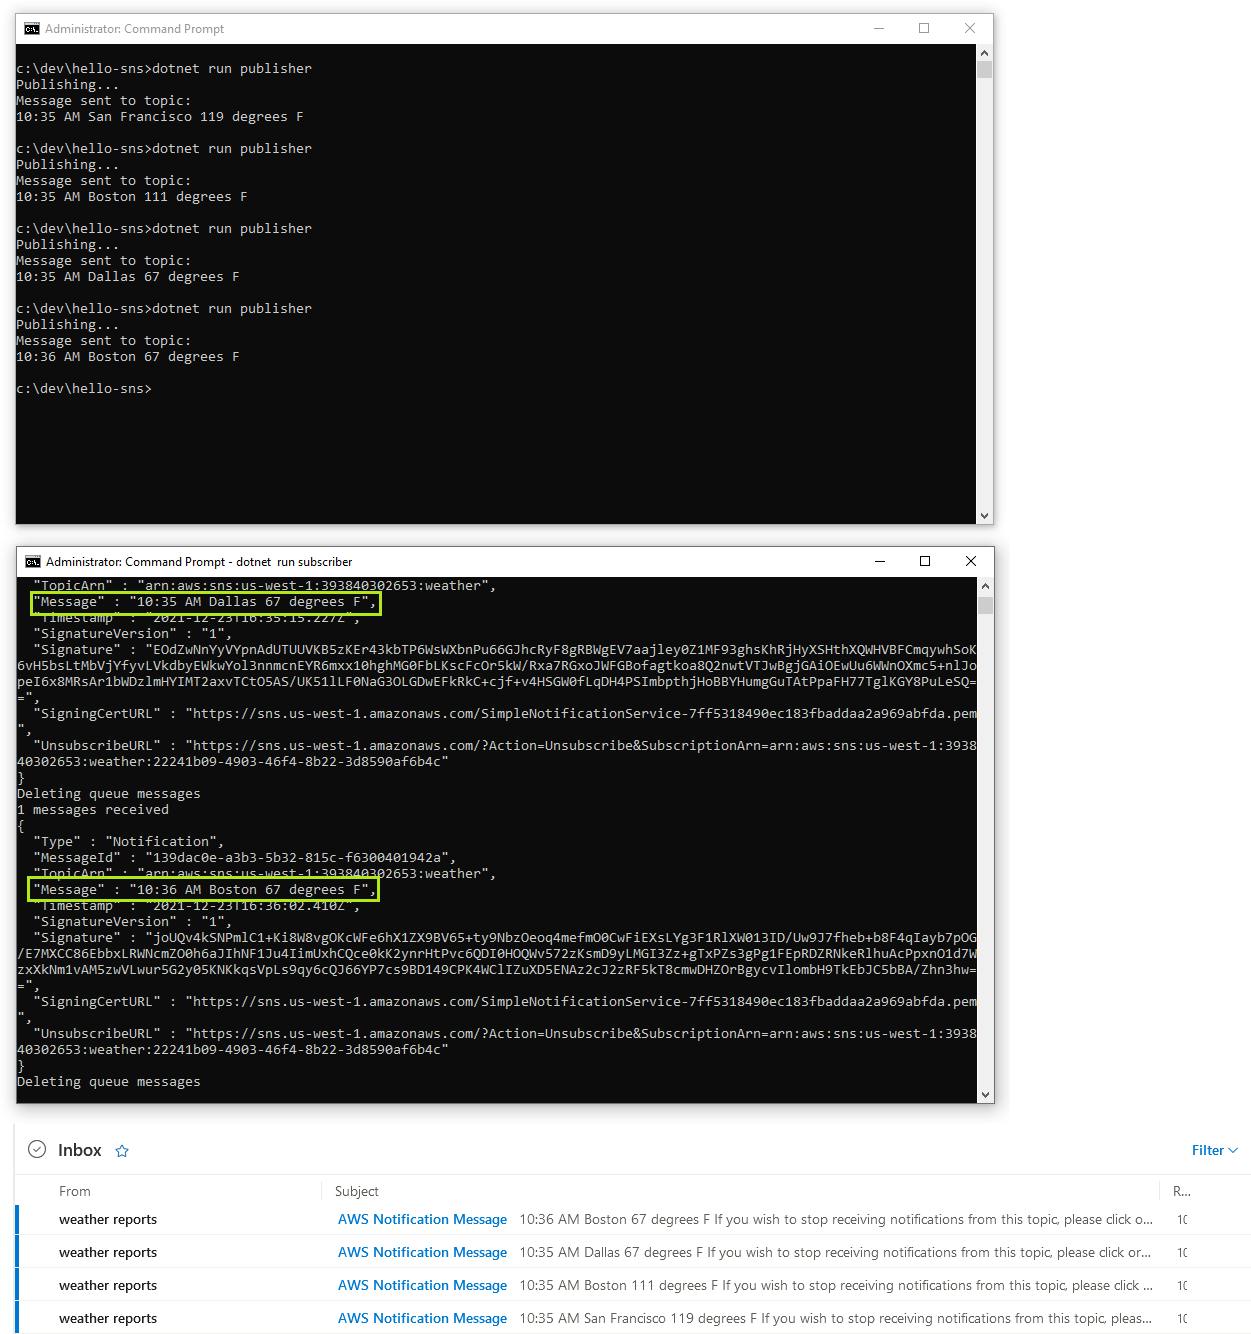
In a command/terminal window, CD to the project location and run the program with dotnet run -- publisher. A notification message is sent.

In the AWS console, navigate to or refresh the Queues page. You should now see a message waiting in the queue.

We're halfway done. We've acted as a publisher and sent a notification over an SNS topic. Next we'll see what it's like for subscribers.
Step 7: Receive Notification as an SQS Subscriber and Email Subscriber
In this step, you'll receive the notification as two different subscribers. The first subscriber is the .NET program receiving the notification message programmatically via SQS. The second subscriber is you receiving an email notification.
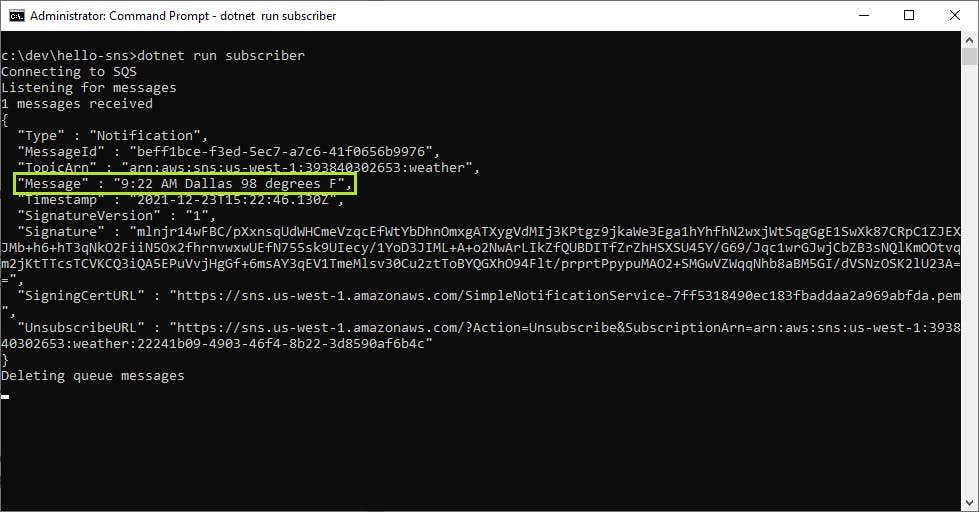
Open another command/terminal window, CD to the project location, and run the program with dotnet run -- subscriber. A JSON notification message is received with a number of fields. The Message field contains the message that was sent in the previous step.
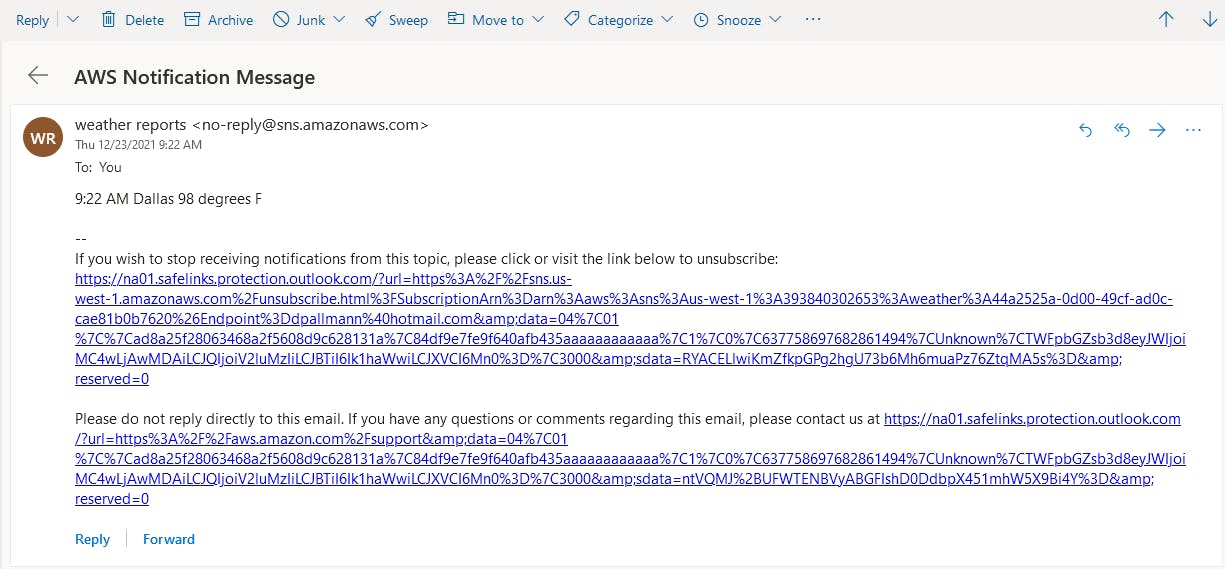
Go to your email client and find the notification email message that was sent. Open it to confirm it contains the same notification message.
Congratulations, you've published an SNS notification and received it in two different ways. Go ahead and publish several more messages, and receive them as subscribers. Note the asynchronous nature of publish-subscribe communication.
Step 8: Shut It Down
When you're done with Hello, SNS, delete your subscriptions, queue and topic in the AWS console. You don't want to accrue charges for something you aren't using.
- In the AWS Console, navigate to Amazon SNS > Subscriptions.
- Select the first subscription, click the Delete button, and confirm.
- Navigate to Amazon SQS > Queues.
- Select the weather queue, click Delete, and confirm.
- Navigate to Amazon SNS > Subscriptions.
- Select the weather topic, click Delete, and confirm.
Where to Go From Here
In this tutorial, you performed basic operations with Amazon Simple Notification Service. You created an SNS topic and two subscriptions. You published notifications to SNS with .NET code and saw each notification result in both an SQS queue message and an email message. You consumed the SQS notification in .NET code, and the email notifications in your email client.
If this is your first taste of publish-subscribe, your mind should be filled with liberating thoughts of how you can loosely couple your applications, services, and people with flexible messaging patterns. Consider what SNS and event-driven serverless applications could mean for your architecture.
There are plenty of SNS features we haven't touched upon. You can filter messages to fine-tune which messages on a topic a subscriber receives. For example, an overnight delivery service subscribed to an Orders topic might only care about orders with expedited shipping. Your notifications can cross regions and AWS accounts. You can set up message retry policies and dead letter queues for undeliverable messages. You can encrypt messages. You can batch messages in your code to reduce cost. Read about SNS features, best practices, and pricing model to understand the service well. As always, the best way to get an appreciation for a service is to use it. Experiment with SNS, and you're likely to become a fan.
Further Reading
AWS DOCUMENTATION
Amazon Simple Notification Service
Getting Started with Amazon SNS
AWS SDK for .NET: Sending Notifications using Amazon SNS
Videos
How to Integrate your .NET Application with SNS
How to add a Managed Pub/Sub Messaging Service to a .NET Application with Amazon SNS
Blogs