Table of contents
- This episode: Amazon Personalize. In this Hello, Cloud blog series, we're covering the basics of AWS cloud services for newcomers who are .NET developers. If you love C# but are new to AWS, or to this particular service, this should give you a jumpstart.
- Amazon Personalize: What is it, and why use It?
- Our Hello, Personalize Project
- One-time Setup
- Step 1: Create S3 Bucket and IAM Service Role in the AWS Console
- Step 2: Upload Training Data
- Step 3: Create a Recommender
- Step 4: Create a Solution, Event Tracker, and Campaign
- Step 5: Test the Campaign in the Console
- Step 6: Create a .NET Program to Get Recommendations
- Step 7: Test the Program
- Step 8: Shut it Down
- Where to Go From Here
- Further Reading
This episode: Amazon Personalize. In this Hello, Cloud blog series, we're covering the basics of AWS cloud services for newcomers who are .NET developers. If you love C# but are new to AWS, or to this particular service, this should give you a jumpstart.
In this post we'll introduce Amazon Personalize and use it in a "Hello, Cloud" .NET program to make personalized product recommendations. We'll do this step-by-step, making no assumptions other than familiarity with C# and Visual Studio. We're using Visual Studio 2022 and .NET 6.
Amazon Personalize: What is it, and why use It?
"I'm most passionate about personalization. I firmly believe personalized experiences with brands will most drive loyalty and relevance for customers in the future." —Katrina Lake, Founder & CEO, Stitch Fix
Personalization is something you run into more and more, and that's because it's effective. From search results to your phone's news feed to social media ads to video streaming recommendations, you've no doubt encountered personalization in action and likely benefited from it.
Amazon Personalize (hereafter "Personalize") is a service that provides personalization services for your application. As AWS describes it, "Amazon Personalize enables developers to build applications with the same machine learning (ML) technology used by Amazon.com for real-time personalized recommendations – no ML expertise required." With Personalize, you can create recommendation systems quickly, and provide quality recommendations to your users in real-time. You can use Personalize from a broad spectrumof applications including web sites, mobile/desktop apps, and email/SMS marketing systems.
Services provided by Personalize include product recommendations, product ranking, and customized direct marketing. Personalize has these notable features:
• Recommenders: get personalized recommendations for a user, such as "top picks for you" or "because you watched x".
• User segmentation: discern segments of users, such as gauging interest in different product categories or brands.
• Automated machine learning: Personalize trains ML models by inspecting your uploaded data.
• Real-time recommendations: as user intent changes, so do Personalize's recommendations.
• New user recommendations: generate recommendations for new users even when there is no interaction history.
• Similar item recommendations: offer similar items to your users.
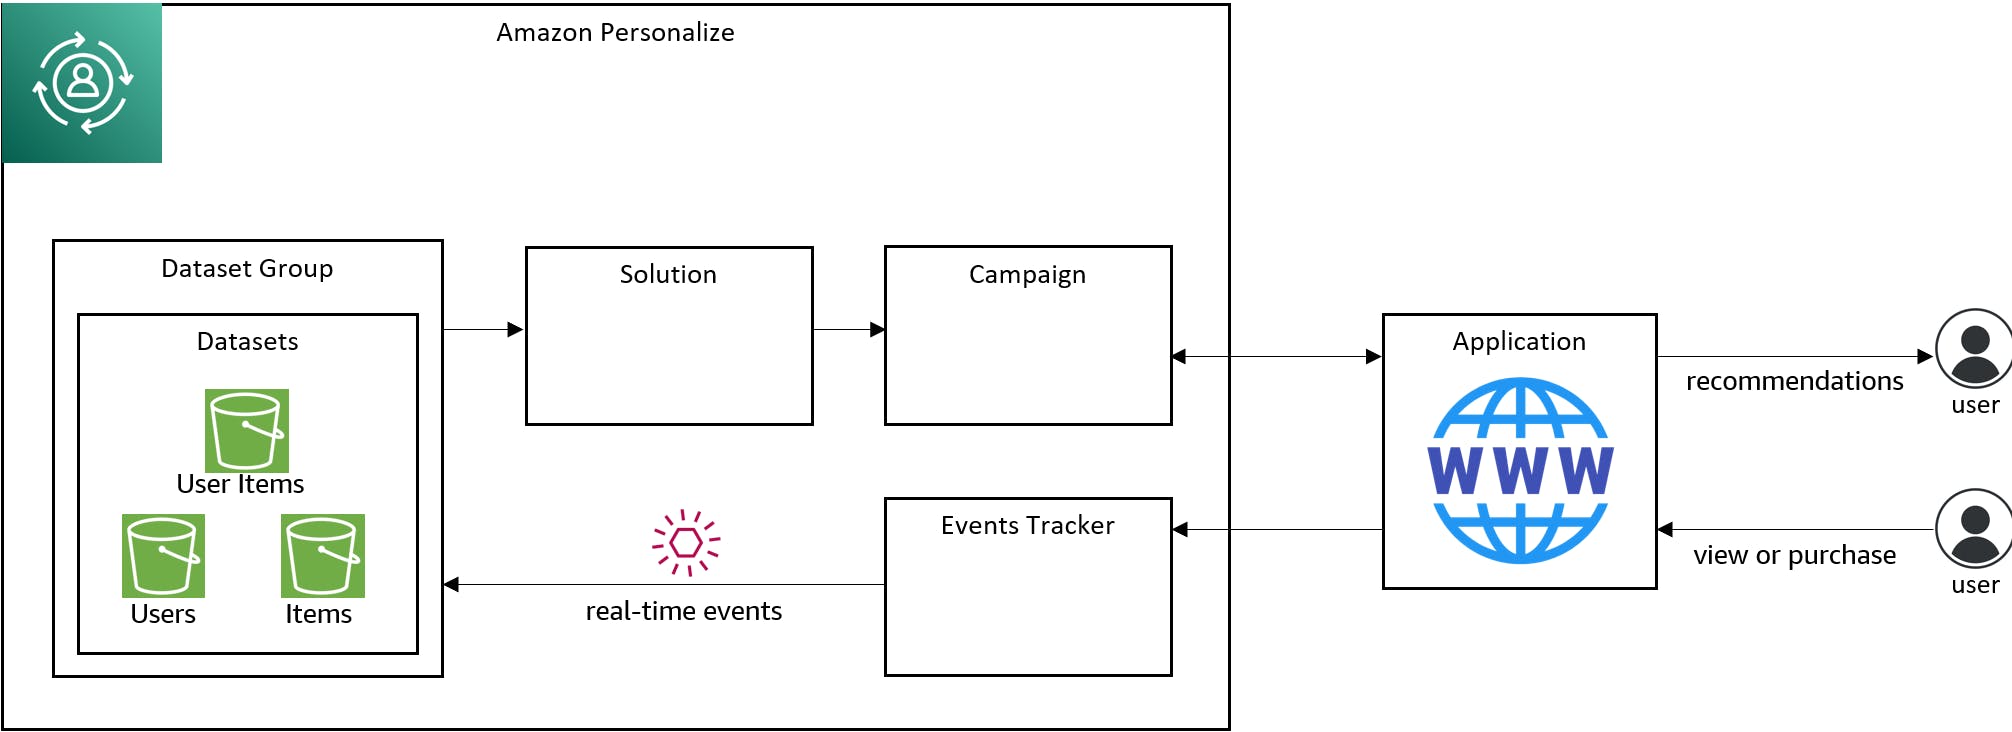
To create a recommendation system, you follow these steps:
- Choose your domain. You can choose e-commerce, video on demand, or create a custom domain.
- Import your data. Upload your data to S3 and import it to train a model. That includes user-item interaction data, and optionally user data and item data.
- Generate recommenders, solutions, campaigns, and event trackers: You configure and generate a variety of artifacts to make ML models trained with your data available for application use.
- Get recommendations: Use your recommendation system, retrieving personalized user recommendations and sending user events in real-time to keep your interaction data up-to-date.
The AWS Free Tier gives you 2 months use of Amazon Personalize for free.
Concepts
Let's review some Personalize concepts and terms:
A recipe is a pre-configured algorithm. User personalization recipes can predict what a user will interact with. Related items recipes can find items similar to an item a user is interested in, or rank items based on predicted interest.
A solution is a combination of a recipe, parameters, and one or more solution versions.
A solution version is a trained machine learning model you can deploy to get recommendations for customers.
A campaign is a deployed solution version. We can invoke the campaign from our application to get recommendations.
An event tracker lets us report new events into the interactions dataset, such as a user watching a video or purchasing an item. We train our recommender with existing historical data, but as our application is used, we need to keep that data current. We do that by reporting user events via an event tracker.
Our Hello, Personalize Project
We will configure Personalize for personalized movie recommendations. We'll be spending time in the AWS console uploading data to S3, creating artifacts in Amazon Personalize, training a model with the data, and deploying a campaign. After that we'll call Personalize from .NET code to get personalized movie recommendations based on user Id. We'll also report user movie watch events to Amazon Personalize to show how the interaction data can be kept up to date with new user activity in real-time.
One-time Setup
For any of the tutorials in the Hello, Cloud series you need the following:
- An AWS account, and an understanding of what is included in the AWS Free Tier.
- Microsoft Visual Studio 2022. If you're using an older version of Visual Studio you won't be able to use .NET 6. If you use a different IDE, you may have to find alternatives to some tutorial steps.
- AWS Toolkit for Visual Studio. You'll need to configure the toolkit to access your AWS account and create an IAM user. Your default AWS profile will be linked to this user when running programs from the command line.
Step 1: Create S3 Bucket and IAM Service Role in the AWS Console
In this step, you'll create an S3 bucket plus IAM policies and a service role for Amazon Personalize. The S3 bucket is where training data will be uploaded. The service role and policies will allow Amazon Personalize to access the S3 bucket.
Note: if you have Block Public Access active for S3, Amazon Personalize will not be able to access your S3 bucket.
Sign in to the AWS management console. At top right, select the region you want to work in. You can check supported regions for Amazon Personalize on the AWS Regional Services page. I'm using us-west-2 (Oregon).
Navigate to Amazon S3. You can enter s3 in the search bar,.
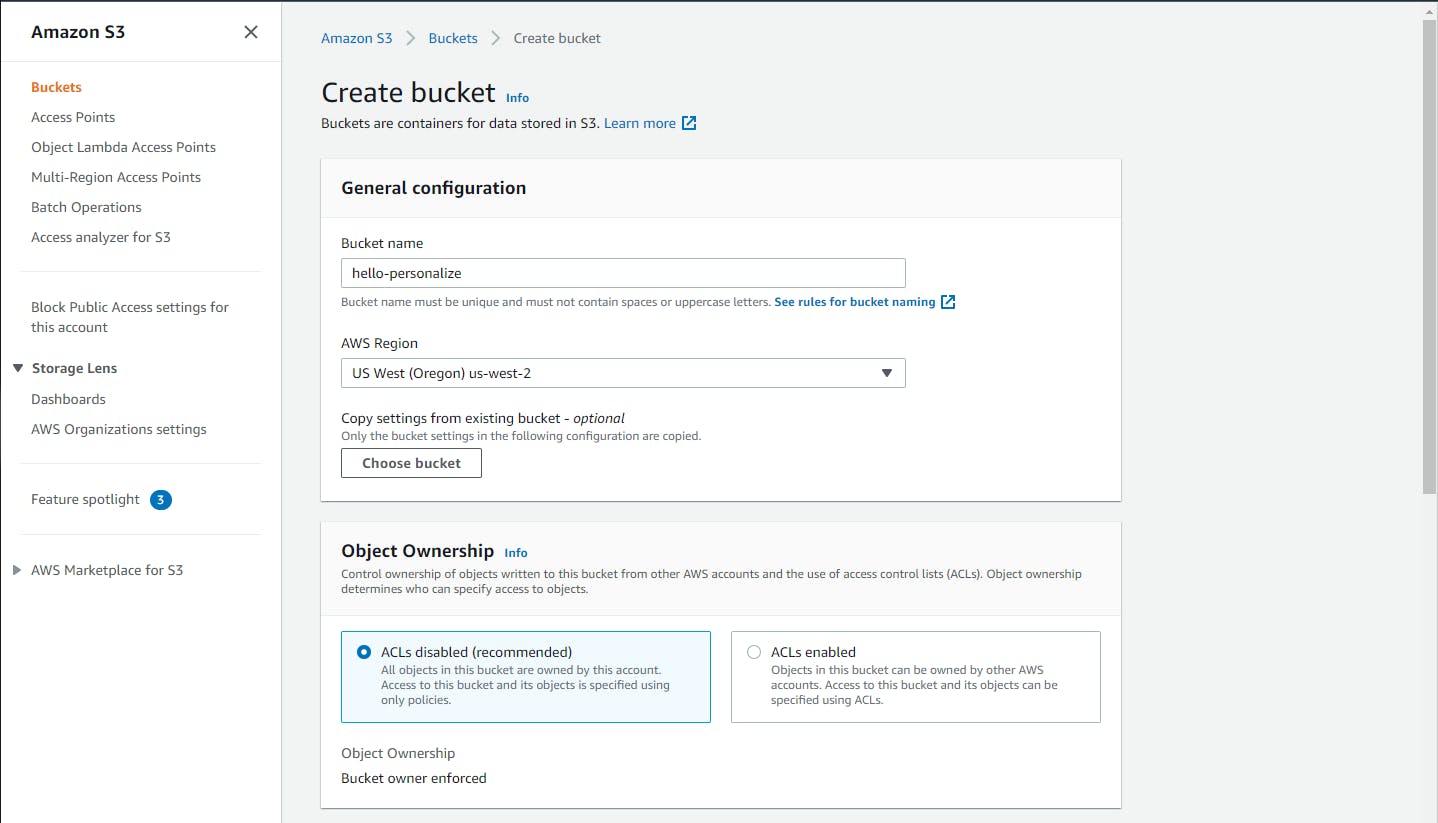
Click Create bucket and enter/select the following to create an S3 bucket:
A. Bucket name: enter a name similar to hello-personalize. The name must be unique, so you may need to use a variation. Record your bucket name.
B. Region: set to the same region you selected in #1 above.
C. At bottom, click Create bucket.
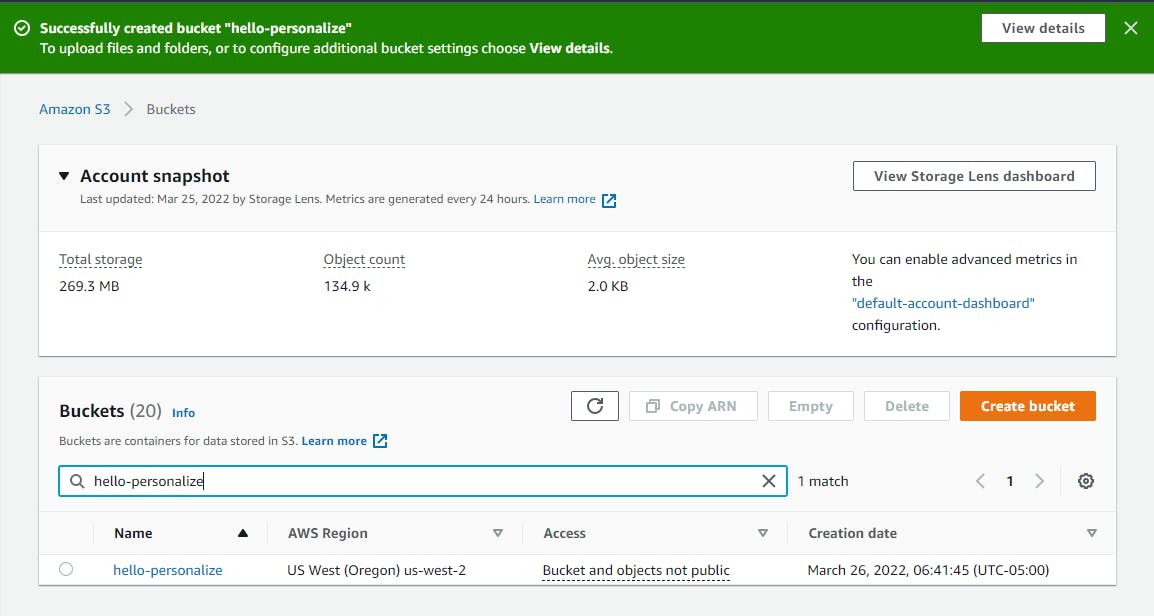
Add a bucket policy allowing Personalize to access the bucket:
A. In the Buckets list, click your bucket name to view its detail.
B. Click Permissions.
C. Under Bucket policy, click Edit.
D. On the JSON tab, enter the JSON below, replacing [bucket-name] with your bucket name.
E. Click Save changes.
{
 "Version": "2012-10-17",
 "Id": "PersonalizeS3BucketAccessPolicy",
 "Statement": [
     {
         "Sid": "PersonalizeS3BucketAccessPolicy",
         "Effect": "Allow",
         "Principal": {
             "Service": "personalize.amazonaws.com"
         },
         "Action": [
             "s3:GetObject",
             "s3:ListBucket"
         ],
         "Resource": [
             "arn:aws:s3:::[bucket-name]",
             "arn:aws:s3:::[bucket-name]/*"
         ]
     }
 ]
}
Navigate to Identity and Access Management. You can enter iam in the search bar.
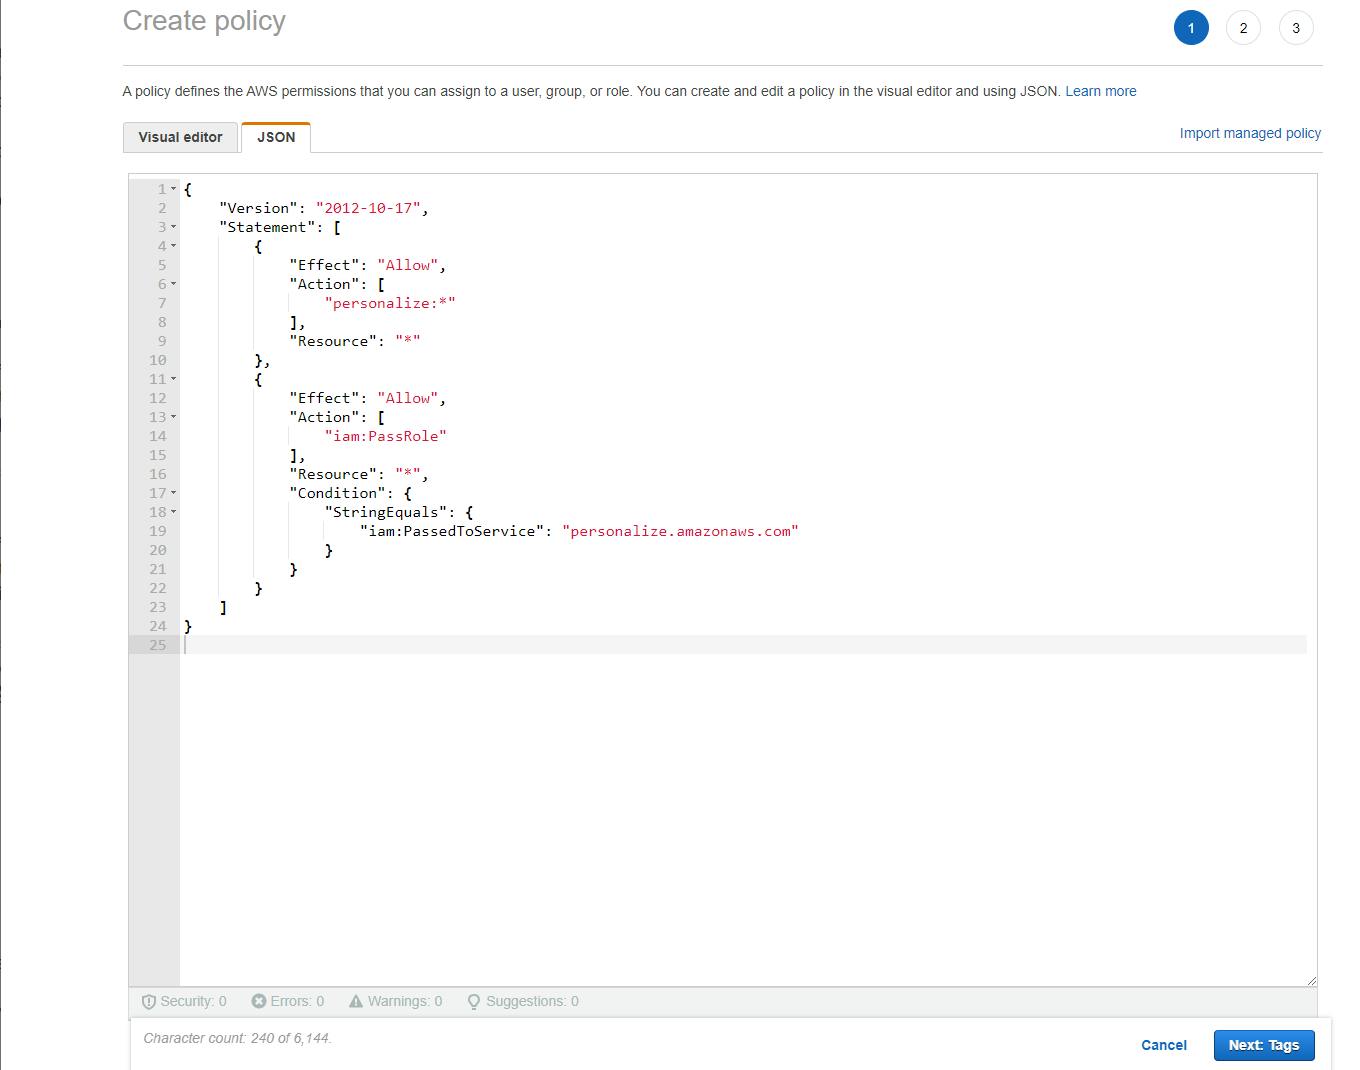
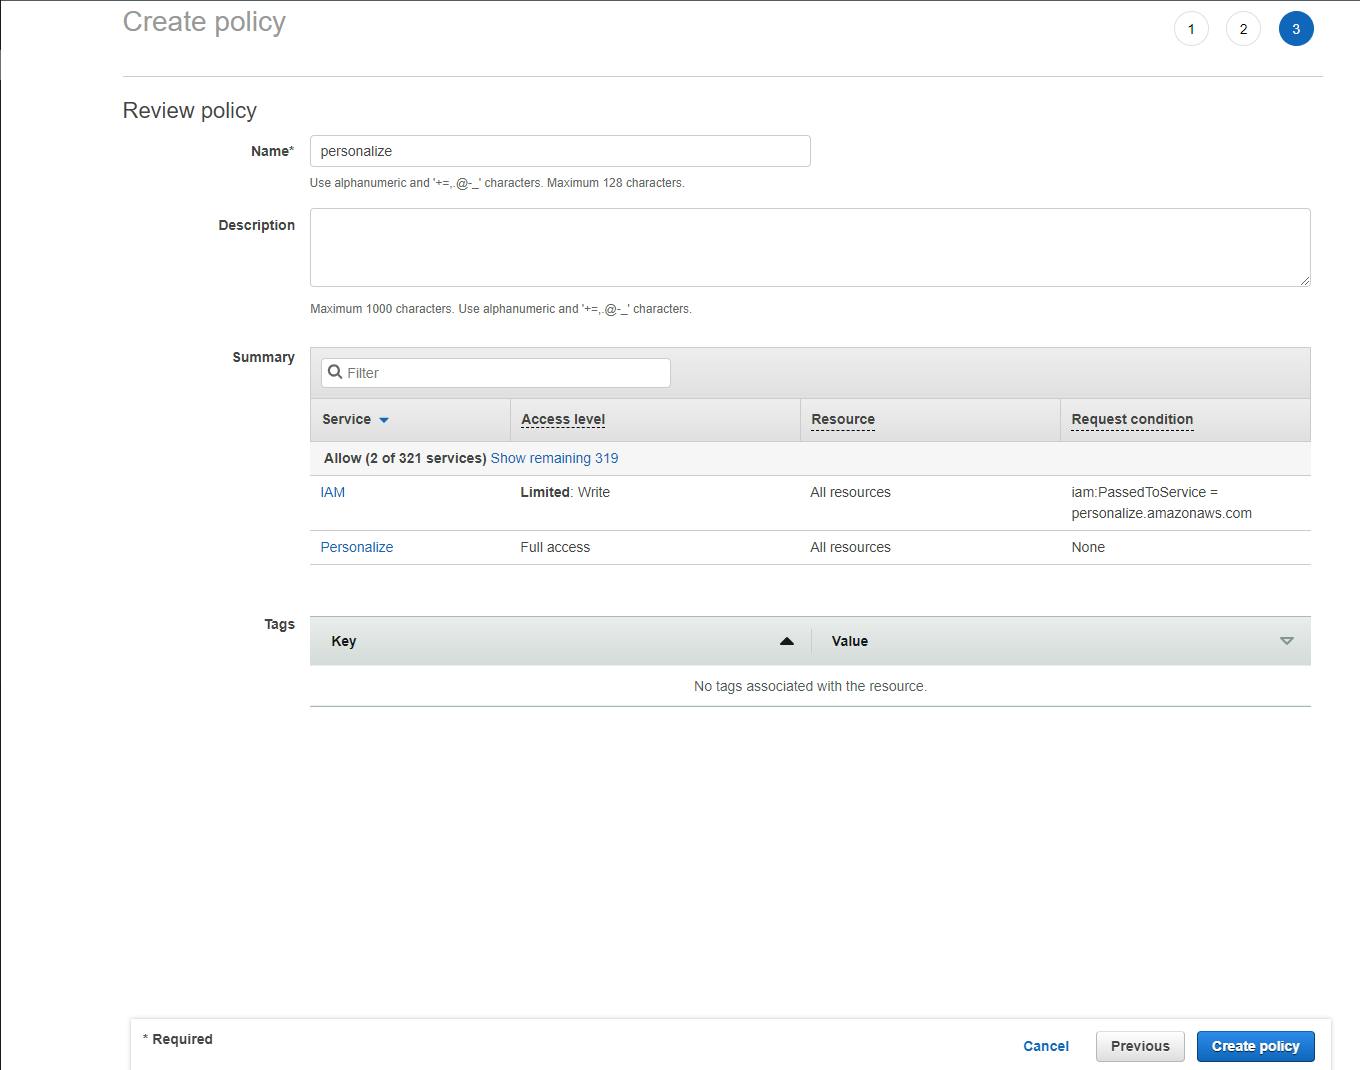
Create a policy allowing Personalize to access your resources. This policy assumes you are working in a developer test account. If you are working in an organizational account, review the policy with your security champion.
A. Select Policies on the left panel and click Create Policy.
B. On the JSON tab, enter the JSON below.
{
 "Version": "2012-10-17",
 "Statement": [
     {
         "Effect": "Allow",
         "Action": [
             "personalize:*"
         ],
         "Resource": "*"
     },
     {
         "Effect": "Allow",
         "Action": [
             "iam:PassRole"
         ],
         "Resource": "*",
         "Condition": {
             "StringEquals": {
                 "iam:PassedToService": "personalize.amazonaws.com"
             }
         }
     }
 ]
}
C. Click Next: Tags and then Review.
D. For name, enter personalize.
E. Click Create policy.
Create an S3 policy for the Personalize service:
A. In the AWS console, navigate to IAM > Policies.
B. Click Create policy.
C. In the JSON tab, enter the JSON below. Replace [bucket-name] with the name of the S3 bucket you created earlier.
{
 "Version": "2012-10-17",
 "Id": "PersonalizeS3BucketAccessPolicy",
 "Statement": [
     {
         "Sid": "PersonalizeS3BucketAccessPolicy",
         "Effect": "Allow",
         "Action": [
             "s3:GetObject",
             "s3:ListBucket",
             "s3:PutObject"
         ],
         "Resource": [
             "arn:aws:s3:::[bucket-name]",
             "arn:aws:s3:::[bucket-name]/*"
         ]
     }
 ]
}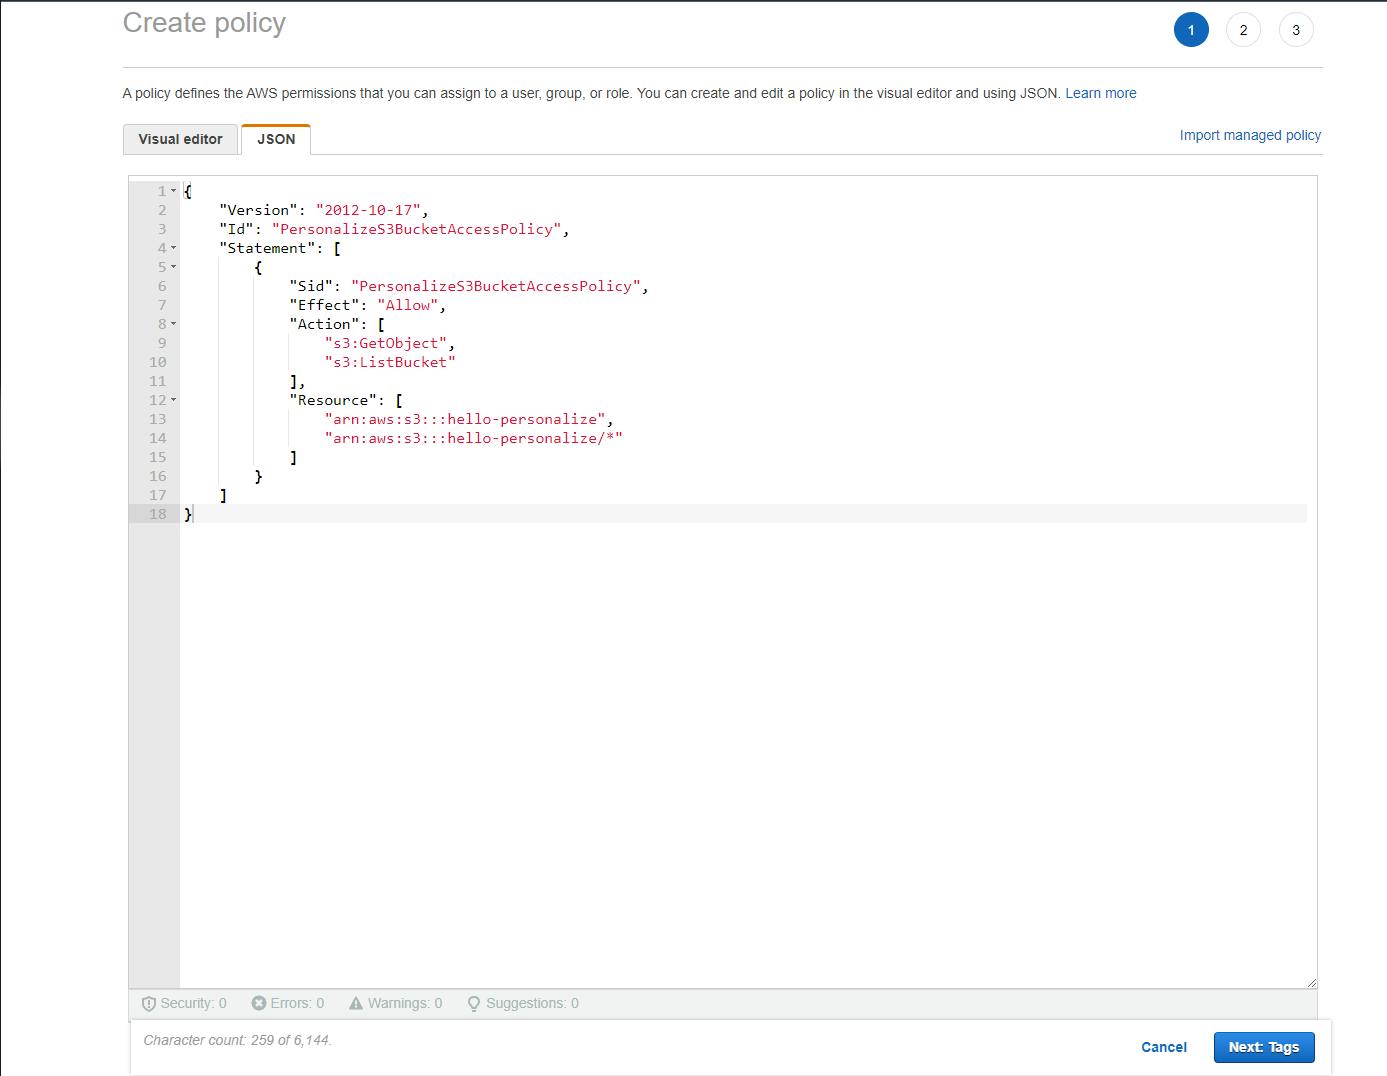
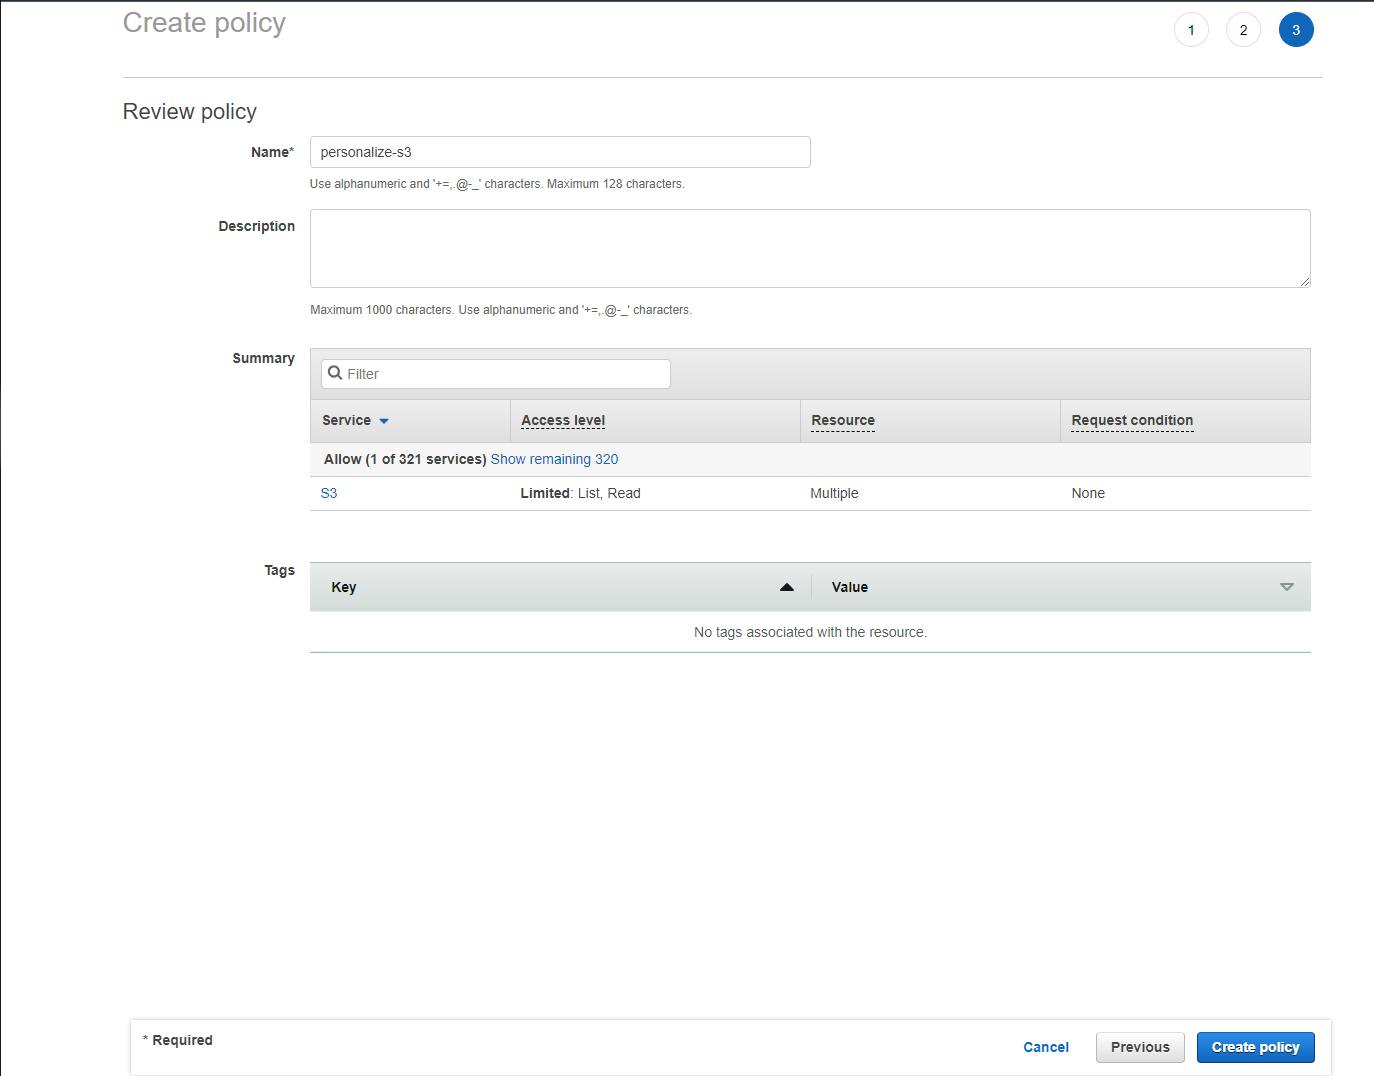
D. Click Next: Tags and then Review.
E. Name the policy personalize-s3 and click Create policy.
Create a service role for Personalize:
A. In the left panel, click Roles and Create role.
B. For Select trusted entity, choose AWS Service.
C. For Use cases for other AWS services, select Personalize.
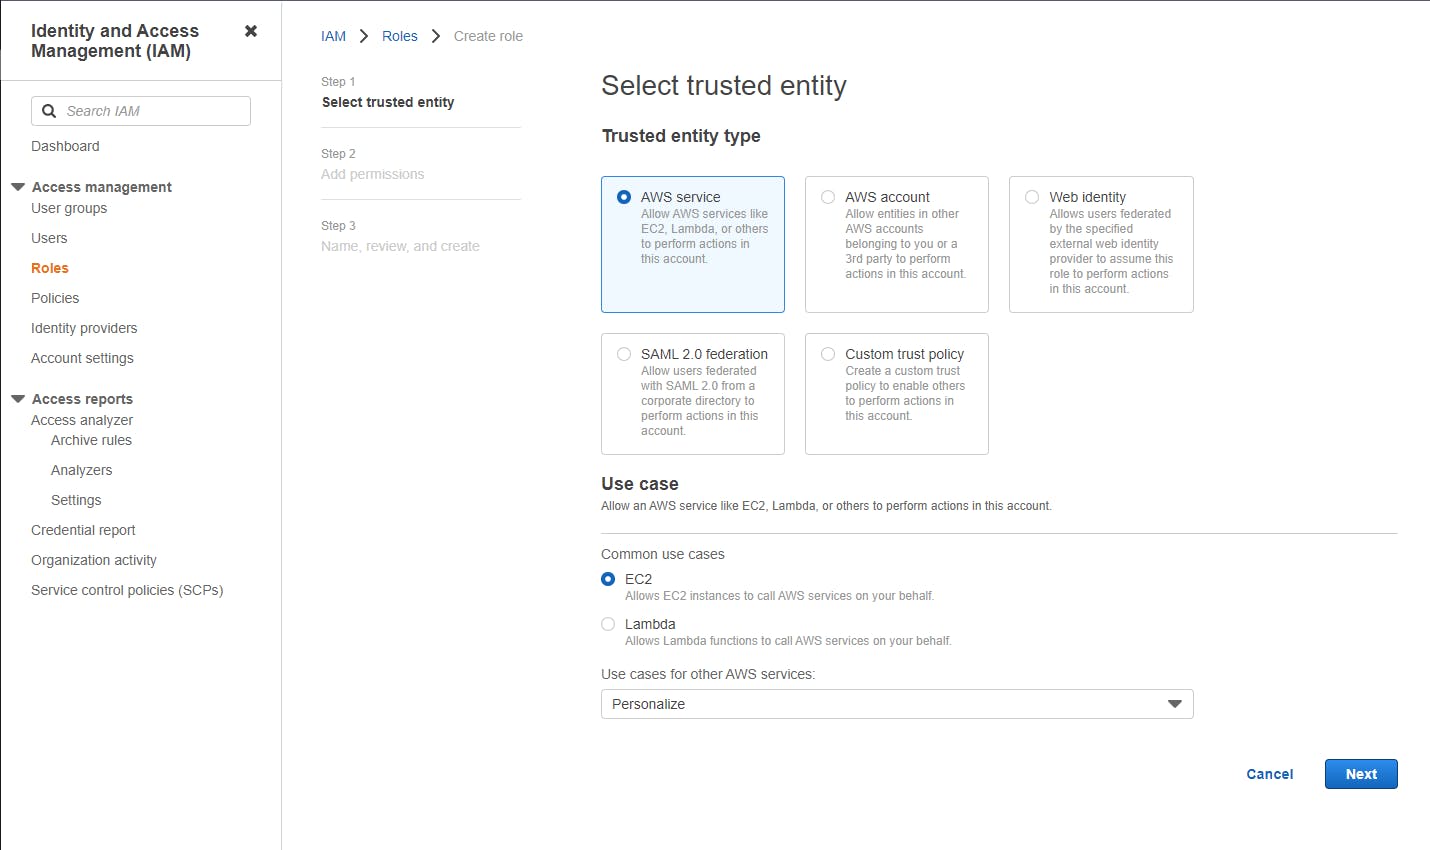
D. Click Next.
E. On the Add permissions page, enter personalize in the search box and select the personalize policy you created earlier.
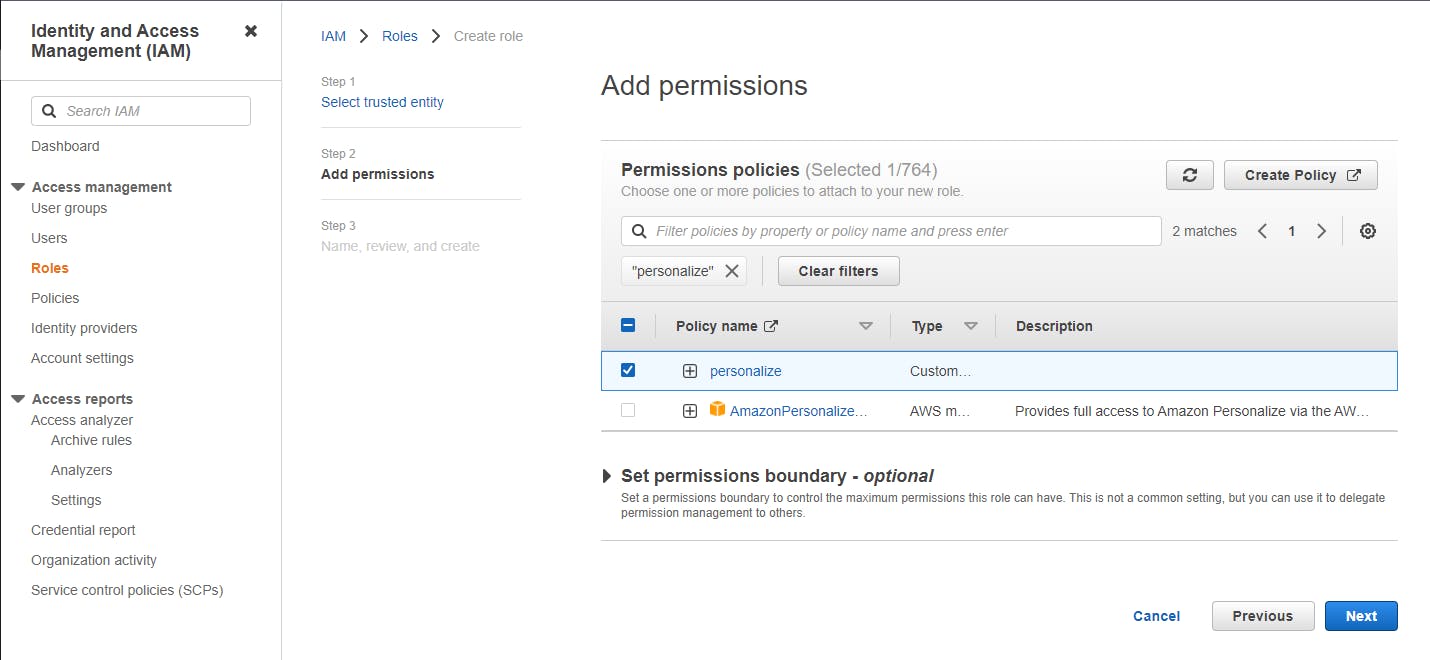
F. In the same way, search for personalize-s3 and also select that policy.
F. Click Next.
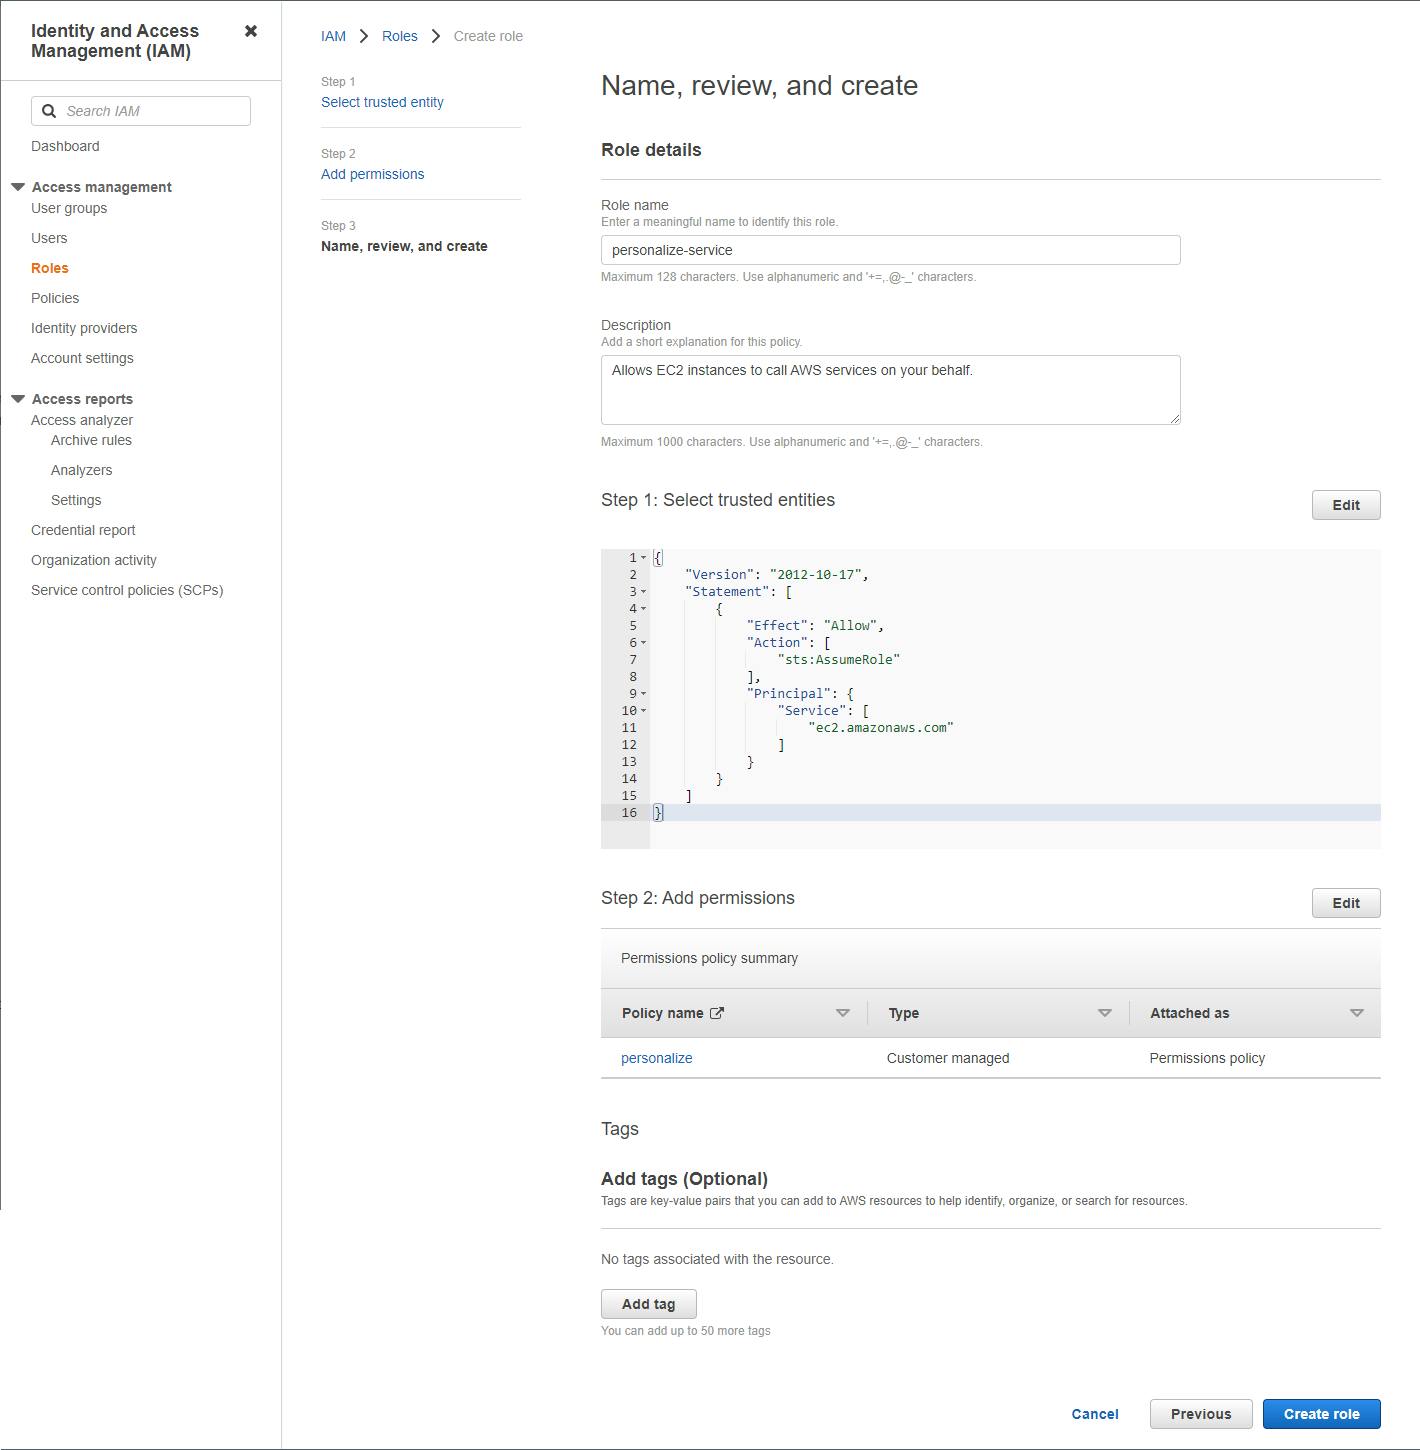
G. On the Role detail page, enter role name personalize-service.
H. Click Create role.
I. Once the role is created, record the Amazon Resource Name (ARN) for the role.

Step 2: Upload Training Data
In this step you'll upload training data to S3 for Amazon Personalize to ingest. Personalize needs a fair amount of data in order to perform its function (at least 1000 user interactions), so we're going to use the same sample data used in an existing Amazon Personalize tutorial for Python. The data is movie titles and ratings data from MovieLens, a movie recommendation service.
Download the data files, which can be found in the GitHub source code for this project. In the
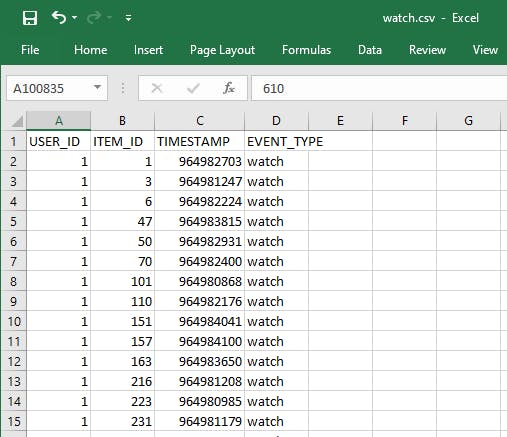
datafolder, you'll find the data files you need. We'll look at these files later to relate recommended Item IDs to movie titles. As the README mentions, these files are public domain from MovieLens. We've added one derived file, watch.csv. This watch.csv file was created from this source data and has been formatted for Personalize.Take a moment to view the watch.csv file. This data captures which movies were watched by users, which will drive viewing recommendations. In it, you see columns USER_ID, ITEM_ID, TIMESTAMP, and EVENT_TYPE. These are the fields Personalize will expect for video training data.
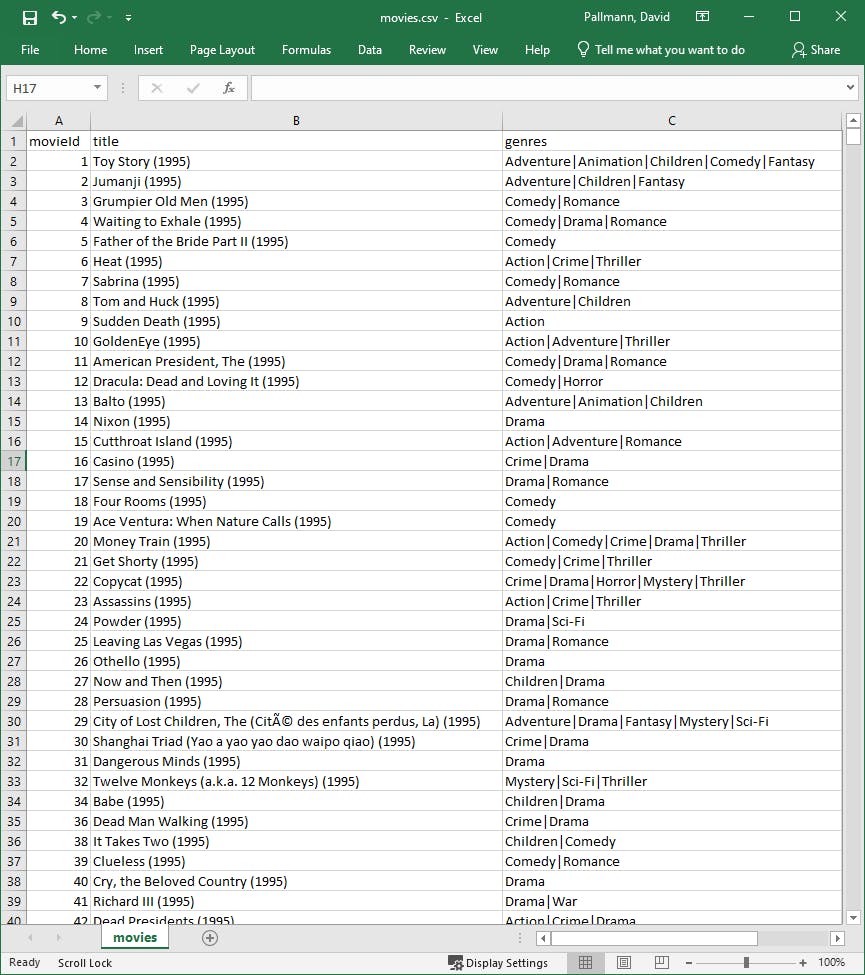
If you view movies.csv that you retrieved in #1 above, you'll see how item IDs relate to movie titles and genres.
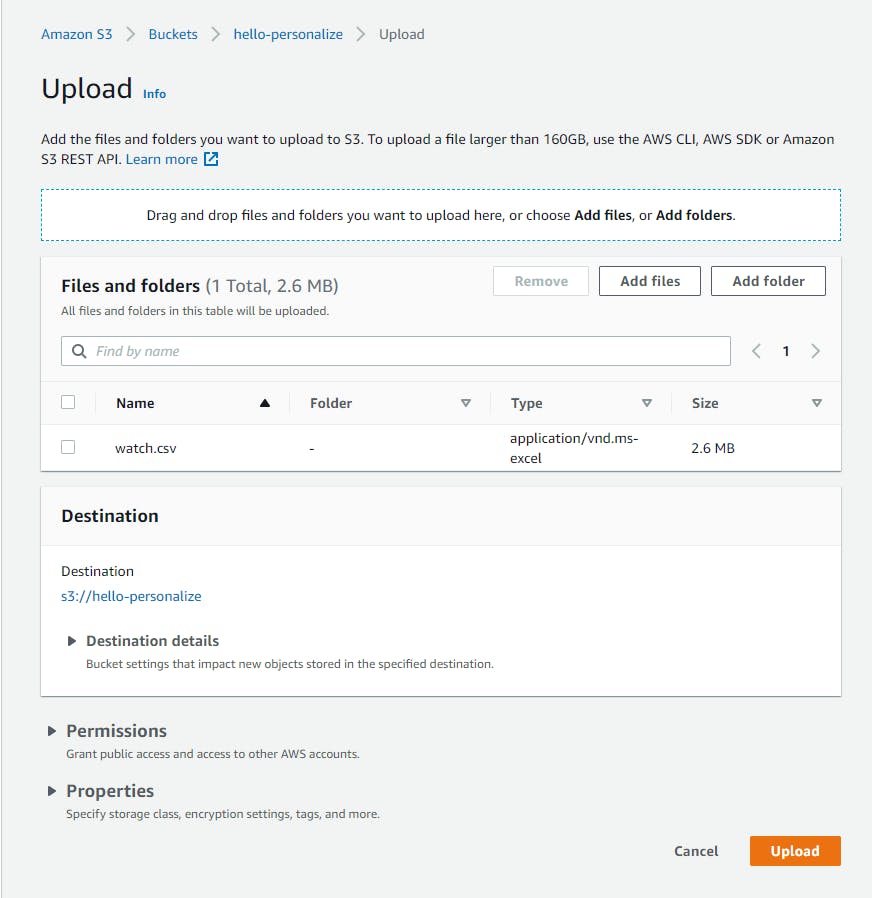
In the AWS console, navigate to Amazon S3 and upload the data file to your S3 bucket:
A. Select Buckets from the left panel.
B. Find and select your S3 bucket.
C. Click Upload and Add Files, and upload file watch.csv.
Next, we'll create a Domain dataset group in Amazon Personalize with the training data.
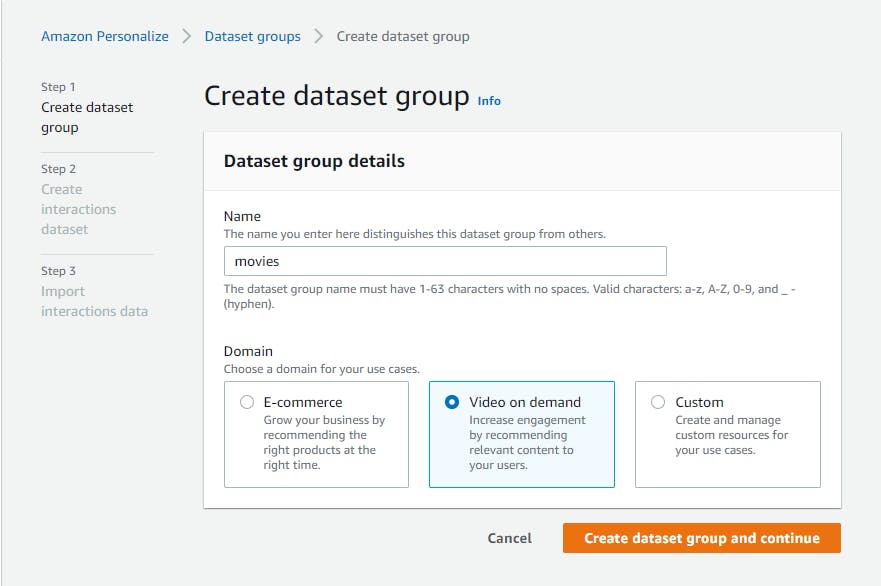
A. Navigate to Amazon Personalize and select Dataset groups from the left panel.
B. Click Create dataset group.
C. For Name, enter movies.
D. For Domain, select Video on demand. This matches the schema of our CSV data file.
E. Click Create dataset group and continue.
On the Create interactions dataset page,
A. For Dataset name, enter watch.
B. For dataset schema, select Create a new domain schema by modifying the existing default schema for your domain.
C. For schema name, enter movies.
D. Click Create dataset and continue.

On the Import interactions data page,
A. For Data import source, select Import data from S3.
B. For Dataset import job name, enter watch01.
C. For Data location, enter s3://[bucket-name]/watch.csv, replacing [bucket-name] with the name of your S3 bucket. Ours is
s3://hello-personalize/watch.csv.D. For IAM service role, select Enter a custom IAM role ARN and enter the Amazon Resource Name (ARN) of the personalize-service role you created earlier, which will have this format: arn:awsiam::[account-id]:role/[role-name].
E. Click Finish.
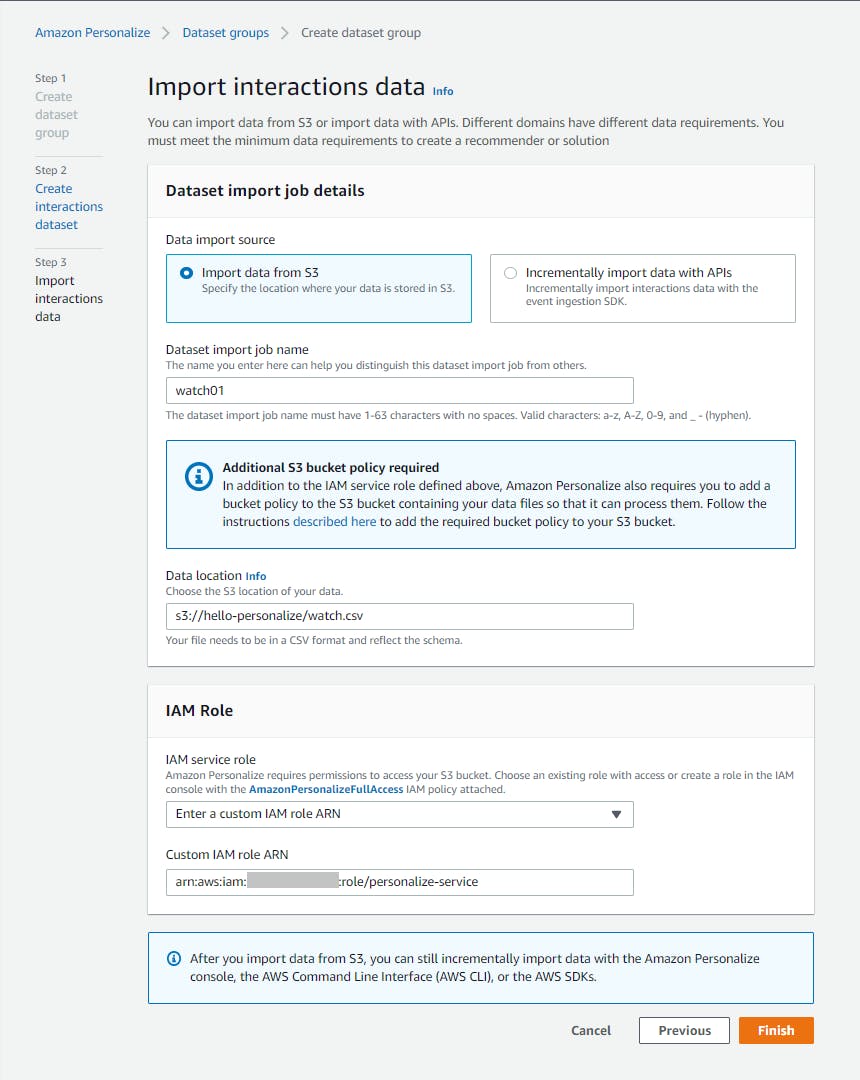
F. You'll see a confirmation that your data is being imported. Refresh the page periodically until you see
Interaction data active.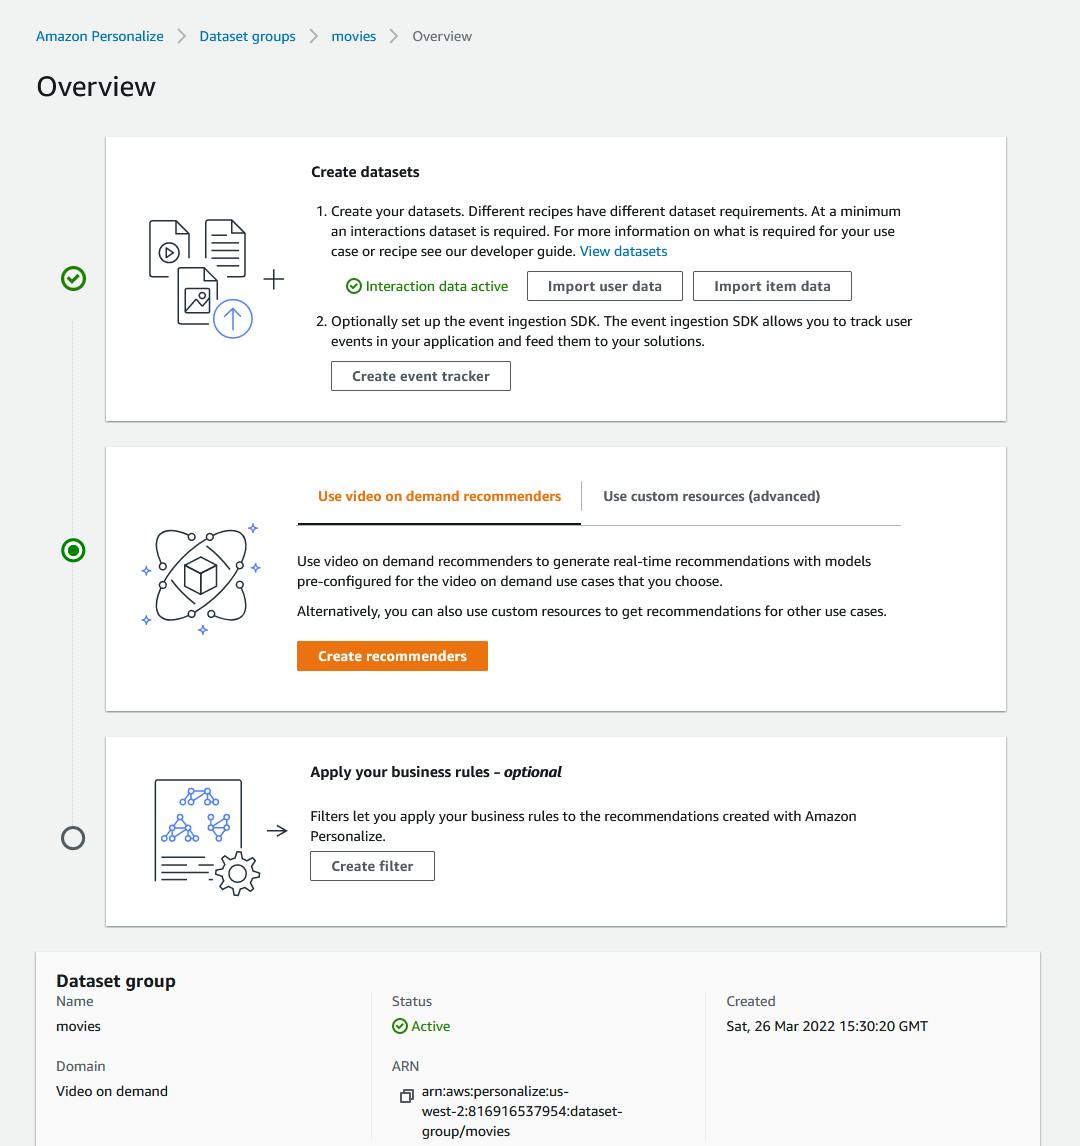
Amazon Personalize has now imported your movie watch data.
Step 3: Create a Recommender
In this step, you'll create a recommender, which can suggest top picks for a user.
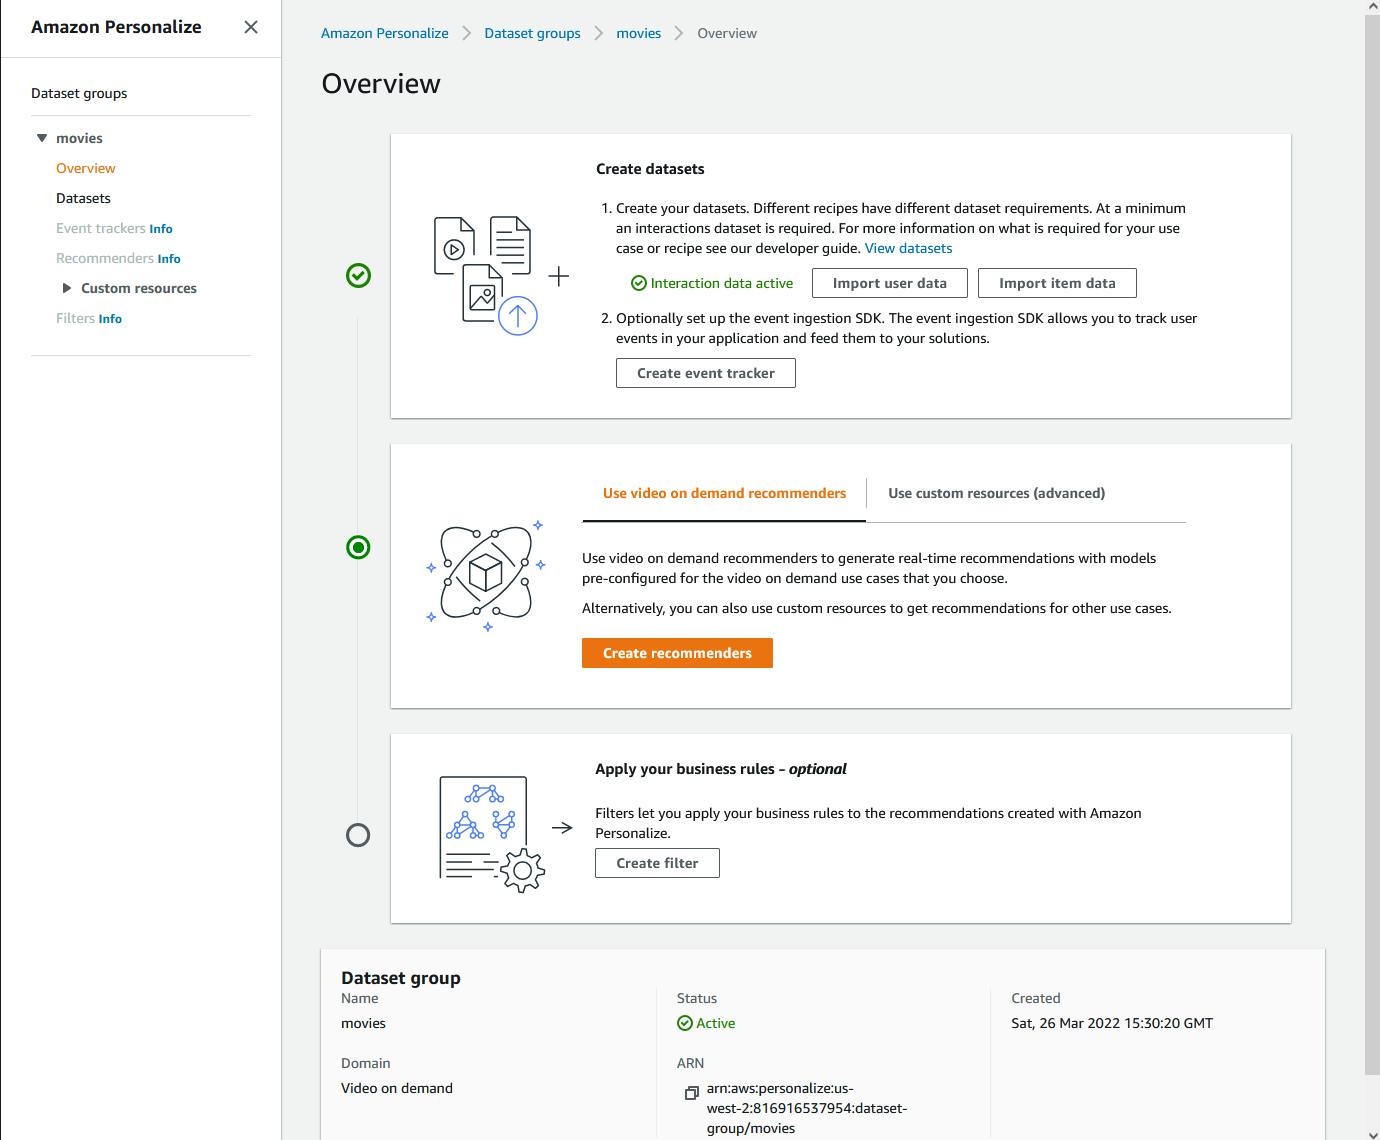
In the AWS console, you should still be in Amazon Personalize on the Overview page from the prior step. If not, navigate to Amazon Personalize > Dataset groups > movies > Overview.
Select the Use video on demand recommenders option and click Create recommenders.
On the Create recommenders page, you'll see a variety of built-in recommenders for video. We're going to create a "top picks" recommender.
A. check Top picks for you and uncheck the other choices.
B. For Recommender name, enter top-picks.
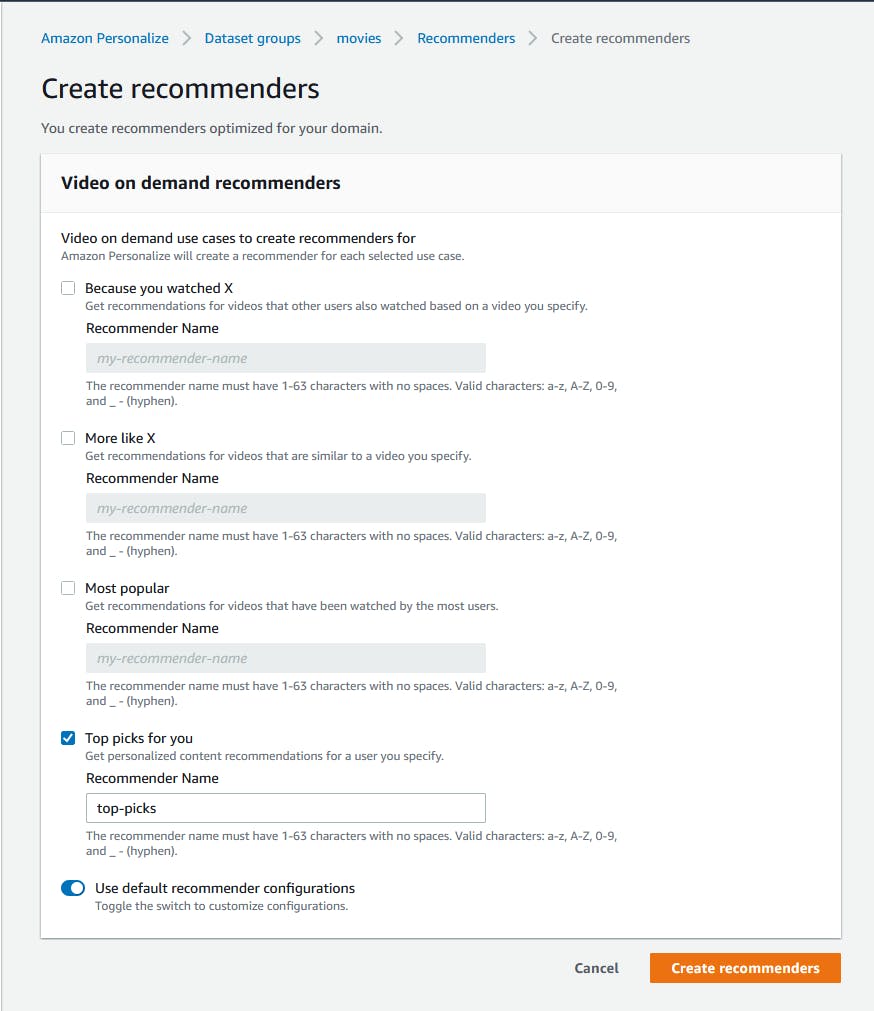
C. Click Create recommenders.
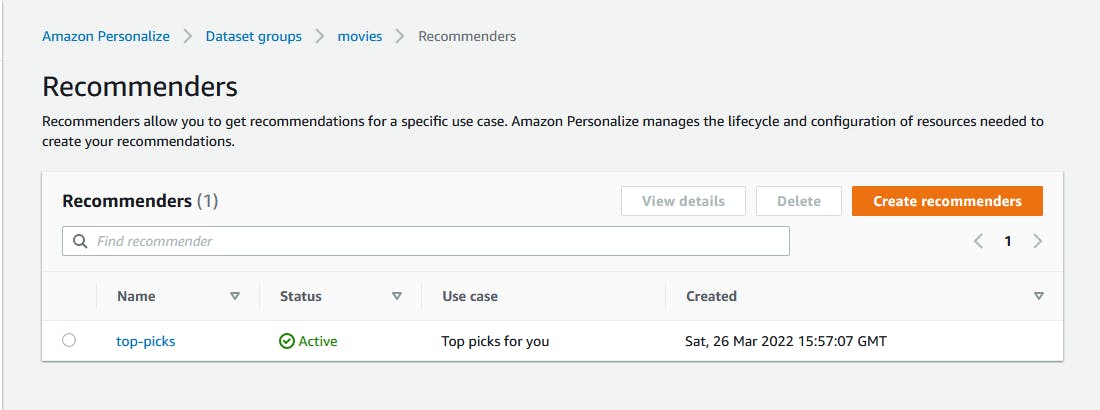
D. On the Recommenders page, watch the status, refreshing the page periodically. Wait for the status to reach
Active. Creating the recommender may take a few minutes. This is a good time for a bio break.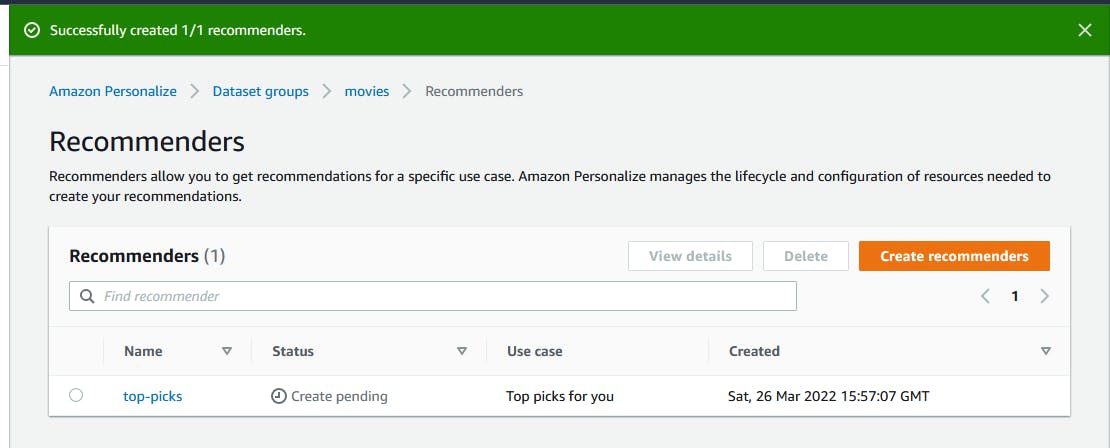
Step 4: Create a Solution, Event Tracker, and Campaign
After all that configuration and training, we're ready to publish our top picks recommender so we can use it in an application. To do that we'll need to create 1) a solution, 2) a solution version, 3) an event tracker, and 4) a campaign.
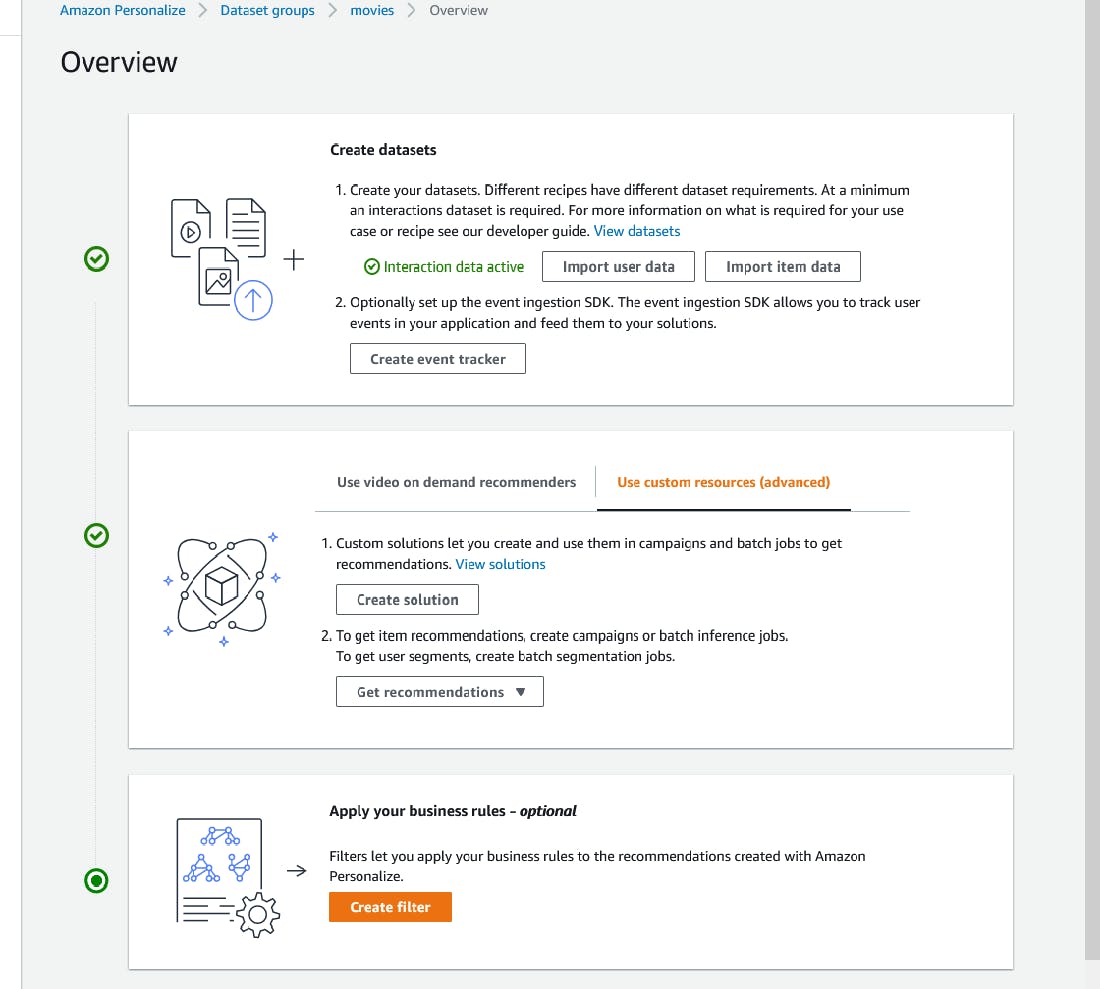
Create a solution:
A. In the AWS console, navigate to Amazon Personalize > Dataset groups > movies > Overview.
B. On the middle pane, select the User custom resources (advanced) tab.
C. Click Create solution.
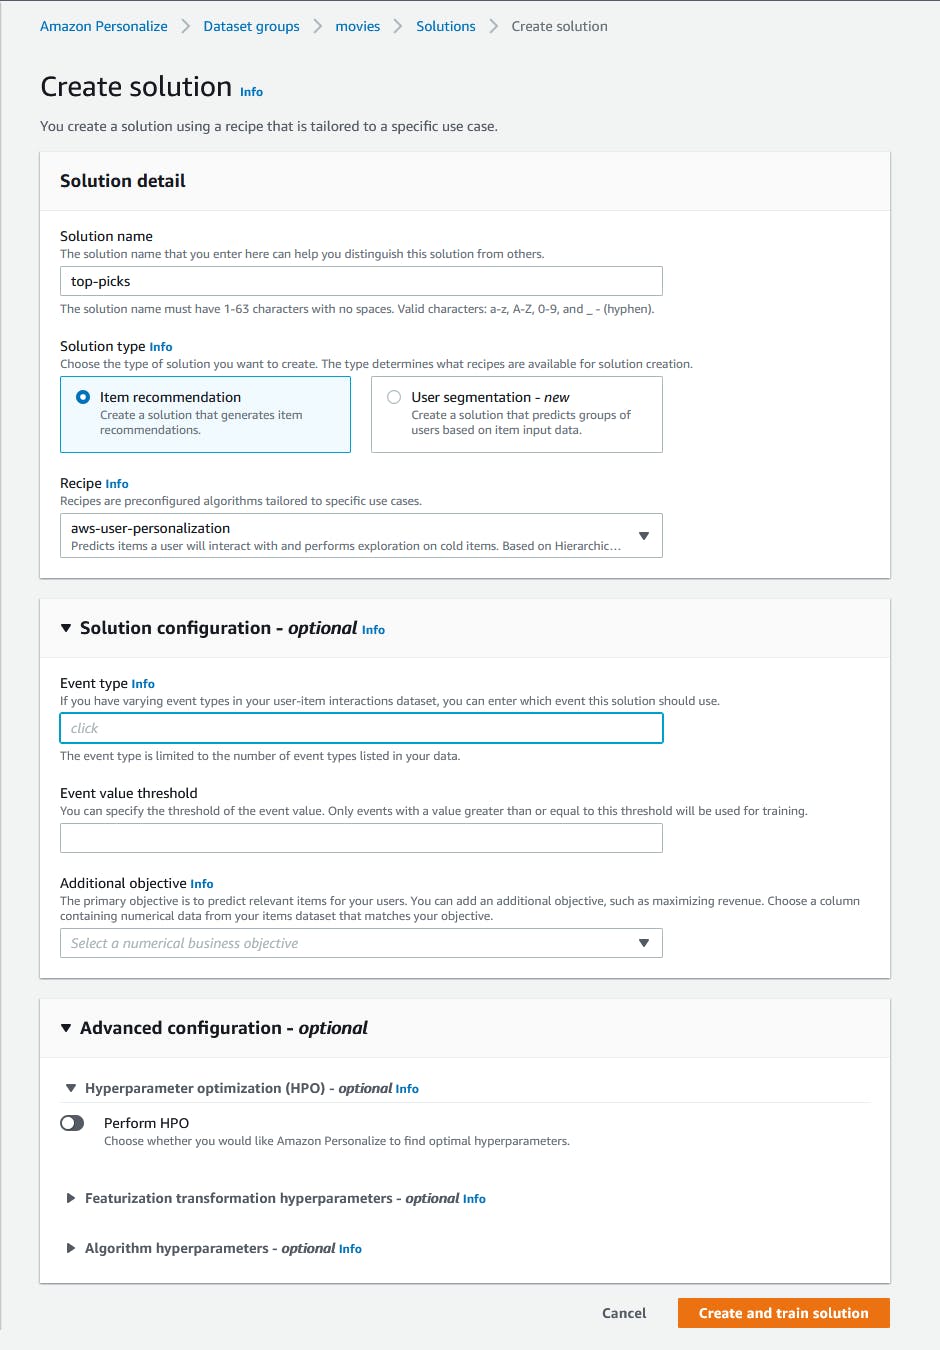
D. On the Create solution page, set Solution name: top-picks.
E. Solution type: select Item recommendation.
F. Recipe: select aws-user-personalization.
G. Event type: watch.
H. Click Create and train solution
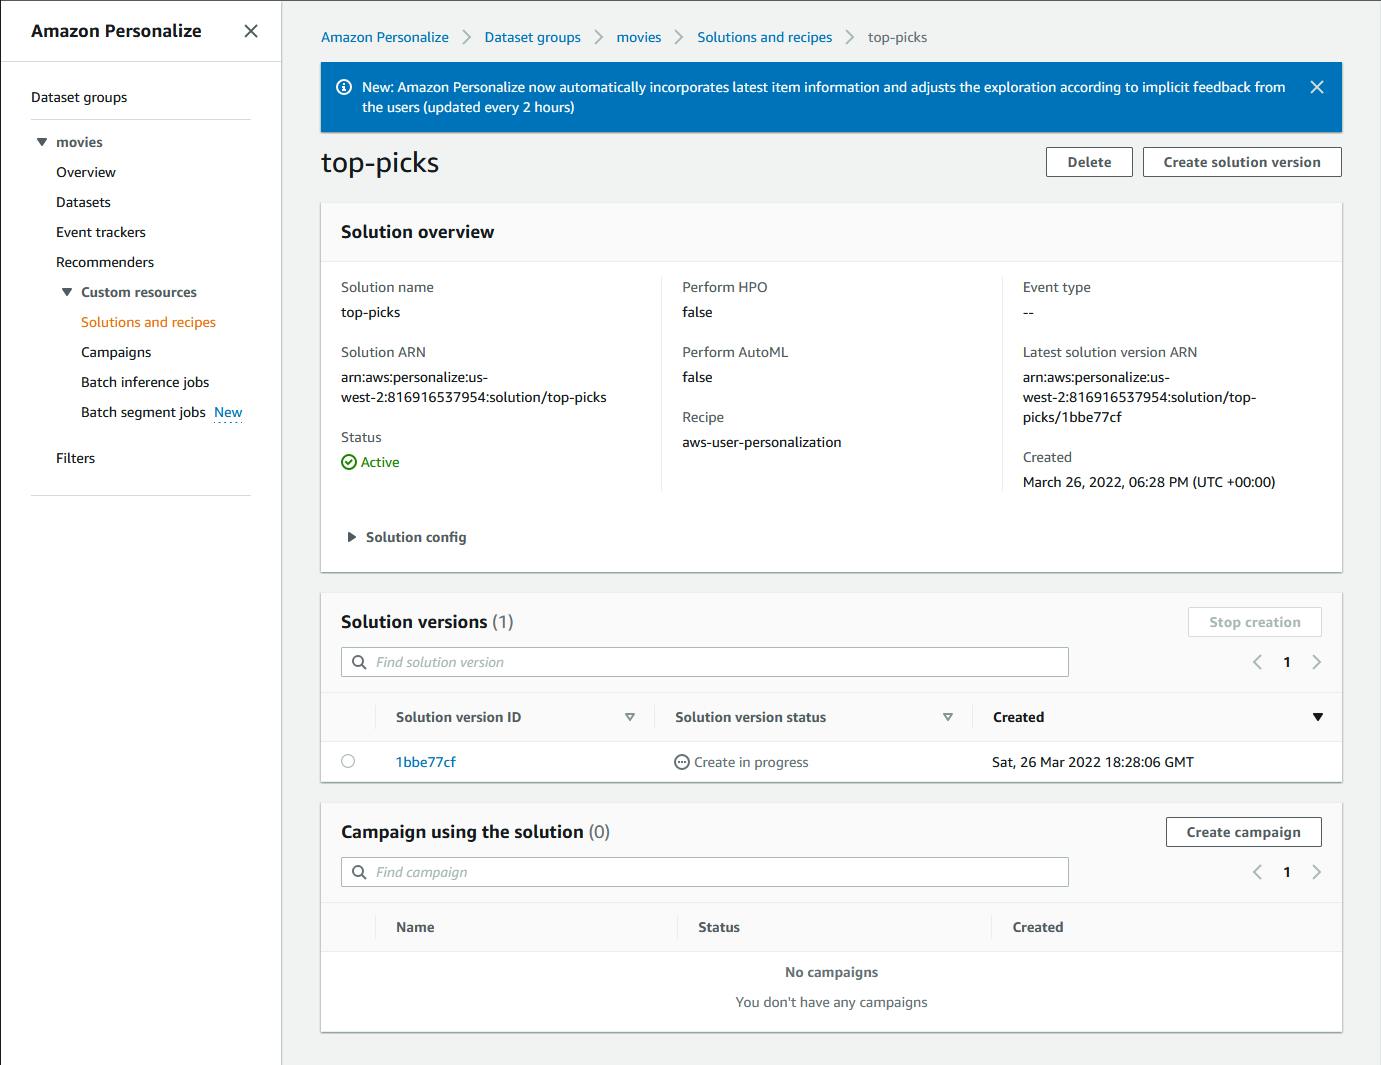
I. Select Custom resources > Solutions and recipes from the left panel, and wait until your top-picks solution status is
Active.

Create a solution version for your solution:
A. Click top-picks to view the solution detail page.
B. Click Create solution version and confirm the prompt by clicking Create solution version.
C. Review the Create solution version page and record the Solution ARN and Latest Solution Version ARN. Then click Create solution version.
D. On the top-picks solution page, you see the solution version being created. Wait for solution training and creation to complete, which may take some minutes, You will see a status of
Activewhen the solution version is ready. Note your solution version ID. Ours is1bbe77cf.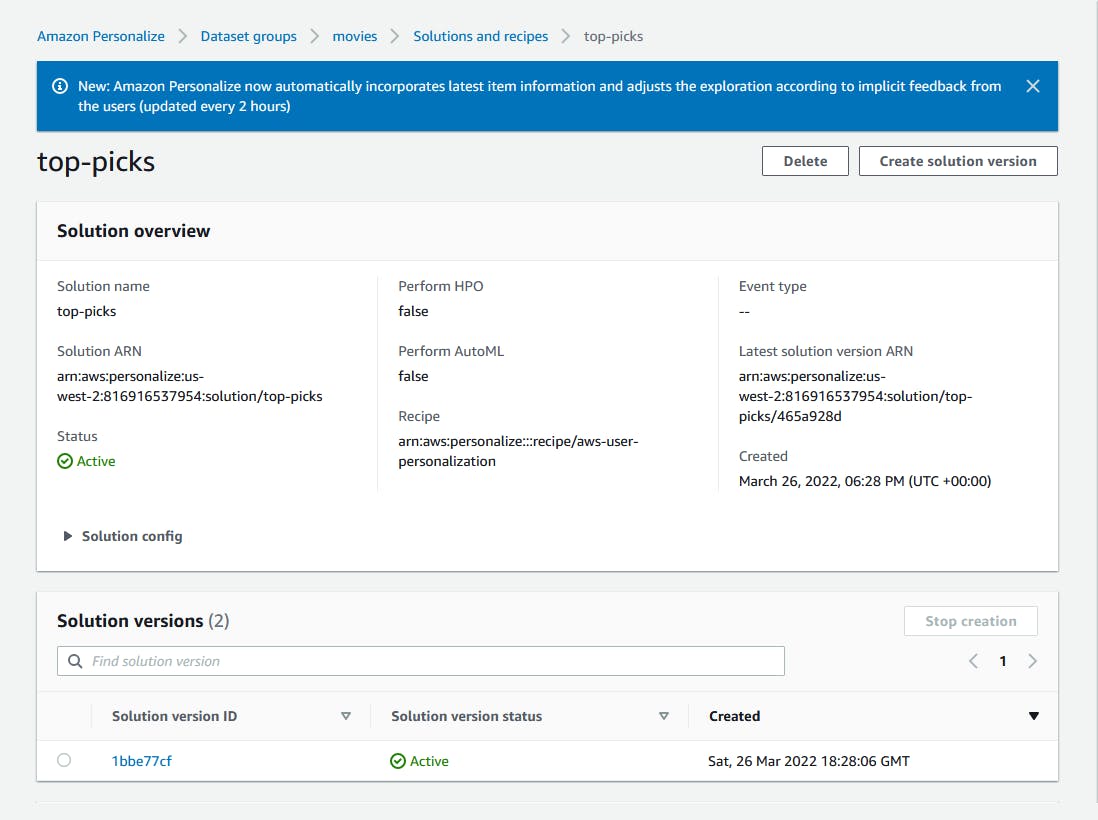
Create an event tracker:
A. Navigate to Dataset groups > movies.
B. On the Create datasets panel, click Create event tracker.

C. On the Configure tracker page, enter Tracker name watch.
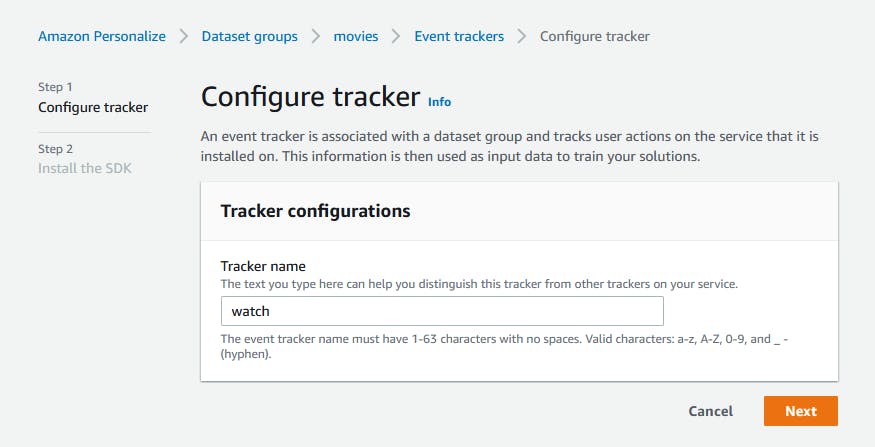
D. Click Next and then Finish.
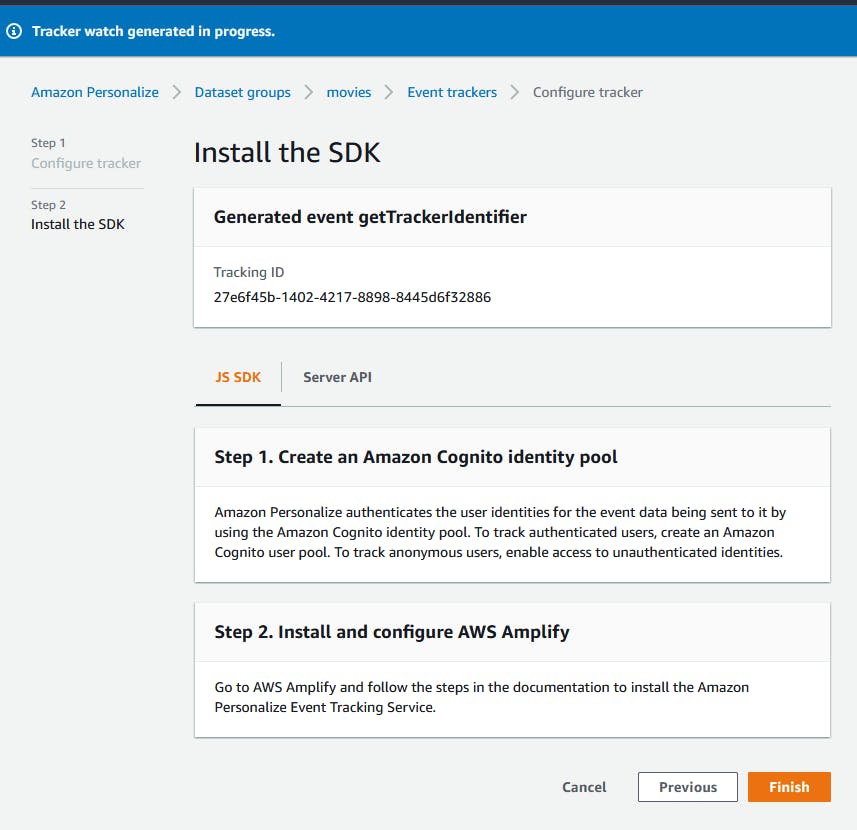
E. Wait for the tracker status to reach `Active'. Record the Tracking ID.

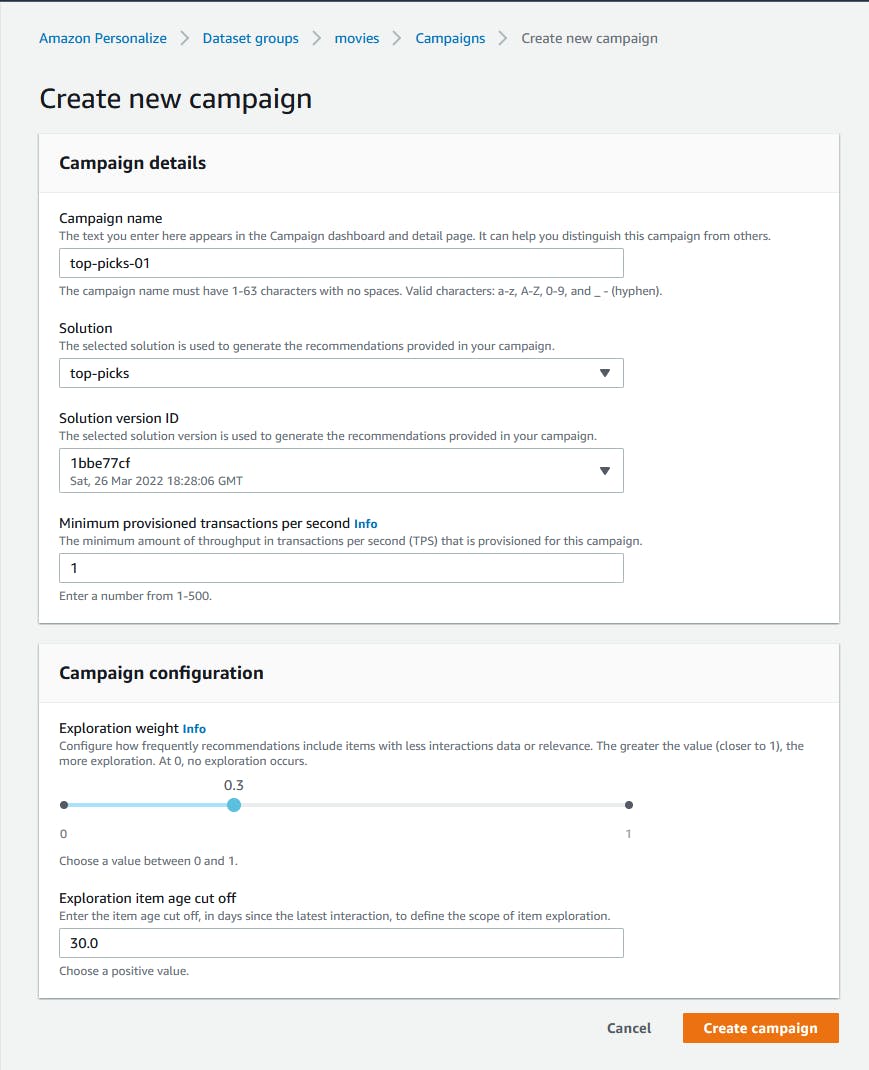
Create a campaign. On the left panel, select Campaigns.
A. Click Create campaign.
B. Campaign name: enter top-picks-01.
C. Solution: select top-picks.
D. Solution version ID: select your solution version.
E. Click Create campaign.
F. Read the notice, which explains that the way to call this campaign is with the
getRecommendationsAPI call. We'll be doing in a later step, via the AWS SDK for .NET. Record the campaign ARN. Ours isarn:aws:personalize:us-west-2:[account-number]:campaign/top-picks-01.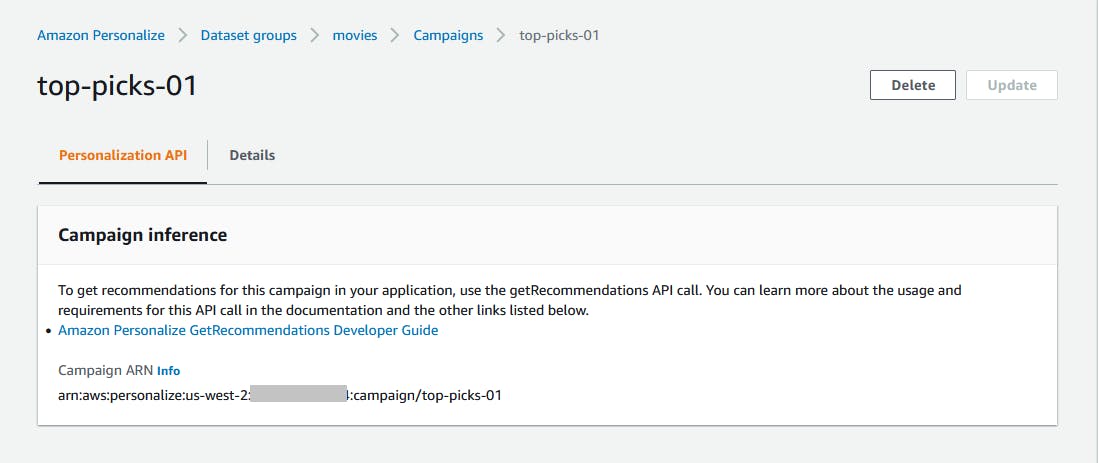
Step 5: Test the Campaign in the Console
We've now completed all the setup we need to get recommendations from an application, but let's first test our recommendation functionality in the AWS console.
In the AWS console, navigate to Amazon Personalize > Custom resources > Campaigns.
Click the top-picks-01 campaign we just created in Step 4.
In the Test campaign results panel, enter a User ID of 1.
Click Get recommendations.
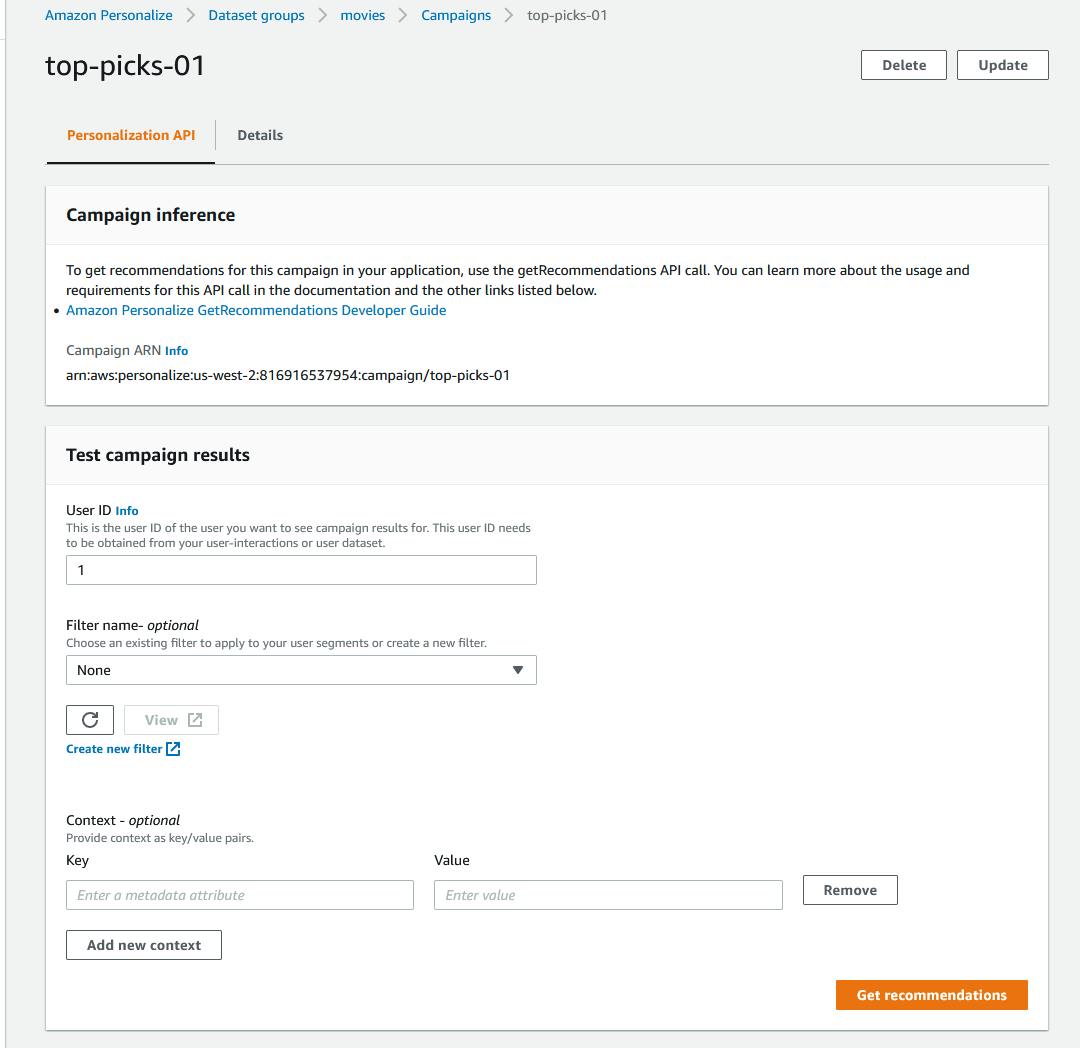
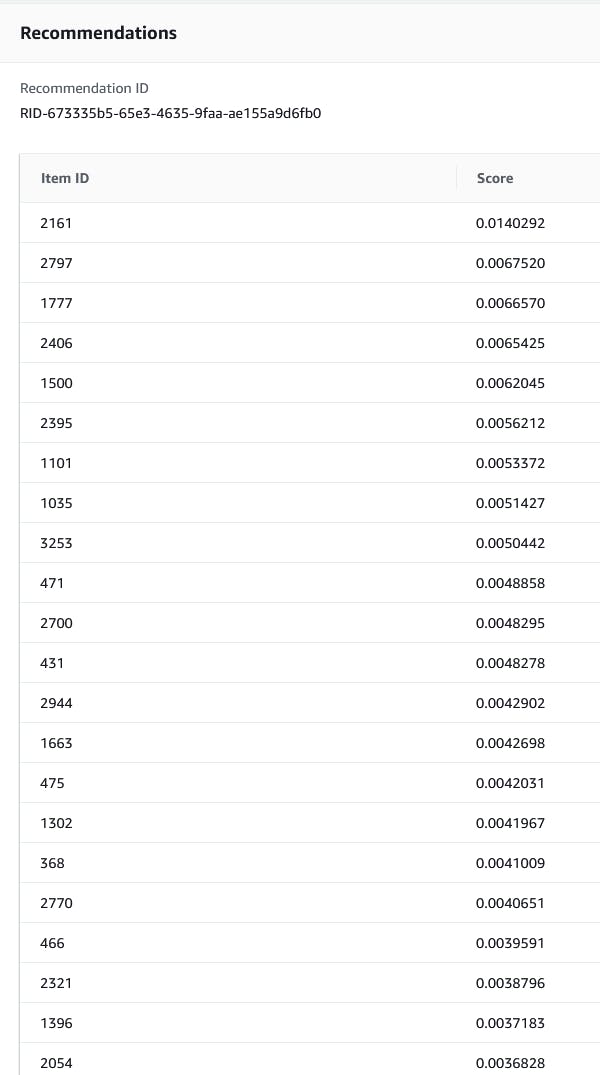
You see a response of recommended movie IDs. It's working!
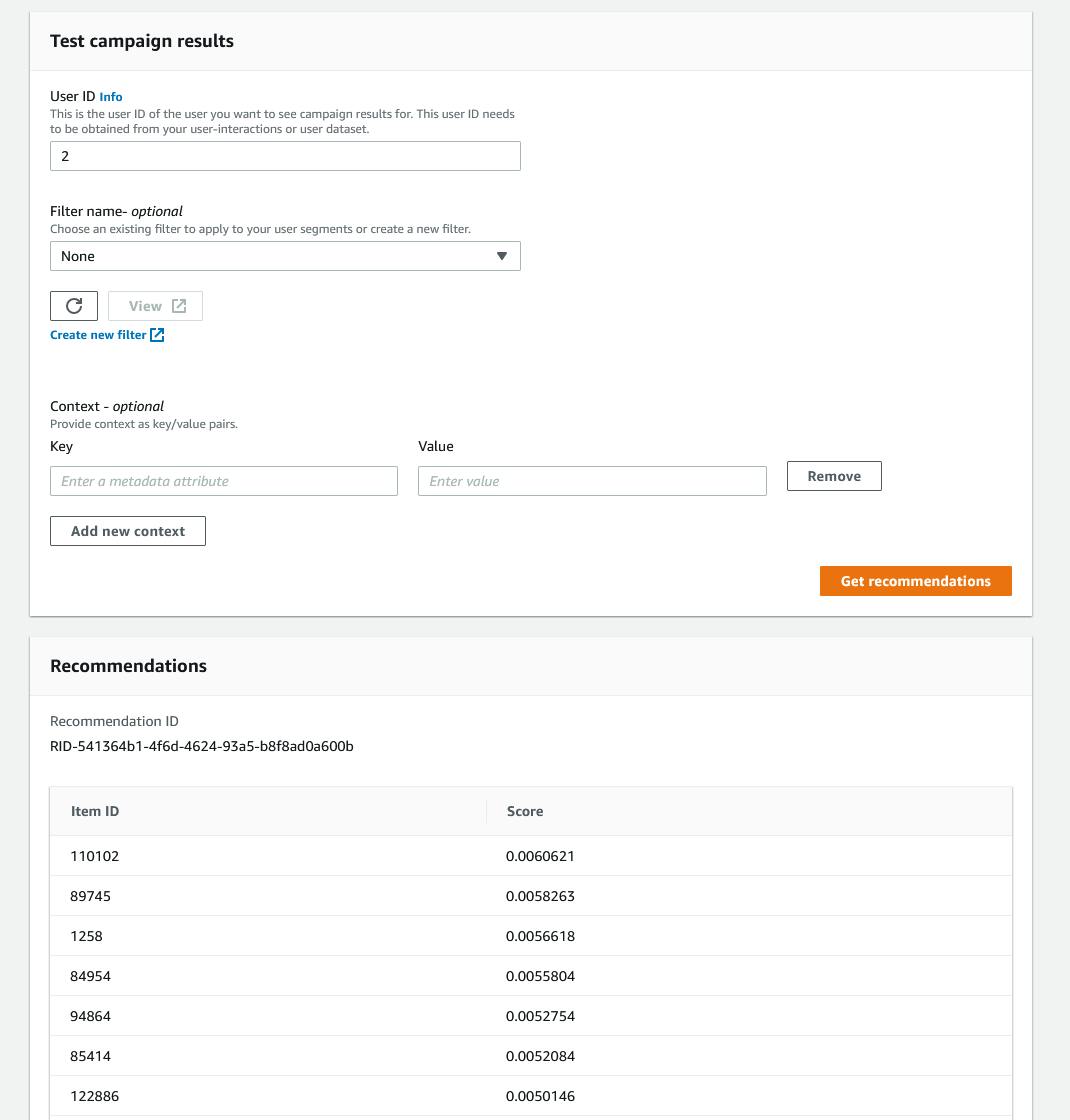
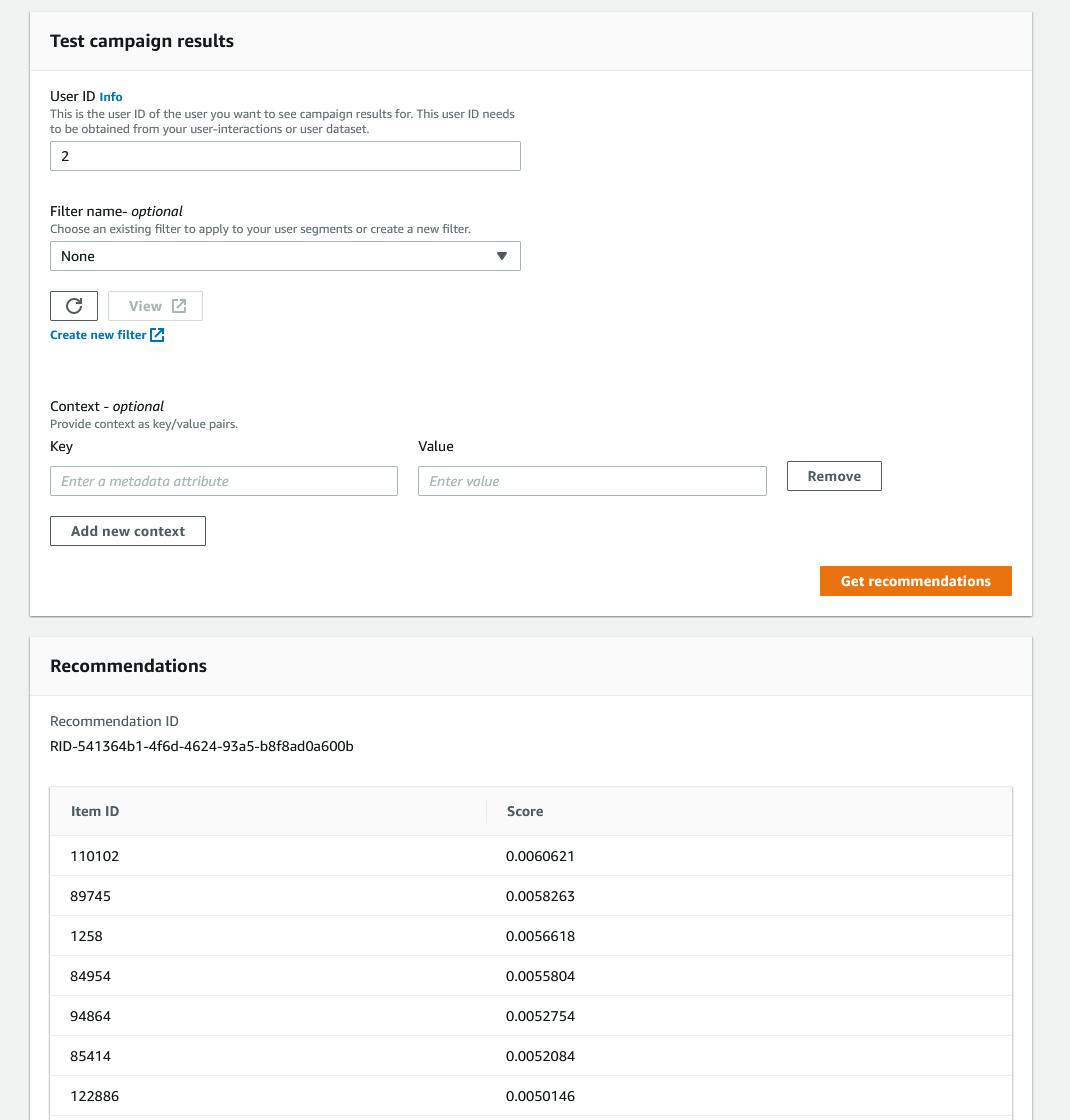
Enter a different User Id of 2 and again click Get recommendations. This time you get a different list of top picks, tailored for a different user.
How can we get comfortable about these results? To confirm the value of the recommendations, go back to the movies.csv data file you reviewed earlier in Step 2. The file movies.csv contains the movie item IDs, titles, and genres. The data file we trained Personalize with, watch.csv, references these movies in the ITEM_ID column.
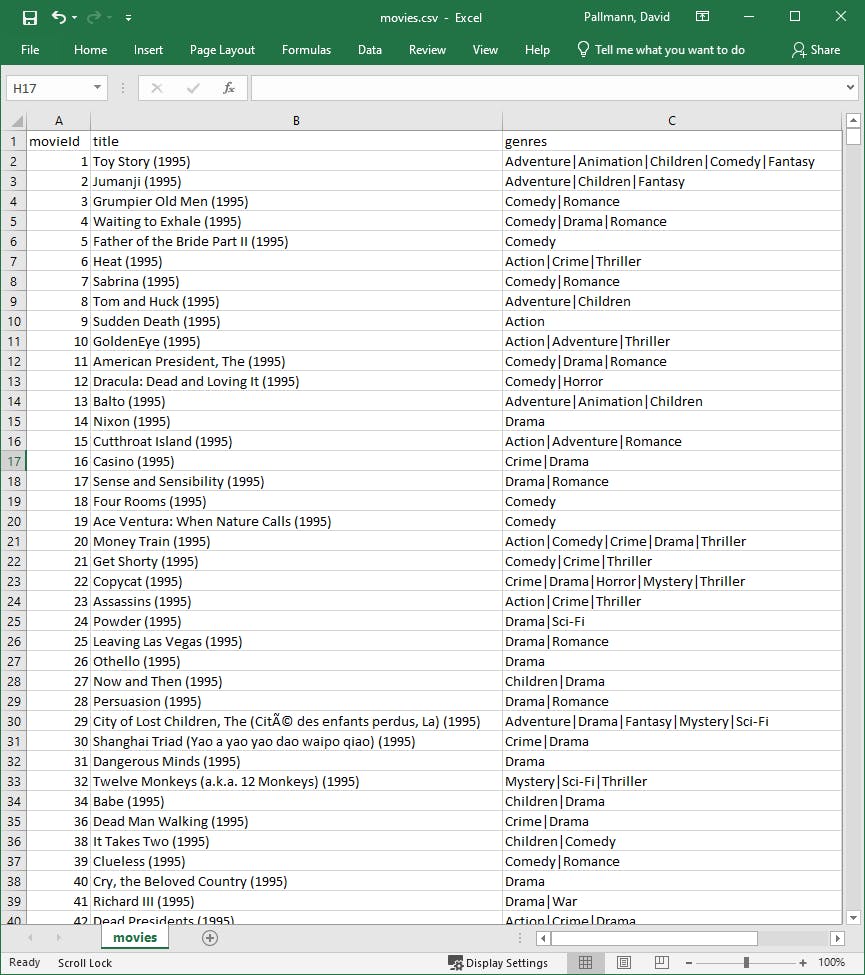
After correlating the movie IDs in the first run for User 1, we can see we are dealing with a romantic comedy fan who also occasionally watches several other genres. Let's compare that to User 2, who favors hero action movies and science fiction.
| ITEM_ID | Movie Title (User 1) |
| 2161 | NeverEnding Story, The (1984) |
| 2797 | Big (1988) |
| 1777 | Wedding Singer, The (1998) |
| 2406 | Romancing the Stone (1984) |
| 1500 | Grosse Pointe Blank (1997) |
| 2395 | Rushmore (1998) |
| 1101 | Top Gun (1986) |
| 1035 | Sound of Music, The (1965) |
| 3253 | Wayne's World (1992) |
| 471 | Close Encounters of the Third Kind (1977) |
| 2700 | South Park: Bigger, Longer and Uncut (1999) |
| 431 | Carlito's Way (1993) |
| 2944 | Dirty Dozen, The (1967) |
| 1663 | Stripes (1981) |
| User 2: ITEM_ID | Movie Title (User 2) |
| 110102 | Captain America: The Winter Soldier (2014) |
| 89745 | Avengers, The (2012) |
| 1258 | Shining, The (1980) |
| 84954 | Adjustment Bureau, The (2011) |
| 94864 | Prometheus (2012) |
| 122886 | Star Wars: Episode VII - The Force Awakens (2015) |
| 128360 | The Hateful Eight (2015) |
| 105504 | Captain Phillips (2013) |
| 115149 | John Wick (2014) |
| 60069 | WALL·E (2008) |
| 59784 | Kung Fu Panda (2008) |
Step 6: Create a .NET Program to Get Recommendations
Now it's finally time to use this in a .NET application. It's beyond the scope of this "Hello, Cloud" to create a full web application, so we're simply going to write a .NET console program and show how to get recommendations for a user as well as report new user events to Amazon Personalize.
Open a command/terminal window, and CD to a development folder.
Run the dotnet new command below to create a .NET 6 console program named hello-personalize.
dotnet new console -n hello-personalize
Launch Visual Studio and open the hello-personalize project.
In the Solution Explorer, right-click the
hello-personalizeproject and select Manage NuGet Packages.... Search for and install the AWSSDK.Personalize, AWSSDK.PersonalizeEvents, and AWSSDK.PersonalizeRuntime packages.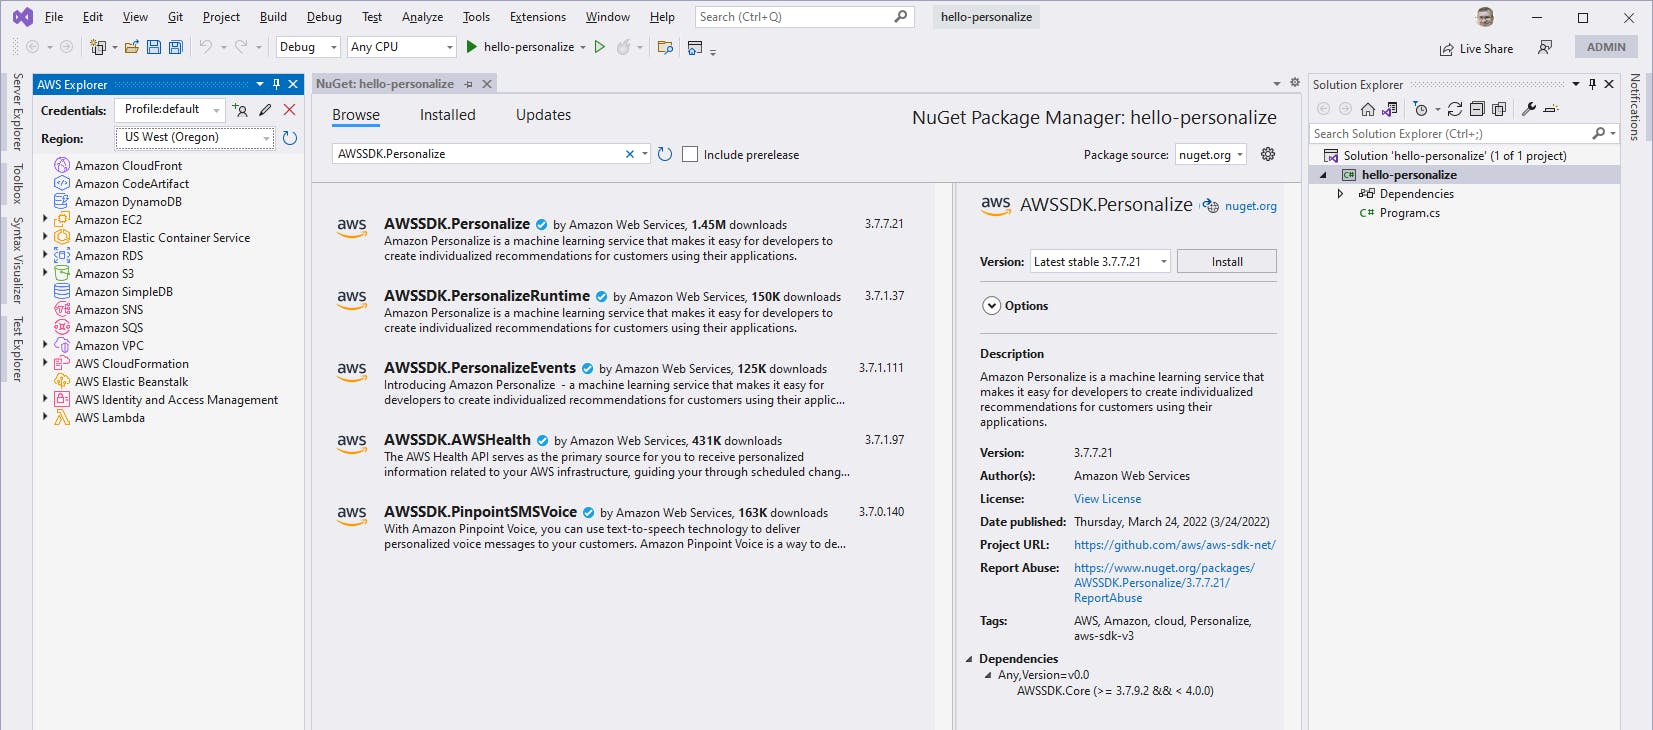
Open Program.cs in the code editor and replace it with the code below at the end of this step. Set RegionEndpoint to the region you're using. Replace [campaign-arn] with the Amazon Resource Name of your campaign. Replace [tracking-id]with your Event Tracker ID. You recorded these IDs in Step 4.
The code is short and simple. If 1 parameter is on the command line (user ID), recommendations are retrieved for the user from Amazon Personalize via an
AmazonPersonalizeRuntimeClientand theGetRecommendationsAsyncmethod. TheGetRecommendationsRequestobject includes the user Id and the ARN of the campaign (created in Step 4). The response, if successful, contains anItemListcollection of recommendations that we iterate through and display to the console.If 2 parameters are on the command line (user ID and item ID), the code sends a "user x watched item y" watch event to Amazon Personalize, by instantiating an
AmazonPersonalizeEventsClientand calling thePutEventsAsyncmethod. ThePutEventsRequestobject specifies the user Id, the event, and the tracking ID of the event tracker (created in Step 4).Save your changes and build the program.
Program.cs
using Amazon;
using Amazon.PersonalizeRuntime;
using Amazon.PersonalizeRuntime.Model;
using Amazon.PersonalizeEvents;
using Amazon.PersonalizeEvents.Model;
using System.Net;

RegionEndpoint region = RegionEndpoint.USWest2;
const string CAMPAIGN_ARN = "[campaign-arn]";
const string TRACKING_ID = "[tracking-id]";

if (args.Length == 1)
{
    // Get recommendations

    var userId = args[0];

    var client = new AmazonPersonalizeRuntimeClient(region);

    Console.WriteLine($"Getting recommendations for user {userId}...");

    var request = new GetRecommendationsRequest()
    {
        CampaignArn = CAMPAIGN_ARN,
        UserId = userId
    };

    var response = await client.GetRecommendationsAsync(request);

    if (response.HttpStatusCode != HttpStatusCode.OK)
    {
        Console.WriteLine($"Error: AmazonPersonalizeRuntimeClient.GetRecommendationsAsync returned status {response.HttpStatusCode}");
    }
    else
    {
        if (response.ItemList != null && response.ItemList.Count > 0)
        {
            Console.WriteLine($"Recommendations:");
            foreach (var recommendation in response.ItemList)
            {
                Console.WriteLine(recommendation.ItemId);
            }
        }
        else
        {
            Console.WriteLine($"No recommendations");
        }
    }
    Environment.Exit(0);
}

if (args.Length == 2)
{
    // Report watch event

    var userId = args[0];
    var itemId = args[1];
    Console.WriteLine($"Reporting watch event to Amazon Personalize - user {userId} watched item {itemId}");

    var eventClient = new AmazonPersonalizeEventsClient(region);
    var eventRequest = new PutEventsRequest()
    {
        EventList = new List<Event>(new Event[]
                {  new Event()
                    {
                        EventId = Guid.NewGuid().ToString(),
                        EventType = "watch",
                        ItemId = itemId,
                        SentAt = DateTime.Now
                    }
                }),
        SessionId = Guid.NewGuid().ToString(),
        TrackingId = TRACKING_ID,
        UserId = userId
    };
    var resp = await eventClient.PutEventsAsync(eventRequest);
    Environment.Exit(0);
}

Console.WriteLine("To report a watch event: dotnet run -- [user-id] [event-id]");
Console.WriteLine("Example:                 dotnet run -- 1 1503");
Console.WriteLine("To get recommendations:  dotnet run -- [user-id]");
Console.WriteLine("Example:                 dotnet run -- 1");
Step 7: Test the Program
In this step, you'll test your program's ability to get recommendations for a user, and to update the interaction dataset in real time with new watch events.
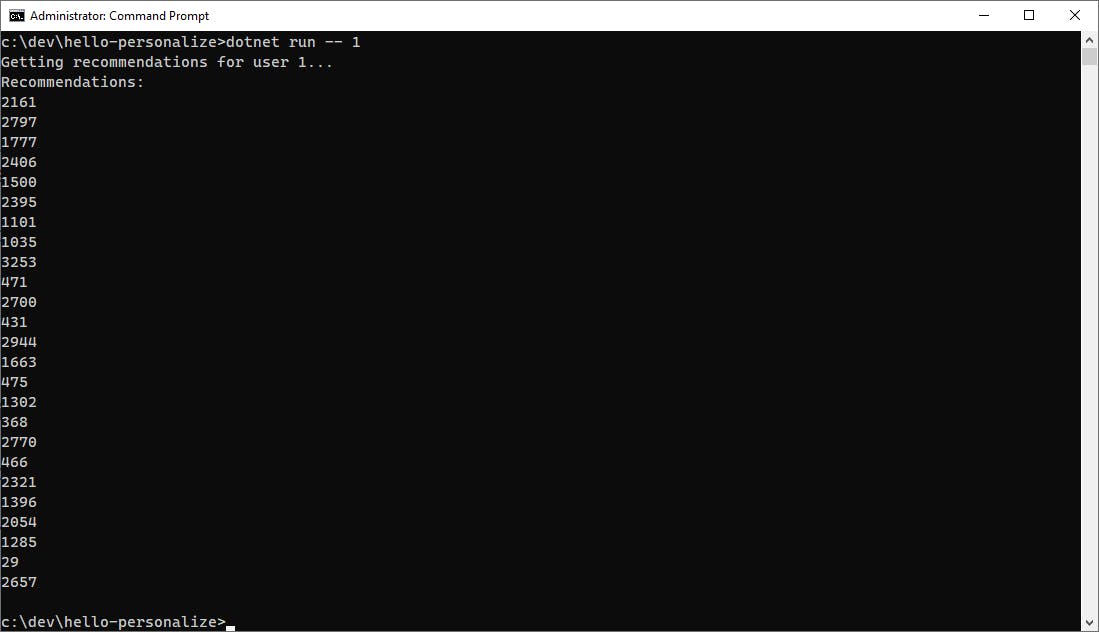
In a command/terminal window, CD to your project folder and run your program with the command line below.
dotnet run -- 1You should get recommendations for User ID 1 that match what you did back in Step 5 in the AWS Console.
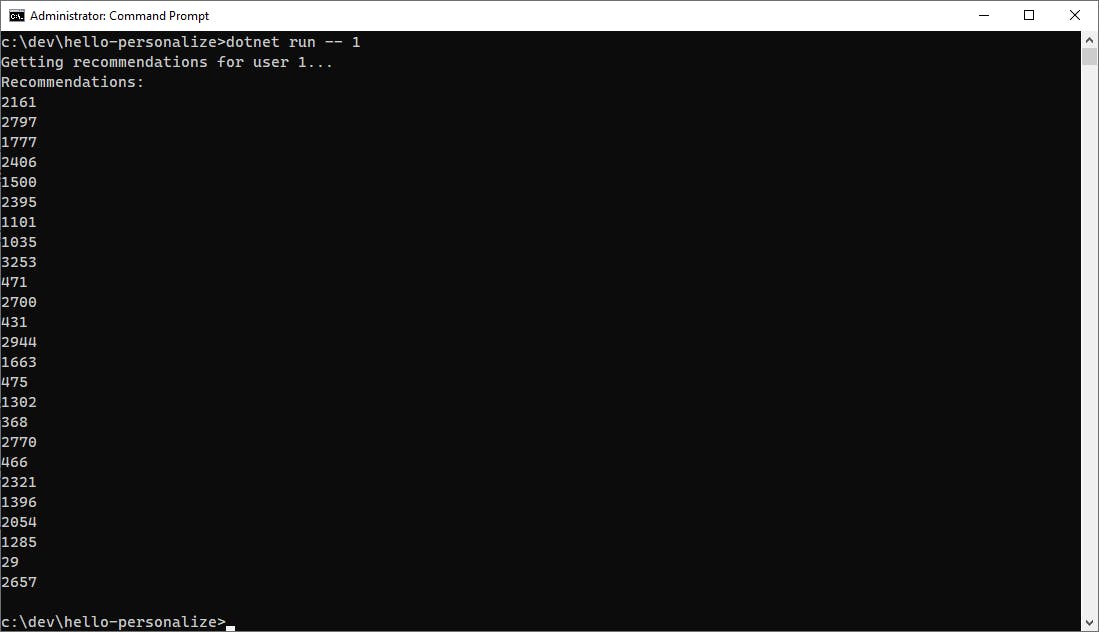
Run the command line, changing the parameter to other User ID values.
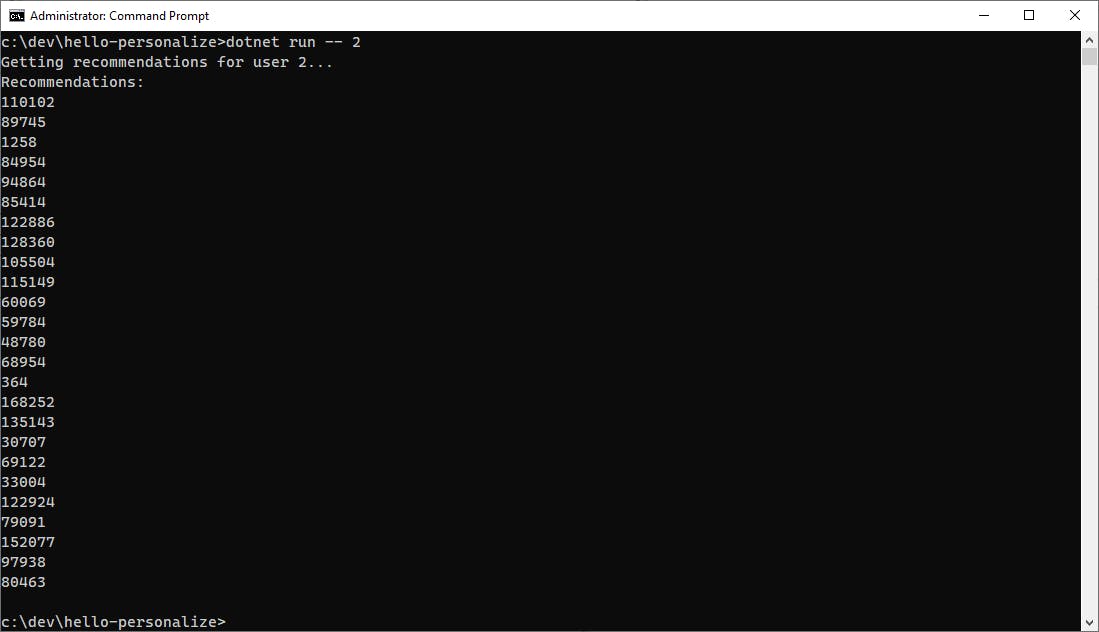
Take a bow! You've trained and configured Amazon Personalize for movie recommendations, and retrieved real-time recommendations in a .NET application.
Now, run the command line with user 777, who does not exist in the interaction data set. You get a list of broadly popular recommendations, such as "Dances with Wolves", "The Shawshank Redemption", and "Star Wars" movies, not based on any historical data for this user. If you try a different new user ID, you'll get the same list.
dotnet run -- 777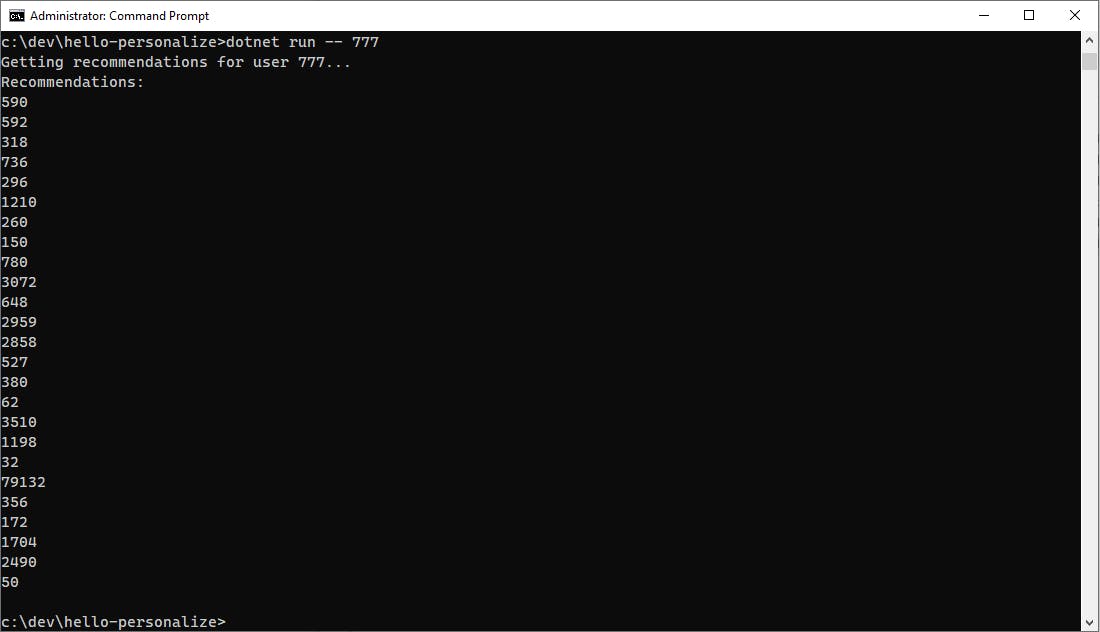
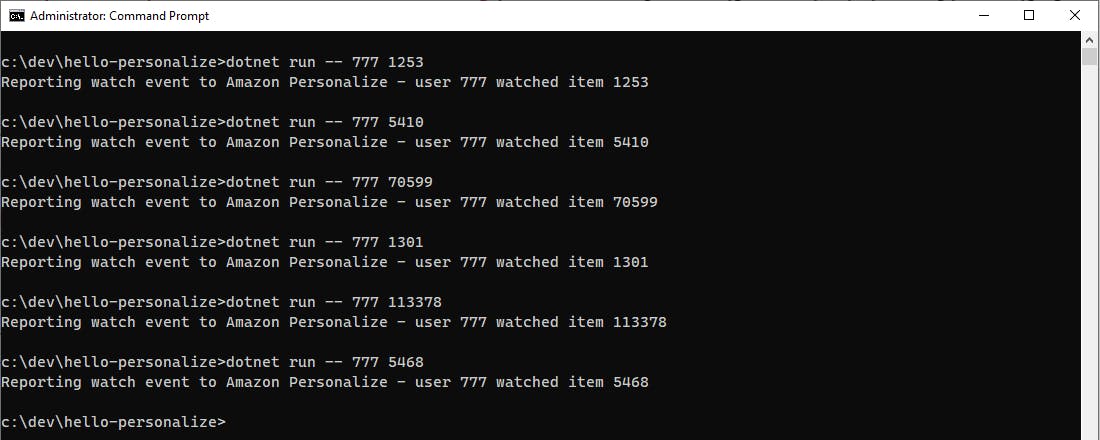
Let's build a history for user 777 by sending events to Amazon Personalize. Run each of the commands below to build up a watch list of sci-fi movies for user 777.
dotnet run -- 777 1253
dotnet run -- 777 5410
dotnet run -- 777 70599
dotnet run -- 777 1301
dotnet run -- 777 113378
dotnet run -- 777 5468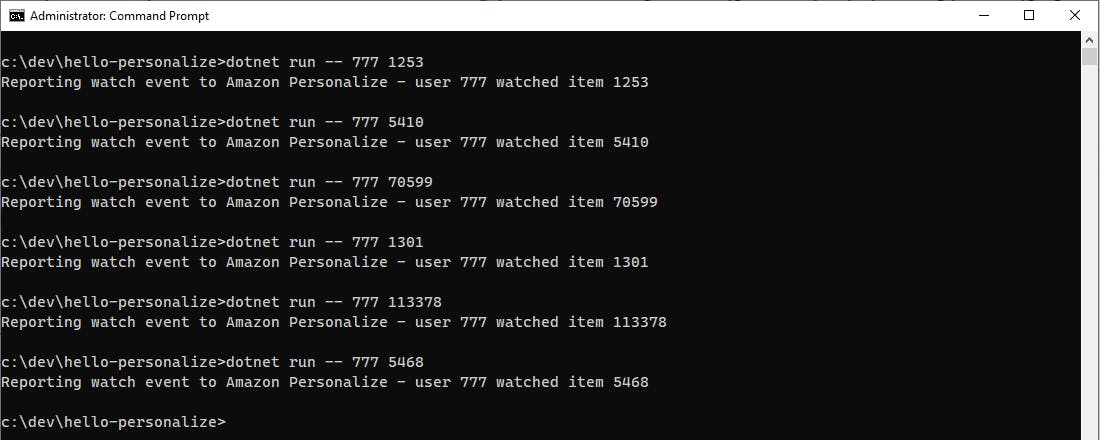
Now, again get recommendations for user 777.
dotnet run -- 777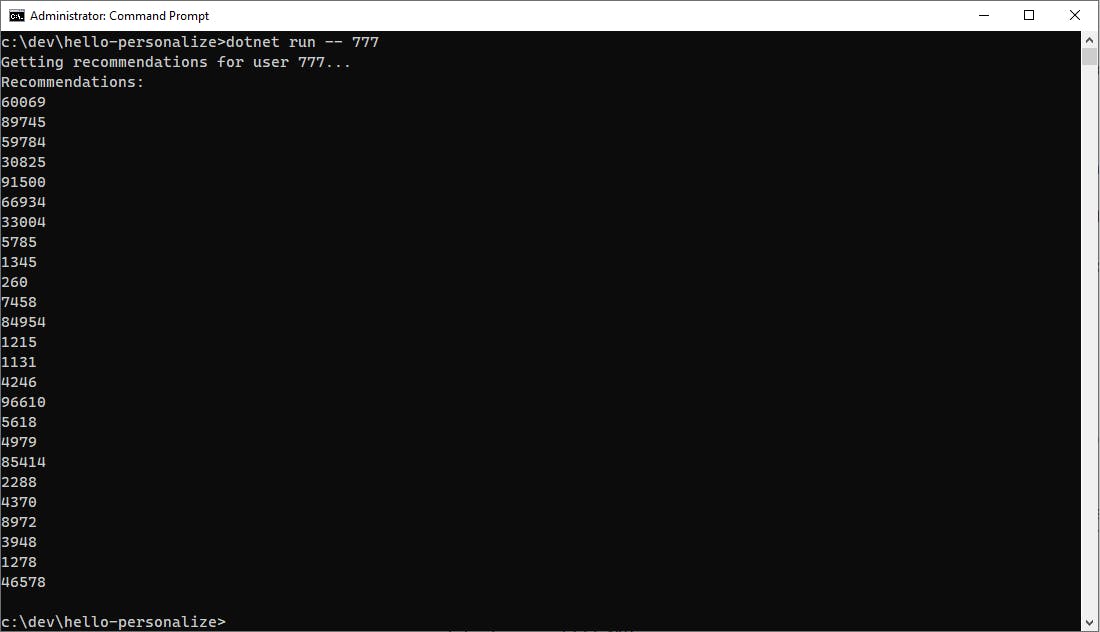
This time, the recommendations are different, because our watch events have given the recommendations engine an idea of our user's tastes. The list now includes many sci-fi movies, including WALL-E, The Hunger Games, Hitchhiker's Guide to the Galaxy, Star Wars: Episode IV, and The Adjustment Bureau.
Congratulations! You've used Amazon Personalize to get movie recommendations for users, and to report real-time user watch events.
Step 8: Shut it Down
When you're all finished with the Hello, Personalize project, deallocate your AWS resources. You don't to be charged for something you're not using.
Delete your campaign:
A. Navigate to Amazon Personalize > Dataset groups > movies and select Custom Resources > Campaigns from the left panel.
B. Click the top-picks-01 campaign.
C. Click the Delete button at top right. Confirm the prompt and wait for the campaign to be deleted.
Delete your solution:
A. Navigate to Amazon Personalize > Dataset groups > movies and select Custom Resources > Solutions from the left panel.
B. Click the top-picks solution.
C. Click the Delete button at top right. Confirm the prompt and wait for the solution to be deleted.
Delete your event tracker:
A. Navigate to Amazon Personalize > Dataset groups > movies > Event trackers.
B. Click on the watch event tracker.
C. Click Delete at top right. Confirm the prompt and wait for your event tracker to be deleted.
Delete your recommender:
A. Navigate to Amazon Personalize > Dataset groups > movies > Recommenders.
B. Click on the top-picks recommender.
C. Click Delete at top right. Confirm the prompt and wait for your recommender to be deleted.
Delete your dataset:
A. Navigate to Amazon Personalize > Dataset groups > movies > Datasets.
B. Click on the watch dataset.
C. Click Delete at top right. Confirm the prompt and wait for your dataset to be deleted.
Where to Go From Here
Personalized service is vital for many businesses, and with Amazon Personalize you can build a high quality personalized recommendation system. In this tutorial, you used sample movie viewing data to train a personalized movie recommendation system. You wrote .NET code that gets recommendations for users from Amazon Personalize. You also wrote code to send user watch events to Amazon Personalize to keep the interaction dataset up to date. You saw how reporting new user events modifies recommendations. The AWS SDK for .NET code was minimal: once things were configured, integration into application code was very simple. We only scratched the surface of what's possible.
In the AWS console, you had to work with quite a few different artifacts, including dataset groups, recipes, solutions, solution versions, campaigns, and event trackers. Be aware it is also possible to perform these operations from the AWS CLI or in code with the AWS SDK. Many of the artifacts you created offered you configuration choices to fine-tune behavior. To move forward with Amazon Personalize, spend time in it and review the documentation deeply. Learn its many features. You'll need to get a firm understanding of these artifacts and the control you have over them, as well as the workflow for iteratively improving your interaction data, models, and results.
Further Reading
AWS Documentation
Amazon Personalize - Getting Started
Amazon Personalize - How it works
Amazon Personalize - Resources
Tutorial: Create real-time, personalized movie recommendations with Amazon Personalize (Python)
AWS SDK for .NET Documentation
Videos
How to Build This: Episode 1 - Personalization by Jillian Forde
Blogs
Creating a Recommendation Engine using Amazon Personalize
Amazon Personalize improvements reduce training time and latency
