Hello, .NET Deploy!
Getting Started with .NET on AWS: AWS .NET Deployment Tool


Table of contents
- This episode: AWS Deployment Tool for .NET CLI. In this Hello, Cloud blog series, we're covering the basics of AWS cloud services for newcomers who are .NET developers. If you love C# but are new to AWS, or to this particular tool, this should give you a jumpstart.
- AWS .NET Deployment Tool : What is it, and why use It?
- Our Hello, .NET Deployment Project
- Where to Go From Here
- Further Reading
This episode: AWS Deployment Tool for .NET CLI. In this Hello, Cloud blog series, we're covering the basics of AWS cloud services for newcomers who are .NET developers. If you love C# but are new to AWS, or to this particular tool, this should give you a jumpstart.
In this post we'll introduce the AWS Deployment Tool for .NET and use it to deploy a "Hello, Cloud" .NET program to several different AWS services. We'll do this step-by-step, making no assumptions other than familiarity with C# and Visual Studio. We're using Visual Studio 2022 and .NET 6.
AWS .NET Deployment Tool : What is it, and why use It?
“If it hurts, do it more frequently, and bring the pain forward.” —Jez Humble, Continuous Delivery: Reliable Software Releases Through Build, Test, and Deployment Automation
There are many kinds of .NET applications, and there are many AWS services capable of hosting them. With so many services and choices available, it can seem overwhelming. Where does a developer start? Which compute service should I use? How can I get started easily? What are good practices I and my team should follow?
The AWS .NET Deployment tool helps you with a guided experience. It's what's known as opinionated tooling. The tool is for modern, cloud-native .NET applications that target running on Linux. You can't use it with legacy .NET framework or Windows applications. At present, the tool supports ASP .NET Core, .NET console, or Blazor WebAssembly applications written in .NET Core 3.1, .NET 5, or .NET 6. The tool is in preview, and is an open source project.
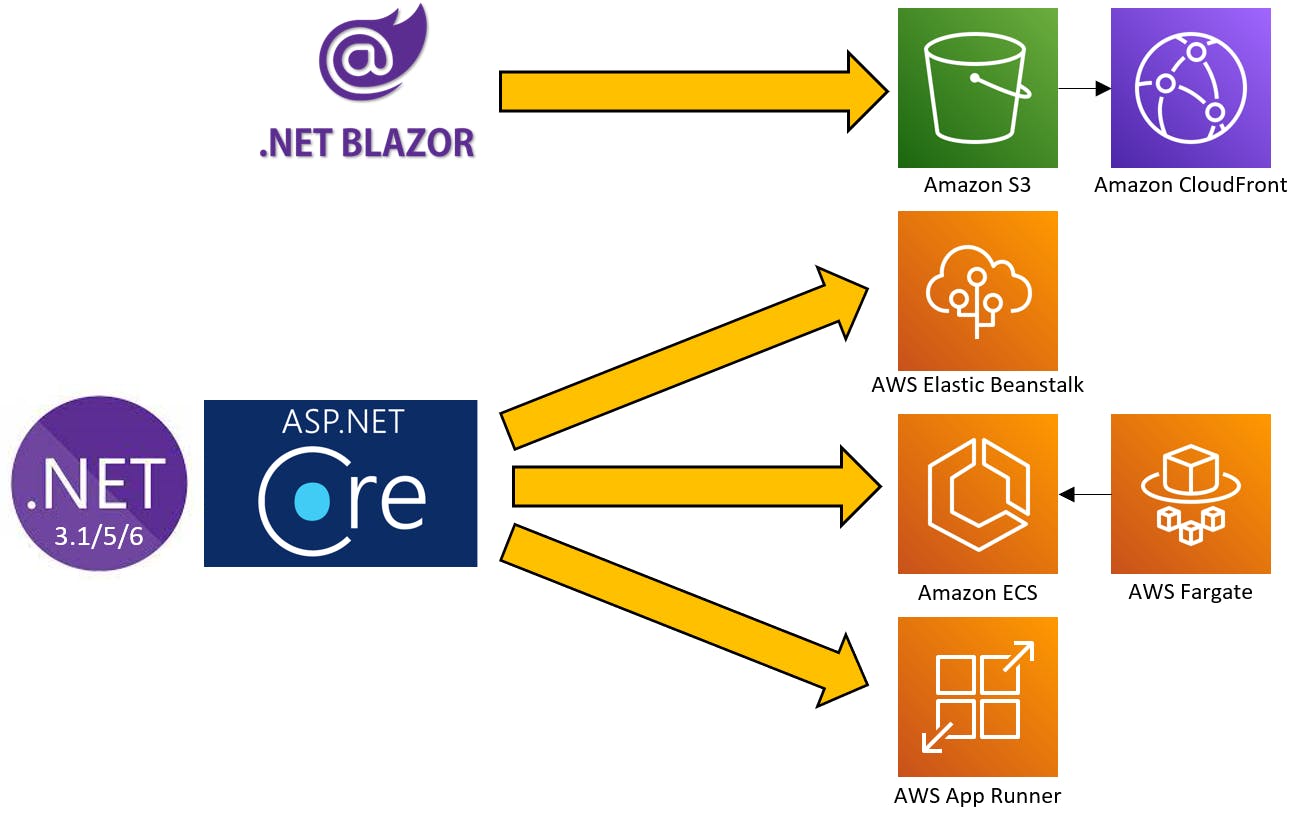
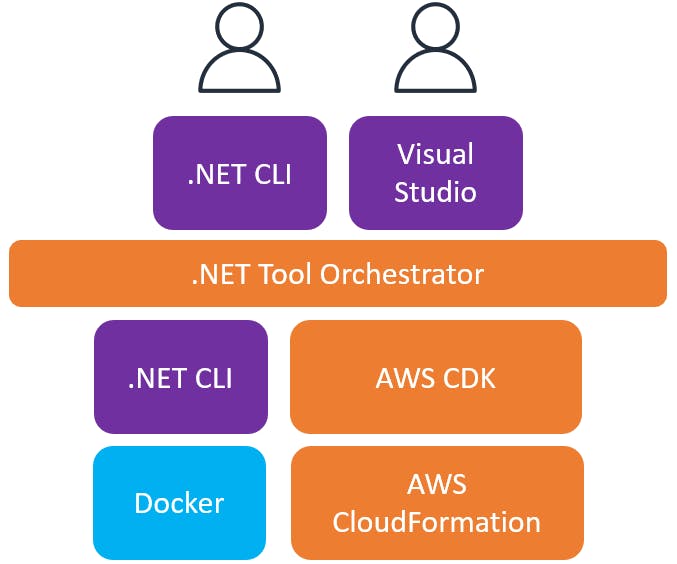
You can run the tool from the command line with the .NET CLI, but it's also integrated into the AWS Toolkit for Visual Studio. As the tool guides you through deployment, it explains the logic behind its recommendations. At present, the AWS .NET deployment tool can guide you to target deployment on AWS App Runner, Amazon Elastic Container Service (ECS) with AWS Fargate, AWS Elastic Beanstalk, or S3 & CloudFront (for Blazor WebAssembly apps). In the future, the plan is for the tooling to merge with the .NET AWS Lambda experience.
Whether you use the .NET CLI or Visual Studio, the underlying .NET tool orchestrator handles the deployment. It integrates with the .NET CLI and Docker to build and containerize applications, and with the AWS Cloud Development Kit (CDK) and AWS CloudFormation to deploy to AWS.
There are already a number of IDE deployment wizards and command line ways to deploy services to AWS, so why use the AWS .NET Deployment tool? The tool provides a unified experience and a minimal number of steps. You don't need to know a lot about AWS to use it, but as you learn about advanced AWS features, the tool allows you to use them. The interactive experience the tool provides can be reused in automated deployments. It's extensible and can be customized for your organization's needs.
Our Hello, .NET Deployment Project
We will create a Blazor WebAssembly project and a Web API project. We'll use the AWS .NET deployment tool to deploy the Blazor project to S3 and CloudFront. Then we'll deploy the Web API project, first to AWS Elastic Beanstalk, and afterward to Amazon ECS.


One-time Setup
For any of the tutorials in the Hello, Cloud series you need the following:
- An AWS account, and an understanding of what is included in the AWS Free Tier.
- Microsoft Visual Studio 2022. If you're using an older version of Visual Studio you won't be able to use .NET 6. If you use a different IDE, you may have to find alternatives to some tutorial steps.
- AWS Toolkit for Visual Studio. You'll need to configure the toolkit to access your AWS account and create an IAM user. Your default AWS profile will be linked to this user when running programs from the command line.
Step 1: Install the Tool
In this step, you'll install the AWS .NET Deployment Tool.
Open a command/terminal window.
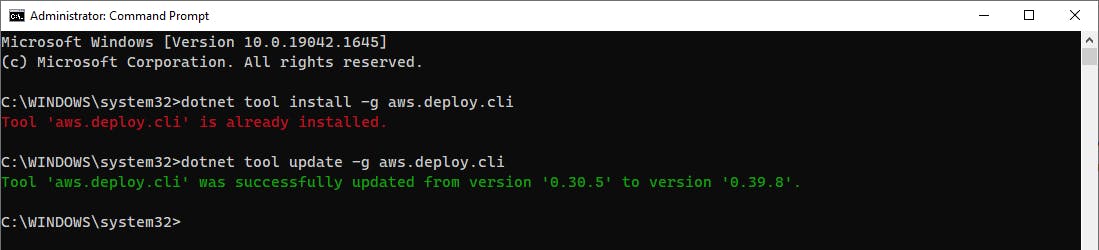
Run the command below to install the tool.
dotnet tool install -g aws.deploy.cli
If you receive a message that the tool is already installed, run the update command below to ensure you are on the latest version.
dotnet tool update -g aws.deploy.cli
Step 2: Deploy a Blazor WebAssembly Front-end Application to S3
In this step, you'll create a sample Blazor project and use the AWS .NET deployment tool to deploy it to Amazon S3 as a static web site.
Open a command/terminal window and CD to a development folder.
Run the dotnet new command below to create a new Blazor WebAssembly project named hello-net-deploy-blazor.
dotnet new blazorwasm -n hello-net-deploy-blazor
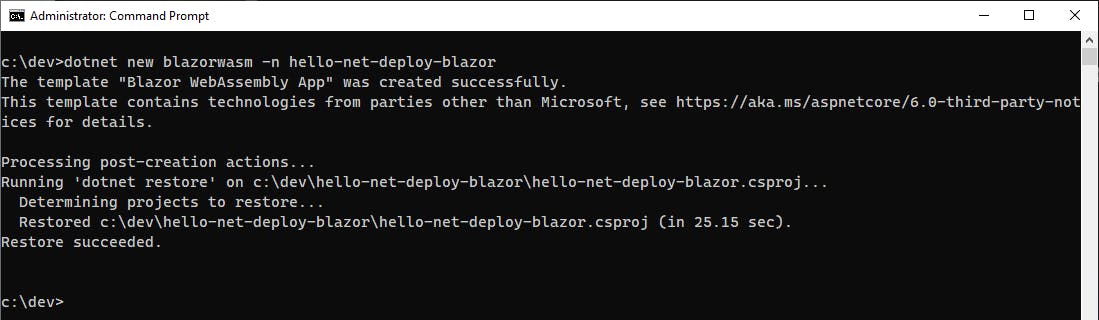
Open the project in Visual Studio and get familiar with the structure and code of the generated Hello, World project.
Press F5 to run the project.
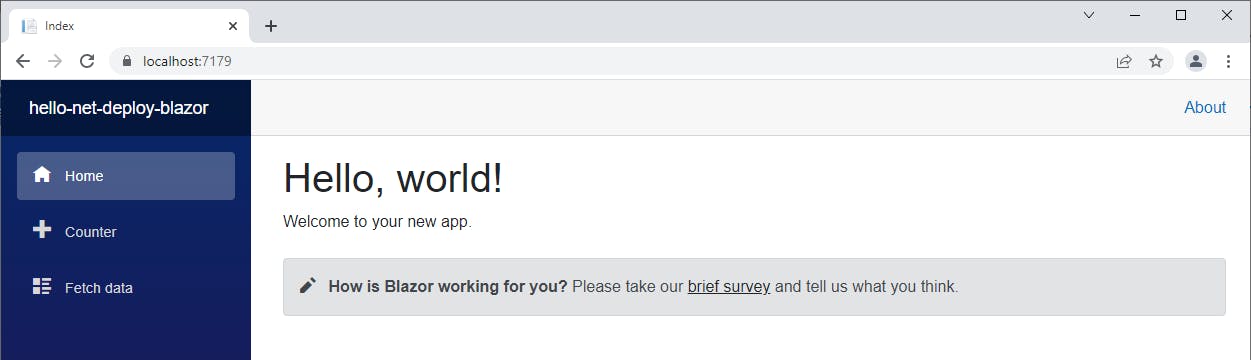
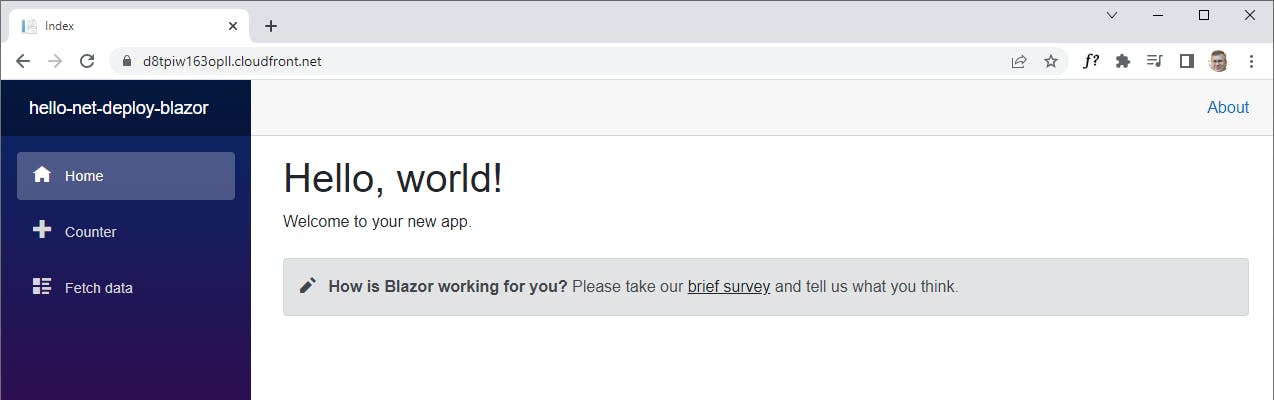
A. The app opens in a browser tab. You see "Hello, World."
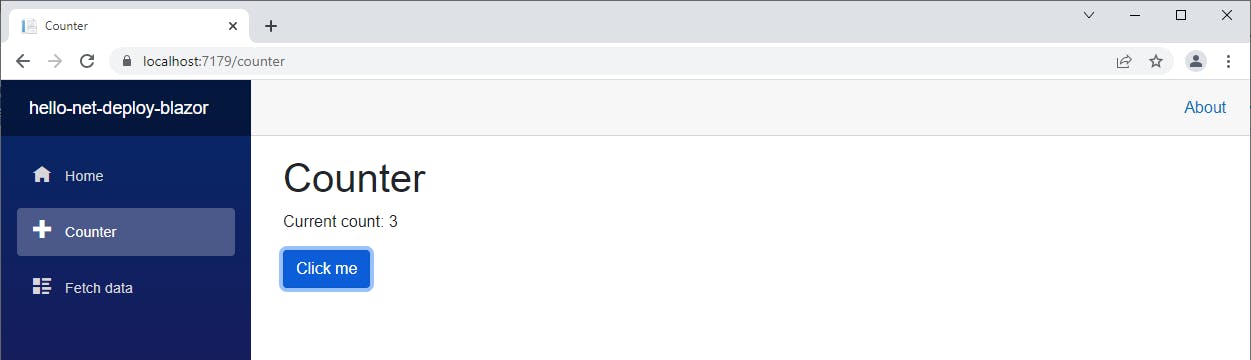
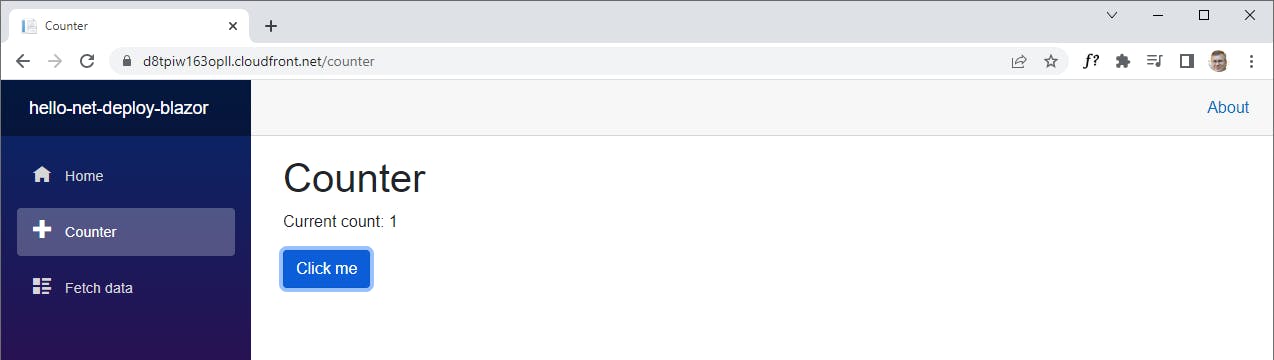
B. On the left panel of the app, click Counter.
C. Click the Click me button repeatedly, and observe the Current count increase.
D. In Visual Studio, stop the program.
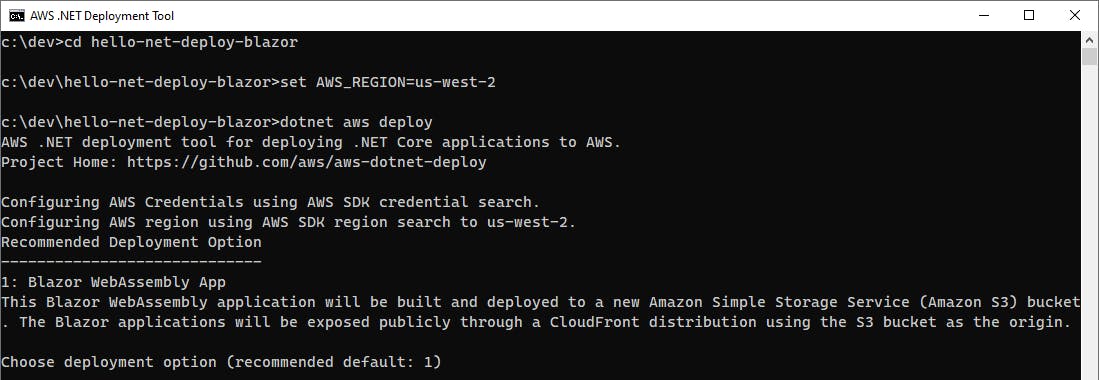
In Visual Studio, open the AWS Explorer and select a region you want to work in. We're using US-West-2 (Oregon).
In the command/terminal window, CD to the
hello-net-deploy-blazorproject location and set the AWS_REGION environment variable to the region you want to work in.On a Windows PC:
set AWS_REGION=us-west-2On a Mac:
export AWS_REGION=us-west-2Run the command
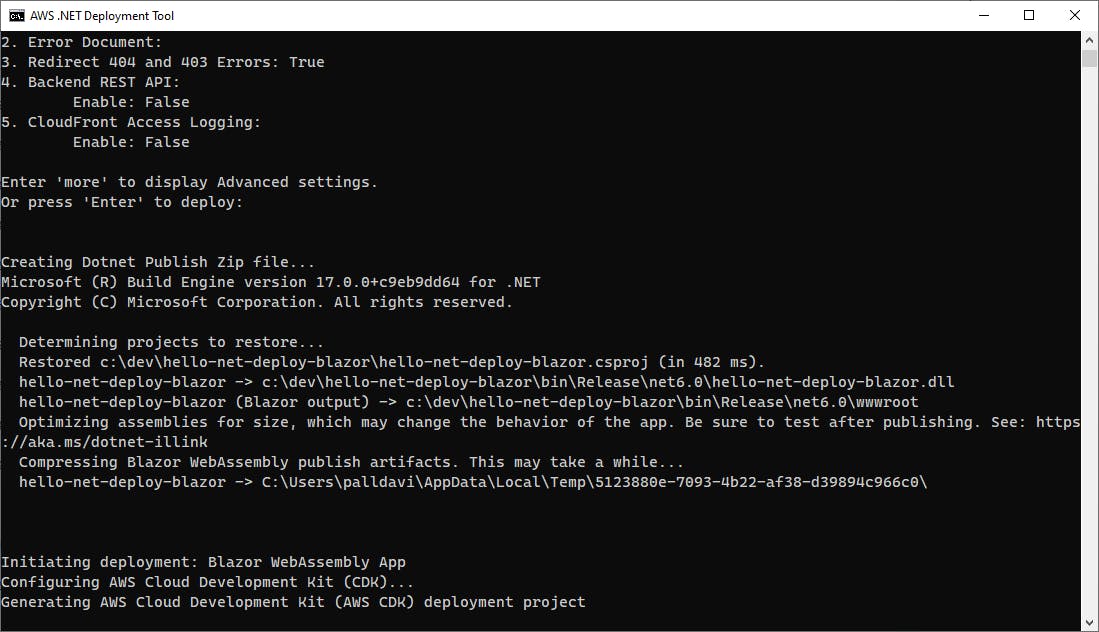
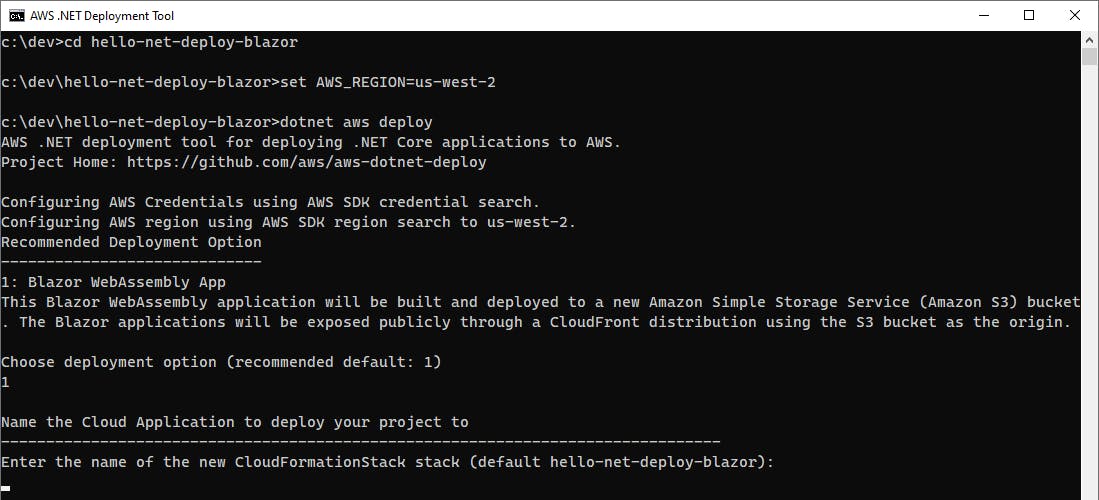
dotnet aws deployto run the AWS .NET deployment tool.dotnet aws deployA. The deployment tool tells you the region it is using, detects the .NET project, and provides option(s) for deployment. In this case, there is one option offered for a Blazor WASM project, deployment to an S3 bucket. Read the description of what will be done, then enter 1.
B. Next you are prompted to name the project. Press Enter to accept the default of hello-net-deploy-blazor.
C. The tool now shows you the settings it proposes to use, which you may review or change. We see the index document is
index.html, the simple project has no error page, the option to redirect on 403/404 errors is enabled, there is no back-end REST API, and we won't be logging access in CloudFront. All of these settings are fine for our purposes, so press Enter.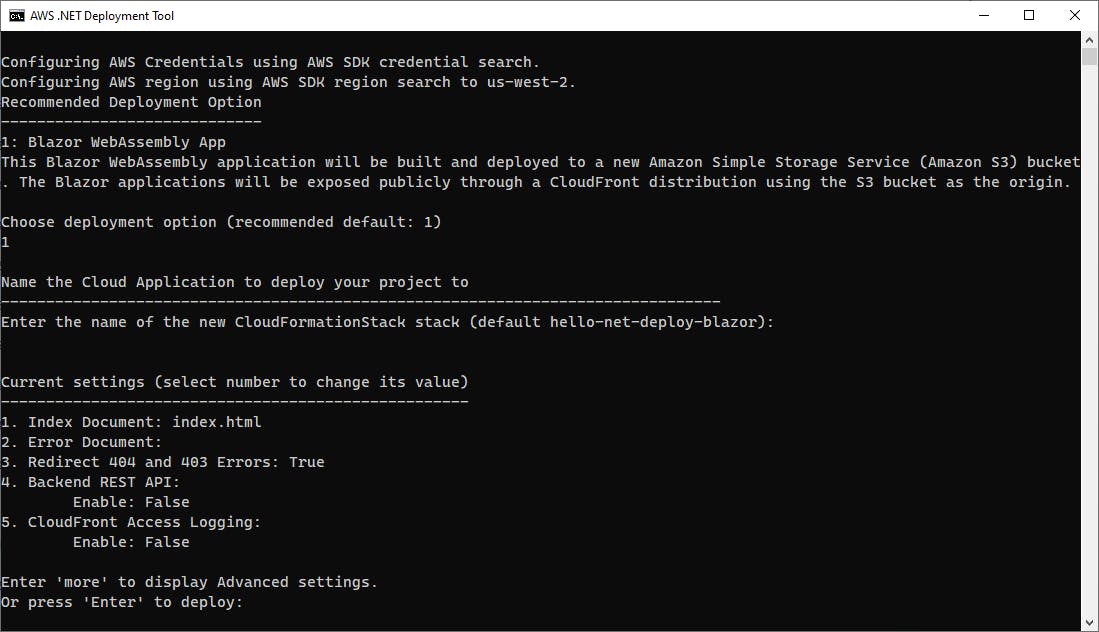
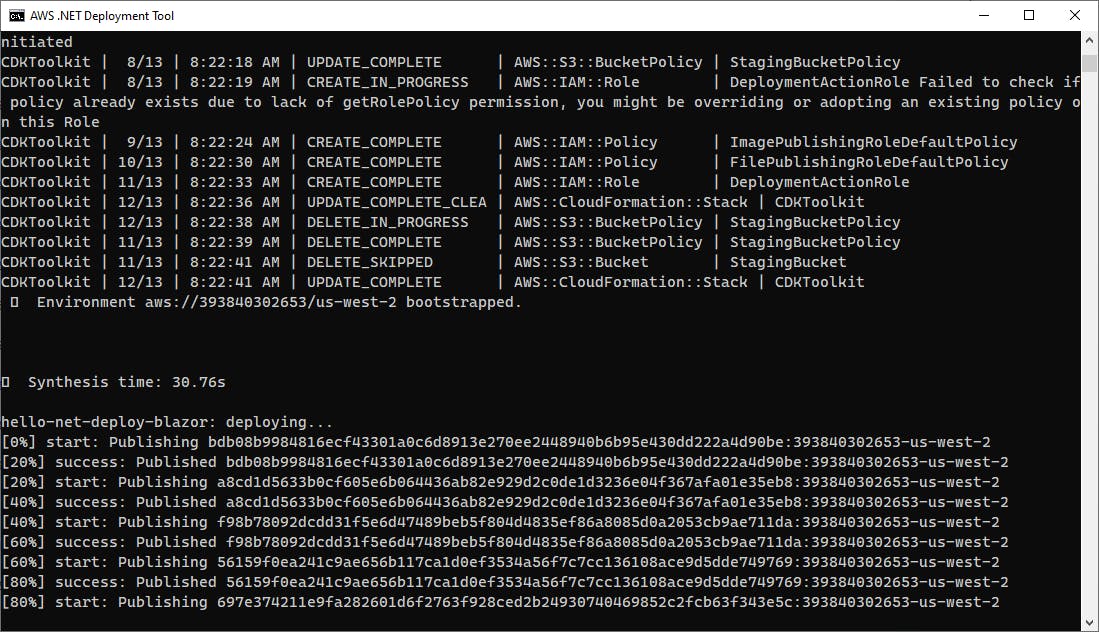
D. Now deployment begins, which takes a few minutes. The tool tells you it is doing a build, packaging up the app, and creating a CDK project.

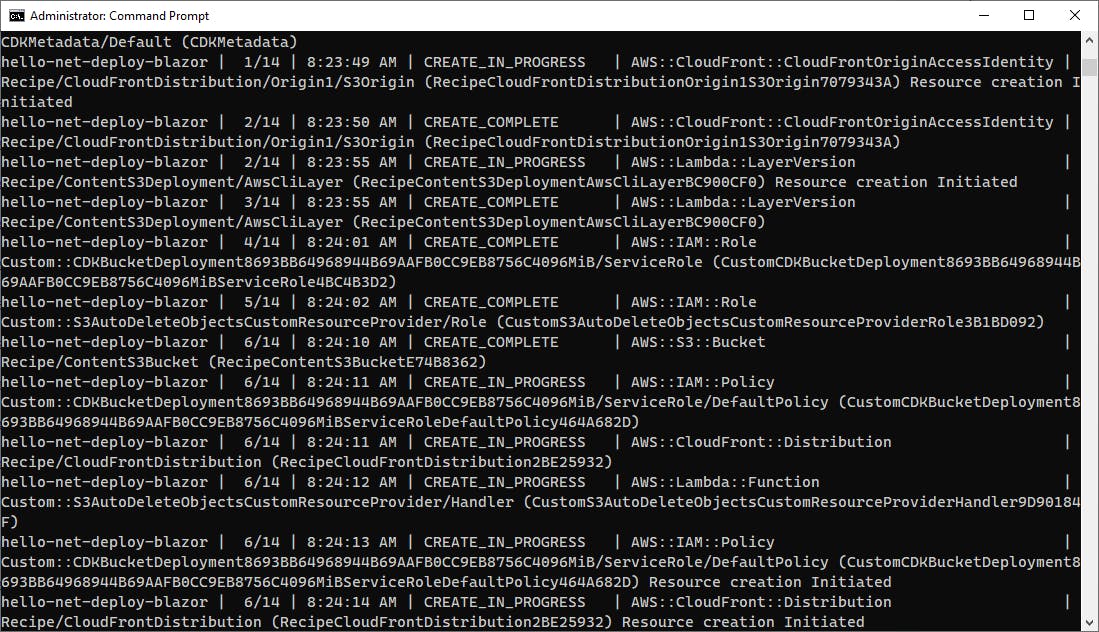
Soon, deployment with CloudFormation begins. You see various CloudFormation "recipes" run, with details about S3 bucket creation and IAM policies and a CloudFront distribution.
E. Finally, the deployment completes. At the end of the display, you see the endpoint URL of your CloudFront distribution (
https://d8tpiw163opll.cloudfront.net/for us), and the name of the S3 bucket that holds the website (hello-net-deploy-blazor-recipecontents3buckete74b-anutmrgtivyffor us).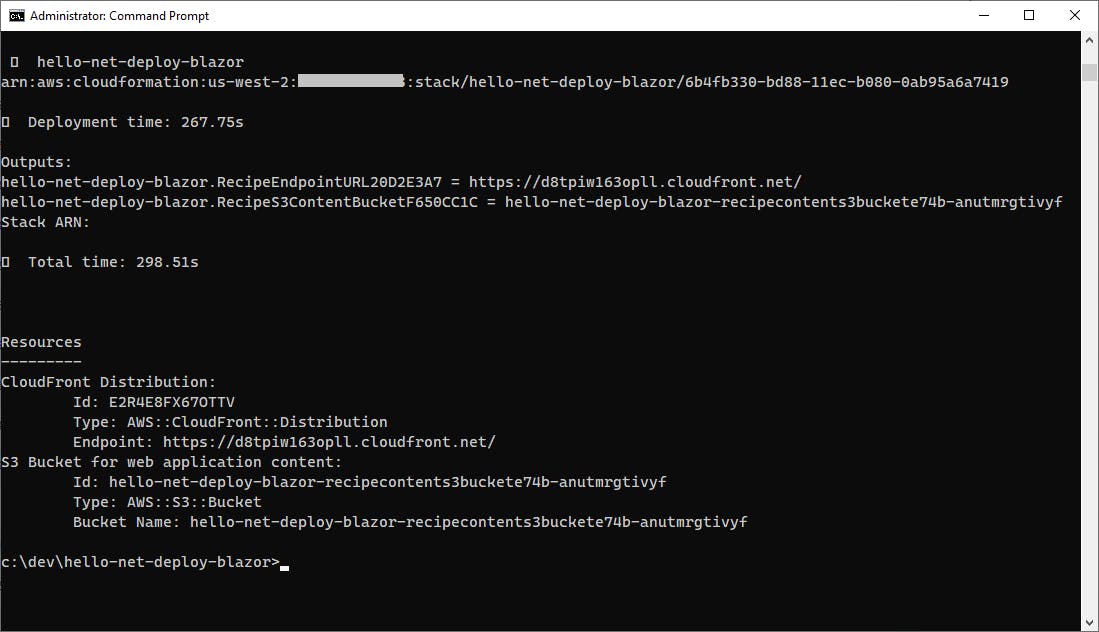
Now it's time to test the the deployed app.
A. In a browser, visit the CloudFront URL. It works! Our app is deployed and available online, hosted in S3 and CloudFront.
B. Click the Counter link and test that page as well.
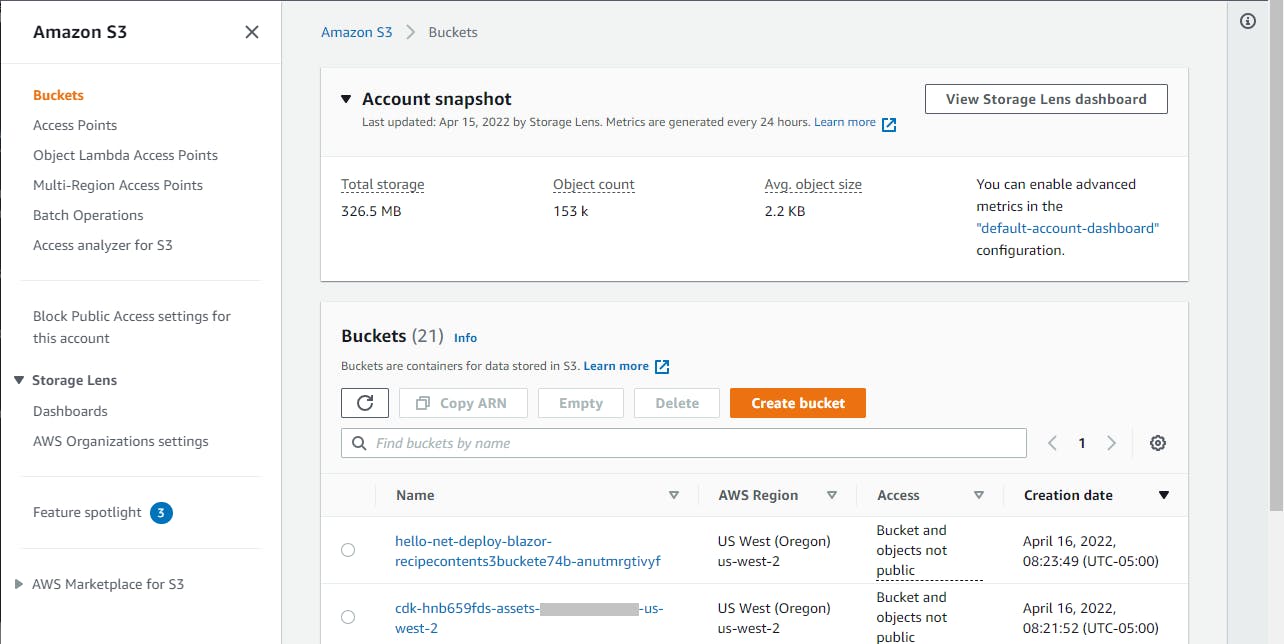
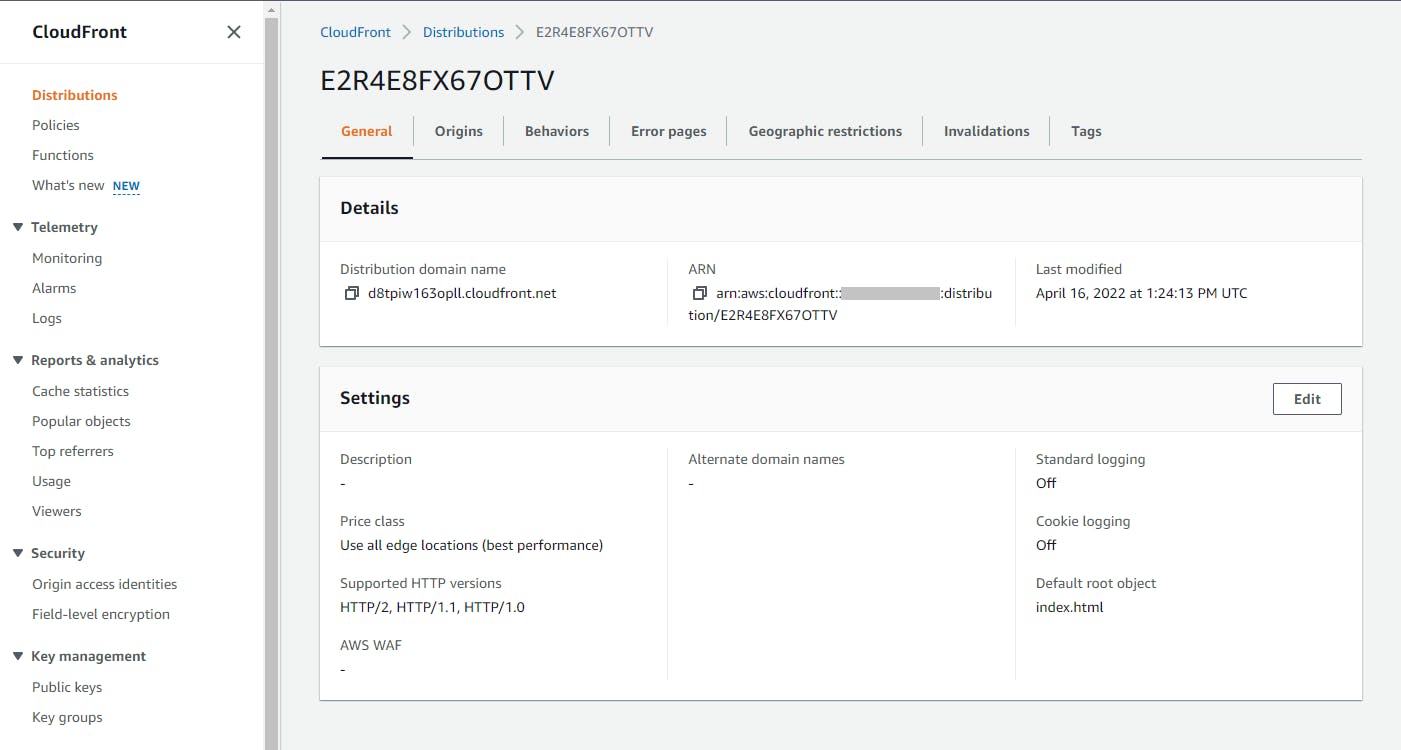
Visit the AWS management console to review what was allocated.
A. Set the region to the region you've been working in.
B. Navigate to Amazon S3 (you can enter s3 in the search bar). You should see an S3 bucket, with the same name displayed in Step 5E, along with another bucket for use by the CDK.
C. Navigate to AWS CloudFront. You should see a CloudFront distribution, with the name that was displayed in Step 5E.
When you're done admiring your deployed project, let's delete it. We want to see how to delete a deployment with the AWS .NET deployment tool, and we don't want to leave things around that you might get charged for.
A. In the command/terminal window, run the command below.
dotnet aws delete-deployment hello-net-deploy-blazorB. When prompted for confirmation, enter Y.
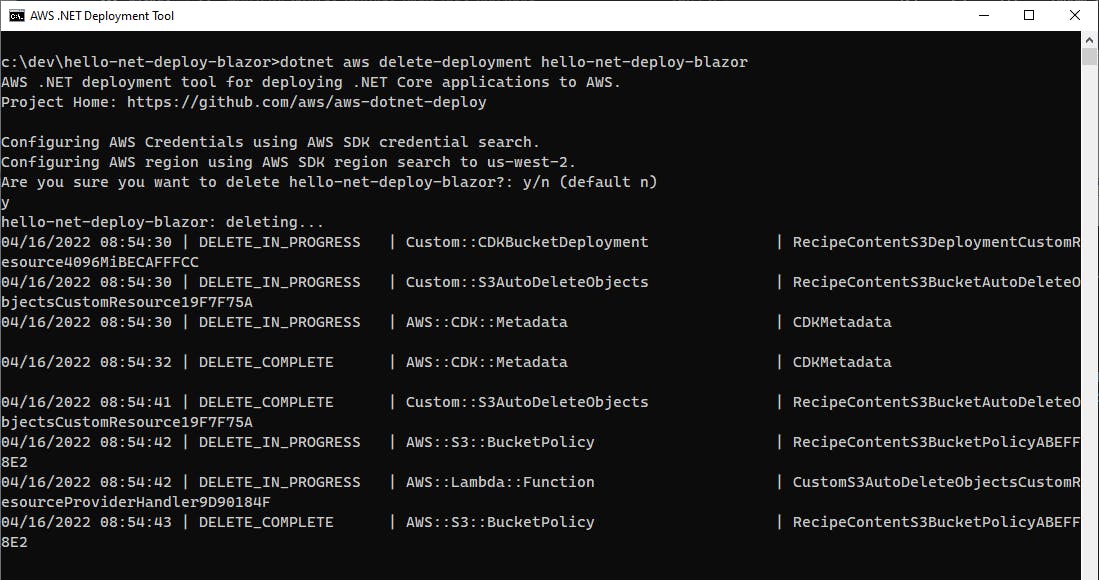
C. Wait for the delete deployment operation to complete.
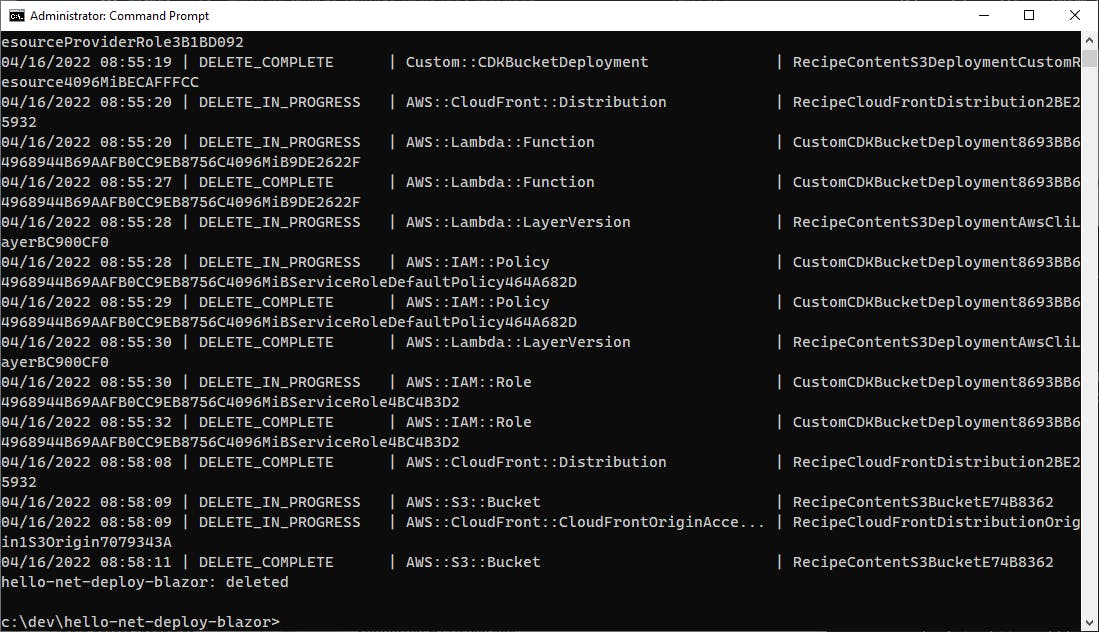
D. If you wish, revisit CloudFormation and S3 in the AWS console and confirm that the artifacts have been removed.
Congratulations! You've published a Blazor WebAssembly project to AWS S3 and CloudFront. The AWS NET deployment tool did all the work. Deleting the deployment was just as easy.
Step 3: Deploy a WebAPI Project to AWS Elastic Beanstalk
In this step, you'll create a WebAPI project and use the AWS .NET deployment tool to deploy it to Amazon Elastic Container Service (ECS) and AWS Fargate.
Open a command/terminal window and CD to a development folder.
Run the dotnet new command below to create a new Web API project named hello-net-deploy-webapi.
dotnet new webapi -n hello-net-deploy-webapi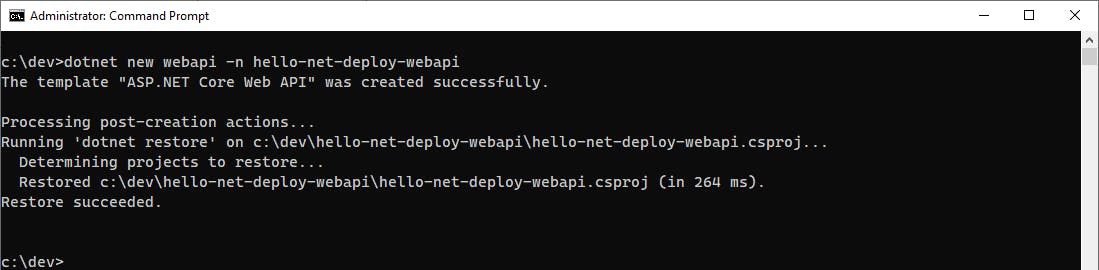
CD to the
hello-net-deploy-webapifolder, and build and test the project with the dotnet run command.dotnet run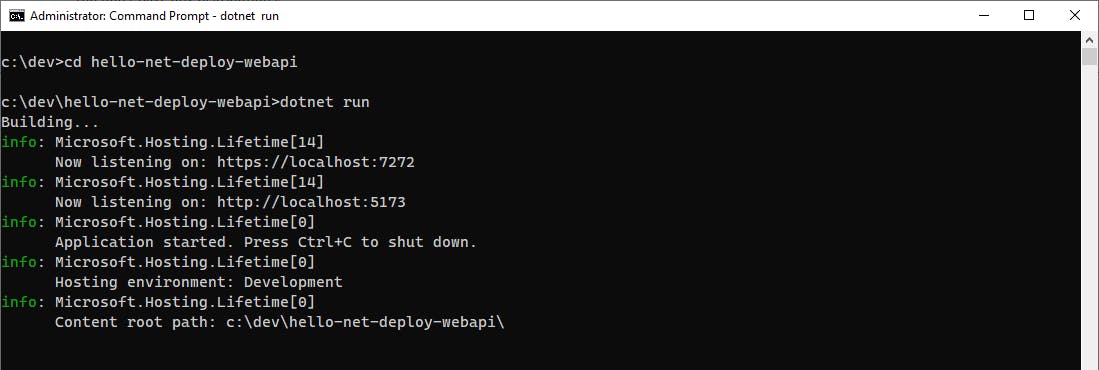
Note the displayed HTTPS URL and visit that URL in a browser, with /WeatherForecast at the end of the path. Our URL is
https://localhost:7272/WeatherForecast. You see a JSON response with weather data.
In the command/terminal window, stop the program.
Now we'll deploy our Web API project with the AWS .NET deployment tool. In the command/terminal window, run the command below.
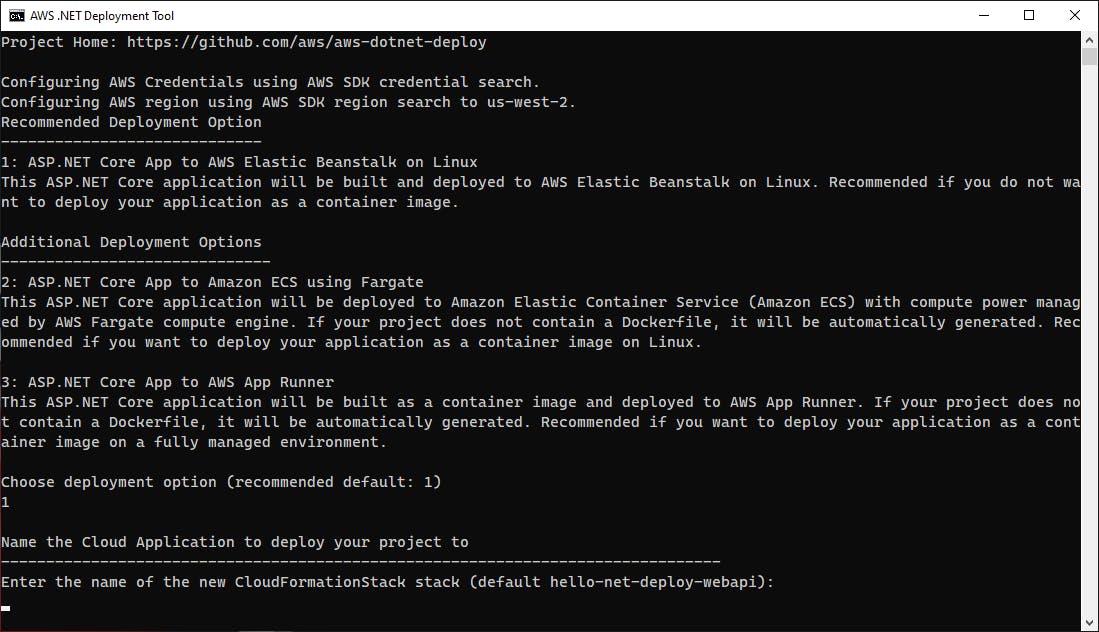
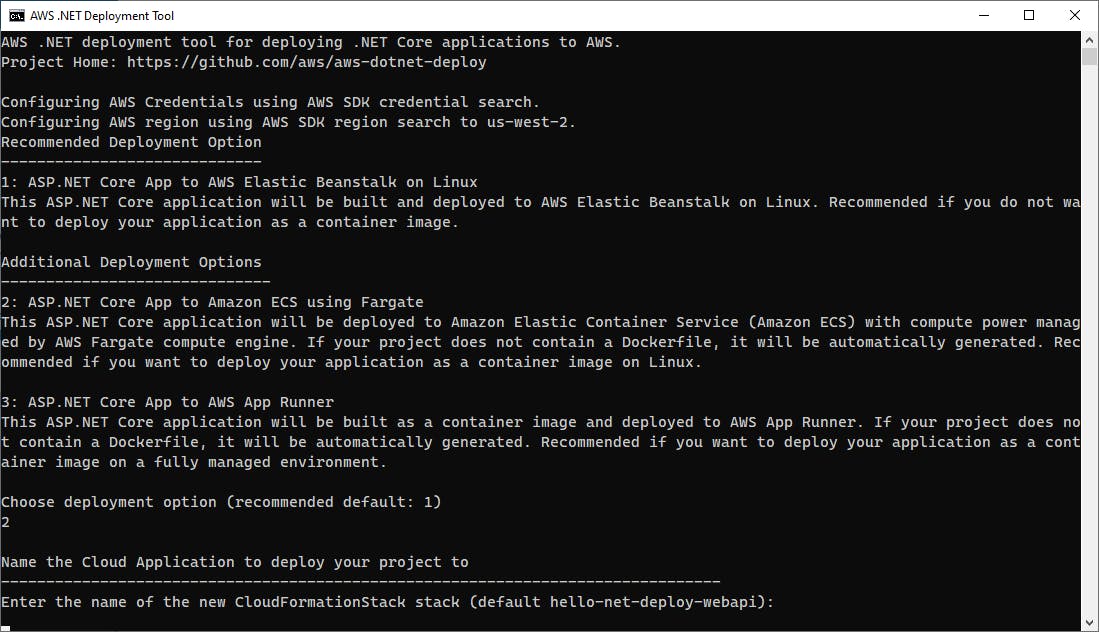
dotnet aws deployA. This time, we have choices. The deployment tool offers us the option of deploying to 1) AWS Elastic Beanstalk on Linux, 2) Amazon ECS using AWS Fargate, or 3) AWS App Runner. Choose 1 to deploy to AWS Elastic Beanstalk.
B. When prompted for project name, press Enter to accept the default of hello-net-deploy-webapi.
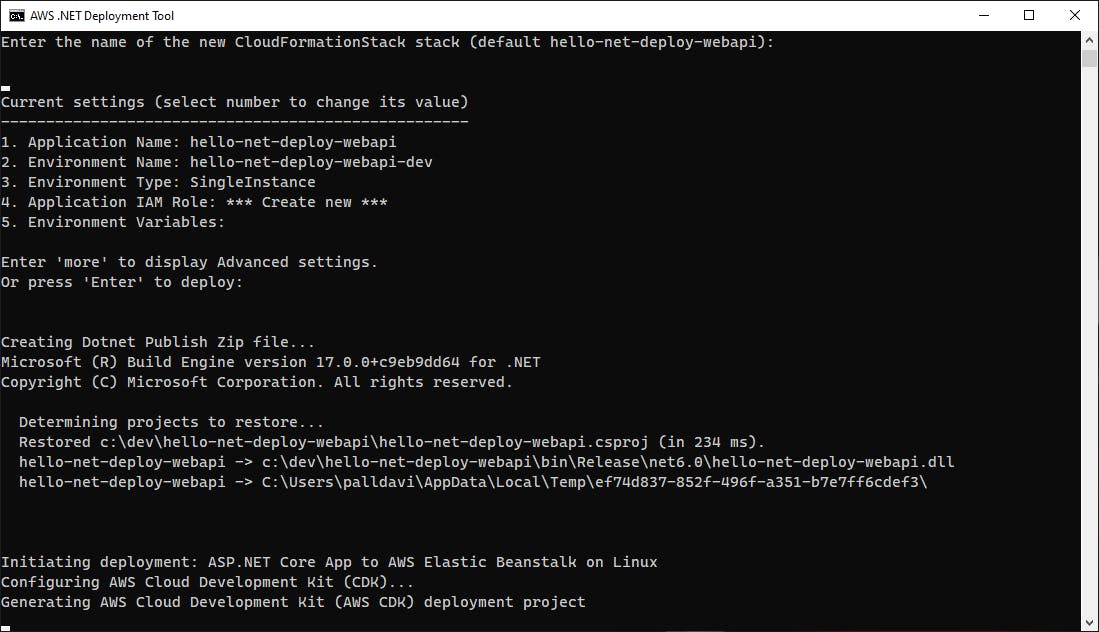
C. Review and accept the proposed settings by pressing Enter.
D. Wait for the deployment to complete, and watch the console output to understand what is being done.
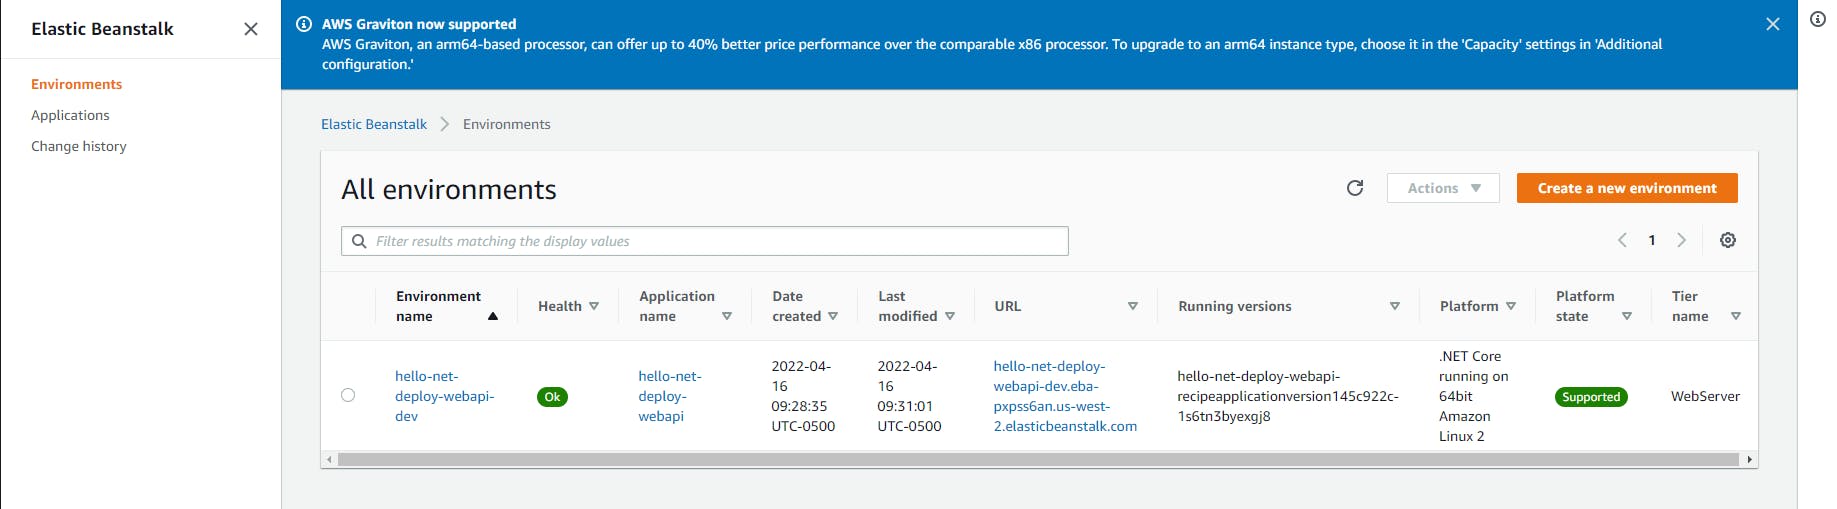
When deployment completes, note the URL. Our is
http://hello-net-deploy-webapi-dev.eba-pxpss6an.us-west-2.elasticbeanstalk.com/.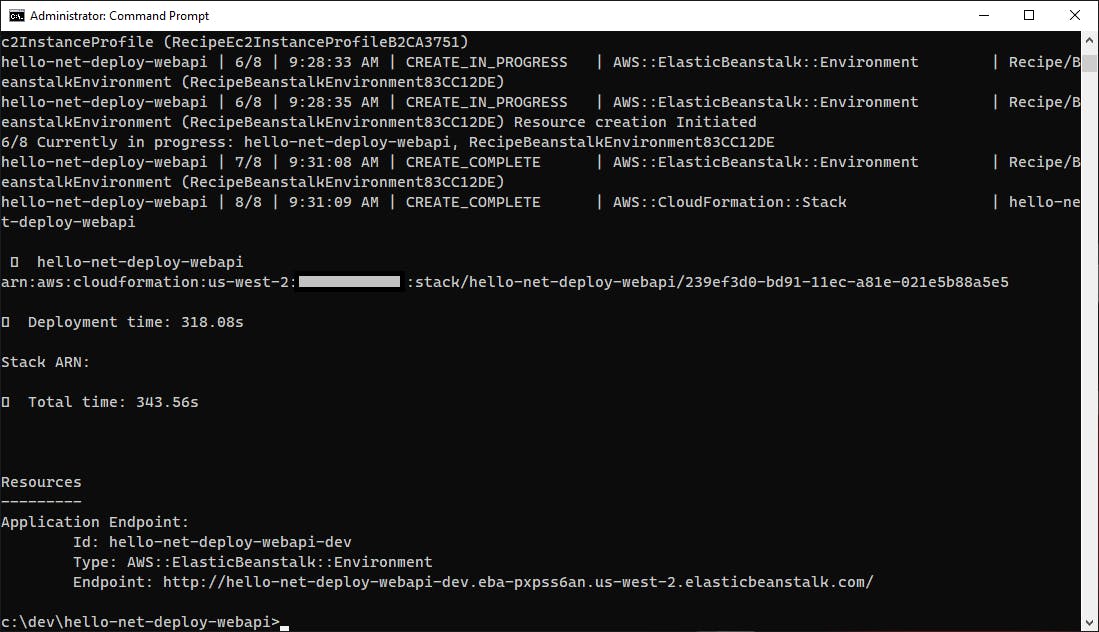
Visit the URL in a browser, with /WeatherForecast at the end of the path. Your Web API project is now hosted in AWS Elastic Beanstalk!

In the AWS console, visit the AWS Elastic Beanstalk area to view the Elastic Beanstalk allocation the deployment tool created.

When you're done with the project, enter the command below to delete the deployment, and wait for the delete to complete.
dotnet aws delete-deployment hello-net-deploy-webapi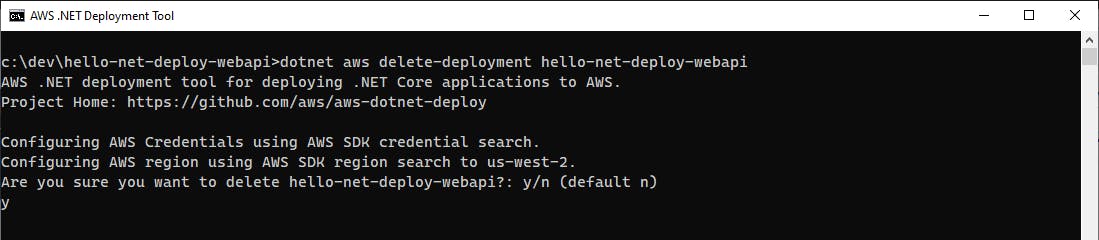
Step 4: Deploy the Web API Project to Amazon Elastic Container Service (ECS)
In this step, you'll deploy the same Web API project you worked with in Step 3, this time to Amazon Elastic Container Service (ECS).
In a command/terminal window, CD to your Web API project folder.
Run the command below to again deploy the project.
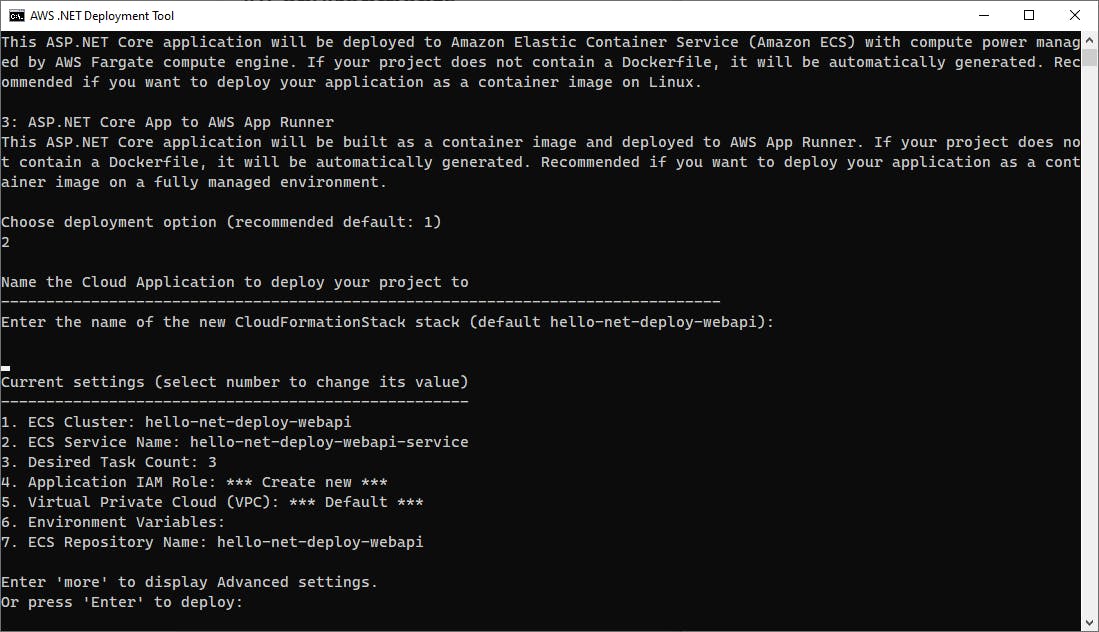
dotnet aws deployYou should again be presented with 3 options just as in Step 3. This time, enter 2 to select deployment to Amazon ECS using Fargate.
When prompted for project name, accept the default of hello-net-deploy-webapi.
Review and accept the proposed settings.
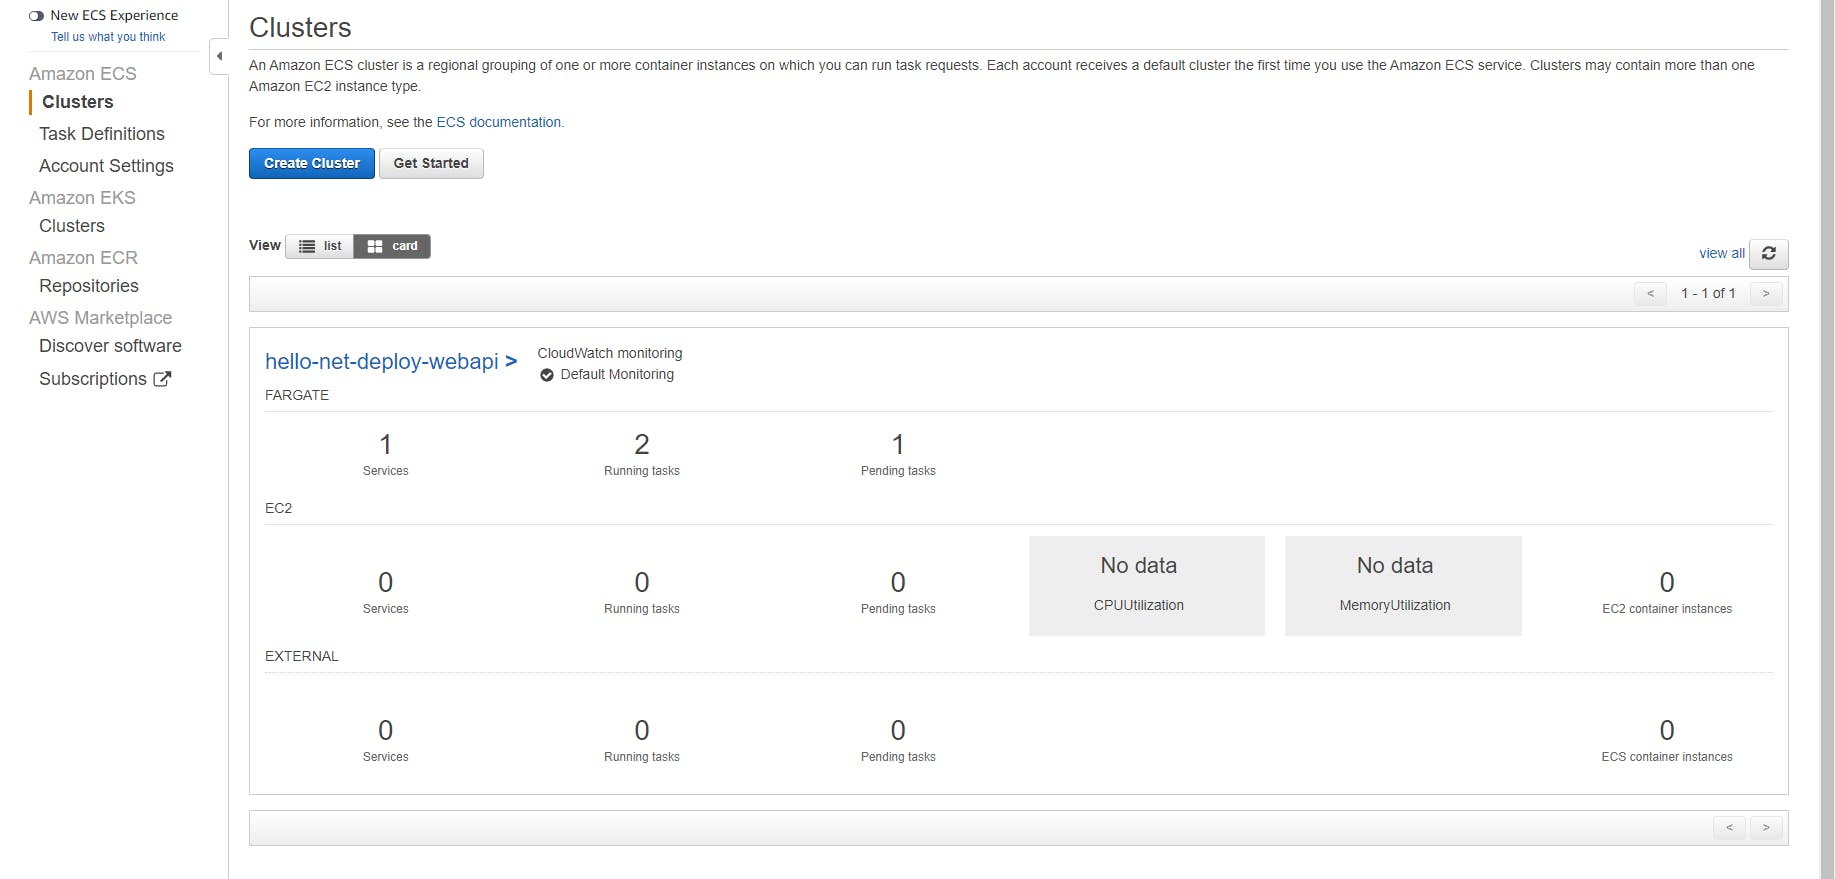
Wait for deployment to complete, and note the URL. Ours is
http://hello-Recip-1EY9JEC5GXW7M-2106390135.us-west-2.elb.amazonaws.com/.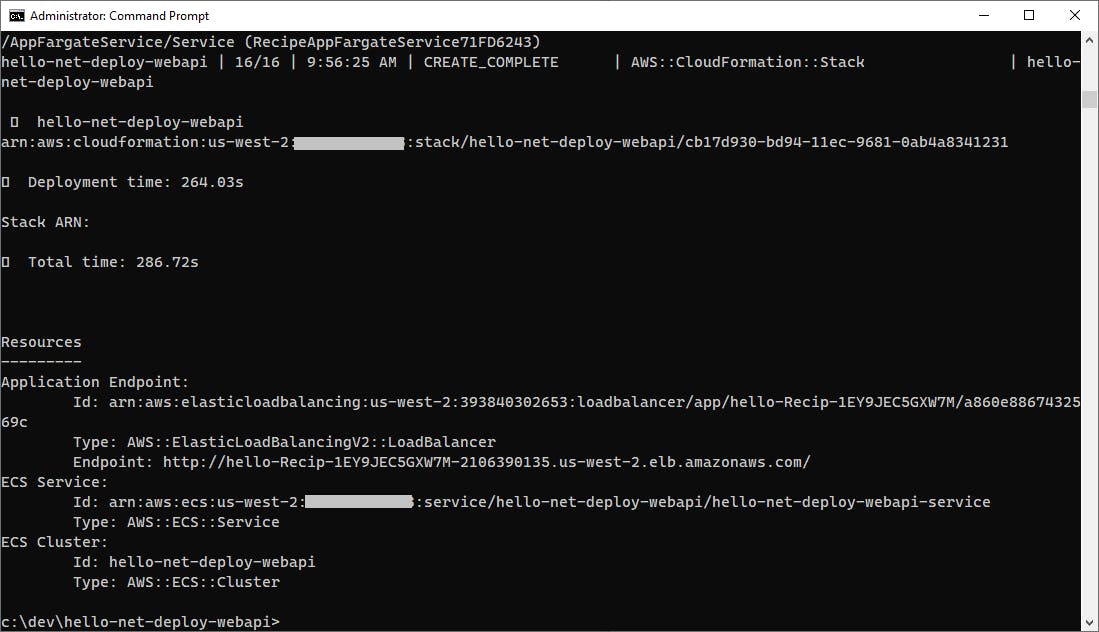
To test the app, visit the URL in a browser with /WeatherForecast at the end of the path. Your app is now hosted in Amazon ECS!

In the AWS console, navigate to Amazon ECS and view the ECS cluster that has been allocated.

When you're done with the project, run the command below in the command/terminal window to delete the deployment. Wait for the delete operation to complete.
dotnet aws delete-deployment hello-net-deploy-webapi
You've now successful deployed your Web API project to a different compute service, Amazon ECS.
Where to Go From Here
The AWS .NET deployment tool gives you a new easy way to deploy. If you've struggled in the past with the setup, configuration, security roles, and options for deployment to AWS services, this guided tool should be a welcome addition. Even though it's doing the work for you, the tool is tremendously useful for learning how AWS works.
In this tutorial, you started with a Blazor WebAssembly front-end project. You used the AWS .NET deployment tool to deploy that to S3 and a CloudFront distribution with a simple command. You didn't have to supply complicated configuration or create security roles; it just worked. You deleted the deployment with another simple command. Next, you created a Web API project. You initially deployed to AWS Elastic Beanstalk. Then, we changed our minds and deployed to Amazon ECS instead. In all of this, we used the same commands and had a common experience.
If you were interested in what the deployment was doing, all you had to do was view the output which contained all the details. We did our deployments and deletions from the command line with the dotnet aws command, but we also could have done the same from Visual Studio. We didn't include steps to deploy the Web API project to AWS App Runner, but you might want to give that a try on your own.
To go further, watch Norm Johanson's video demo and blog posts linked below, and read the documentation.
Further Reading
AWS Documentation
AWS .NET deployment tool for the .NET CLI - Developer Guide
GitHub: AWS .NET deployment tool
Videos
AWS re:Invent 2021 - What’s new with .NET development and deployment on AWS
Blogs
Update on our new AWS .NET Deployment Experience
Deployment Projects with the new AWS .NET Deployment Experience