
Hello, Cognito + OIDC!
Getting Started with .NET on AWS: Amazon Cognito + Open ID Connect


Table of contents
- This episode: Amazon Cognito and OpenID Connect. In this Hello, Cloud blog series, we're covering the basics of AWS cloud services for newcomers who are .NET developers. If you love C# but are new to AWS, or to this particular service, this should give you a jumpstart.
- Amazon Cognito and OpenID Connect: What are they, and why use them?
- Our Hello, Cognito OIDC Project
- One-time Setup
- Step 1: Set Permissions for the AWS Toolkit User
- Step 2: Create a .NET Web Application
- Step 3: Create a Cognito User Pool
- Step 4: Update the .NET Application for Authentication
- Step 5: Run the Program and Test Cognito Sign-in
- Step 6: Configure Google Project
- Step 7: Configure Cognito for Google Identity Provider
- Step 8: Run the Program and Test Google Sign-in
- Step 9: Shut It Down
- Where to Go From Here
- Further Reading
This episode: Amazon Cognito and OpenID Connect. In this Hello, Cloud blog series, we're covering the basics of AWS cloud services for newcomers who are .NET developers. If you love C# but are new to AWS, or to this particular service, this should give you a jumpstart.
In this post we'll use Amazon Cognito to secure a "Hello, Cloud" ASP.NET project using OpenID Connect and federated identity with Google. We'll do this step-by-step, making no assumptions other than familiarity with C# and Visual Studio. We're using Visual Studio 2022 and .NET 6.
Amazon Cognito and OpenID Connect: What are they, and why use them?
Amazon Cognito provides authentication, authorization, and user management for web and mobile apps. We previously introduced Amazon Cognito in Hello, Cognito! and explained user pools (for identity verification) and identity pools (for authorization). Our prior Cognito post studied one scenario, authenticating against Cognito from an ASP.NET MVC application using the Amazon Cognito Identity Provider. This time, our use case is authenticating via OpenID Connect.
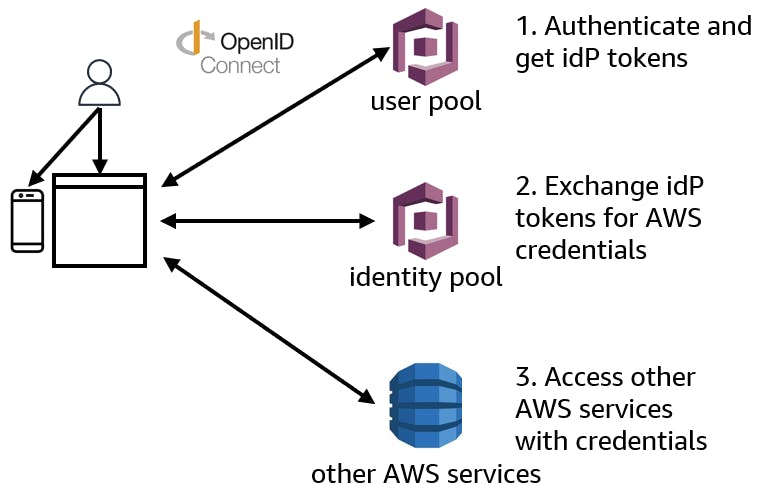
OpenID Connect (OIDC) is "a simple identity layer on top of the OAuth 2.0 protocol". Your app can use OIDC to communicate with Cognito whether you're authenticating against a Cognito user pool or a federated identity provider such as Microsoft Azure Active Directory, Okta, Ping Identity, or Salesforce. Users can sign in to a Cognito-managed identity, or to a federated identity provider.
Cognito provides a hosted UI for user sign-in and sign-up, which you can customize. When you use OIDC to connect to Cognito, the user lands on a Cognito sign-in page. The user can sign in to a Cognito-managed identity (user pool).
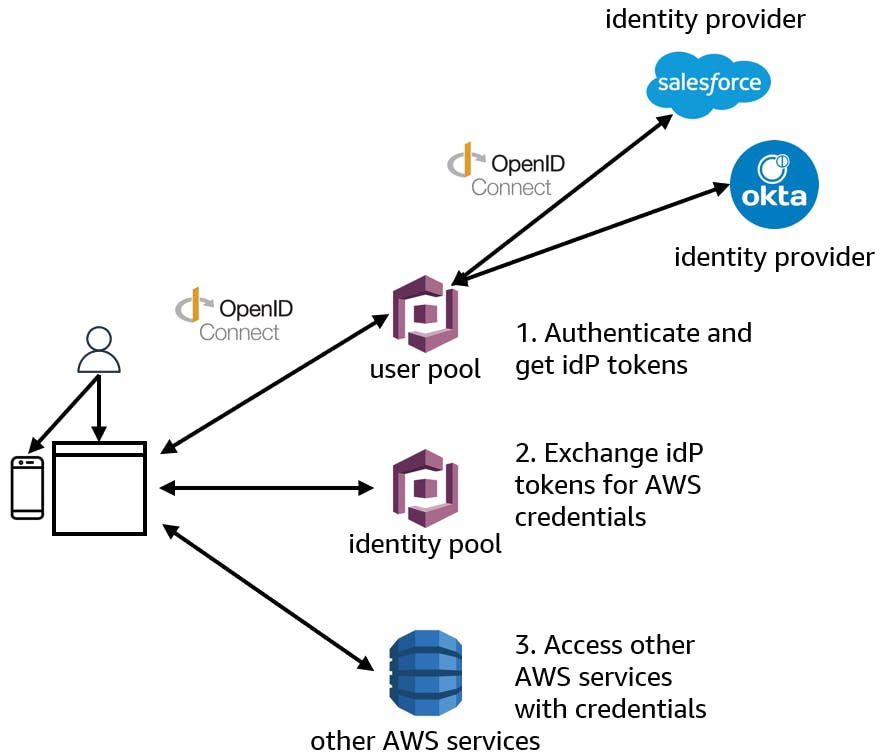
If you've configured Cognito with additional identity providers, such as Salesforce, the Cognito sign-in page will offer the option to sign in through those provider(s). The Cognito user pool takes care of token handling and managing authenticated users from all identity providers. This allows your application to use just one set of user tokens.
From ASP.NET, your application can connect with Cognito in several different ways. Our focus today is OpenID Connect.
| Method | Packages |
| Cognito Identity Provider | Amazon.AspNetCore.Identity.Cognito |
| Amazon.Extensions.CognitoAuthentication | |
| OpenID Connect | Microsoft.AspNetCore.Authentication.OpenIdConnect |
| Microsoft.Identity.Web |
Our Hello, Cognito OIDC Project
We previously introduced Amazon Cognito in Hello, Cognito! and studied one scenario, authenticating against Cognito from an ASP.NET MVC application using the Amazon Cognito Identity Provider. This time, our use case is authenticating to Cognito from an ASP.NET web project using OpenID Connect.
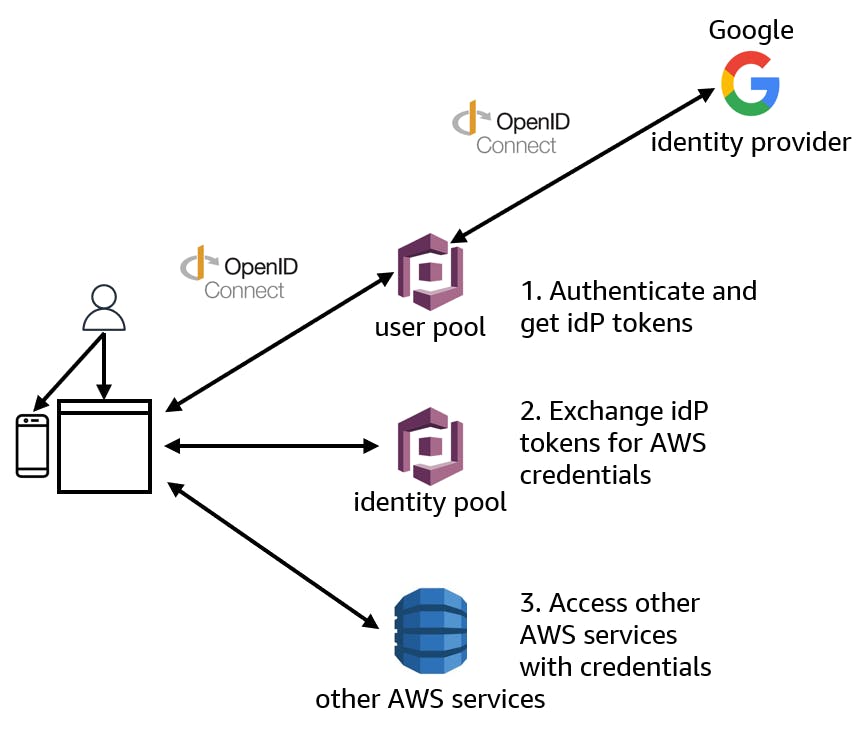
We're going to create an ASP.NET MVC web application that authenticates with Cognito using OIDC. Users will be able to sign in with a Cognito identity or a Google identity. The sign-in dialogs will be provided by Cognito and Google.

One-time Setup
To experiment with Cognito and .NET, you will need:
- An AWS account, and an understanding of what is included in the AWS Free Tier.
- Microsoft Visual Studio 2022. If you're using an older version of Visual Studio you won't be able to use .NET 6.
- AWS Toolkit for Visual Studio. Configure the toolkit to access your AWS account and create an IAM user.
Step 1: Set Permissions for the AWS Toolkit User
In order to perform this tutorial, your AWS Toolkit User / default AWS profile needs the necessary permissions for Cognito operations. In this step, you'll update permissions for your AWS Toolkit for Visual Studio user.
Important: You should always follow the principle of least privilege when it comes to security. This blog series assumes you are working in your own developer account for learning purposes and not working with anything production-related. If you're using an organization-owned AWS account, you should coordinate with your security principal on IAM settings.
- Sign in to the AWS console. Select the region at top right you want to be working in. We're using US West (N. California).
- Navigate to the Identity and Access Management (IAM) area of the AWS Console. You can enter iam in the search box to find it.
- Click Users on the left panel and select the username you use with the AWS Toolkit for Visual Studio. You created this user when you installed and configured the toolkit.
- If not already assigned, add the built-in PowerUserAccess policy. The PowerUserAccess policy provides developers full access to AWS services and resources, but does not allow management of users and groups.
Your AWS Toolkit for Visual Studio user now has the permissions it needs to perform Cognito operations.
Step 2: Create a .NET Web Application
In this step you'll create an ASP.NET Web API project, then update it to communicate with Amazon Cognito using OIDC.
Open a command/terminal window and CD to a development folder.
Enter the dotnet new command below.
dotnet new webapp -n hello-cognito-oidc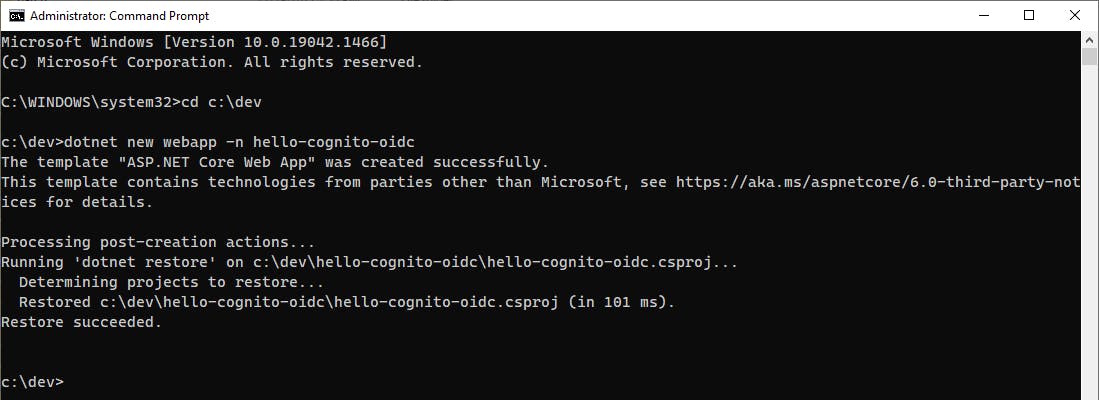
Open the hello-cognito-oidc project in Visual Studio.
Press F5 to build and run the application. A simple welcome page opens in a browser window. Note the application's web address, which will be needed in the next step.
Stop the program.
Step 3: Create a Cognito User Pool
In this step you'll create a new Cognito user pool in the AWS Console.
Sign in to the AWS console and select the region you want to work in at top right. We're using N. California.
Navigate to Amazon Cognito. You can enter cognito in the search bar.
On the left panel, select User pools and click Create user pool. You will now go through several wizard pages to define your user pool.
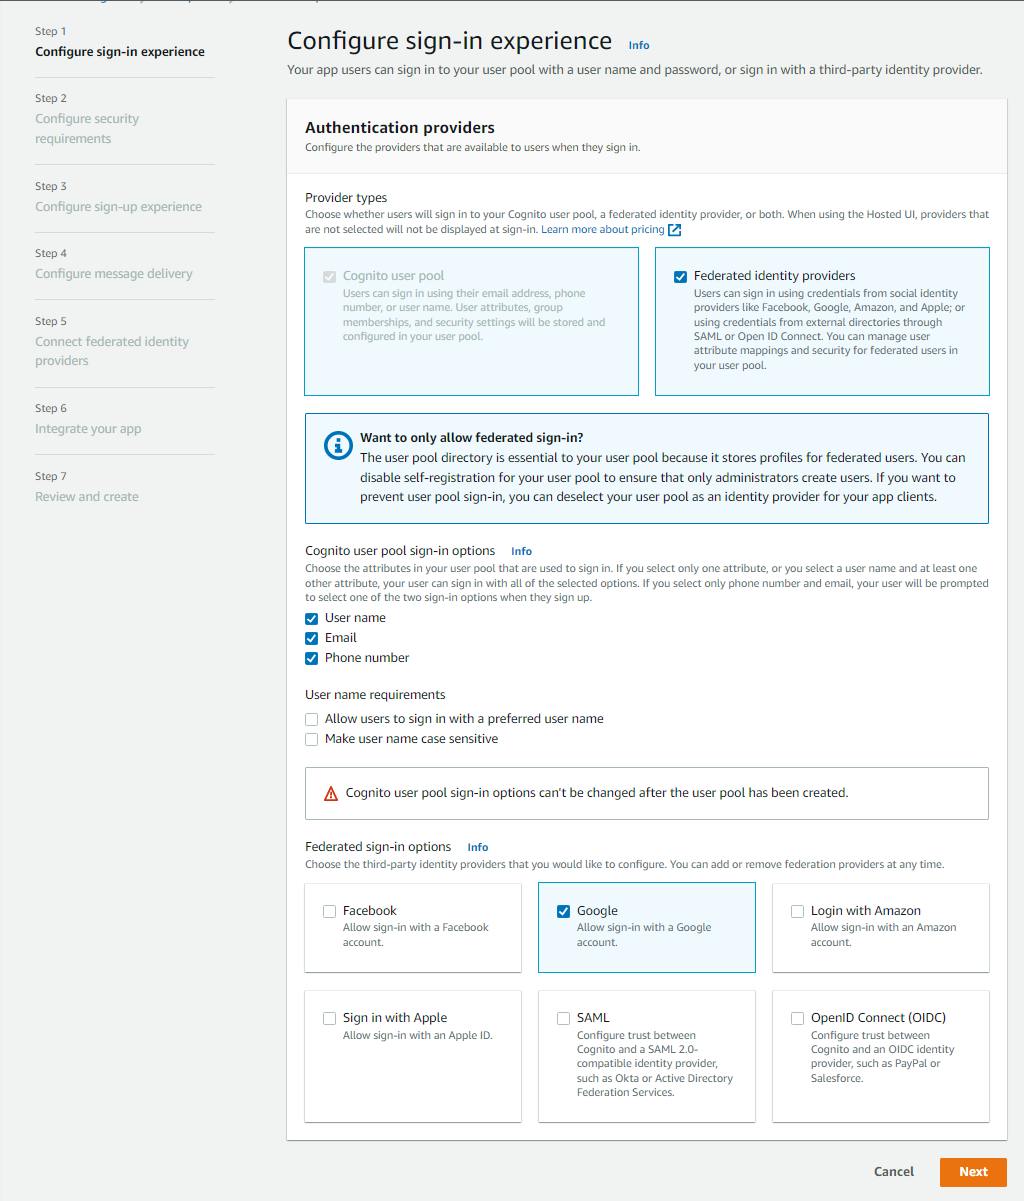
On the Step 1 Configure sign-in experience page, enter/select the following and click Next:
a. Authentication providers - Provider types: select Federated identity providers.
b. Cognito user pool sign-in options: check User name, Email, and Phone number.
c. Federated sign-in options: check Google.
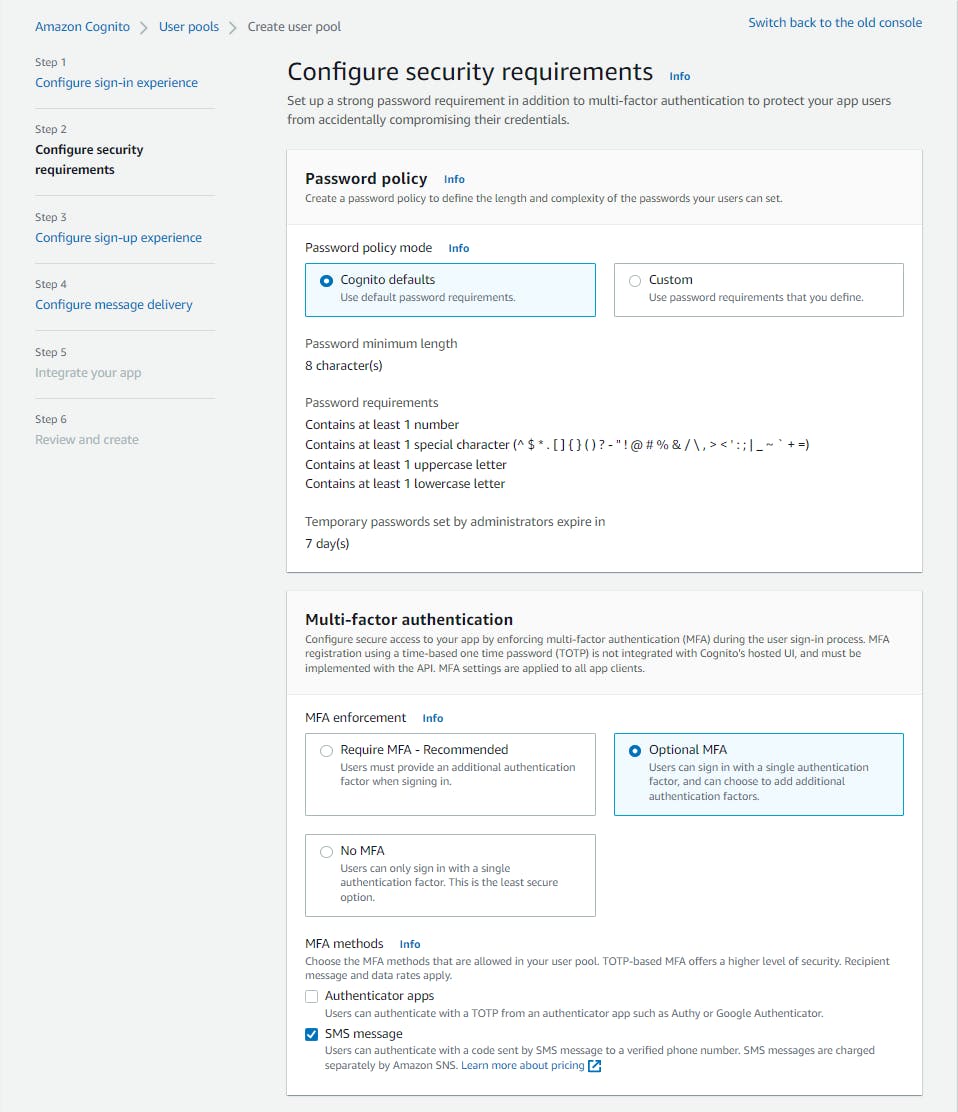
On the Step 2 Configure security requirements page, enter/select the following and click Next:
a. Password policy - Password policy mode: select Cognito defaults.
b. Multi-factor authentication - MFA enforcement: select Optional MFA.
c. MFA methods - check SMS message.
On the Step 3 Configure sign-up experience page, click Next.
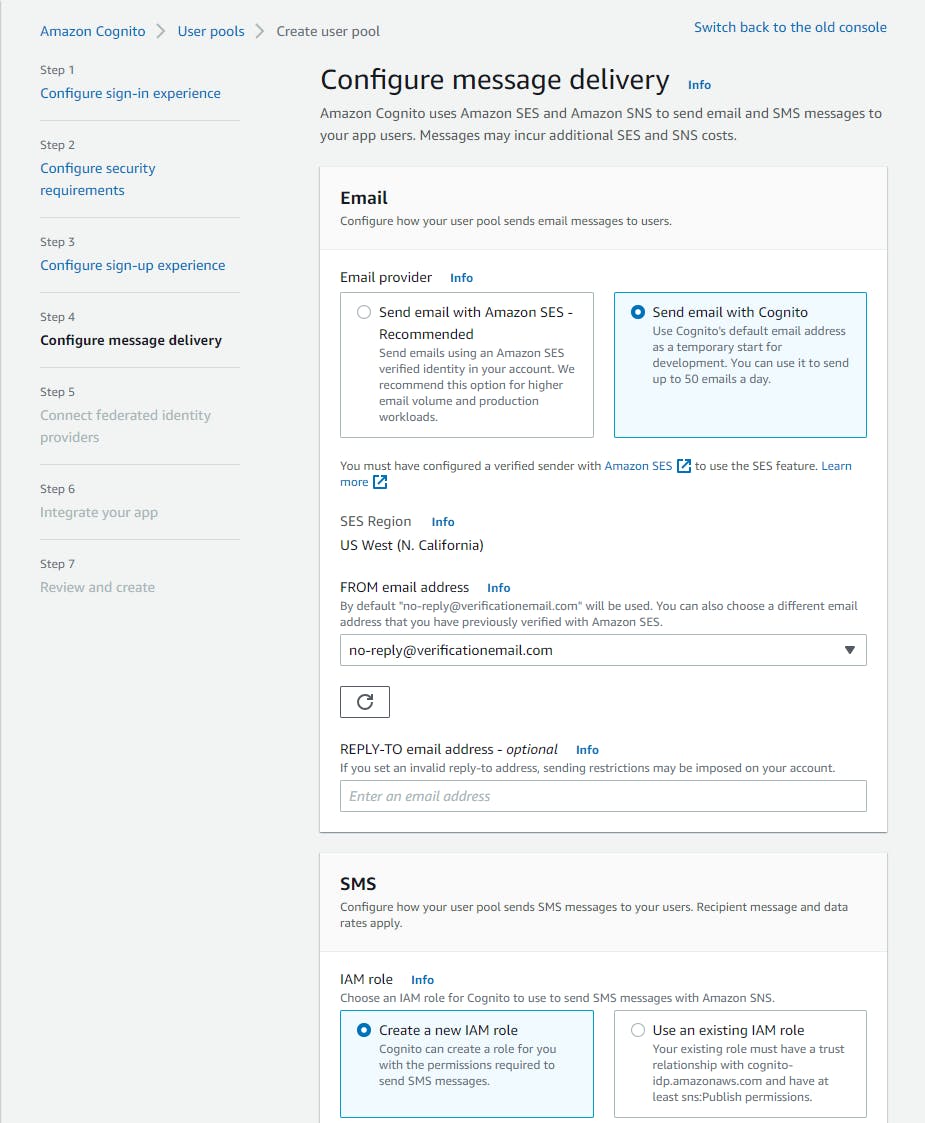
On the Step 4 Configure message delivery page, enter/select the following and click Next:
a. Email - Email provider: select Send email with Cognito.
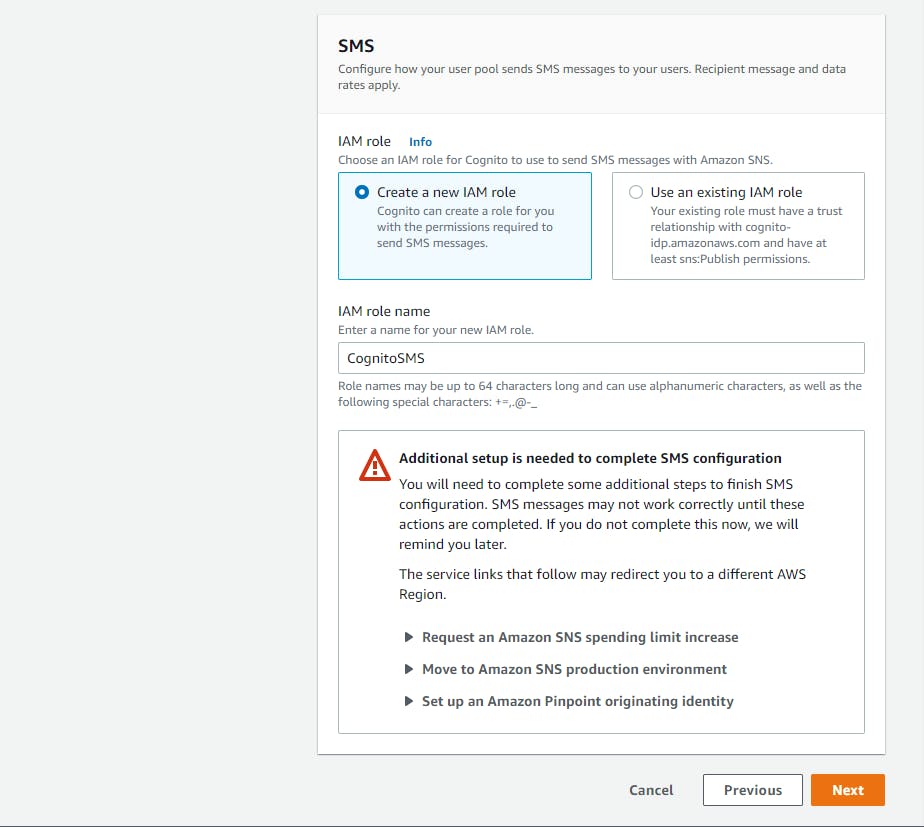
d. SMS - IAM role - select Create a new IAM role.
e. IAM role name - enter a role name such as CognitoSMS.
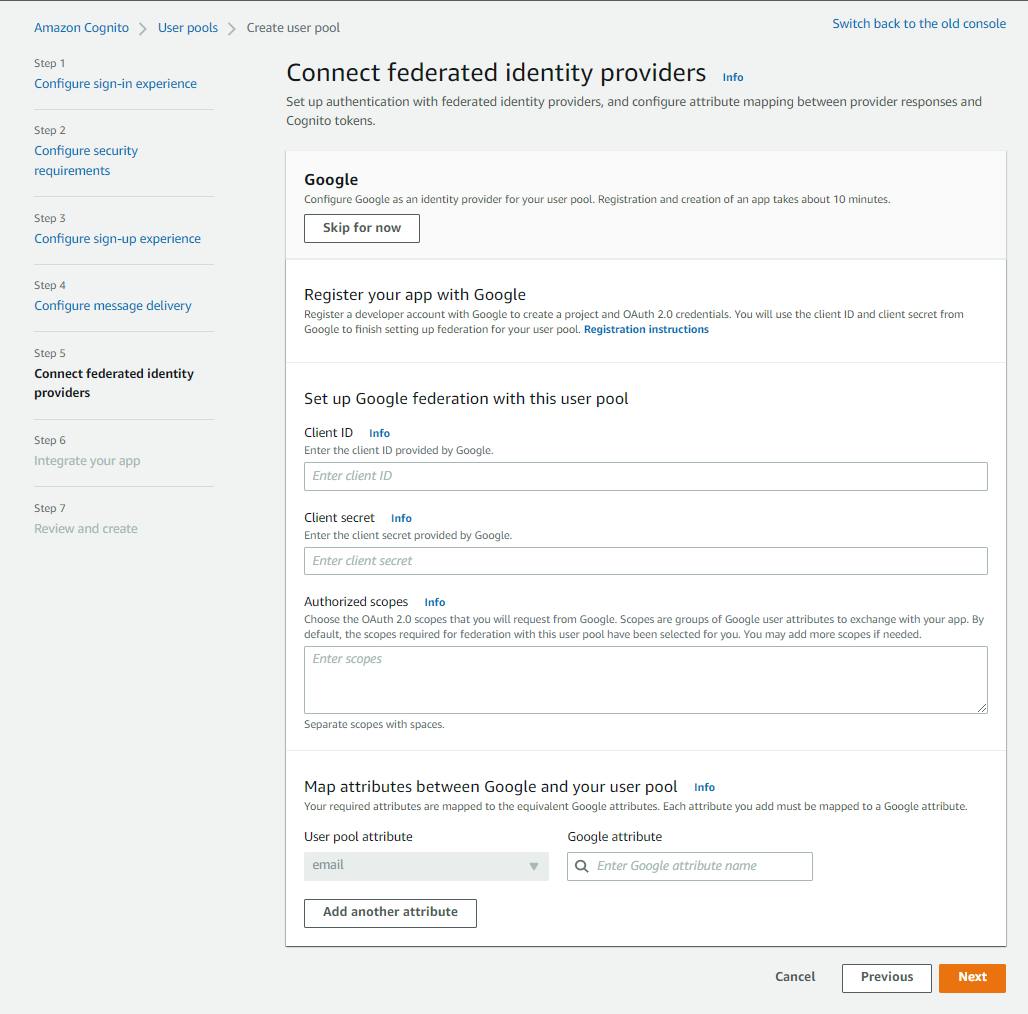
On the Step 5 Connect federated identity providers page, click Skip for now and Next.
On the Step 6 Integrate your app page, enter/select the following and click Next:
a. User pool name: enter HelloCognitoOIDC.
b. Domain - Domain type: select Use a Cognito domain.
c. Cognito domain: enter a domain name. We're using hellocogoidc. Make a note of the full domain name. Our is
https://hellocogoidc.auth.us-west-1.amazoncognito.com.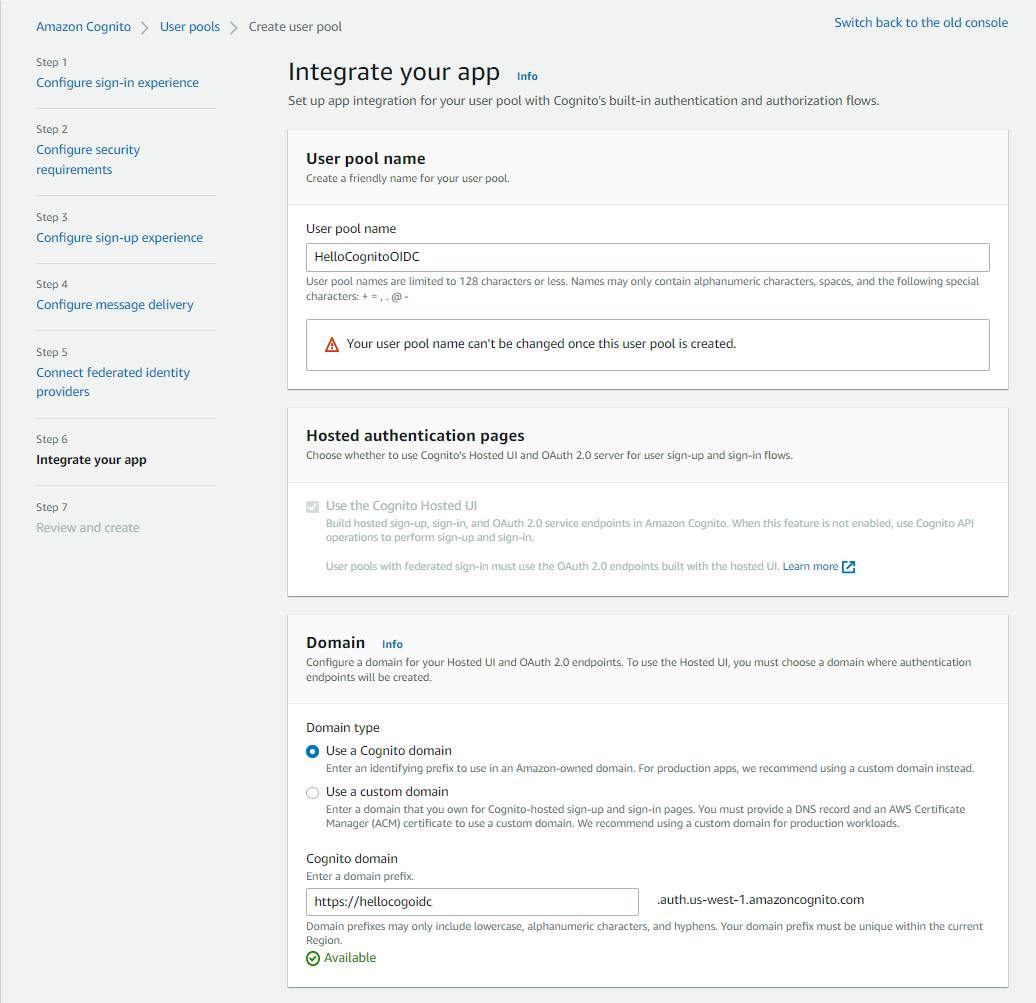
b. Initial app client - App type: select Public client.
c. App client name: enter HelloCognitoWeb.
d. Client secret: select Generate a client secret - Recommended.
e. Under Allowed callback URLs, enter the .NET application's web address URL captured in the previous step plus a suffix of /signin-oidc:
https://localhost:[port]/signin-oidc. This is the application path that processes a successful OIDC sign-in.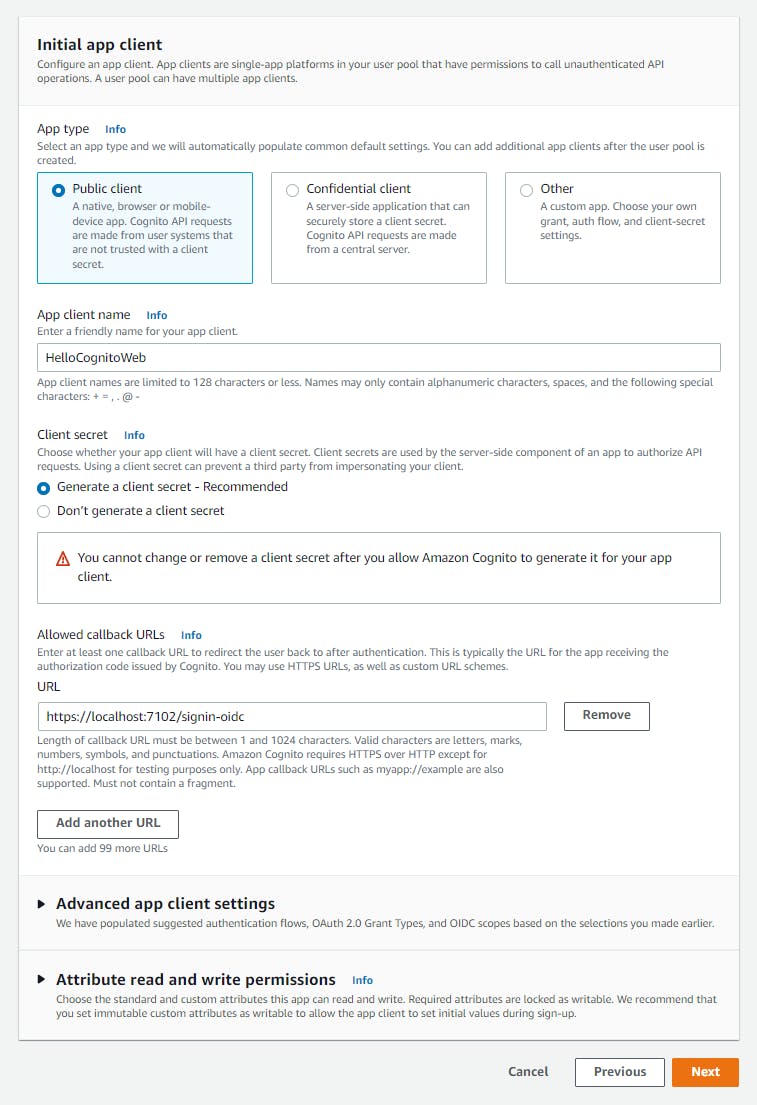
f. Add a sign-out URL. Expand the Advanced app client settings section and click Add sign-out URL. Enter the .NET application's web address URL captured in the previous step plus a suffix of /SignedOut:
https://localhost:[port]/SignedOut. This is the application page a sign-out action redirects to.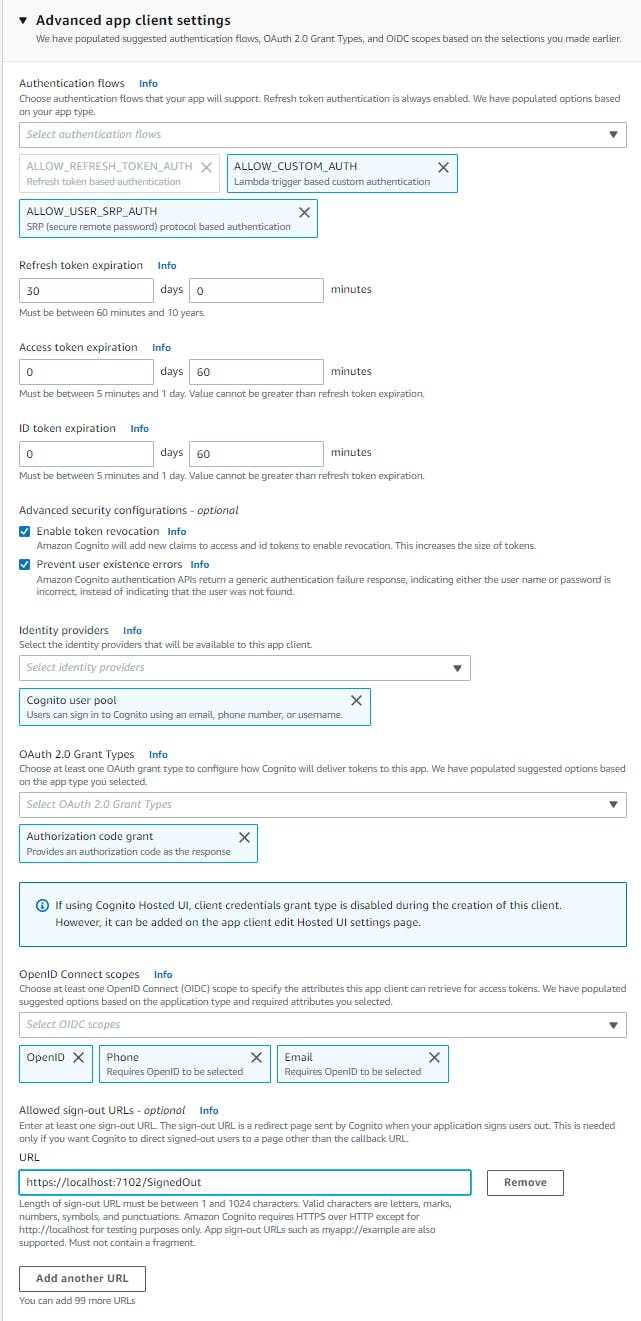
On the Step 7 Review and create page, confirm the options match the above instructions, then click Create user pool at the bottom of the page. The user pool is created.

Click the User pool name to view its detail. Select the App integration tab and record the following:
a. Record the User pool ID (User pool overview panel).
b. Click the HelloCognitoWeb client Id at bottom of page to view its detail.
c. Record the Client ID (App client information panel).
d. Capture the Client secret by clicking the Show client secret toggle.
You now have a Cognito user pool named HelloCognitoOIDC.
Step 4: Update the .NET Application for Authentication
In this step, you'll configure the .NET application for authentication. You'll add or update packages, Cognito configuration settings, start-up code, a main page, a signout page, and a signed out page.
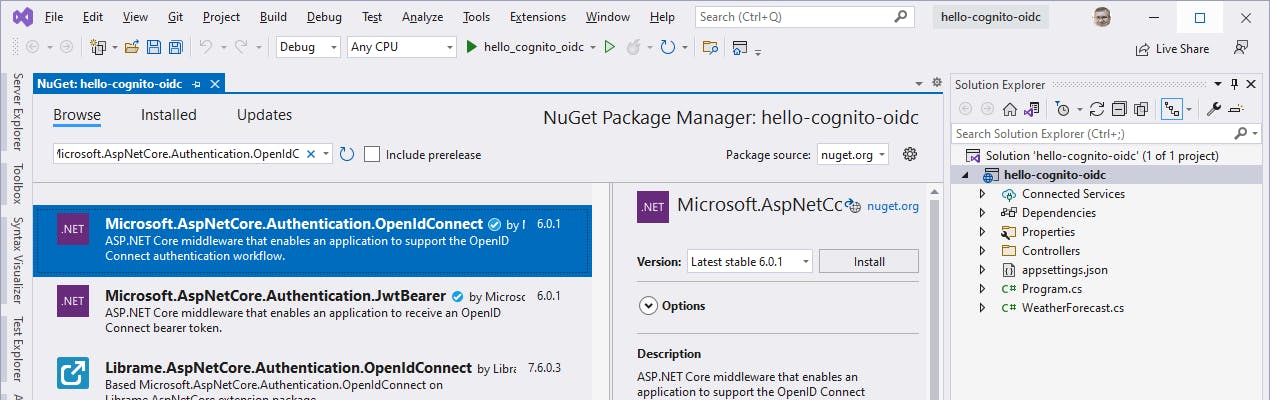
In Visual Studio Solution Explorer, right-click the hello-cognito-oidc project and select Manage NuGet Packages....
a. Find and install the Microsoft.AspNetCore.Authentication.OpenIdConnect package.
b. Find and install the Microsoft.Identity.Web package.
Open appsettings.Development.json and replace it with the code below at the end of this step. Replace [client-id], [client-secret], [region], [user-pool-id], and [cognito-domain] with the values you recorded in the previous step.
Open Program.cs in the editor and replace it with the code below. We replace the generated code, which uses C# minimal code (top level statements), with a traditional body so we can define multiple methods. To provide the OIDC mechanics, authentication is added with cookie and OpenID authentication. Cognito client and URL values are loaded from configuration. A sign-out redirect method is defined, OnRedirectToIdentityProviderForSignOut, which will process a Cognito sign-out, then redirect to a signed out page in our app.
Open Shared/_Layout.cshtml in the editor, and replace with the code below. If the user is authenticated, we include a Logout navigation option.
Open index.cshtml in the editor, and replace with the code below. If the user is authenticated, we retrieve claims (username and email address) and show the username on the page.
Open index.cshtml.cs in the editor, and replace with the code below. We add an [Authorize] attribute to the class. The home page will initiate a sign-in if the user is not authorized.
In Solution Explorer, right-click Pages and select Add > Razor Page. Add a new empty Razor page named SignOut.cshtml. Open SignOut.cshtml in the editor, and replace with the code below. This is the page that the Logout option on the home page will link to.
Open Signout.cshtml.cs in the editor, and replace with the code below.
In Solution Explorer, right-click Pages and select Add > Razor Page. Add a new empty Razor page named SignedOut.cshtml. Open SignedOut.cshtml.cs in the editor, and replace with the code below. This is the page that Cognito will redirect to after signing out a user.
Open SignedOut.cshtml.cs in the editor, and replace with the code below.
Build the project and ensure it compiles without error.
appSettings.Development.json
{
  "DetailedErrors": true,
  "Logging": {
    "LogLevel": {
      "Default": "Information",
      "Microsoft": "Warning",
      "Microsoft.Hosting.Lifetime": "Information"
    }
  },
  "Authentication": {
    "Cognito": {
      "ClientId": "[client-id]",
      "ClientSecret": "[client-secret]",
      "IncludeErrorDetails": true,
      "MetadataAddress": "https://cognito-idp.[region].amazonaws.com/[user-pool-id]/.well-known/openid-configuration",
      "RequireHttpsMetadata": false,
      "ResponseType": "code",
      "SaveToken": true,
      "TokenValidationParameters": {
        "ValidateIssuer": true
      },
      "LogoutEndpoint": "[cognito-domain]/logout",
      "LogoutRelPath": "/SignedOut"
    }
  }
}
Program.cs
using Microsoft.AspNetCore.Authentication.Cookies;
using Microsoft.AspNetCore.Authentication.OpenIdConnect;
using Microsoft.AspNetCore.Builder;
using Microsoft.AspNetCore.Hosting;
using Microsoft.AspNetCore.HttpsPolicy;
using Microsoft.Extensions.Configuration;
using Microsoft.Extensions.DependencyInjection;
using Microsoft.Extensions.Hosting;
using System;
using System.Collections.Generic;
using System.Linq;
using System.Threading.Tasks;
using Microsoft.IdentityModel.Tokens;

namespace hello_cognito_oidc;

public class Program
{
    static IConfiguration Configuration;
    static async Task Main(string[] args)
    {
        var builder = WebApplication.CreateBuilder(args);

        Configuration = builder.Configuration;

        // Add services to the container.
        builder.Services.AddRazorPages();

        builder.Services.AddAuthentication(options =>
        {
            options.DefaultAuthenticateScheme = CookieAuthenticationDefaults.AuthenticationScheme;
            options.DefaultSignInScheme = CookieAuthenticationDefaults.AuthenticationScheme;
            options.DefaultChallengeScheme = OpenIdConnectDefaults.AuthenticationScheme;
            options.DefaultSignOutScheme = CookieAuthenticationDefaults.AuthenticationScheme;
        })
        .AddCookie()
        .AddOpenIdConnect(options =>
        {
            options.ResponseType = Configuration["Authentication:Cognito:ResponseType"];
            options.MetadataAddress = Configuration["Authentication:Cognito:MetadataAddress"];
            options.ClientId = Configuration["Authentication:Cognito:ClientId"];
            options.ClientSecret = Configuration["Authentication:Cognito:ClientSecret"];
            options.SaveTokens = true;
            options.Events = new OpenIdConnectEvents()
            {
                OnRedirectToIdentityProviderForSignOut = OnRedirectToIdentityProviderForSignOut
            };
        });

        var app = builder.Build();

        // Configure the HTTP request pipeline.
        if (!app.Environment.IsDevelopment())
        {
            app.UseExceptionHandler("/Error");
            // The default HSTS value is 30 days. You may want to change this for production scenarios, see https://aka.ms/aspnetcore-hsts.
            app.UseHsts();
        }

        app.UseHttpsRedirection();
        app.UseStaticFiles();

        app.UseRouting();

        app.UseAuthentication();
        app.UseAuthorization();

        app.MapRazorPages();

        app.Run();
    }

    private static Task OnRedirectToIdentityProviderForSignOut(RedirectContext context)
    {
        context.ProtocolMessage.Scope = "openid";
        context.ProtocolMessage.ResponseType = "code";

        var logoutEndpoint = Configuration["Authentication:Cognito:LogoutEndpoint"];
        var clientId = Configuration["Authentication:Cognito:ClientId"];
        var logoutUrl = $"{context.Request.Scheme}://{context.Request.Host}{Configuration["Authentication:Cognito:LogoutRelPath"]}";
        context.ProtocolMessage.IssuerAddress = $"{logoutEndpoint}?client_id={clientId}&logout_uri={logoutUrl}&redirect_uri={logoutUrl}";

        // delete cookies
        context.Properties.Items.Remove(CookieAuthenticationDefaults.AuthenticationScheme);
        // close openid session
        context.Properties.Items.Remove(OpenIdConnectDefaults.AuthenticationScheme);

        return Task.CompletedTask;    }
}
_Layout.cshtml
<!DOCTYPE html>
<html lang="en">
<head>
<meta charset="utf-8" />
<meta name="viewport" content="width=device-width, initial-scale=1.0" />
<title>@ViewData["Title"] - hello_cog</title>
<link rel="stylesheet" href="~/lib/bootstrap/dist/css/bootstrap.min.css" />
<link rel="stylesheet" href="~/css/site.css" />
</head>
<body>
<header>
<nav class="navbar navbar-expand-sm navbar-toggleable-sm navbar-light bg-white border-bottom box-shadow mb-3">
<div class="container">
<a class="navbar-brand" asp-area="" asp-page="/Index">hello_cog</a>
<button class="navbar-toggler" type="button" data-toggle="collapse" data-target=".navbar-collapse" aria-controls="navbarSupportedContent"
aria-expanded="false" aria-label="Toggle navigation">
<span class="navbar-toggler-icon"></span>
</button>
<div class="navbar-collapse collapse d-sm-inline-flex justify-content-between">
<ul class="navbar-nav flex-grow-1">
<li class="nav-item">
<a class="nav-link text-dark" asp-area="" asp-page="/Index">Home</a>
</li>
<li class="nav-item">
<a class="nav-link text-dark" asp-area="" asp-page="/Privacy">Privacy</a>
</li>
@if (User.Identity.IsAuthenticated)
{
<li class="nav-item">
<a class="nav-link text-dark" asp-area="" asp-page="/SignOut">Logout</a>
</li>
}
</ul>
</div>
</div>
</nav>
</header>
<div class="container">
<main role="main" class="pb-3">
@RenderBody()
</main>
</div>
<footer class="border-top footer text-muted">
<div class="container">
© 2022 - hello_cog - <a asp-area="" asp-page="/Privacy">Privacy</a>
</div>
</footer>
<script src="~/lib/jquery/dist/jquery.min.js"></script>
<script src="~/lib/bootstrap/dist/js/bootstrap.bundle.min.js"></script>
<script src="~/js/site.js" asp-append-version="true"></script>
@await RenderSectionAsync("Scripts", required: false)
</body>
</html>
index.cshtml
@page
@using System.Security.Claims
@model IndexModel
@{
    ViewData["Title"] = "Home page";
}

@if(User.Identity.IsAuthenticated)
{
    <p>
        Authenticated!
    </p>
    <p>
        Username: @User.Claims.FirstOrDefault(c => c.Type=="cognito:username")?.Value
    </p>
    <p>
        Email address: @User.Claims.FirstOrDefault(c => c.Type=="http://schemas.xmlsoap.org/ws/2005/05/identity/claims/emailaddress")?.Value
    </p>
}

<div class="text-center">
    <h1 class="display-4">Welcome</h1>
    <p>Learn about <a href="https://docs.microsoft.com/aspnet/core">building Web apps with ASP.NET Core</a>.</p>

    @if (User.Identity.IsAuthenticated)
    {
        var identity = User.Identity as ClaimsIdentity;

        string username = identity.Claims.FirstOrDefault(c => c.Type == "cognito:username")?.Value;
        <h1>Welcome @username</h1>

    }
</div>
index.cshtml.cs
using Microsoft.AspNetCore.Authorization;
using Microsoft.AspNetCore.Mvc;
using Microsoft.AspNetCore.Mvc.RazorPages;

namespace hello_cognito_oidc.Pages;

[Authorize]
public class IndexModel : PageModel
{
    private readonly ILogger<IndexModel> _logger;

    public IndexModel(ILogger<IndexModel> logger)
    {
        _logger = logger;
    }

    public void OnGet()
    {

    }
}
SignOut.cshtml
@page
@model SignOutModel
@{
    ViewData["Title"] = "SignOut";
}
<h1>@ViewData["Title"]</h1>

<p>Signing you out.</p>
SignOut.cshtml.cs
using Microsoft.AspNetCore.Mvc;
using Microsoft.AspNetCore.Mvc.RazorPages;
using Microsoft.Extensions.Logging;
using Microsoft.AspNetCore.Authentication;
using Microsoft.AspNetCore.Authentication.Cookies;
using Microsoft.AspNetCore.Authentication.OpenIdConnect;

namespace hello_cognito_oidc.Pages
{
    public class SignOutModel : PageModel
    {
        private readonly ILogger<SignOutModel> _logger;

        public SignOutModel(ILogger<SignOutModel> logger)
        {
            _logger = logger;
        }

        public IActionResult OnGet()
        {
            var callbackUrl = Url.Page("/SignedOut", pageHandler: null, values: null, protocol: Request.Scheme);
            return SignOut(
                new AuthenticationProperties { RedirectUri = callbackUrl },
                CookieAuthenticationDefaults.AuthenticationScheme, OpenIdConnectDefaults.AuthenticationScheme
            );
        }
    }
}
SignedOut.cshtml
@page
@model SignedOutModel
@{
    ViewData["Title"] = "SignedOut";
}
<h1>@ViewData["Title"]</h1>

<p>You have been signed out.</p>
SignedOut.cshtml.cs
using Microsoft.AspNetCore.Mvc.RazorPages;
using Microsoft.Extensions.Logging;

namespace hello_cognito_oidc.Pages
{
    public class SignedOutModel : PageModel
    {
        private readonly ILogger<SignedOutModel> _logger;

        public SignedOutModel(ILogger<SignedOutModel> logger)
        {
            _logger = logger;
        }

    }
}
Step 5: Run the Program and Test Cognito Sign-in
In this step we'll run the .NET application and test user authentication and registration with Cognito.
In Visual Studio, press F5 to debug run the program.
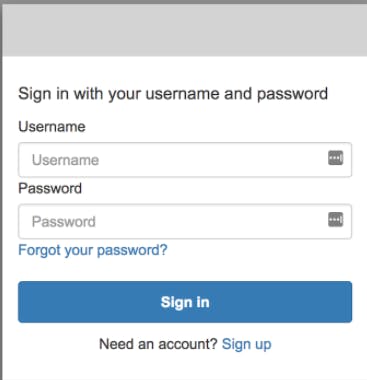
You are redirected to a sign-in screen provided by Cognito. Click Sign up to add a new user.
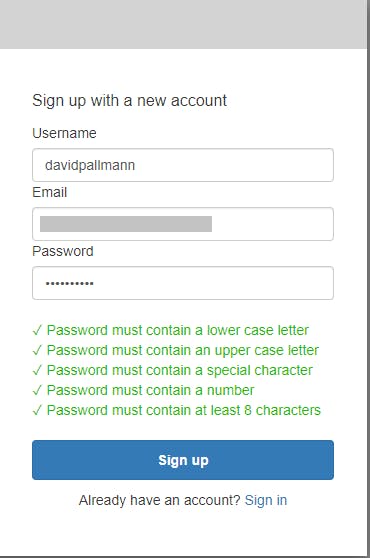
On the Sign up page, enter a username email, and password. Click Sign up.
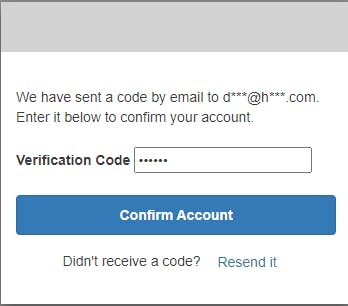
You are next prompted to enter a code. Go to the email account you registered with, where there should be a confirmation message with a code.
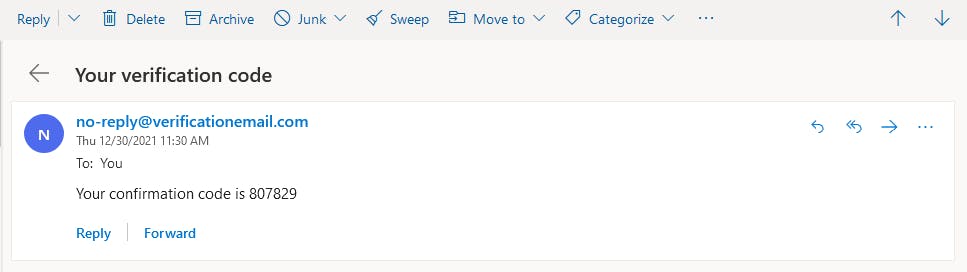
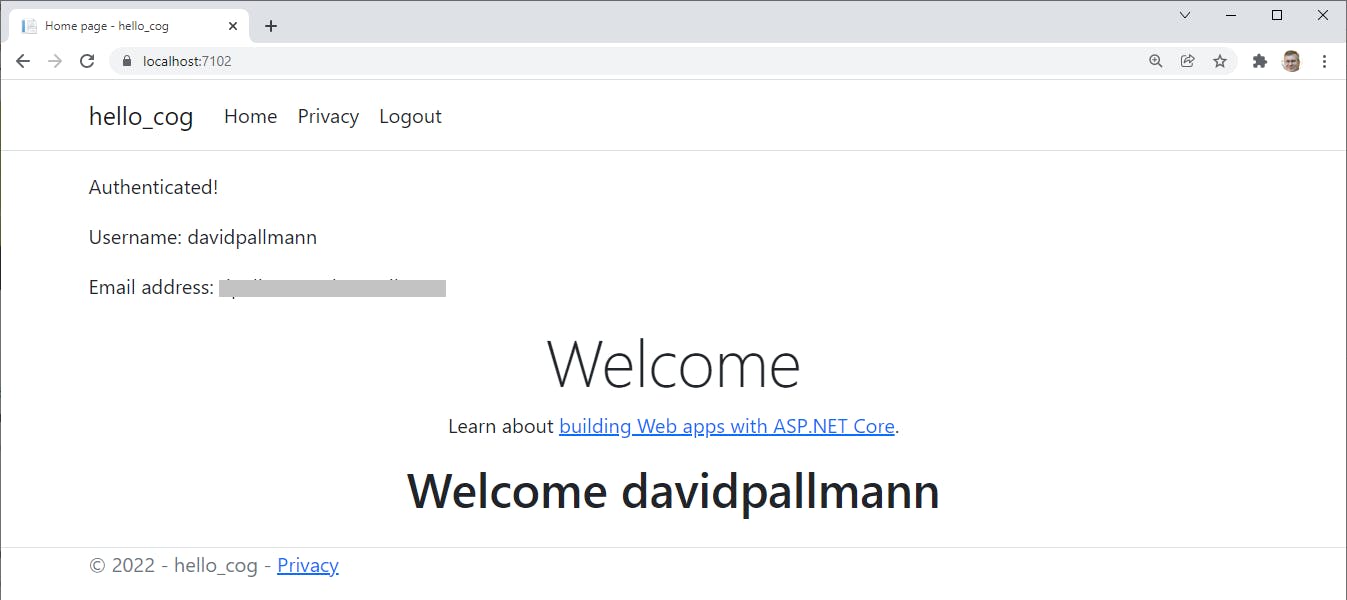
Enter the verification code from the email on the web page and click Confirm Account. You are returned to the welcome page, this time with your username and email shown on the page
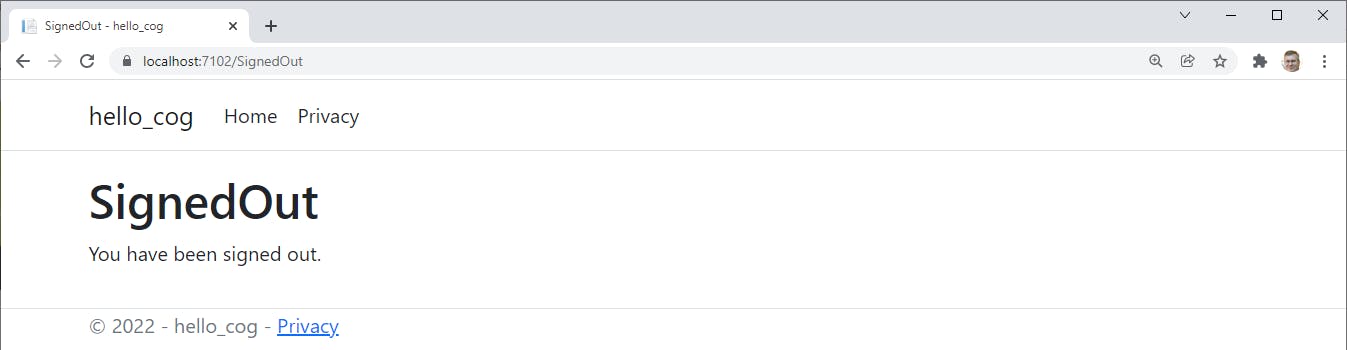
To test logout, click Logout at top right. You are signed out of Cognito and redirected to the app's SignedOut page. To log in again, click Home and you are taken back to Cognito's sign-in screen.
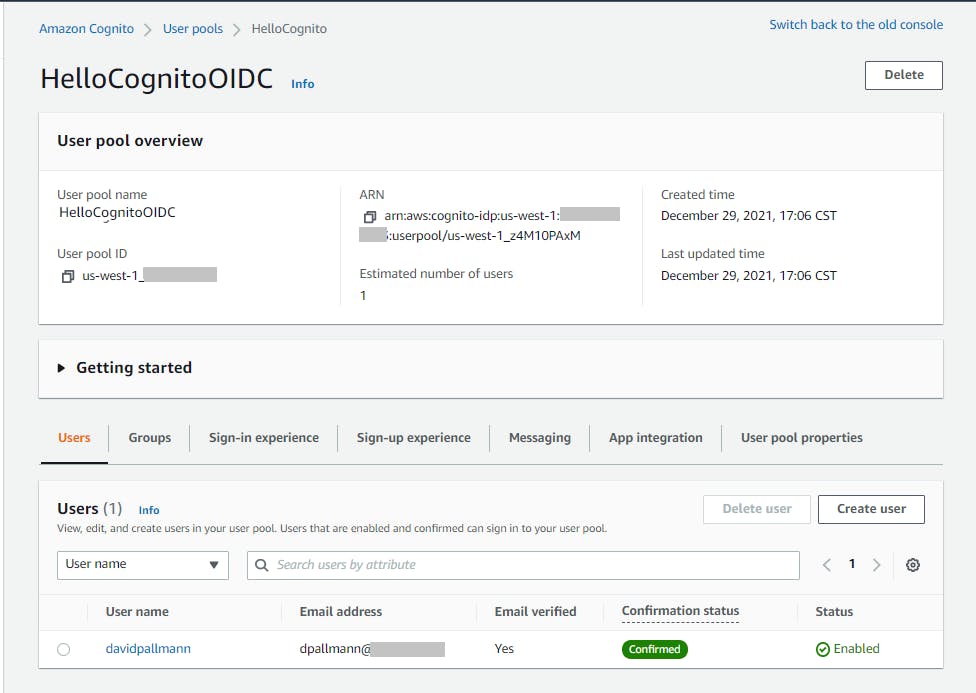
Let's view the user in the AWS console. Navigate to Amazon Cognito > User pools > HelloCognitoOIDC and click the Users tab. The user you just registered is listed, along with their email address and confirmation status. You can click on the username for more details.
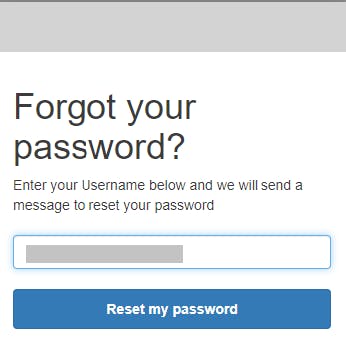
Finally, let's test forgotten password functionality. Click Logout, then Home. On the sign-in page, click Forgot your password?. On the Forgot your password? page, enter the username you registered with and click Reset my password.
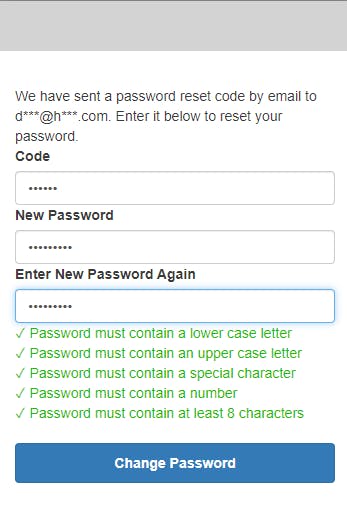
You'll receive a password verification email. Open the email and copy the verification code. On the reset password page, enter your verification code, a new password, and password confirmation. Then click Change password. Your password is reset, which you can test by signing in again.
Stop the program.
Congratulations! You have added authentication with a Cognito user pool to an ASP.NET 6 web application using OIDC!
However, we're not done yet. Next, we'd like to add a second scenario, identity federation to Google.
Step 6: Configure Google Project
In this step, you'll create a Google developer project and configure it for federation credentials for Cognito and your application.
Log into the Google Cloud console at https://console.cloud.google.com/.
At the top of the page, click Select a Project, then New Project.
Enter a project name (we're using HelloCognitoOIDC) and create a project.
Click Select Project to select the project.
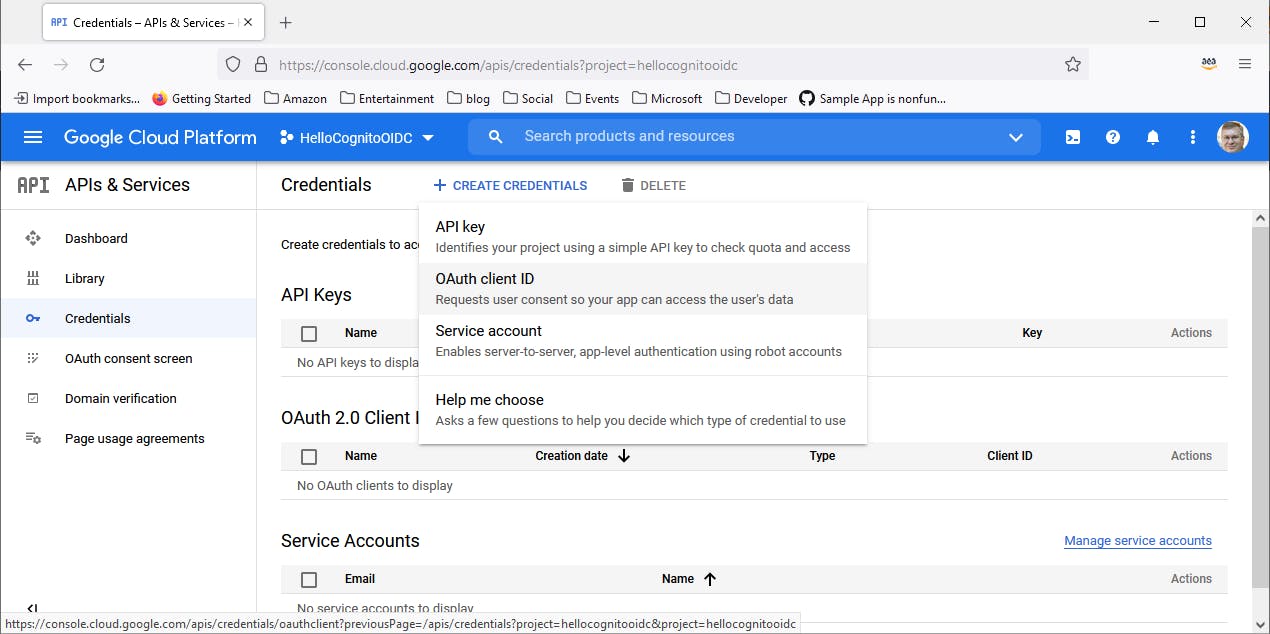
Navigate to APIs & Services, then select Credentials
Click the + Create Credentials link at the top of the page and select OAuth client ID.
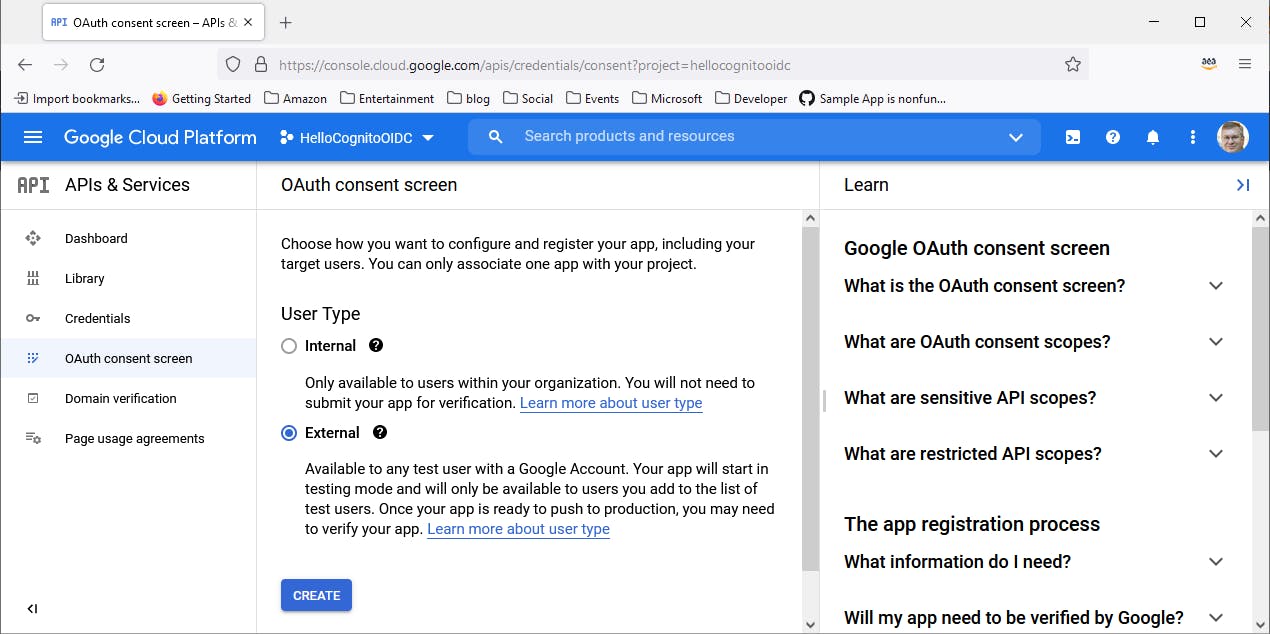
On the Create OAuth client ID page, click Configure Consent Screen and enter the following.
a. Select External and click Create.
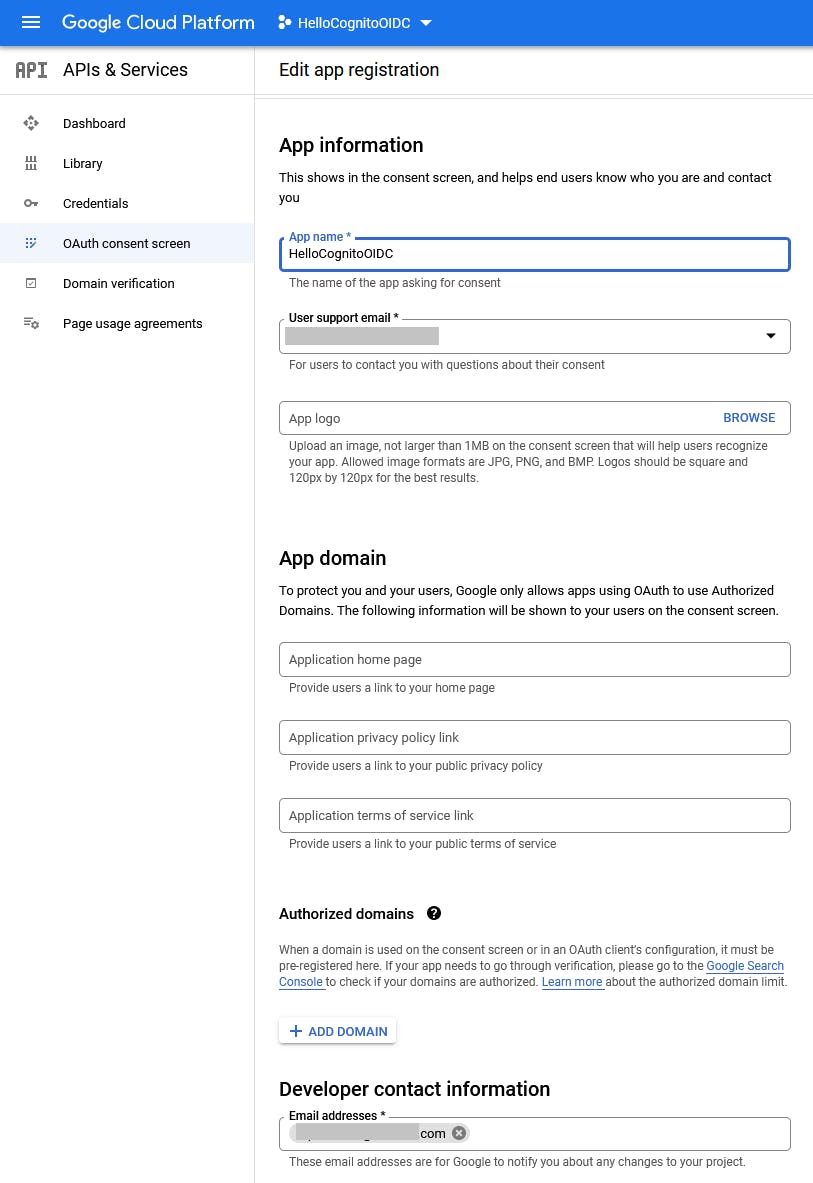
On the Edit app registration page, enter the following, then click Save and Continue:
a. App information - App name: HelloCognitoOIDC
b. User support email: your email address
c. App logo: optionally, you may select an image for your sign-in screen
d. App domain - application home page: leave blank
e. Application privacy policy link: leave blank
f. Application terms of service link: leave blank
g. Authorized domains: click + Add Domain and enter amazoncognito.com.
h. Developer contact information - email addresses: enter your email address.
click Save and Continue two more times to complete the app registration.
Select Credentials from the left panel.
Click + Create Credentials > OAuth client ID.
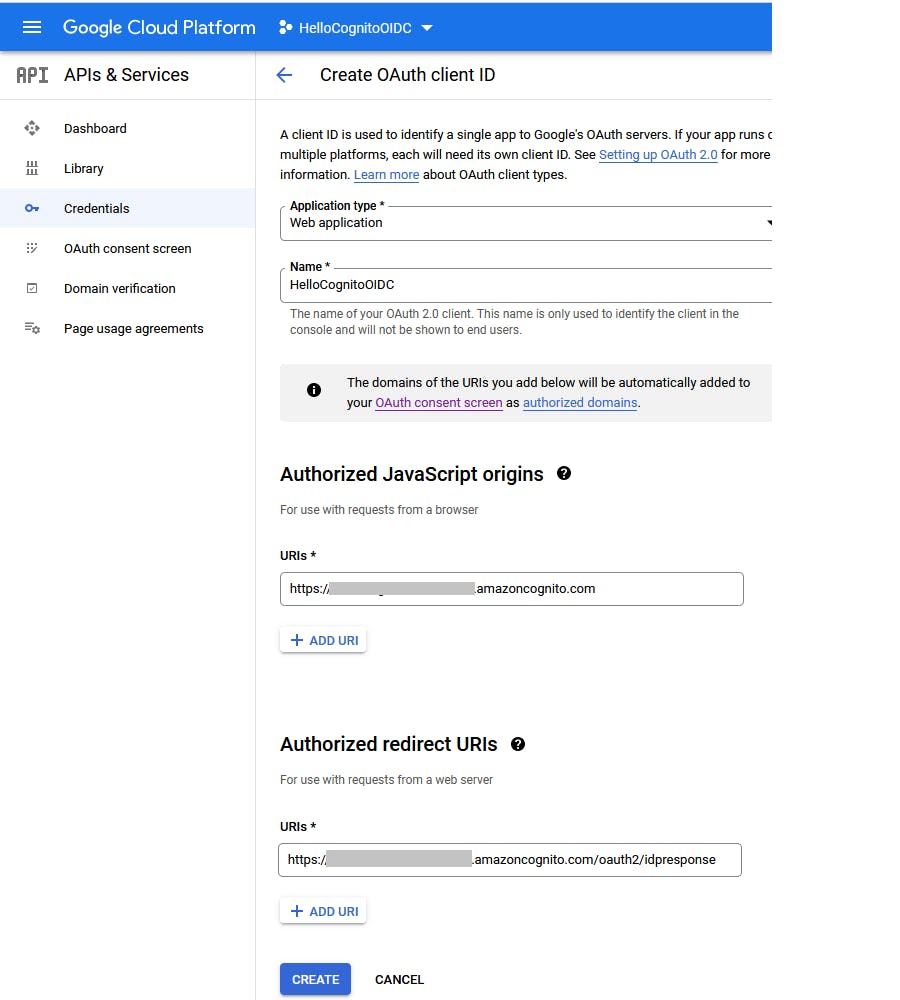
On the Create OAuth client ID page, enter/select the following:
a. Application type: Web application.
b. Name: HelloCognitoOIDC.
c. Authorized JavaScript origins: click + Add URI and enter your user pool domain, which you should have captured during Step 3 #9. Ours is hellocogoidc.auth.us-west-1.amazoncognito.com
d. Authorized redirect URIs: click + Add URI and enter your user pool domain, suffixed with /oauth2/idpresponse. Ours is hellgogoidc.auth.us-west-1.amazoncognito.co...
e. click Create.
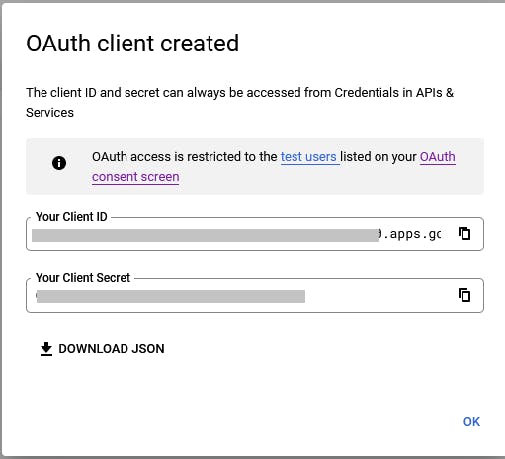
An OAuth client created dialog will appear.
a. Copy and record Your Client ID.
b. Copy and record Your Client Secret.
c. Click OK.
Step 7: Configure Cognito for Google Identity Provider
In this step, you'll configure the Google identity provider in your Cognito user pool.
Back in the AWS console, return back to the Amazon Cognito > User Pools page and click HelloCognitoOIDC to view its detail.
Select the Sign-in experience tab, then click Add identity provider on the Federated identity provider sign-in panel.
Click Google and click Add identity provider.
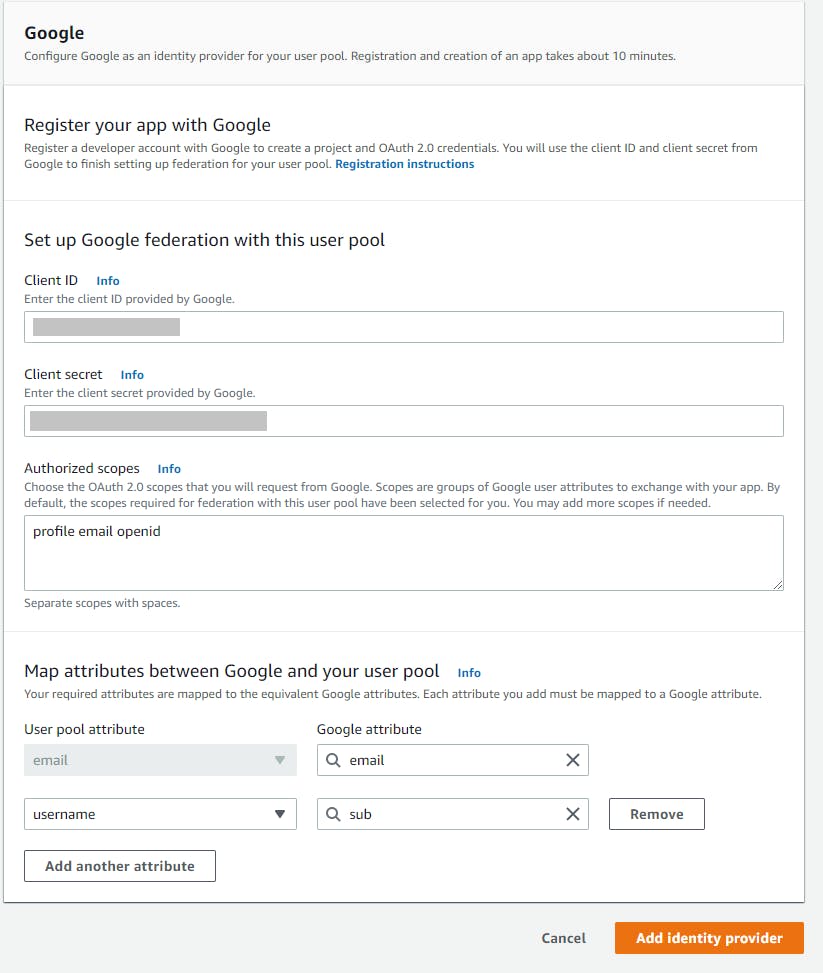
In the Google panel, enter:
a. Client ID: the Google Client ID you recorded in the previous step.
b. Client Secret: the Google client secret you recorded in the previous step.
c. Authorized scopes, enter profile email openid.
d. Map attributes between Google and your user pool: associate user pool attribute email with Google attribute email, and user pool attribute username with Google attribute sub.
e. Click Add identity provider. On the user pools > HelloCognitoOIDC page, on the Federated identity provider sign-in panel, Google should now be listed.
Select the App integration tab.
Select the HelloCognitoWeb app client to view its detail
On the Hosted UI panel, click Edit.
a. Under Identity providers, add Google.
b. Click Save changes at bottom.
That was a lot to configure, and I hope you were careful doing it. Now for the payoff, seeing it work.
Step 8: Run the Program and Test Google Sign-in
In this step we'll run our program again—unchanged from our earlier Cognito sign-in test—and see that we can now also sign-in via Google.
In Visual Studio, press F5 to run the program.
If you are not taken to a sign-in screen (already signed in), click Logout and then Home.
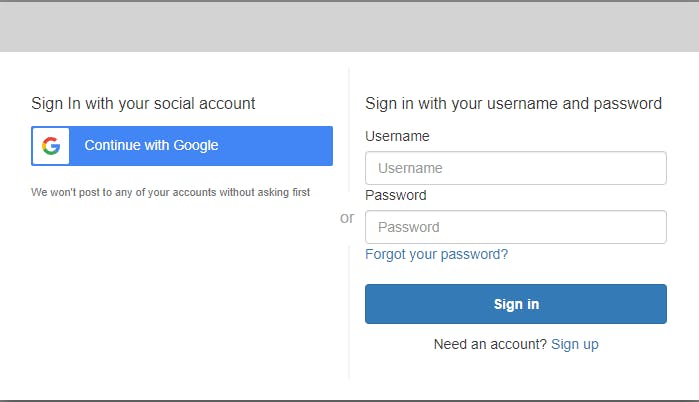
You should now see a slightly different Cognito sign-in screen that offers a Continue with Google option. Users can now authenticate with the Cognito user pool, as in the past, or with a Google identity.
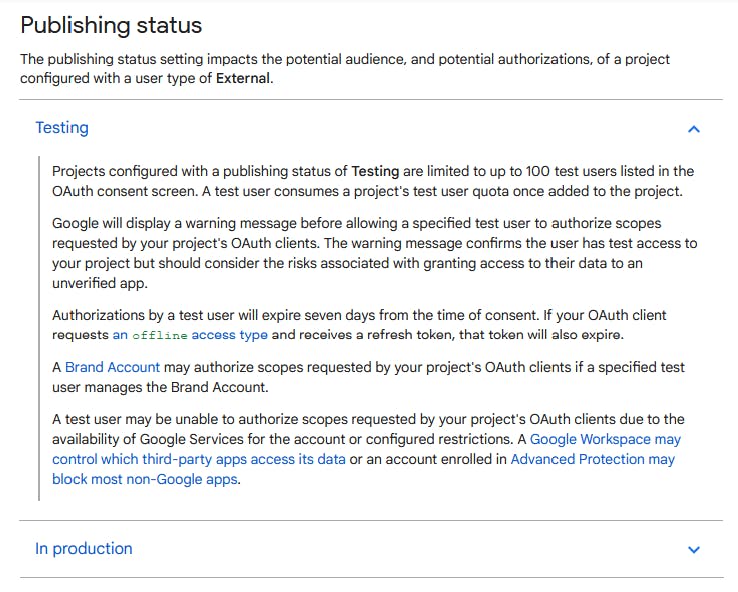
Note that sign-ins are limited to your own Google account. That's because the Google project you created is in a Testing status. As Google explains here, "The non-production Google project will only allow the owning developer to sign in, plus any addition user accounts you configure." If you want other accounts besides your own to be able to sign in, go back to the Google console, select your project, navigate to APIs & Services, click OAuth consent screen, and add test users.
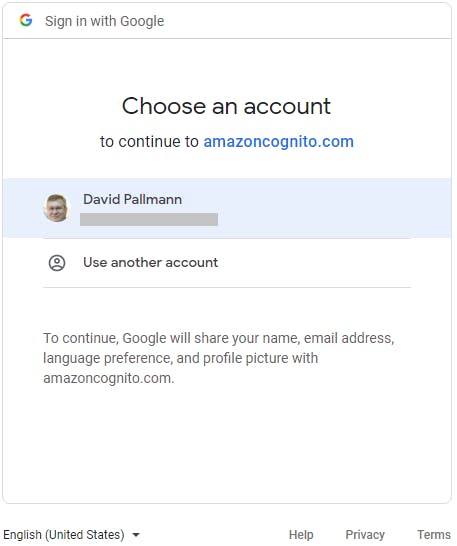
Click Continue with Google and select/confirm a Google account.
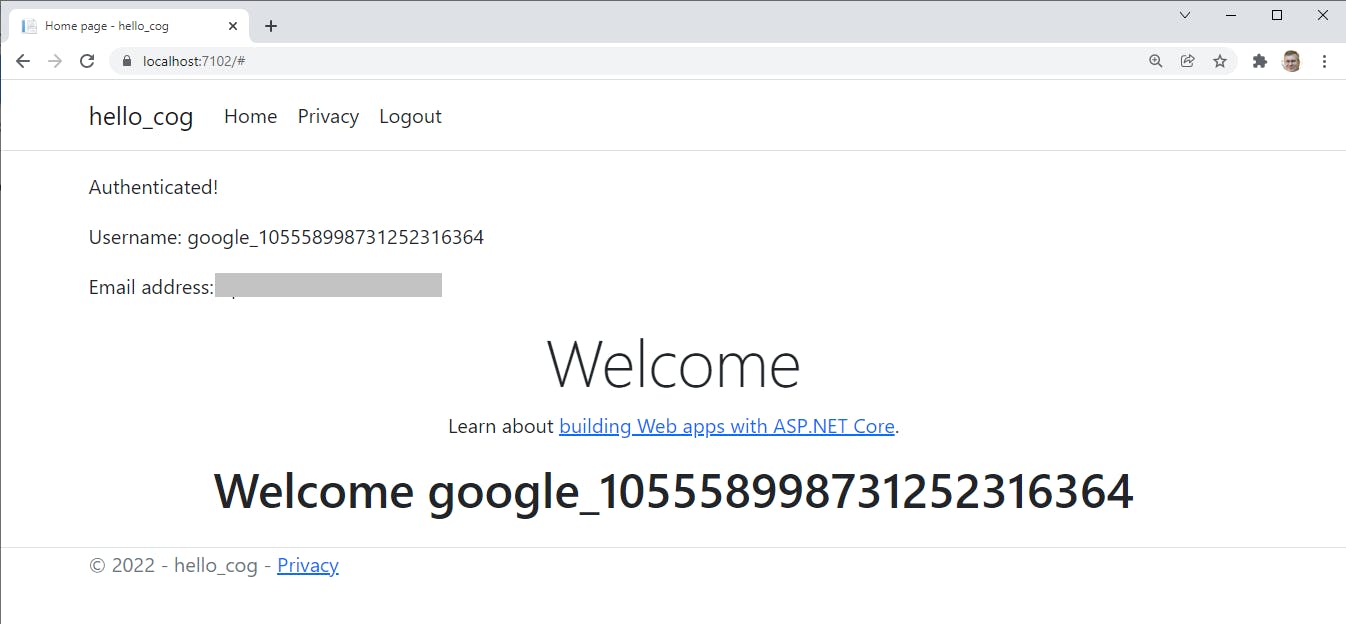
You are directed back to the application welcome page. Your Google user ID and email address are displayed on the page.
Test sign out by clicking Logout. To log in again, click Home.
Congratulations are really in order now. You've not only learned how to connect with Cognito by OIDC, you've also federated identity with Google. Give yourself a big pat on the back.
Step 9: Shut It Down
When you're done with Hello, Cognito, delete your Cognito user pool. You don't want to accrue charges for something you aren't using.
- In the AWS Console, navigate to Amazon Cognito > User pools.
- Click the HelloCognitoOIDC user pool to view its detail.
- Select the App Integration tab.
- Under Domain, select Delete Cognito domain from the Actions drop-down and confirm.
- Under App client list, select the HelloCognitoWeb app client, click Delete, and confirm.
- Navigate back to Amazon Cognito > User pools.
- Select the HelloCognitoOIDC user pool, click Delete, and confirm.
Where to Go From Here
Security is a heavy responsibility, and addressing it means analyzing scenarios and making many choices. Amazon Cognito's support for common identity management standards and ability to federate to identity providers covers a wealth of scenarios.
In this tutorial, we used OpenID Connect and looked at two Cognito authentication scenarios: user authentication to Cognito user pool identities, and identity federation with Google. You set up an Amazon Cognito user pool, created an ASP.NET 6 web application for OIDC authentication to Cognito, and tested it. You saw Cognito sign-in dialogs handle new user registration, login, logout, and forgot password. You then configured Google and Cognito to federate identity, and saw that work as well without having to change the .NET application. Although the Cognito sign-in prompts were very generic, you do have the ability to customize their look with an image and CSS.
So far, we've limited ourselves to authentication with Cognito. In a future blog post we'll also explore authorization.
Further Reading
AWS DOCUMENTATION
Getting Started with Amazon Cognito
Adding user pool sign-in through a third party
Adding OIDC identity providers to a user pool
Amazon Cognito Developer Guide
Customizing the built-in sign-in and sign-up webpages
Code Samples
ASP.NET MVC .NET Core OpenID Cognito
ASP.NET Core Cognito Integration
Videos
Authentication for Your Applications: Getting Started with Amazon Cognito by Quint Van Deman
Protecting your .NET Core Serverless App with Amazon Cognito by Mike Bentzen
Blogs
Protecting your .NET Core Serverless App with Amazon Cognito by Mike Bentzen