


Table of contents
- This episode: AWS Cloud Development Kit and Infrastructure-as-Code. In this Hello, Cloud blog series, we're covering the basics of AWS cloud services for newcomers who are .NET developers. If you love C# but are new to AWS, or to this particular service, this should give you a jumpstart.
- Amazon CDK : What is it, and why use It?
- Our Hello, CDK Project
- One-time Setup
- Step 1: Install CDK
- Step 2: Create a CDK Project
- Step 3: Add a Date AWS Lambda Function
- Step 4: Add a Time AWS Lambda Function
- Step 5: Add the Lambda functions to the CDK project
- Step 6: Publish the Solution and Bootstrap CDK
- Step 7: Deploy with CDK
- Step 8: Add an API Gateway
- Step 9: Delete Your Deployment
- Where to Go From Here
- Further Reading
This episode: AWS Cloud Development Kit and Infrastructure-as-Code. In this Hello, Cloud blog series, we're covering the basics of AWS cloud services for newcomers who are .NET developers. If you love C# but are new to AWS, or to this particular service, this should give you a jumpstart.
In this post we'll introduce Amazon CDK and write AWS infrastructure-as-code in C#. We'll do this step-by-step, making no assumptions other than familiarity with C# and Visual Studio. We're using Visual Studio 2022 and .NET 6.
Amazon CDK : What is it, and why use It?
“CDK has been a gamechanger for us. It has drastically improved our feedback cycle and reduced the time it takes to go from brand-new to fully deployed infrastructure." —Tyler van Hensbergen, Software Engineer, Stedi
Cloud applications require infrastructure, and configuring it manually can be cumbersome, time-consuming, or inconsistent. Infrastructure as code (IaC) provides a refreshing alternative: automated infrastructure management through code. What kind of code? AWS's infrastructure automation platform is AWS CloudFormation, in which you model your entire cloud environment in JSON or YAML files. That's terrific, but as a developer you might yearn for a way to model your environment in your preferred programming language, such as C#.
AWS Cloud Development Kit (hereafter "CDK") is a software development framework that allows you to write Infrastructure-as-Code (IaC) in a programming language. AWS describes it as "an open-source software development framework to define your cloud application resources using familiar programming languages". C# is a supported programming language, along with JavaScript, TypeScript, Python, Java, and Go.
With CDK, you work in your familiar programming language to define your cloud infrastructure, and CloudFormation is generated for you. For a .NET developer, this means your IaC and application can all be written in the same programming language and reside in the same solution. That's highly advantageous for productivity, and does away with the need to switch to a different language or development environment for IaC.
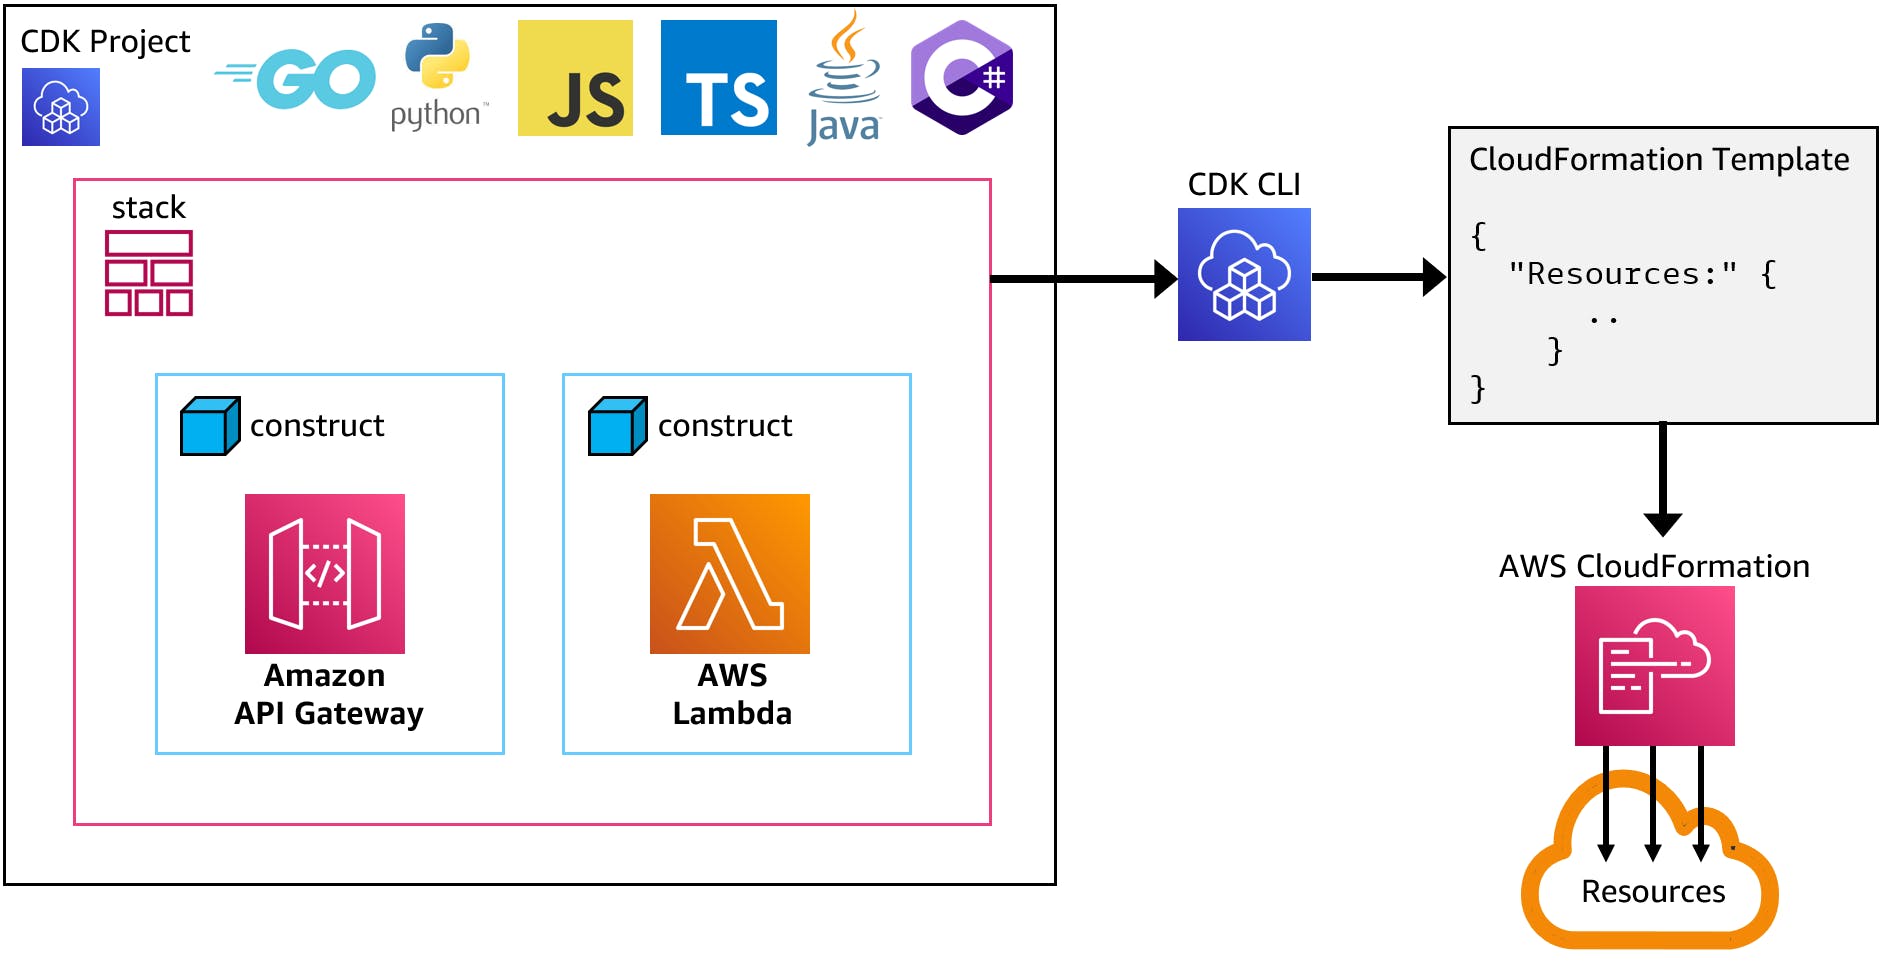
In a CDK project, you compose a stack from high-level components called constructs. For C# CDK development, you use a NuGet package. You use the CDK CLI to manage CDK deployments, which generates and deploys CloudFormation. CDK is built on Node.js and npm, which you must install to use CDK.
A large collection of open source CDK libraries, or "constructs", are available on Construct Hub. There are over 600 .NET constructs available.
The AWS CDK CLI is how you invoke CDK operations, such as deploying or redeploying your stack, or destroying an existing stack. Other AWS CLI tools also make use of CDK, including the AWS Deploy tool for .NET CLI and AWS Copilot.
Our Hello, CDK Project
We will develop, in a single C# solution, two AWS Lambda functions and a CDK project. The CDK project will define infrastructure for the Lambda functions and Amazon API Gateway endpoints. We'll deploy and later destroy a stack using the CDK CLI.


One-time Setup
For any of the tutorials in the Hello, Cloud series you need the following:
- An AWS account, and an understanding of what is included in the AWS Free Tier.
- Microsoft Visual Studio 2022. If you're using an older version of Visual Studio you won't be able to use .NET 6. If you use a different IDE, you may have to find alternatives to some tutorial steps.
- AWS Toolkit for Visual Studio. You'll need to configure the toolkit to access your AWS account and create an IAM user. Your default AWS profile will be linked to this user when running programs from the command line.
Step 1: Install CDK
In this step, you'll install CDK and its prerequisites.
Open a command/terminal or PowerShell window.
Install node.js for your operating system, which will also install Node Package Manager (npm). You can check whether you already have npm with the command
npm --version.
Install the AWS CLI. You can check whether you already have the AWS CLI with the command
aws --version.
If you don't have it, install it and configure it:
A. install the AWS CLI from https://aws.amazon.com/cli/.
B. Follow these instructions to configure the AWS CLI.
Set your your default region by running the command
aws configure. We're using us-east-1 (N. Virginia) in this tutorial.aws configureUse the npm command below to install the AWS CDK CLI.
npm install -g aws-cdk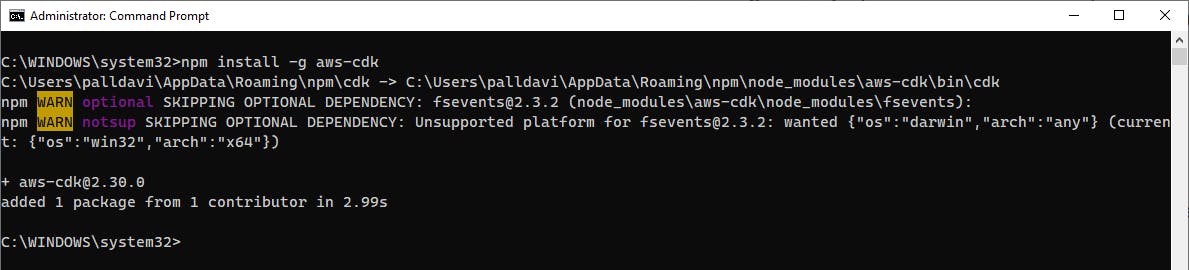
Run the
cdkwith no parameters to see help, and take note of the actions available to you.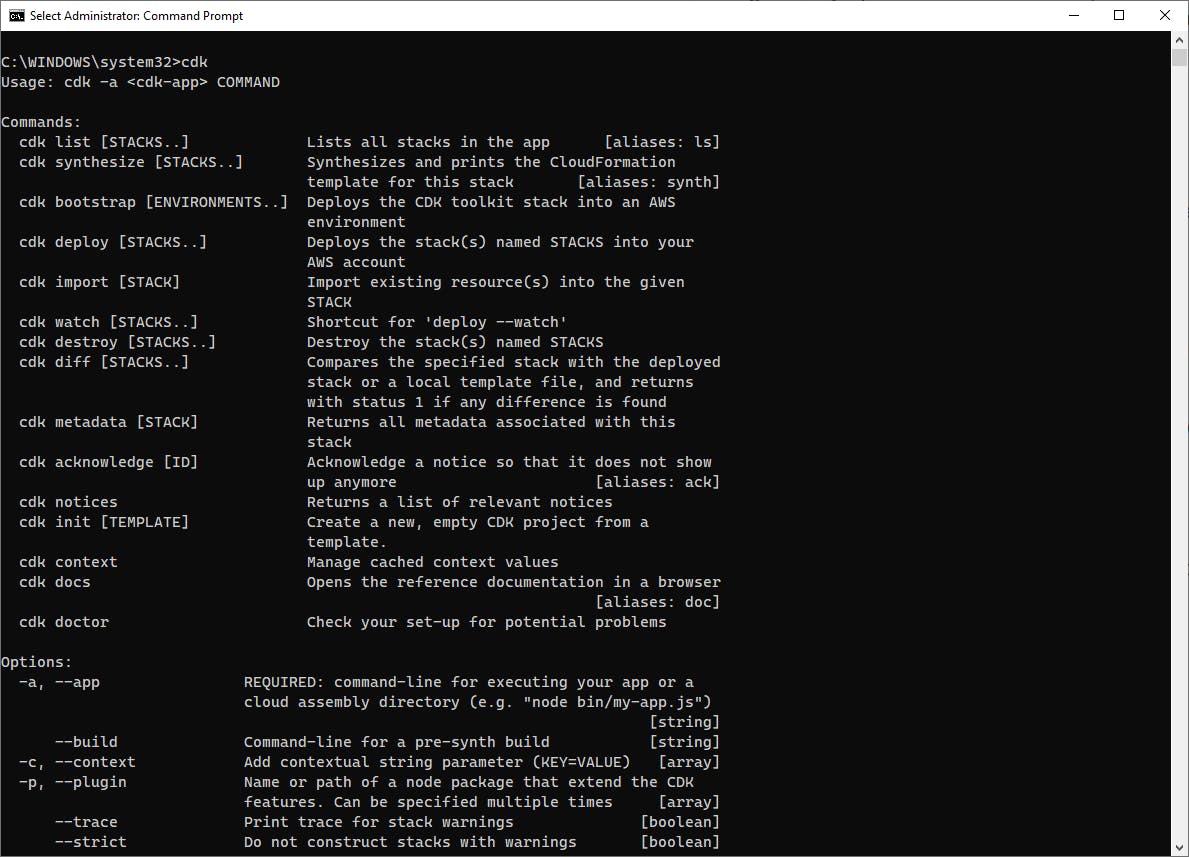
Now that prerequisites and the CDK CLI are installed, close your command/terminal window and open a new one.
Step 2: Create a CDK Project
In this step, you'll create a CDK project for the AWS Lambda function.
In a command/terminal window, create a new development folder named
hello-cdkand CD to it.
Run the
cdk initcommand below to create the scaffolding for a C# CDK project.cdk init app --language csharp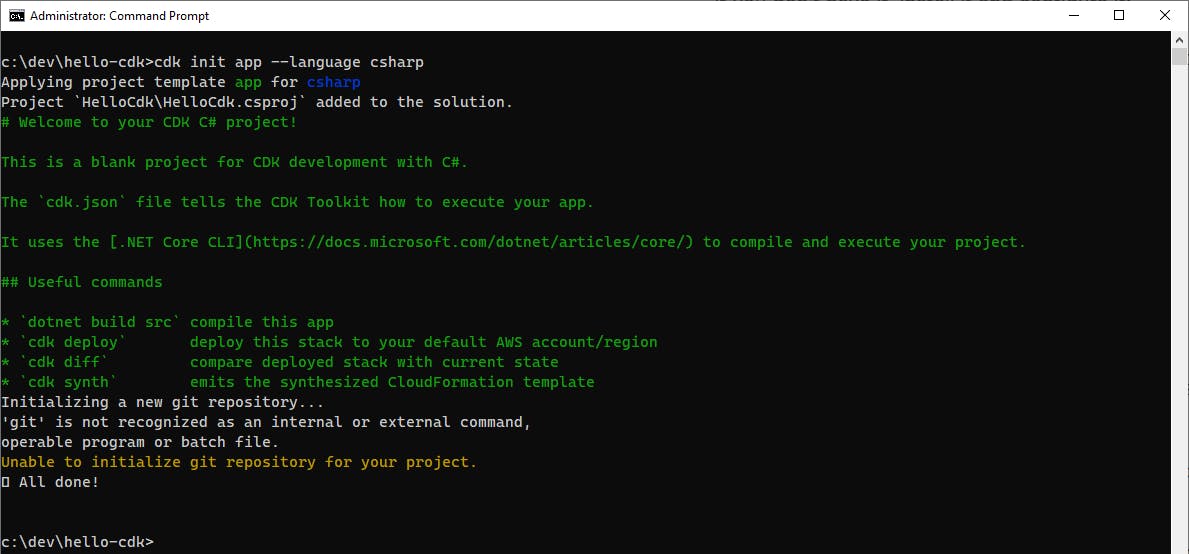
Your
hello-cdkfolder now contains a generated C# solution, in thesrcsubfolder.
Open the solution in Visual Studio or your preferred IDE.
In Solution Explorer, right-click the HelloCdk project and select Properties. Set the Target framework to .NET 6.
An important file used by the CDK, but not formally part of the project, is cdk.json in the top-most hello-cdk folder. Let's add it to the project so we can easily work with it in Visual Studio:
A. In Solution Explorer, right-click the
HelloCdkproject and select Add > Existing Item.B. In the Add dialog, select All Files.
C. Browse to and select the cdk.json file in your top-most
hello-cdkfolder.D. The
cdk.jsonfile is added to your project. Open it in the code editor to get a look at it. From this file, the CDK command will know how to run the CDK project, the files to include/exclude, and which features to enable.{ "app": "dotnet run --project src/HelloCdk/HelloCdk.csproj", "watch": { "include": [ "**" ], "exclude": [ "README.md", "cdk*.json", "src/*/obj", "src/*/bin", "src/*.sln", "src/*/GlobalSuppressions.cs", "src/*/*.csproj" ] }, "context": { "@aws-cdk/aws-apigateway:usagePlanKeyOrderInsensitiveId": true, "@aws-cdk/core:stackRelativeExports": true, "@aws-cdk/aws-rds:lowercaseDbIdentifier": true, "@aws-cdk/aws-lambda:recognizeVersionProps": true, "@aws-cdk/aws-lambda:recognizeLayerVersion": true, "@aws-cdk/aws-cloudfront:defaultSecurityPolicyTLSv1.2_2021": true, "@aws-cdk-containers/ecs-service-extensions:enableDefaultLogDriver": true, "@aws-cdk/aws-ec2:uniqueImdsv2TemplateName": true, "@aws-cdk/core:checkSecretUsage": true, "@aws-cdk/aws-iam:minimizePolicies": true, "@aws-cdk/core:validateSnapshotRemovalPolicy": true, "@aws-cdk/aws-codepipeline:crossAccountKeyAliasStackSafeResourceName": true, "@aws-cdk/core:target-partitions": [ "aws", "aws-cn" ] } }
Step 3: Add a Date AWS Lambda Function
In this step, you'll add a serverless project with a Lambda function to the solution that returns the date.
In Solution Explorer, right-click the
HelloCdksolution and select Add > New Project.In the Add a new project wizard, choose project type Serverless, then select the AWS Serverless Application (.NET Core - C#) project template and click Next.
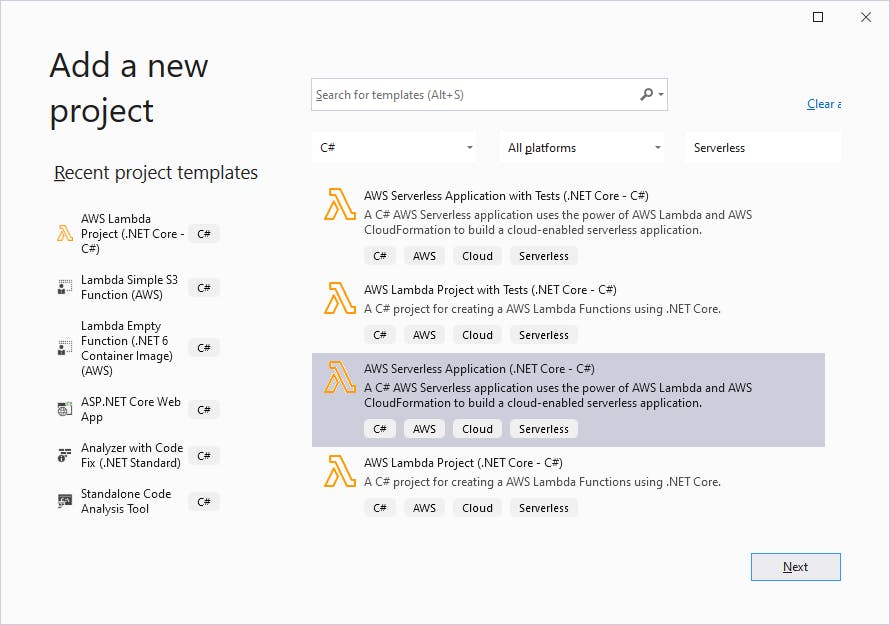
On the Configure your project page, set the Project name to DateFunction.
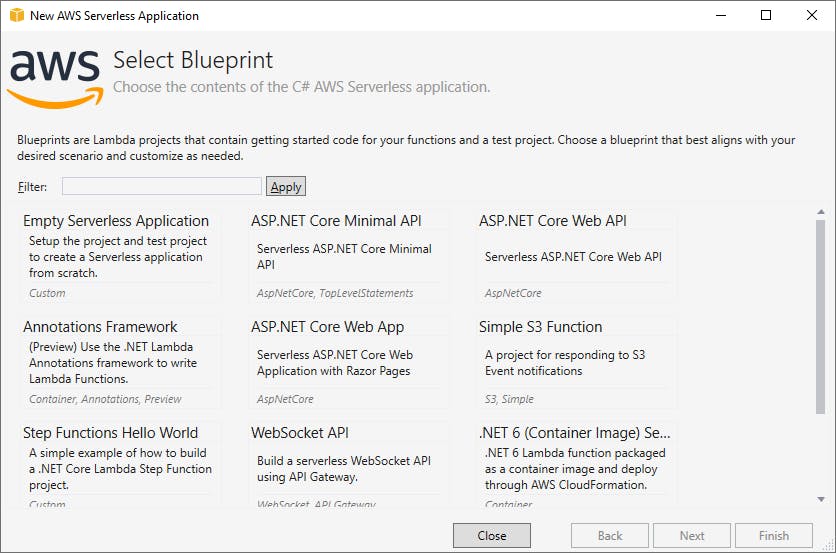
On the Select Blueprint wizard, select Empty Serverless Application and click Finish.
Open the
DateFunctionproject'sFunction.csfile in the code editor, and replace the code with the code below. We are changing two things from the generated code: the namespace is nowDateFunction, and the function handler sets the response body to a date string reflecting the current date.
DateFunction - Function.cs
using System.Net;
using Amazon.Lambda.Core;
using Amazon.Lambda.APIGatewayEvents;

// Assembly attribute to enable the Lambda function's JSON input to be converted into a .NET class.
[assembly: LambdaSerializer(typeof(Amazon.Lambda.Serialization.SystemTextJson.DefaultLambdaJsonSerializer))]

namespace DateFunction;

public class Functions
{
    /// <summary>
    /// Default constructor that Lambda will invoke.
    /// </summary>
    public Functions()
    {
    }


    /// <summary>
    /// A Lambda function to respond to HTTP Get methods from API Gateway
    /// </summary>
    /// <param name="request"></param>
    /// <returns>The API Gateway response.</returns>
    public APIGatewayProxyResponse Get(APIGatewayProxyRequest request, ILambdaContext context)
    {
        context.Logger.LogInformation("Get Request\n");

        var response = new APIGatewayProxyResponse
        {
            StatusCode = (int)HttpStatusCode.OK,
            Body = $"{DateTime.Today.ToLongDateString()}",
            Headers = new Dictionary<string, string> { { "Content-Type", "text/plain" } }
        };

        return response;
    }
}
Step 4: Add a Time AWS Lambda Function
In this step, you'll add another serverless project to the solution, with a Lambda function that returns the time. You'll follow the same steps you did for Step 3.
In Solution Explorer, right-click the
HelloCdksolution and select Add > New Project.In the Add a new project wizard, choose project type Serverless, then select the AWS Serverless Application (.NET Core - C#) project template and click Next.
On the Configure your project page, set the Project name to TimeFunction and click Create.
On the Select Blueprint wizard, select Empty Serverless Application and click Finish.
Open the
TimeFunctionproject'sFunction.csfile in the code editor, and replace the code with the code below. This function handler sets the response body to a time string reflecting the current time.Save your changes and build the solution.
TimeFunction - Function.cs
using System.Net;
using Amazon.Lambda.Core;
using Amazon.Lambda.APIGatewayEvents;

// Assembly attribute to enable the Lambda function's JSON input to be converted into a .NET class.
[assembly: LambdaSerializer(typeof(Amazon.Lambda.Serialization.SystemTextJson.DefaultLambdaJsonSerializer))]

namespace TimeFunction;

public class Functions
{
    /// <summary>
    /// Default constructor that Lambda will invoke.
    /// </summary>
    public Functions()
    {
    }


    /// <summary>
    /// A Lambda function to respond to HTTP Get methods from API Gateway
    /// </summary>
    /// <param name="request"></param>
    /// <returns>The API Gateway response.</returns>
    public APIGatewayProxyResponse Get(APIGatewayProxyRequest request, ILambdaContext context)
    {
        context.Logger.LogInformation("Get Request\n");

        var response = new APIGatewayProxyResponse
        {
            StatusCode = (int)HttpStatusCode.OK,
            Body = $"{DateTime.Now.ToLongTimeString()}",
            Headers = new Dictionary<string, string> { { "Content-Type", "text/plain" } }
        };

        return response;
    }
}
Step 5: Add the Lambda functions to the CDK project
In this step, you'll add the two Lambda functions to the CDK project.
From Solution Explorer, open
HelloCdkStack.csin the code editor.Add a using statement at top for the Amazon.CDK.AWS.Lambda namespace:
using Amazon.CDK.AWS.Lambda;In the
HelloCdkStackfunction body, add the code below to create a CDK Lambda function. The parameters to theAmazon.CDK.AWS.Lambda.Functionspecify this class instance, the CDK namedateLambda, and function properties. The function properties specify the .NET 6.0 runtime, the location where published code can be found, and the Lambda function handler name, which must be of the form project::type::method.var dateLambda = new Amazon.CDK.AWS.Lambda.Function(this, "dateLambda", new FunctionProps { Runtime = Runtime.DOTNET_6, Code = Code.FromAsset("src/DateFunction/bin/Release/net6.0/linux-x64/publish"), Handler = "DateFunction::DateFunction.Functions::Get" });Below that, add a similar statement with the code below for the TimeFunction Lambda function.
var timeLambda = new Amazon.CDK.AWS.Lambda.Function(this, "timeLambda", new FunctionProps { Runtime = Runtime.DOTNET_6, Code = Code.FromAsset("src/TimeFunction/bin/Release/net6.0/linux-x64/publish"), Handler = "TimeFunction::TimeFunction.Functions::Get" });
Your HelloCdkStack.cs code should now look like this:
using Amazon.CDK;
using Amazon.CDK.AWS.Lambda;
using Constructs;
namespace HelloCdk
{
public class HelloCdkStack : Stack
{
internal HelloCdkStack(Construct scope, string id, IStackProps props = null) : base(scope, id, props)
{
         var dateLambda = new Amazon.CDK.AWS.Lambda.Function(this, "dateLambda", new FunctionProps
         {
             Runtime = Runtime.DOTNET_6,
             Code = Code.FromAsset("src/DateFunction/bin/Release/net6.0/linux-x64/publish"),
             Handler = "DateFunction::DateFunction.Functions::Get"
         });
         var timeLambda = new Amazon.CDK.AWS.Lambda.Function(this, "timeLambda", new FunctionProps
         {
             Runtime = Runtime.DOTNET_6,
             Code = Code.FromAsset("src/TimeFunction/bin/Release/net6.0/linux-x64/publish"),
             Handler = "TimeFunction::TimeFunction.Functions::Get"
         });
}
}
}
Step 6: Publish the Solution and Bootstrap CDK
In this step, you'll use the dotnet publish command to build the solution and create the publish files.
Open a command/terminal windows and CD to the to
hello-cdkproject folder, wherecdk.jsonresides.Enter the command below to publish the .NET solution. This will create runtime files for the Lambda functions where the CDK project will be looking for them.
dotnet publish src -c Release -r linux-x64 -p:PublishReadyToRun=false --self-contained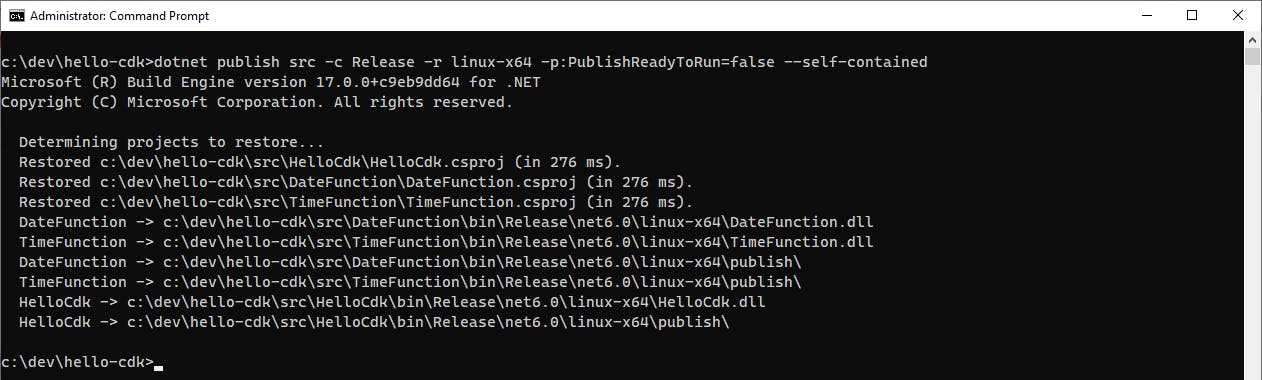
Next we'll bootstrap the CDK with the
cdk bootstrapcommand. This is something you only need to run once, for a region. Bootstrapping the CDK will install resources in your AWS environment necessary for CDK operations. Run the command below.cdk bootstrap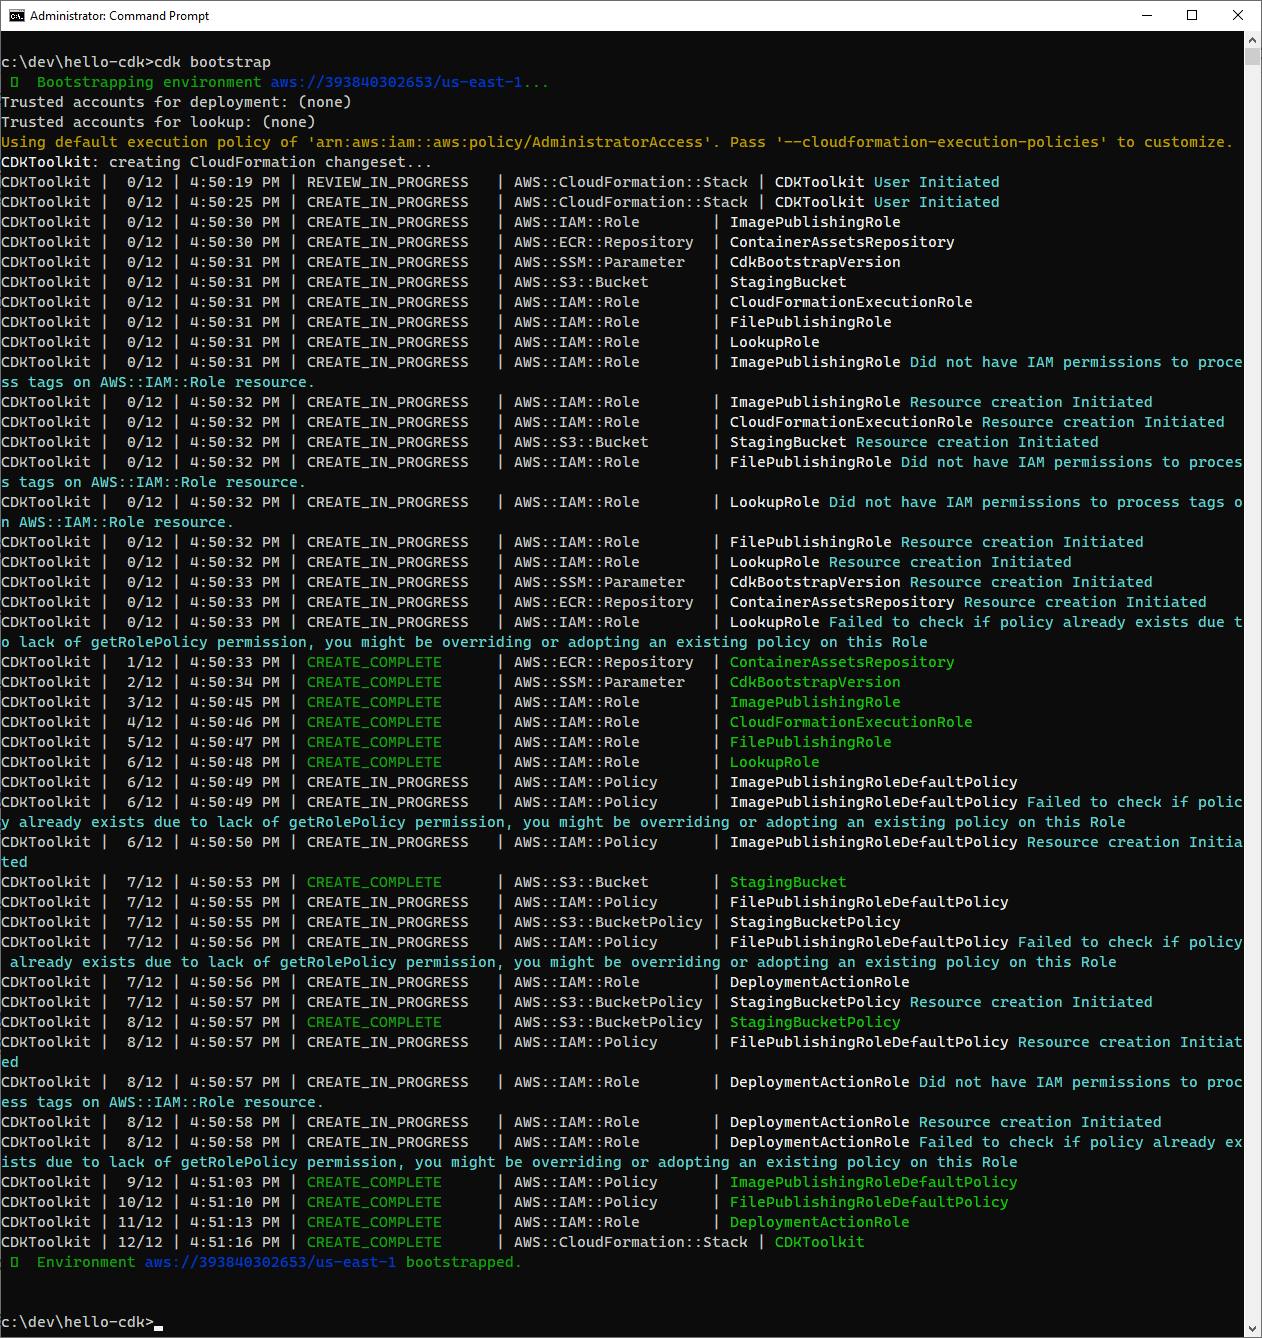
Step 7: Deploy with CDK
Now we're ready for the CDK command to do its magic. In this step, you'll use the CDK CLI to execute your CDK project, creating CloudFormation and deploying your two Lambda functions.
In a command/terminal window, CD to the project folder.
Run the command below to deploy:
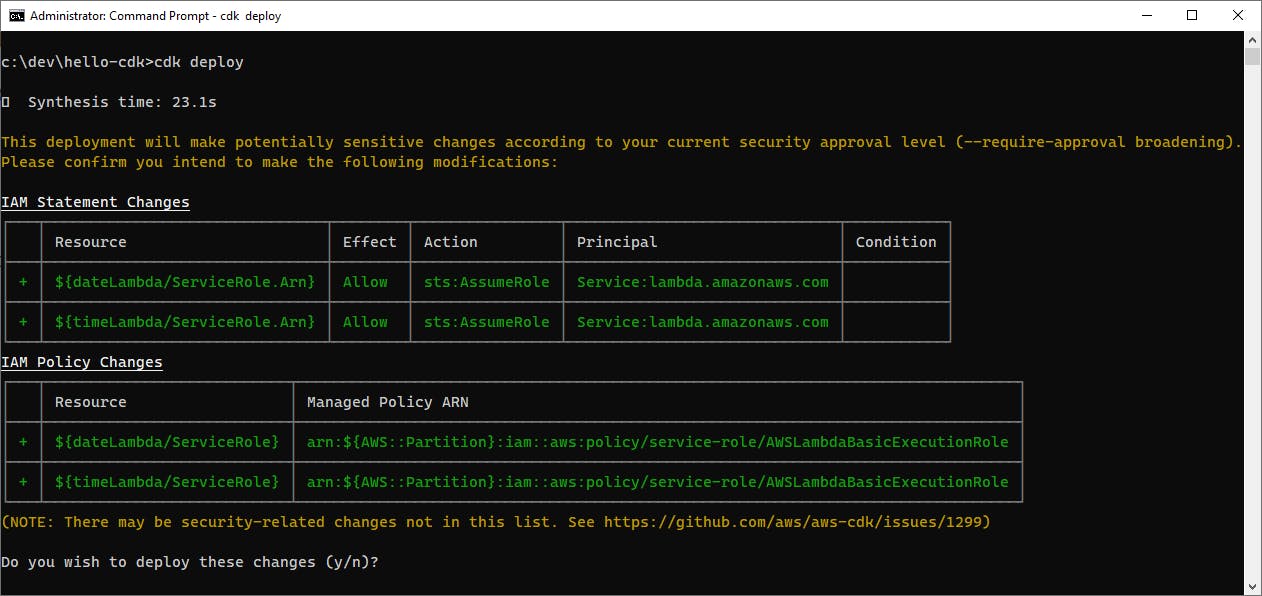
cdk deployThe CDK command shows you security changes it plans to make, new IAM roles needed for the two Lambda functions. Respond with y to proceed.
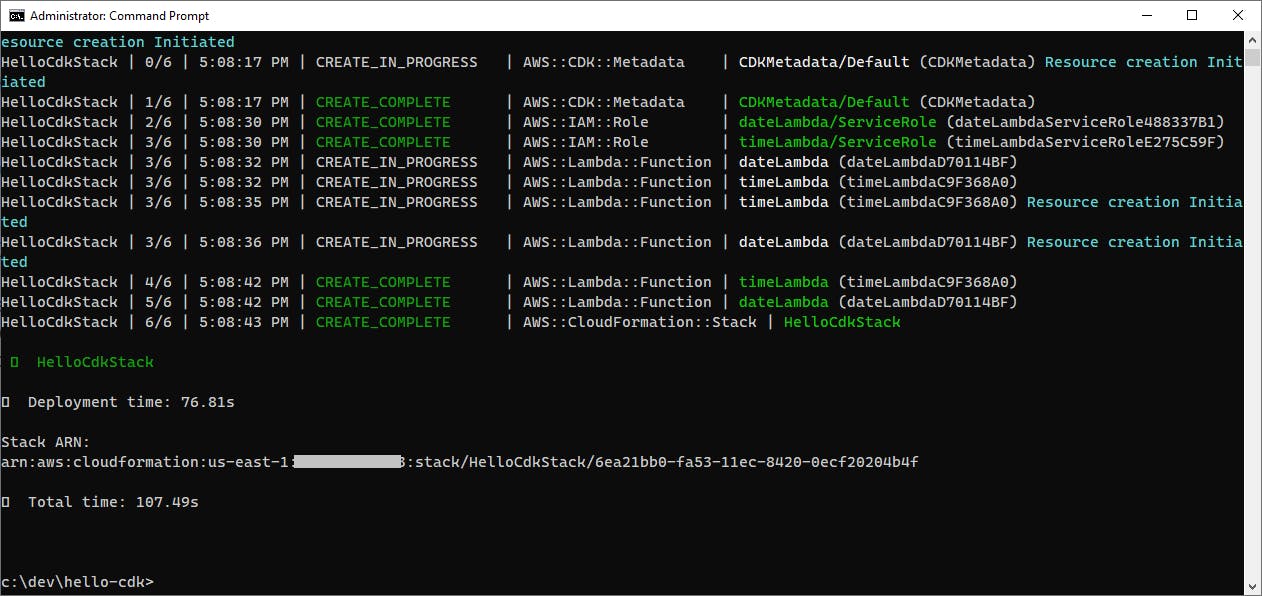
Now wait for the CDK to deploy, which may take a few minutes. The output is very detailed, and that's so you know what's being done and have the information you need to correct any errors that may occur.
If you do get an error, review the error message(s) to understand the nature of the problem. Double check you did all of the prior steps properly, and that your path names are correct and match what's on your machine.
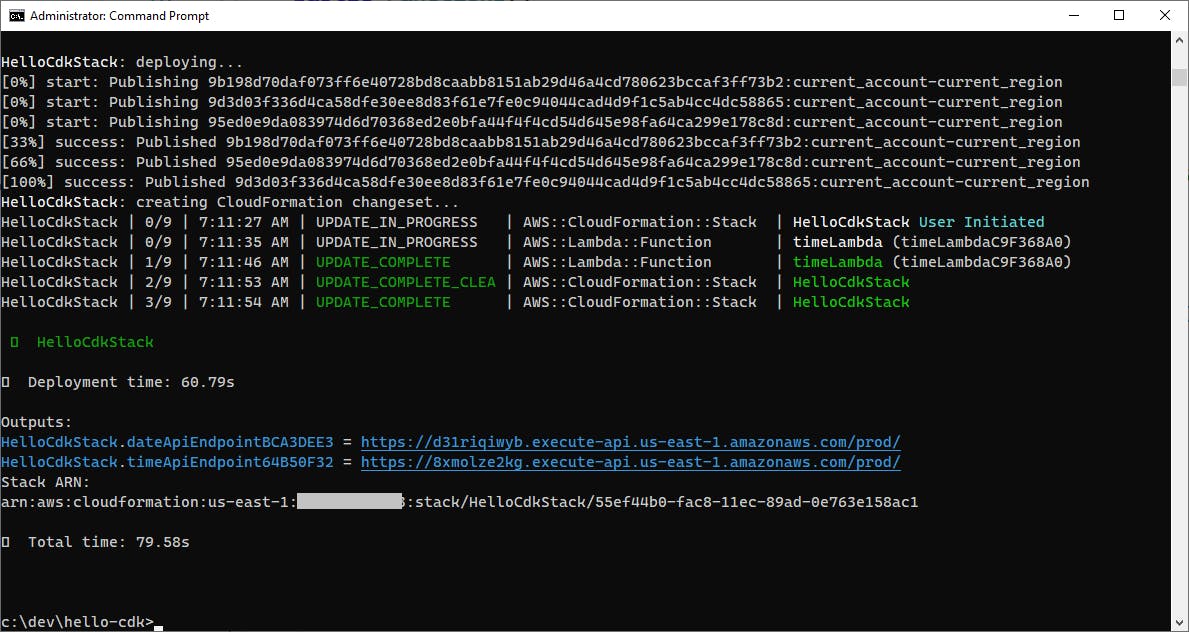
If deployment completes without errors, the end of the output will look like this:
Let's verify the deployment really took place. In a browser, open the AWS management console, and set the region at top right to the region you deployed to. Then navigate to AWS Lambda and select Functions on the left pane. You should see your two Lambda functions.

Congratulations, you've successfully deployed two Lambdas to AWS using a C# CDK project and the CDK CLI! However, we can't access them yet. Let's add API Gateway to the mix so we can get to our Lambda functions from a browser.
Step 8: Add an API Gateway
In this step, you'll add an API Gateway to your CDK project and again deploy it. Then you'll test accessing your API and your Lambda functions from a browser.
In Visual Studio, open
HelloCdkStack.csin the code editor.Add a using statement at top for the Amazon.CDK.AWS.APIGateway namespace:
using Amazon.CDK.AWS.APIGateway;In the constructor, insert two statements to define API gateway endpoints for the Lambda functions.
A. Insert this statement below the
var dateLambda =...statement.new LambdaRestApi(this, "dateApiEndpoint", new LambdaRestApiProps { Handler = dateLambda });B. Insert this statement below the
var timeLambda =...statement.new LambdaRestApi(this, "timeApiEndpoint", new LambdaRestApiProps { Handler = timeLambda });Save your changes.
In the command/terminal window, again publish the .NET solution to generate runtime files:
dotnet publish src -c Release -r linux-x64 -p:PublishReadyToRun=false --self-containedRedeploy by running
cdk deploy. Review the changes and confirm with y.cdk deploy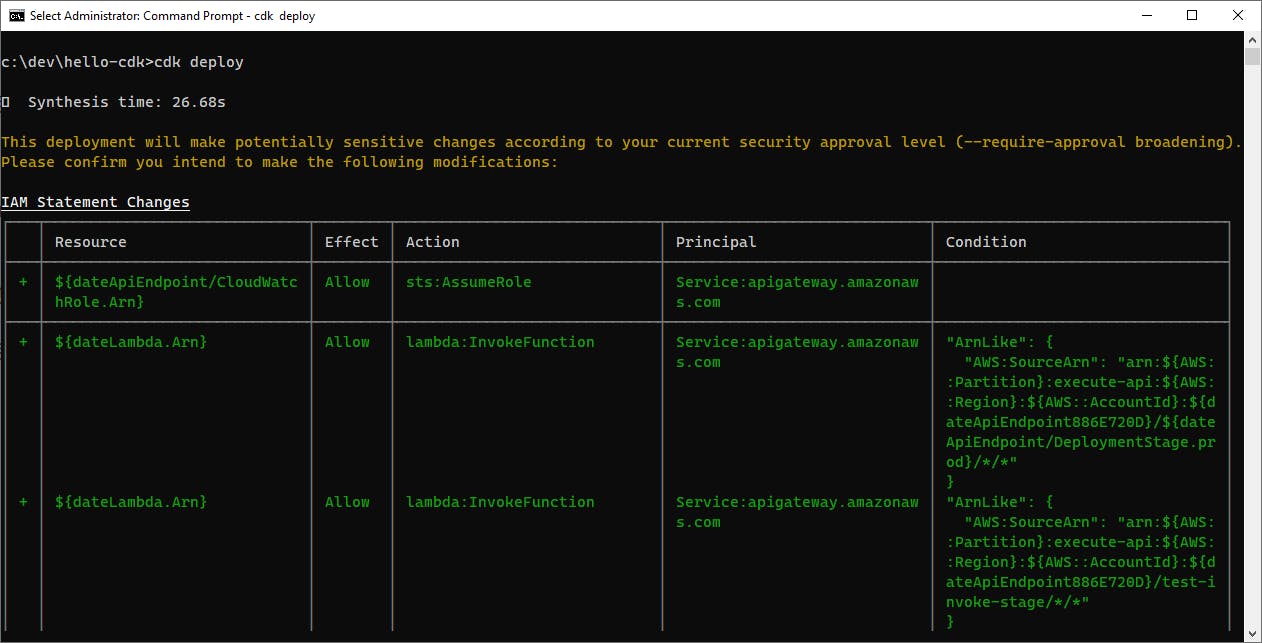
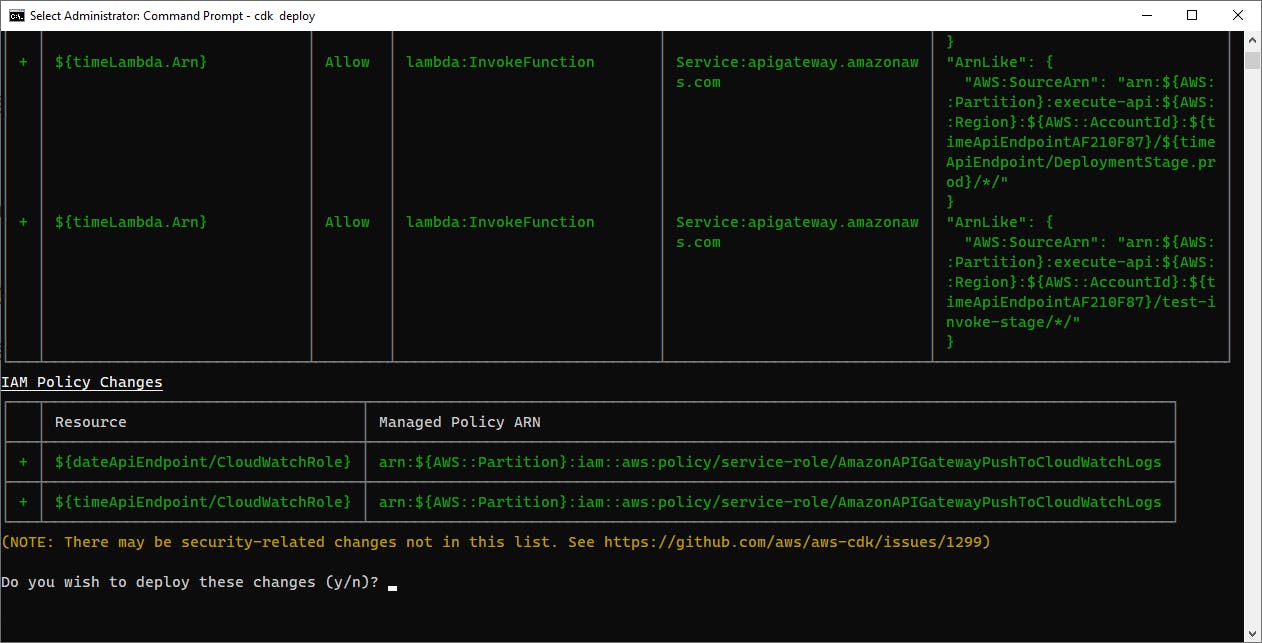
Once again, wait for the deployment to complete, and troubleshoot any errors. Dozens of more steps were added for the API Gateway, but in code you merely added two statements to make all that happen.
On successful completion, you will see API Gateway endpoints for your two Lambda functions. Record the endpoint URLs.
In the AWS management console, navigate to Amazon API Gateway and you should see that your API Gateway endpoints have been deployed.

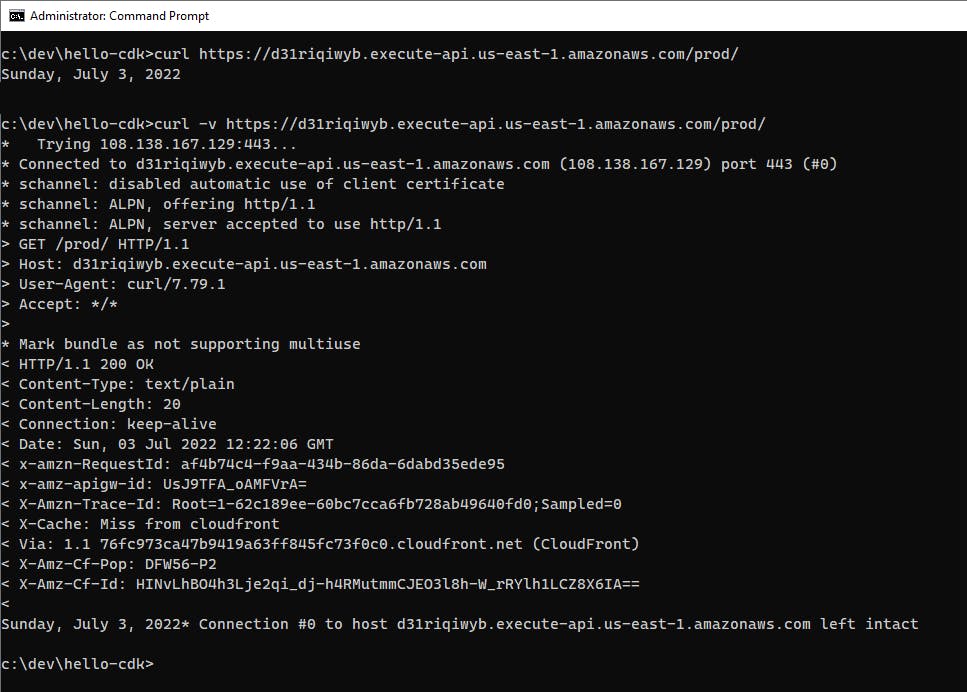
Visit your Date endpoint in a browser, and you should see the date displayed. Visit your Time endpoint in a browser, and you should see the time displayed (local to the cloud instance).


You can also use tools like curl, iwr (in PowerShell), Postman, or Fiddler to test and inspect responses to your API Gateway endpoints.
Nice! You've successfully added API Gateway endpoints for your two Lambda functions and re-deployed with CDK.
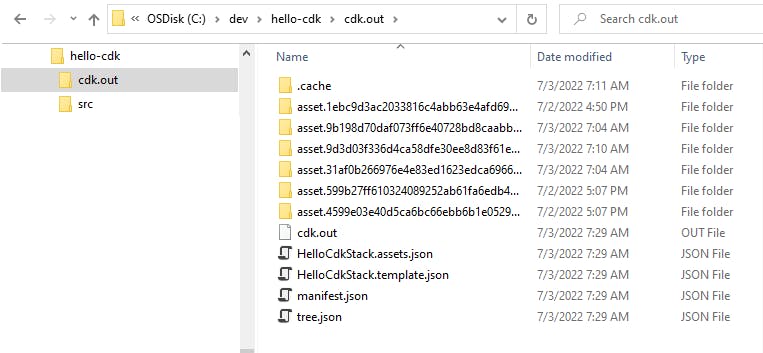
- In case you're curious about the CloudFormation that CDK is generating, look at your development folder structure and you'll see a folder named
cdk.out. This contains the generated CloudFormation files. Take a peek, and I think you'll agree that working in C# in a CDK project with constructs is far simpler than writing lengthy JSON yourself.
Step 9: Delete Your Deployment
When you're done working with your Hello, CDK project, follow the steps below to delete the deployment. You don't want to accrue charges for something you're not using.
Open a command/terminal windows and CD to your
hello-cdkproject folder.Run the
cdk destroycommand and confirm the Are you sure prompt with y.
Wait for the CDK destroy operation to complete.
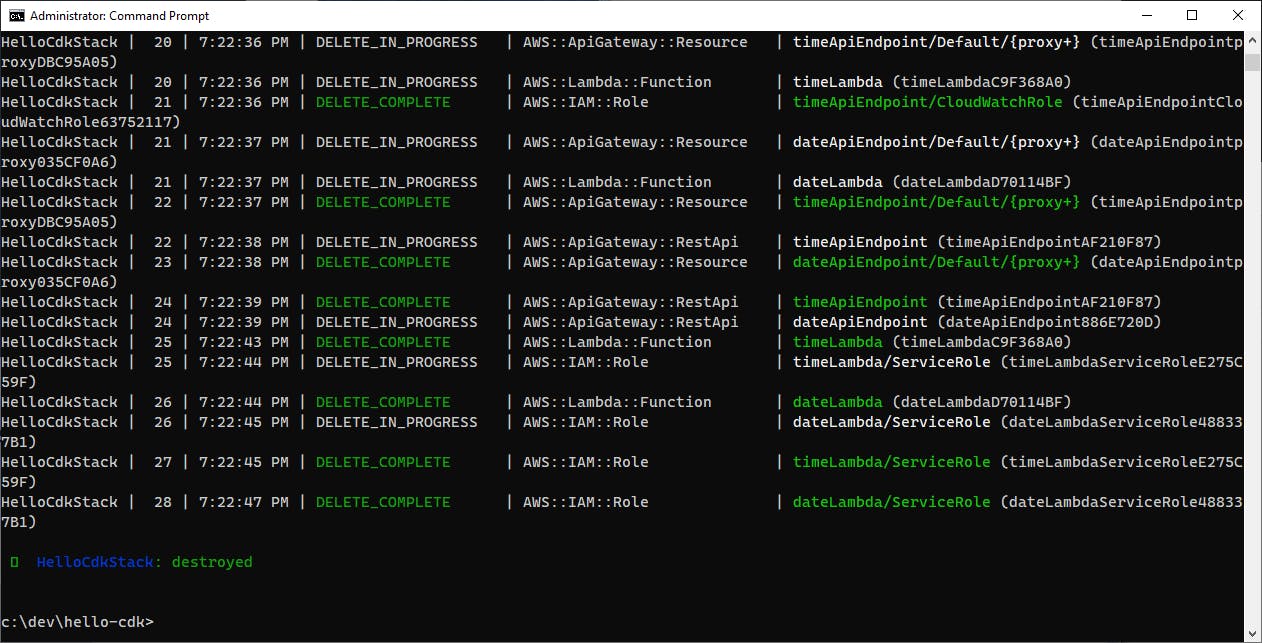
In the AWS management console, navigate to AWS Gateway and confirm the API Gateway has been removed.
Navigate to AWS Lambda and confirm the two Lambda functions have been removed.
Where to Go From Here
Infrastructure-as-Code is powerful and necessary for streamlined, reliable cloud development. It's well worth making a part of your cloud development. With AWS Cloud Development Kit, you can work on IaC right alongside your application code in the same solution, the same programming language, and the same IDE.
In this tutorial, you installed dependencies and the CDK CLI, generated a CDK C# project, and created two Lambda functions. You added C# code to the CDK project for your two Lambda functions and API Gateway endpoints. The code was short and simple. You used the CDK CLI to deploy and redeploy your software. You saw how simple the CDK project was, just a handful of statements.
The AWS CDK allowed you to work in familiar C#, and had the building blocks to make defining Lambda functions and API Gateway endpoints very simple. The CDK CLI gave you plenty of detailed information, helpful both for learning and troubleshooting. The CDK CLI generated and executed CloudFormation, but you didn't have to work with it directly.
IaC can seem intimidating at times, and it can get complex. If you have a good understanding of the AWS services you use and their configuration options, you'll write better IaC. If you get familiar with the CDK .NET constructs and object model, the CDK code will come more readily.
This tutorial only covered a small amount of surface area, Amazon API Gateway and AWS Lambda. You'll want to learn how to use CDK in your CI/CD pipelines, leverage environment variables, and deploy across multiple environments such as test, staging, and production. To go further, read the documentation, take tutorials, and practice using CDK for different things. I got my start with CDK watching the PJ Pittle video linked below. Remember, before writing your own CDK code, check Construct Hub for existing constructs that may do what you need.
Further Reading
AWS Documentation
AWS Cloud Development Kit on GitHub
AWS CDK Toolkit Developer Guide
Working with the AWS CDK in C#
AWS CDK Examples on GitHub
.NET Workshop AWS Cloud Development Kit (AWS CDK)
Dependencies and Installations
Node.js and Node Package Manager (npm) download
Install AWS CDK CLI: [npm install -g aws-cdk](npm install -g aws-cdk)
Community Resources
cdk.dev CDK Community
ConstructHub open source CDK libraries
AWS SDK for .NET Documentation
Videos
Note: AWS CDK is at v2 at the time of this writing. Some of these videos and blogs may reference CDK v1.
How to use C# with the AWS CDK to manage your Infrastructure as Code by PJ Pittle
Build Your Infrastructure in .NET with AWS Cloud Development Kit (CDK) - AWS Online Tech Talks by Martin Beeby
AWS Cloud Development Kit (CDK) with the .NET by Taz Hussein
AWS re:Invent 2019: Infrastructure as .NET with AWS CDK by Nikki Stone and Steve Roberts
Blogs
The AWS CDK using C# by Graham Beer
AWS CDK for .NET by Aaron Costley
Deployment Projects with the new AWS .NET Deployment Experience
4 ways to deploy a .NET Core Lambda using AWS CDK
Deploying an ASP.NET Core API to AWS Fargate using CDK by Christian Eder