Table of contents
- This episode: Amazon Bedrock and Generative AI. In this Hello, Cloud blog series, we're covering the basics of AWS cloud services for newcomers who are .NET developers. If you love C# but are new to AWS, or to this particular service, this should give you a jumpstart.
- Bedrock : What is it, and why use It?
- Our Hello, Bedrock Project
- Where to Go from Here
- Further Reading
This episode: Amazon Bedrock and Generative AI. In this Hello, Cloud blog series, we're covering the basics of AWS cloud services for newcomers who are .NET developers. If you love C# but are new to AWS, or to this particular service, this should give you a jumpstart.
In this post we'll introduce Amazon Bedrock and use it in a "Hello, Cloud" .NET program to generate text. We'll do this step-by-step, making no assumptions other than familiarity with C# and Visual Studio. We're using Visual Studio 2022 and .NET 6.
Bedrock : What is it, and why use It?
"We're making this analogy that AI is the new electricity. Electricity transformed industries: agriculture, transportation, communication, manufacturing." —Andrew Ng
The widespread interest in Generative AI has everyone's attention and can potentially transform any line of business. Generative AI is powered by machine learning models that are pre-trained on vast amounts of data, known as Foundation Models.
Amazon Bedrock (hereafter "Bedrock") is a service that makes it easy to build generative AI solutions. AWS describes it as "a fully managed service that offers leading foundation models (FMs) as a single API along with a broad set of capabilities you need to build generative AI applications, simplifying development while maintaining privacy and security." Bedrock provides a choice of FMs from Amazon and leading third-party model providers.
Use cases for Bedrock include text generation of original content, conversational chatbots, answering questions, text summarization, image generation, and personalized recommendations.
Here's the general developer sequence for working with Bedrock:
1. Choose the Foundation Model(s) you want to work with. You can easily experiment with FMs in the AWS console, which has Chat, Text, and Image playgrounds.
2. Optionally, Customize the FM with your private data to fine-tune the model for your company-specific tasks.
3. Use Single API calls to perform inferences from your model.

The Bedrock pricing model charges for model inferences and customization. You can choose between On-demand and Provisioned Throughput. On-demand is pay-as-you-go, while Provisoned Throughput provides a level of throughput in exchange for a time-based commitment. The rates vary by model, so be sure to get familiar with them and review the pricing examples. Note that Provisioned Throughput is required If you want to customize (fine-tune) a model with your own data.
Our Hello, Bedrock Project
We will first get familiar with Bedrock in the AWS console, focusing on text generation. Then we'll write a .NET program that generates text in response to prompts, with a choice of model. We won't be customizing any models in this tutorial and will rely on what the models give us out-of-the-box.

One-time Setup
For any of the tutorials in the Hello, Cloud series you need the following:
An AWS account, and an understanding of what is included in the AWS Free Tier.
Microsoft Visual Studio 2022. If you're using an older version of Visual Studio you won't be able to use .NET 6. If you use a different IDE, you may have to find alternatives to some tutorial steps.
AWS Toolkit for Visual Studio. You'll need to configure the toolkit to access your AWS account and create an IAM user. Your default AWS profile will be linked to this user when running programs from the command line.
Step 1: Configure Bedrock Model Access
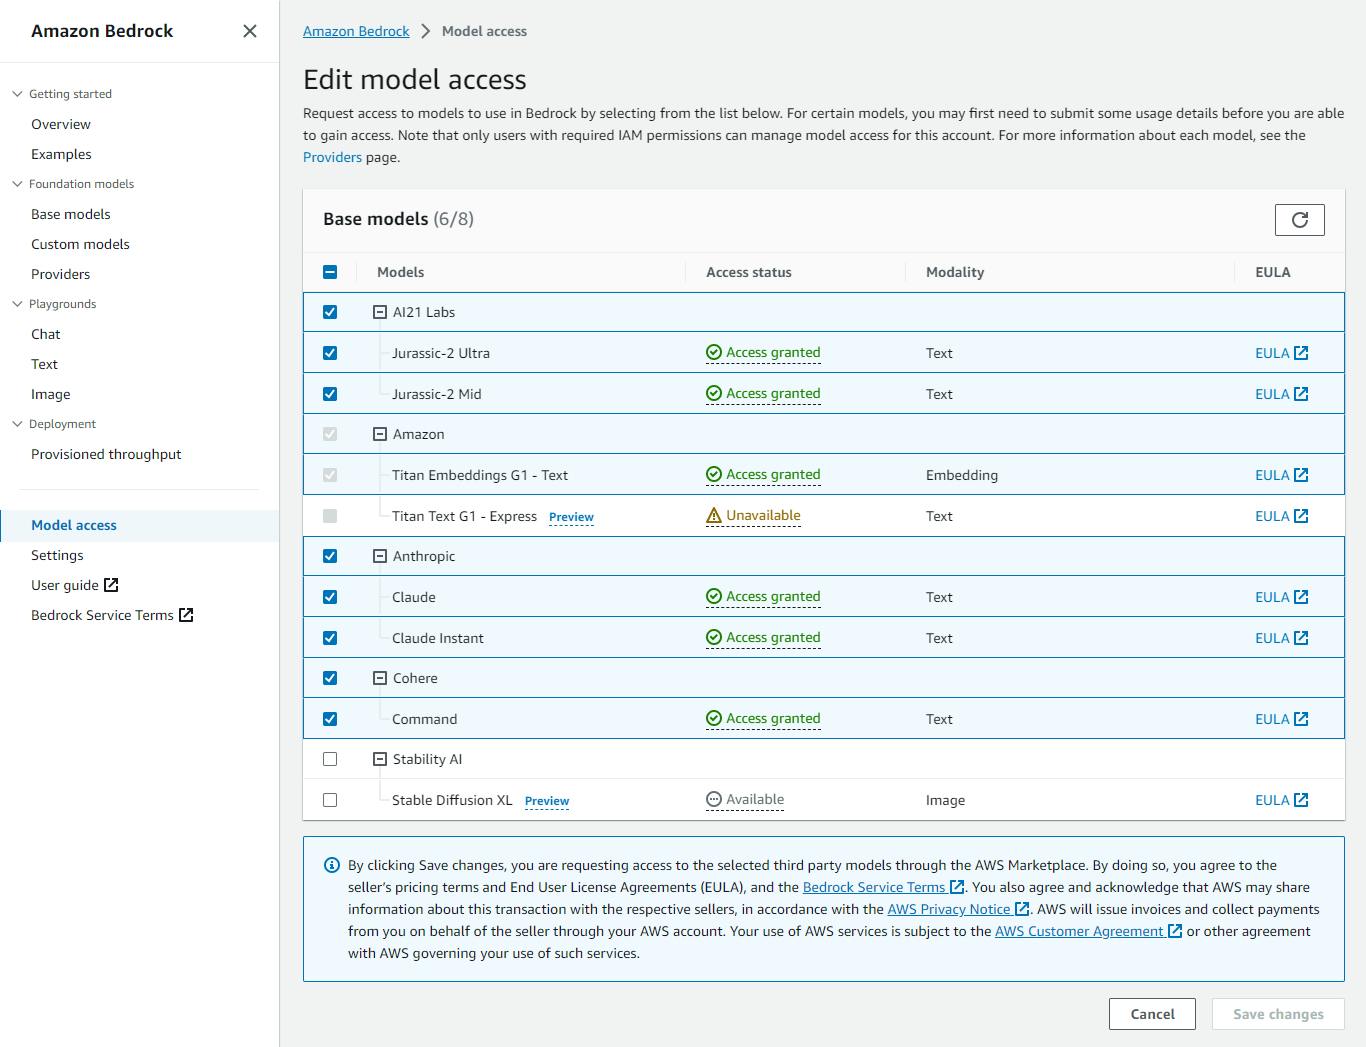
In this step, you'll request access to the Bedrock models we want to use in our program. Our program will let users choose from a list of models, so we want several models enabled.
Sign in to the AWS console. At top right, select the region you want to work in. You can check supported regions for Bedrock on the Bedrock FAQs page. I'm using us-west-2 (Oregon).
Navigate to Amazon Bedrock.
On the left pane, select Model access.
Click Edit. Check the boxes for all of the available Text models you'd like to work with. Our program will know how to work with all of these models: Anthropic Claude Instant V1, Claude V1, Claude-V2, AI21 J2 Ultra V1, J2 Mid V1, and Cohere Command. As the page reminds you, be sure you're comfortable with pricing terms and End User License Agreements for each model you enable.
Click Save changes.
Step 2: Use Bedrock in the AWS console.
In this step, you'll get experience with Bedrock in the AWS console.
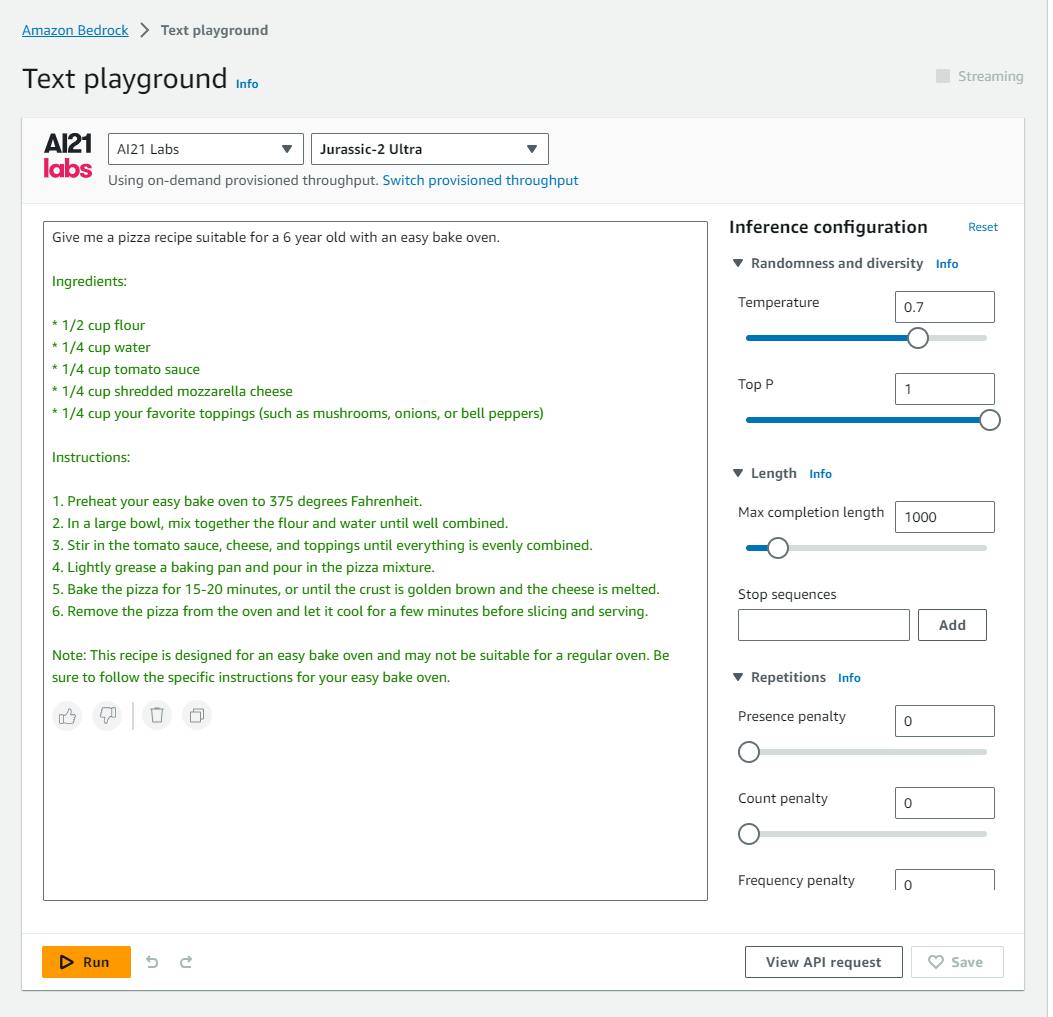
In the AWS Bedrock console, select Playgrounds > Text from the left panel.
Use the drop downs at top of page to select a model. I selected AI21 Labs | Jurassic-2 Ultra.
In the configuration panel at right, increase the Max completion length parameter to 1000. This will allow longer responses.
In the Write something... input box, enter a text prompt:
Give me a pizza recipe suitable for a 6 year old with an easy bake oven.Click Run and observe the result in the text box. The response should be a pizza recipe with language tailored for a child. If you don't like the response, click Run again. Generative AI is non-deterministic, and can produce different outputs for the same input. You can of course also tinker with the prompt wording itself.
Clear the text and replace it with the following:
Give me a pizza recipe suitable for a gourmet chef.Click Run. Note how the response differs from the earlier prompt.

Now, select a different model from the top drop-downs, such as Anthropic Claude V2. Increase the Maximum length setting to 1000 to allow for a larger response.
Try the same prompts you gave earlier, and see how this model differs from the earlier one. In my test, I liked that safety tips were provided for the 6-year old.


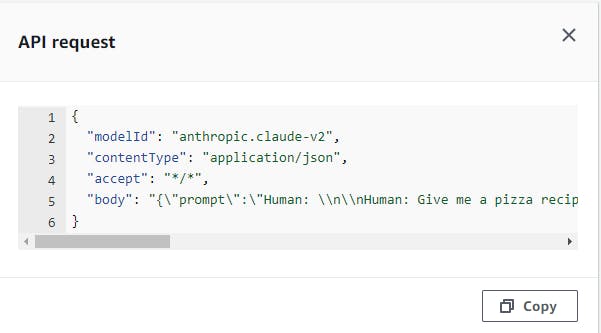
Click the View API request button at the lower right. This tells you details you need for programmatic access, including the Model ID and the JSON request body. That JSON differs by model and lets you configure the same parameters you see in the configuration panel at right.
Step 3. Write a .NET Program for Text Generation
Now that we've seen what Bedrock can do, it's time to work with it programmatically. In this step you'll write a .NET program that lets you choose a model and responds to text prompts.
Open a command/terminal window and CD to a development folder.
Enter the dotnet new command below to create a console program named hello-bedrock:
dotnet new console -n hello-bedrockCD to the hello-bedrock folder.

Run these commands to add Bedrock NuGet packages and Newtonsoft to your project:
dotnet add package AWSSDK.Bedrock
dotnet add package AWSSDK.BedrockRuntime
dotnet add package newtonsoft.jsonOpen the hello-bedrock project in Visual Studio or your preferred IDE.
Open Program.cs in the code editor, and replace it with the code below.
using System.Text;
using Amazon;
using Amazon.BedrockRuntime;
using Amazon.BedrockRuntime.Model;
using Newtonsoft.Json;
using Newtonsoft.Json.Linq;

#pragma warning disable CS8600 // Converting null literal or possible null value to non-nullable type.

var models = new List<Model>();
models.Add(new Model("1", "anthropic.claude-instant-v1", "{{'prompt': 'Human:{0} Assistant:', 'max_tokens_to_sample':300, 'temperature':1, 'top_k':250,'top_p':0.999, 'stop_sequences':['Human'],'anthropic_version':'bedrock-2023-05-31'}}"));
models.Add(new Model("2", "anthropic.claude-v1", "{{'prompt': 'Human:{0} Assistant:', 'max_tokens_to_sample':300, 'temperature':1, 'top_k':250, 'top_p':1, 'stop_sequences':['Human'],'anthropic_version':'bedrock-2023-05-31' }}"));
models.Add(new Model("3", "anthropic.claude-v2", "{{'prompt': 'Human:{0} Assistant:', 'temperature':0.5, 'top_p':1 , 'max_tokens_to_sample':300, 'top_k':250,'stop_sequences':['Human'] }}"));
models.Add(new Model("4", "ai21.j2-ultra-v1", "{{'prompt':'{0}','maxTokens':200,'temperature':0.7,'topP':1,'stopSequences':[],'countPenalty':{{'scale':0}},'presencePenalty':{{'scale':0}},'frequencyPenalty':{{'scale':0}}}}"));
models.Add(new Model("5", "ai21.j2-mid-v1", "{{'prompt':'{0}','maxTokens':200,'temperature':0.7,'topP':1,'stopSequences':[],'countPenalty':{{'scale':0}},'presencePenalty':{{'scale':0}},'frequencyPenalty':{{'scale':0}}}}"));
models.Add(new Model("6", "cohere.command-text-v14", "{{'prompt':'{0}','max_tokens':400,'temperature':0.75, 'p':0.01, 'k':0, 'stop_sequences':[], 'return_likelihoods': 'NONE'}}"));

// Command line processing

if (args.Length < 2)
{
    Console.WriteLine("Generate text with Amazon Bedrock.");
    Console.WriteLine(@"Usage: dotnet run -- model ""prompt""");
    Console.WriteLine("Available models:");
    foreach (var m in models)
    {
        Console.WriteLine($"{m.Nickname} {m.Id}");
    }
    Environment.Exit(0);
}

var model = models.Where(m =>m.Nickname == args[0] || m.Id == args[0]).FirstOrDefault();
if (model==null)
{
    Console.WriteLine($"Model {args[0]} not found");
    Environment.Exit(0);
}

var prompt = args[1];
prompt = prompt.Replace("'", "\\'");

Console.WriteLine("Model: " + model.Id);

// Create the request.

AmazonBedrockRuntimeClient client = new AmazonBedrockRuntimeClient(new AmazonBedrockRuntimeConfig
{
    RegionEndpoint = RegionEndpoint.USWest2
});

InvokeModelRequest request = new InvokeModelRequest();
request.ModelId = model.Id;

JObject json = JObject.Parse(String.Format(model.Body, prompt));
byte[] byteArray = Encoding.UTF8.GetBytes(JsonConvert.SerializeObject(json));
MemoryStream stream = new MemoryStream(byteArray);
request.Body = stream;
request.ContentType = "application/json";
request.Accept = "application/json";

// Invoke model and output the response.

var response = await client.InvokeModelAsync(request);
string responseBody = new StreamReader(response.Body).ReadToEnd();
dynamic parseJson = JsonConvert.DeserializeObject(responseBody);
string answer = model.Id switch
{
    "anthropic.claude-instant-v1" => parseJson?.completion,
    "anthropic.claude-v1" => parseJson?.completion,
    "anthropic.claude-v2" => parseJson?.completion,
    "ai21.j2-mid-v1" => parseJson?.completions[0].data.text,
    "ai21.j2-ultra-v1" => parseJson?.completions[0].data.text,
    "cohere.command-text-v14" => parseJson?.generations[0].text,
    _ => null
};

Console.WriteLine(answer?.Trim());
Environment.Exit(0);

class Model
{
    public string Nickname;
    public string Id;
    public string Body;
    public Model(string nickname, string id, string body) { Nickname = nickname; Id = id; Body = body; }
}
Understand the Code
The code begins by defining a collection of models (lines 10-16). We want to give the user a choice of model, and we need to know the model Id and JSON request body structure for each model we will support.
Next, we process the command line (lines 18-42). If there are no command line arguments, we display command help and list the available models. If arguments are provided, we get the model and text prompts from the command line. The model can be specified as a number (such as 1) or a model Id (such as anthropic.claude-instant-v1). If a matching model is found, its Id is echoed to the console and we proceed to perform an inference.
Next we set up a request for Bedrock (lines 44-59). We instantiate an AmazonBedrockRuntimeClient and specify a region (update this if you prefer a different region). Then we create an InvokeModelRequest. The request includes the model Id of our model, a body, and properties for content type and accept headers. The request body takes the header defined in our Models collection and replaces the {0} portion with the prompt from the command line. It's then turned into a memory stream. By the way, some models support streaming, and those can be invoked with InvokeModelWithResponseStreamRequest which returns a response stream. We used InvokeModelRequest here for simplicity because it can be used with all models.
With our request prepared, it's time to invoke the model and output the results (lines 61-78). We call InvokeModelAsync to process the request. The response's Body property is a stream we read. Like the request, the response body structure varies by model. To deal with that, we assign the deserialized JSON to a dynamic variable, and use a switch expression to retrieve the response answer text. The result is displayed to the console.
Step 4: Run the Program and Test Bedrock
Now it's time to run our .NET program and see it work.
Open a command/terminal window and CD to the project location.
Run the dotnet run command with no parameters:
dotnet runYou'll see command help displayed and the list of models.

Now, run the program with a model and prompt (in quotes), such as
dotnet run -- 1 "Explain Newton's first law at a third-grade reading level"
Try different models and different prompts. Have fun! As you experiment, stay conscious of what you're spending. Here are some examples:
What dish can I make with just tomatoes and bread?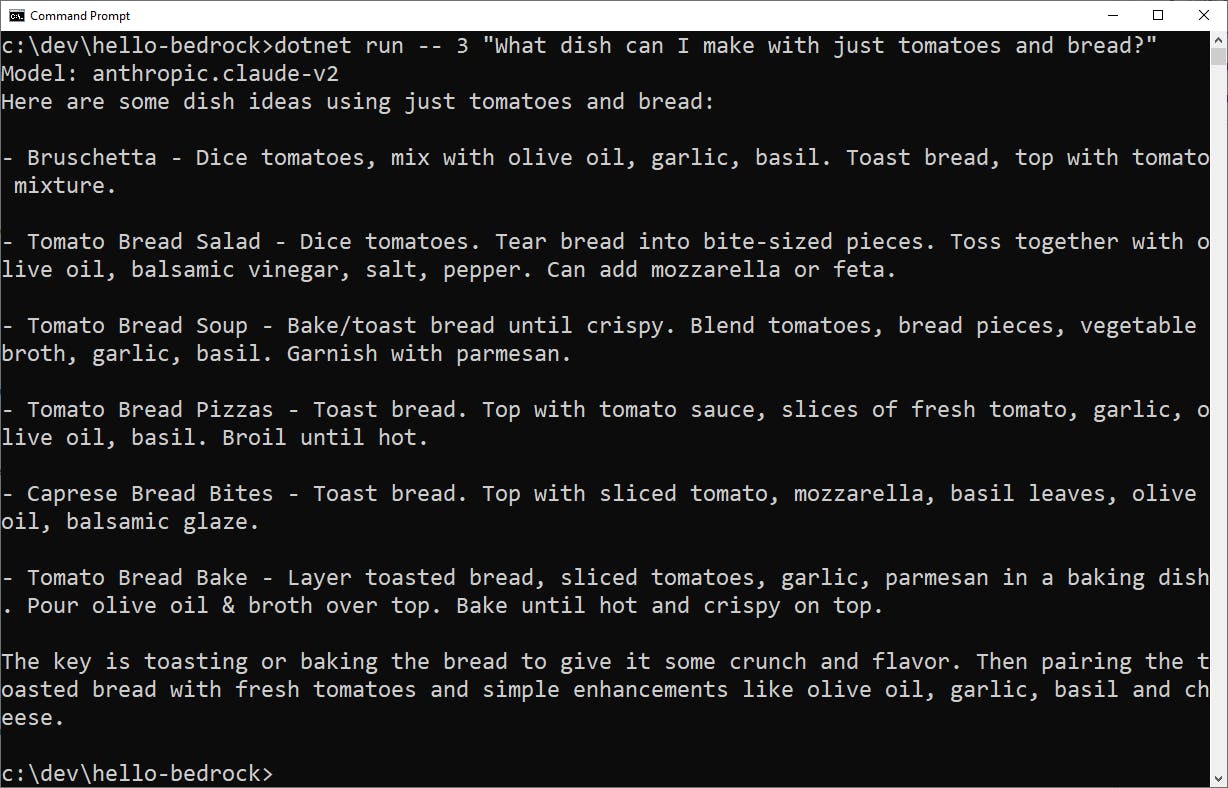
Write a jingle about a new toothpase that you can swallow safely

Where to Go from Here
In this tutorial, you learned about Amazon Bedrock and sampled text generation with different models. You also learned how to access Bedrock programatically from .NET code. Now you'll want to learn as much as you can about Bedrock. Use the resources linked below to understand Bedrock more fully. On the Bedrock product page, you can learn about each model including benefits and use cases.
We only explored text generation today. Bedrock also has image and chat capabilities you'll want to get familiar with. Experiment with Bedrock. Experimentation is key to understanding Generative AI and the strengths of different foundation models.
Think about your own use cases for Generative AI. Once you have a specific use case in mind and have selected a model, you can move forward rapidly to bring it to life with Bedrock. That may include fine-tuning a model with your private data.
Further Reading
AWS Documentation
AWS SDK for .NET - Amazon BedrockClient
Blogs
Amazon Bedrock is Now Generally Available
Videos
Introduction to Amazon Bedrock
Integrating Foundation Models into Your Code with Amazon Bedrock (Python)
