


Table of contents
- This episode: Publish to AWS and enhanced deployment from Visual Studio. In this Hello, Cloud blog series, we're covering the basics of AWS cloud services for newcomers who are .NET developers. If you love C# but are new to AWS, or to this particular service, this should give you a jumpstart.
- Publish to AWS : What is it, and why use It?
- Our Hello, Publish Project
- Where to Go From Here
- Further Reading
This episode: Publish to AWS and enhanced deployment from Visual Studio. In this Hello, Cloud blog series, we're covering the basics of AWS cloud services for newcomers who are .NET developers. If you love C# but are new to AWS, or to this particular service, this should give you a jumpstart.
In this post we'll introduce the Publish to AWS feature of the AWS Toolkit for Visual Studio and use it effortlessly deploy a "Hello, Cloud" .NET web application to multiple cloud services. We'll do this step-by-step, making no assumptions other than familiarity with C# and Visual Studio. We're using Visual Studio 2022 and .NET 6.
Publish to AWS : What is it, and why use It?
"Publishing isn't a job anymore. It's a button." —Clay Shirky
Publishing (or deploying) your .NET application to the cloud involves multiple steps. You need to script infrastructure as code, allocate cloud resources, create roles or security groups, package or containerize your application, and upload to the destination cloud service. Along the way you have decisions to make, including which cloud service to host your application on.
The AWS Toolkit for Visual Studio comes with a feature called Publish to AWS that enhances the publishing process for .NET workloads. With it, you can easily deploy .NET applications to AWS, even if you have minimal experience with AWS.
The idea behind Publish to AWS is simple: in Visual Studio, you select Publish to AWS from Solution Explorer, answer or confirm a minimal number of prompts, and your .NET workload is published to the cloud.
Supported Applications, Platforms, and Services
Publish to AWS is for cloud-native .NET applications, built with .NET Core 3.1 or above, that will run on Linux. You can deploy these kinds of .NET workloads:
- ASP .NET Core web applications can be deployed to AWS App Runner, Amazon ECS using AWS Fargate, or AWS Elastic Beanstalk.
- Long-running service applications that are meant to run indefinitely can be deployed as an Amazon ECS service as a container image.
- Schedule tasks, programs that need to run periodically (such as once an hour) can be deployed as a schedule task container image using Amazon ECS and CloudWatch Events.
- Blazor WebAssembly applications can be deployed as static websites to S3.
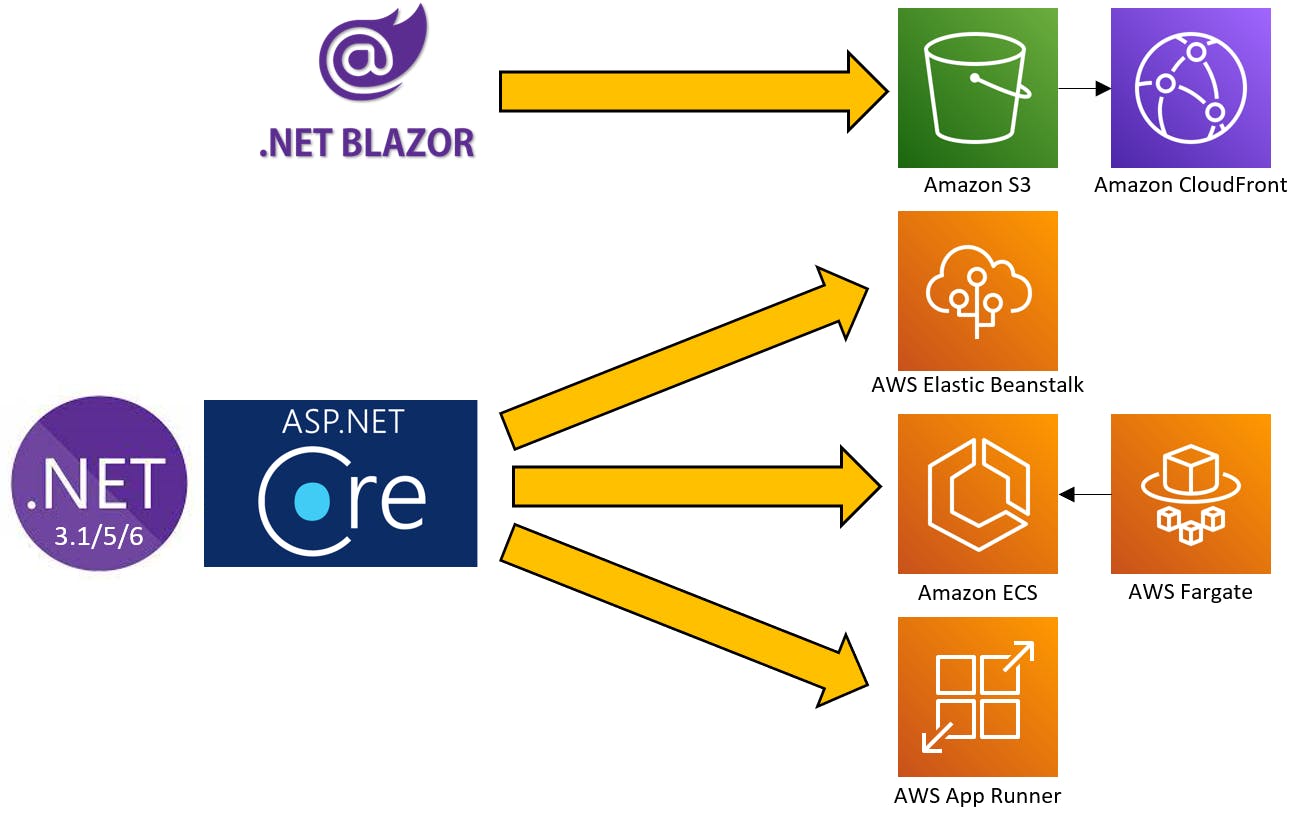
At present, Publish to AWS supports three AWS managed compute services as destinations: AWS App Runner, Amazon Elastic Container Service (ECS) using AWS Fargate, and AWS Elastic Beanstalk. Here's a comparison of these services:
| Service | Description | Containers | Serverless |
| AWS App Runner | Fully managed service for containerized web applications and APIs | YES | YES |
| Amazon ECS using AWS Fargate | Highly scalable and fast container management service on serverless infrastructure | YES | YES |
| AWS Elastic Beanstalk | A service for deploying and scaling web applications and services on familiar servers such as Apache, Nginx, Passenger, and IIS | NO | NO |
What about other target services? Stay tuned. You can add feedback about other targets by filing an issue at the aws-dotnet-deploy GitHub repo.
IDE and Command Line Symmetry
Publish to AWS has a counterpart, the AWS deployment tool for .NET CLI. It's a way to deploy from the dotnet command line tool, with the same features as Publish to AWS in the AWS Toolkit for Visual Studio. We previously looked at the AWS .NET deployment tool in Hello, Deploy!. The feature parity between Publish to AWS and the AWS deployment tool for .NET CLI is helpful when you move from working yourself in Visual Studio to setting up CI/CD pipelines where everything needs to be command-line driven.
Our Hello, Publish Project
We will create an website with an Angular front end and an ASP .NET MVC back end. We'll use Publish to AWS to deploy the website to AWS Elastic Beanstalk. Then we'll publish the same app to Amazon ECS. Lastly, we'll publish the app to AWS App Runner. In each case, Publish to AWS will do all the work, including creating the AWS service and required artifacts such as IAM roles.

One-time Setup
For any of the tutorials in the Hello, Cloud series you need the following:
- An AWS account, and an understanding of what is included in the AWS Free Tier.
- Microsoft Visual Studio 2022. If you're using an older version of Visual Studio you won't be able to use .NET 6. If you use a different IDE, you may have to find alternatives to some tutorial steps.
AWS Toolkit for Visual Studio. You'll need to configure the toolkit to access your AWS account and create an IAM user. Your default AWS profile will be linked to this user when running programs from the command line.
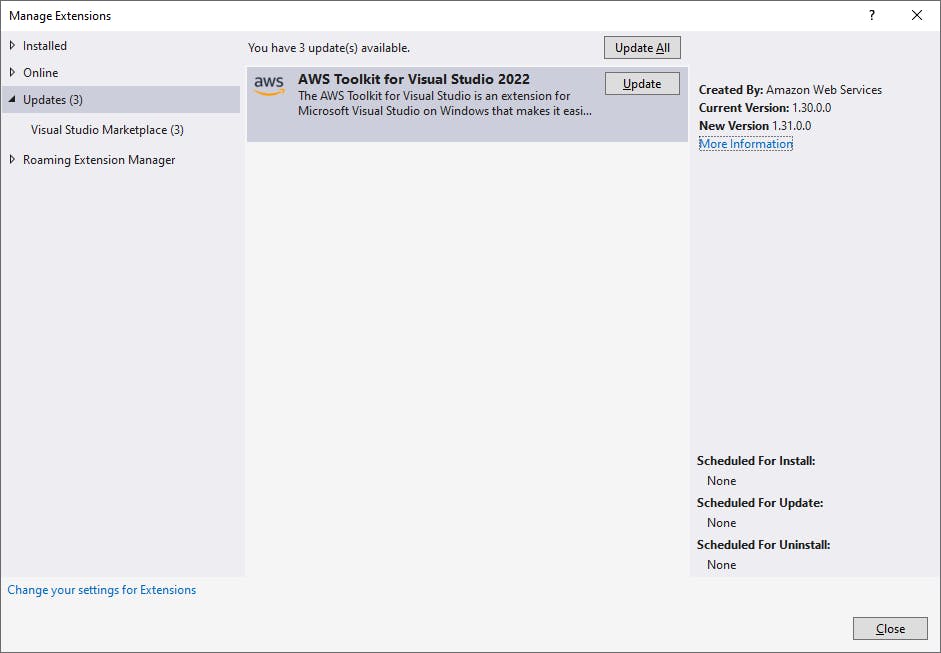
If you already have the AWS Toolkit for Visual Studio installed, update to the latest version by launching Visual Studio and selecting Extensions > Manage Extensions > Updates from the menu.
Step 1: Create a .NET web app
In this step, you'll create a .NET web app and test it by running it locally.
Open a command/terminal window and CD to a development folder.
Run the
dotnet newcommand below go generate a .NET web app with an Angular front end and an ASP .NET MVC back end.dotnet new angular -n hello-publish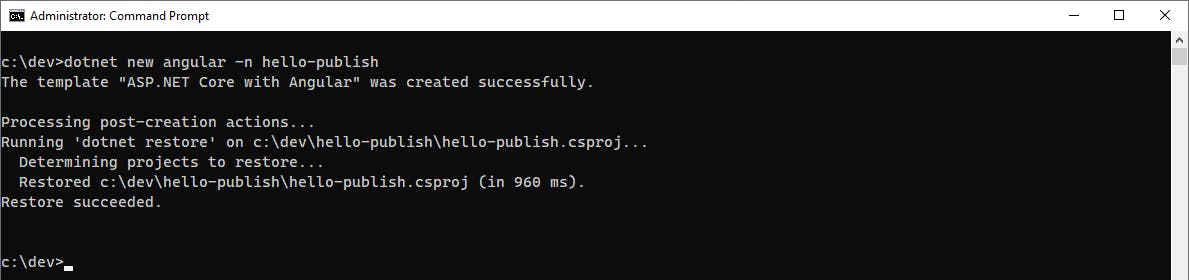
Launch Visual Studio and open the
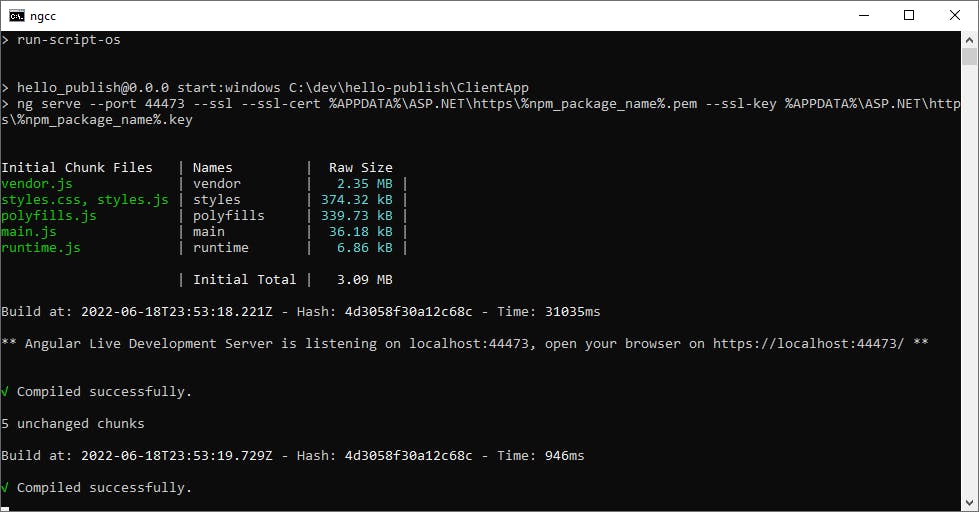
hello-publishproject.Press F5 to build and test the web app locally. The app will build and open in a browser. This will take some extra time the first time you do it as npm packages are installed and the Angular live development server starts up to host the web site.
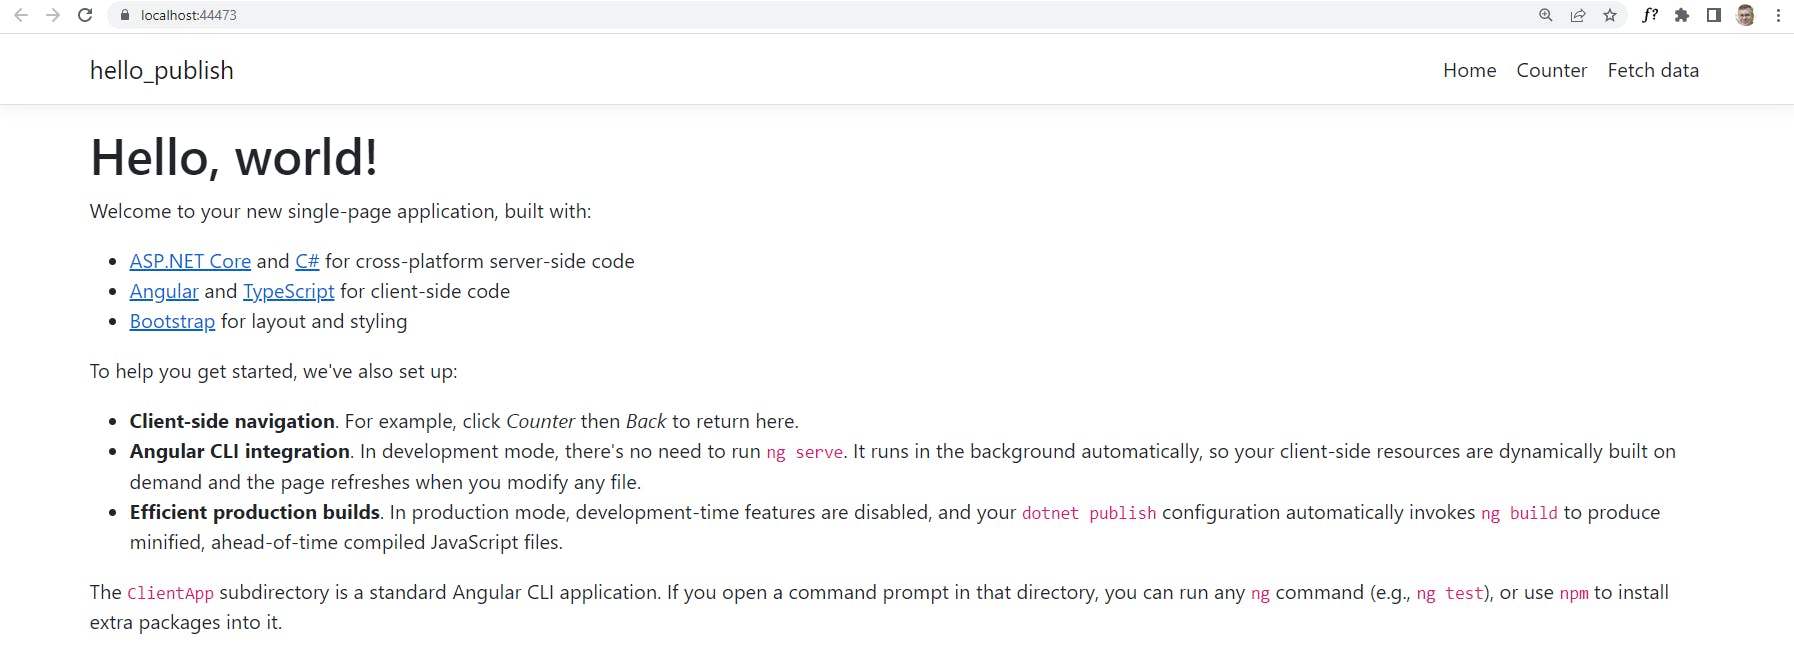
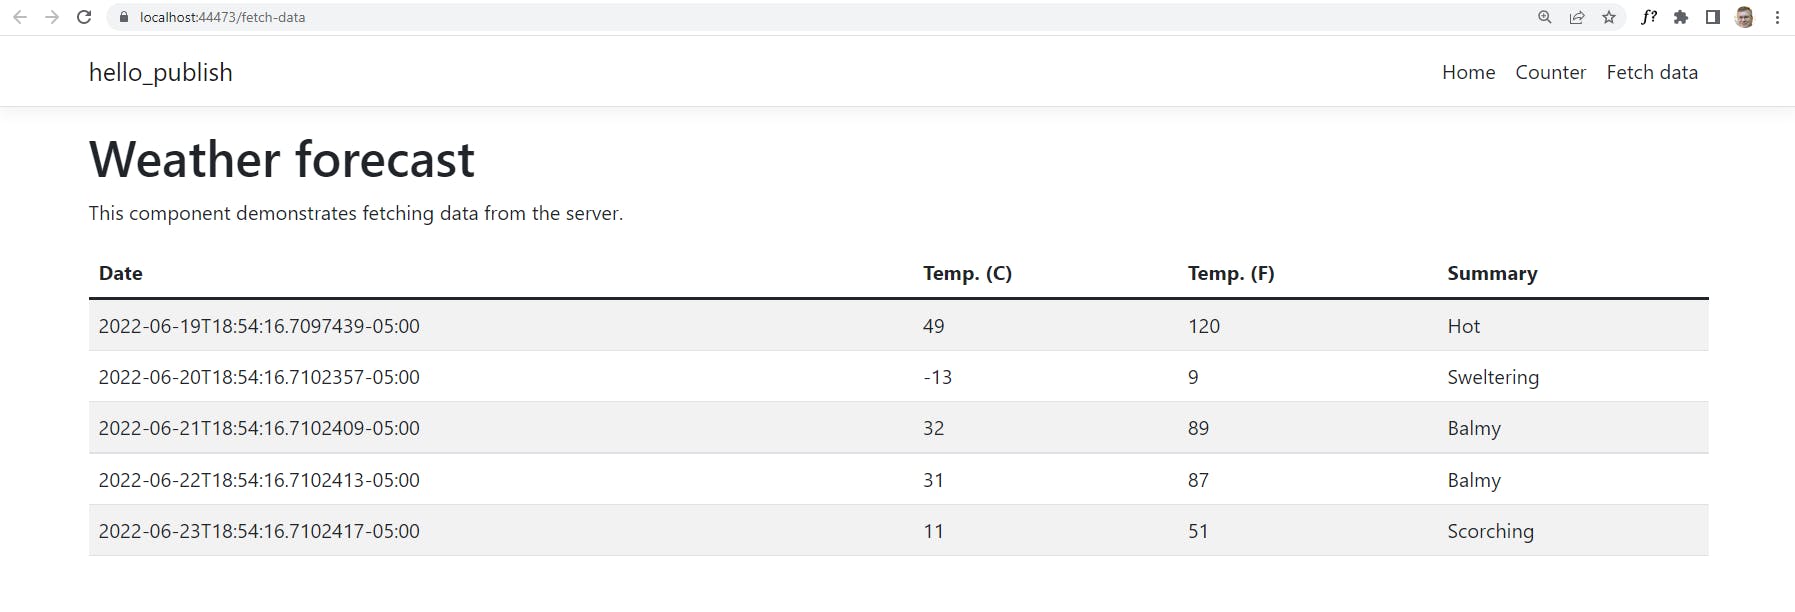
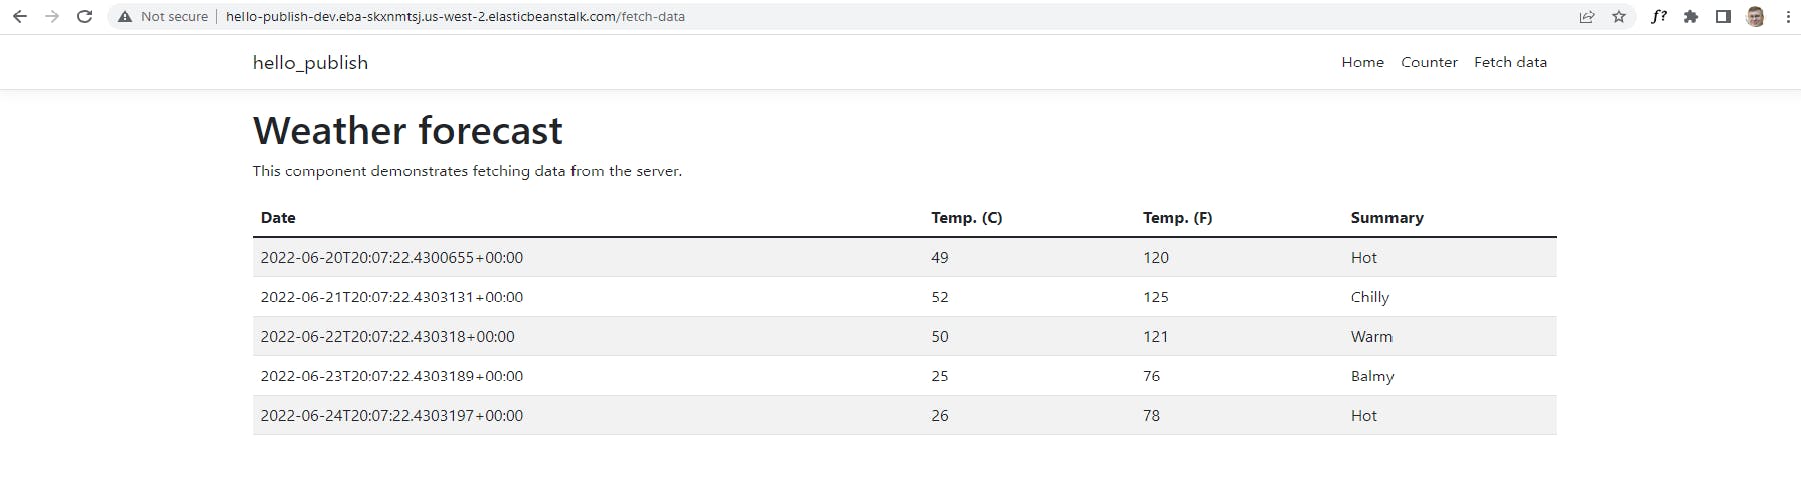
In the browser tab where the app opened, click Fetch Data. You see a weather page with data retrieved from the MVC back end.
In Visual Studio, stop the program.
Step 2: Publish to AWS Elastic Beanstalk
In this step, you'll publish the website to AWS Elastic Beanstalk in one easy step.
In Visual Studio, open AWS Explorer and select the AWS region you want to publish to. We're using us-west-2 (Oregon).
In Solution Explorer, right click the
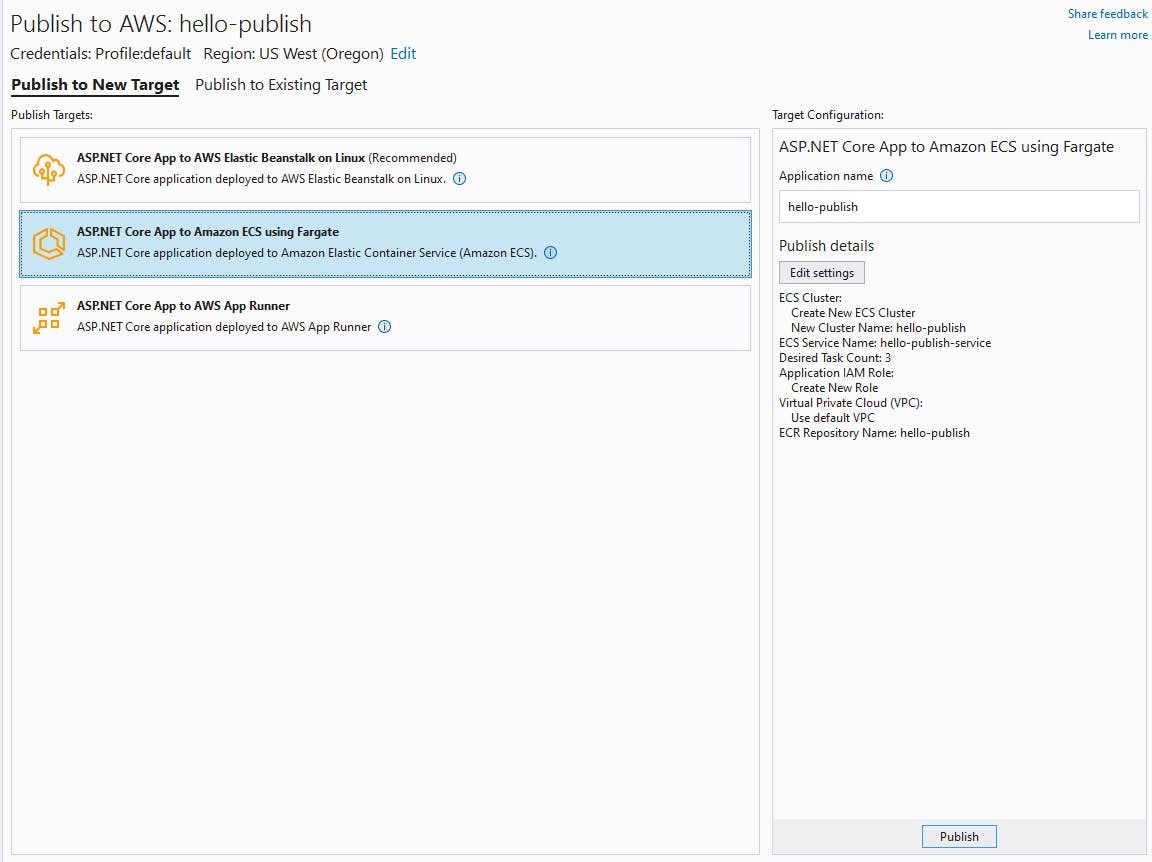
hello-publishproject and select Publish to AWS.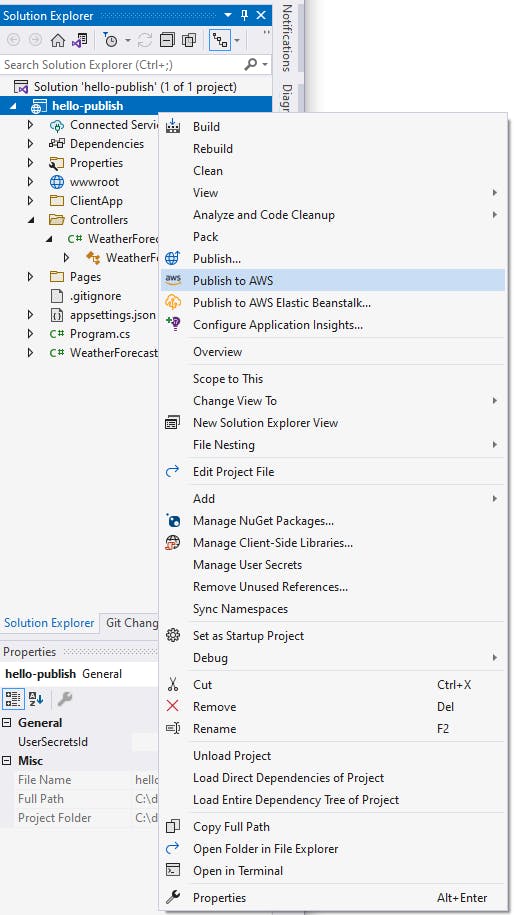
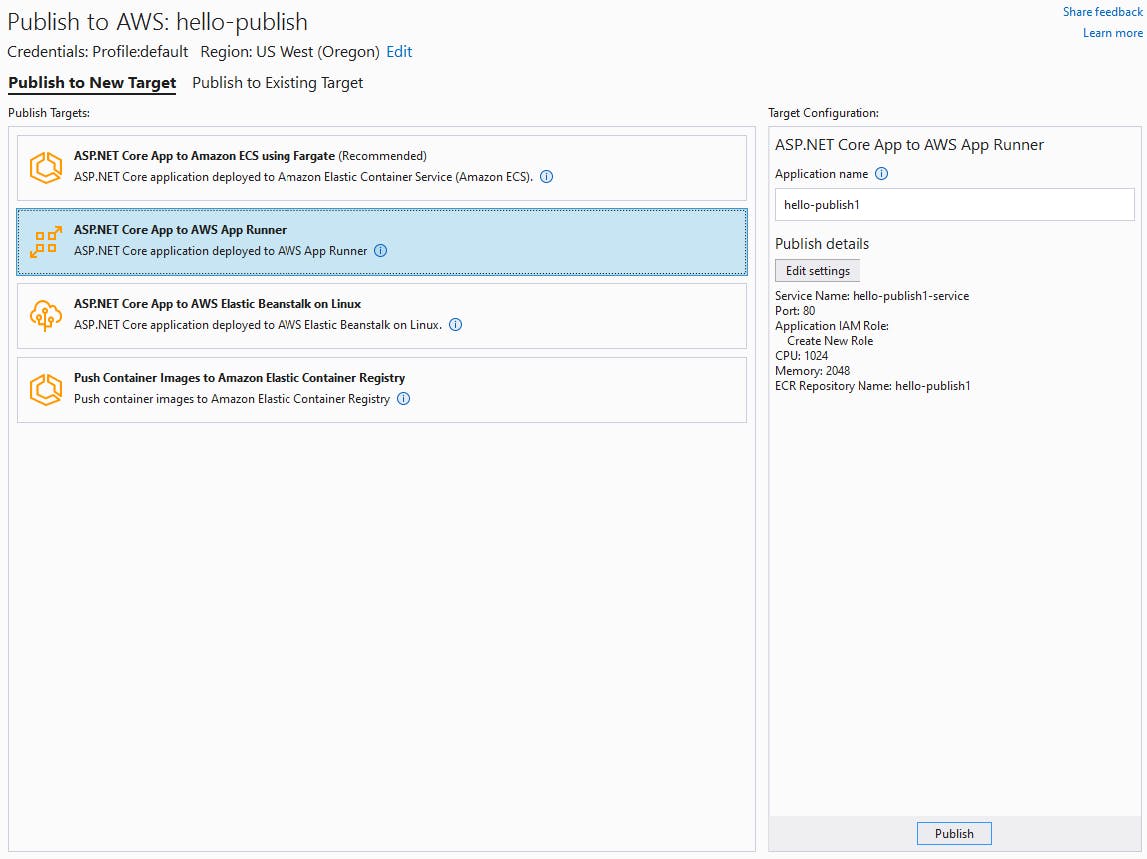
A wizard opens and asks you to select the target hosting service. Publish to AWS can deploy this application to 3 services: AWS Elastic beanstalk, AWS App Runner, or Amazon ECS on AWS Fargate. Select ASP.NET Core App to AWS Elastic Beanstalk on Linux.
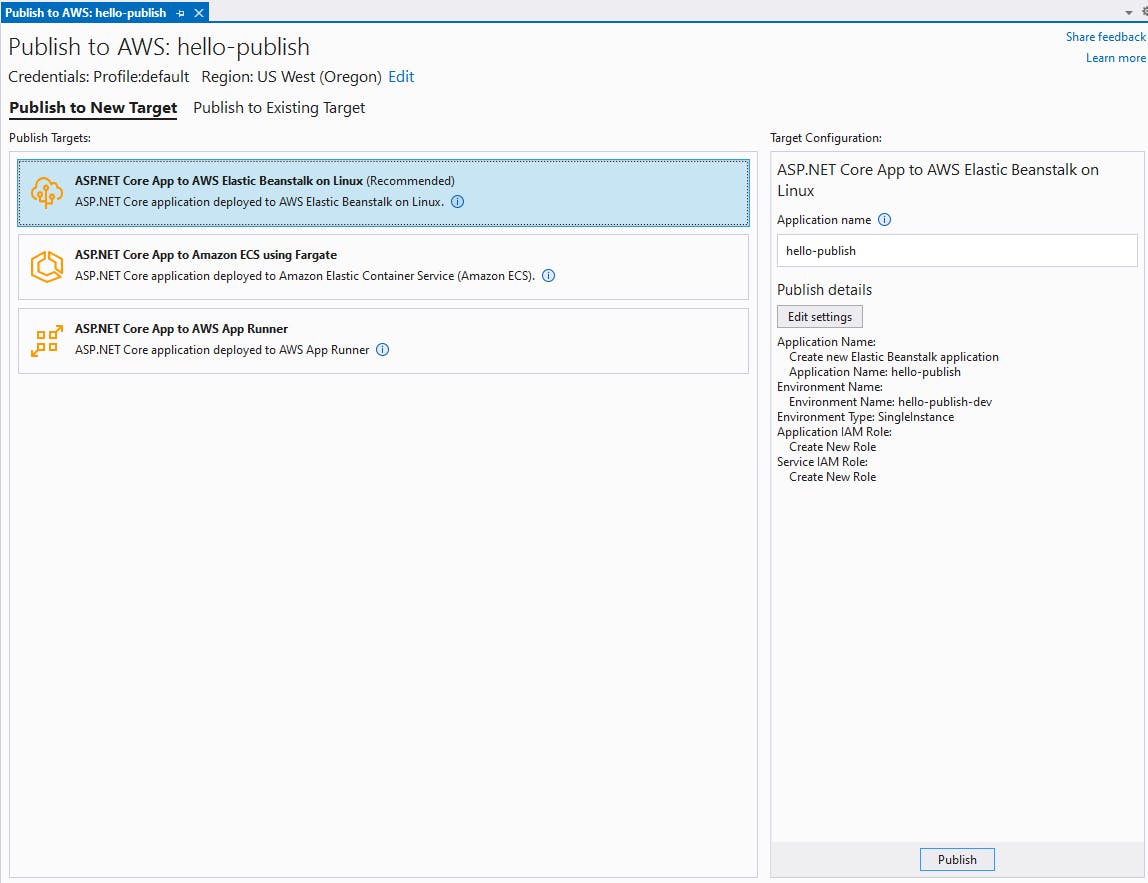
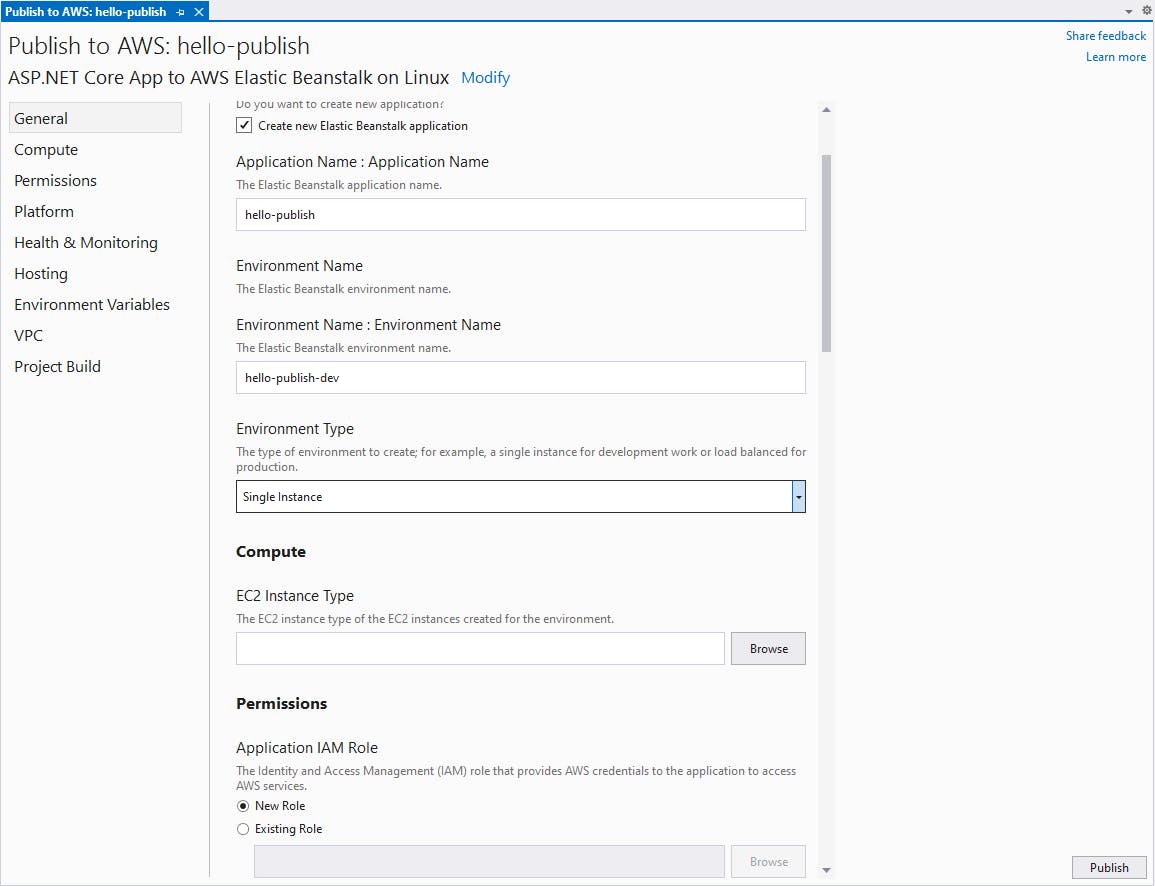
At right, you see the plan for the deployment to Elastic Beanstalk. A new Elastic Beanstalk application will be created in AWS. The application name will be
hello-publish, in environmenthello-publish-dev. It will be be a single-instance deployment. New IAM roles will be created for the application and service.Publish to AWS nicely sets up defaults to make this process simple for newcomers, but you have full control over the details. Click Edit Settings to see what you can change. Although we'll stick with defaults in this step, notice that you can override or specify many of the details. That includes choosing between single instance and load balanced multi-instance deployment. You can also select a specific EC2 instance type if you wish.
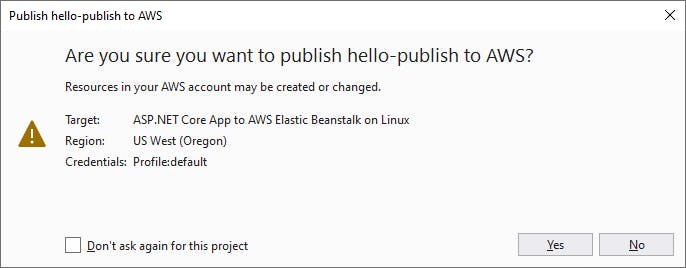
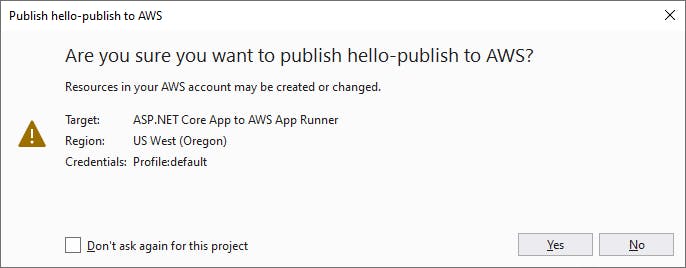
At bottom right, click the Publish button to begin the publish operation. Confirm the Are you sure you want to publish hello-publish to AWS? prompt by clicking Yes.
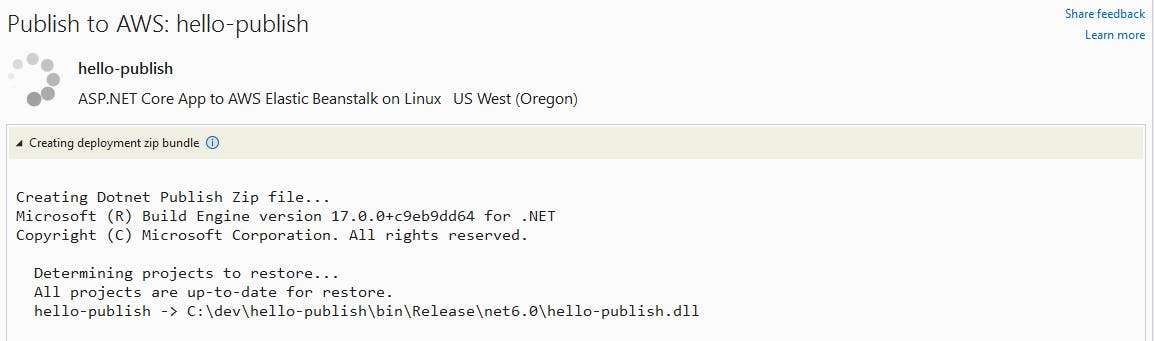
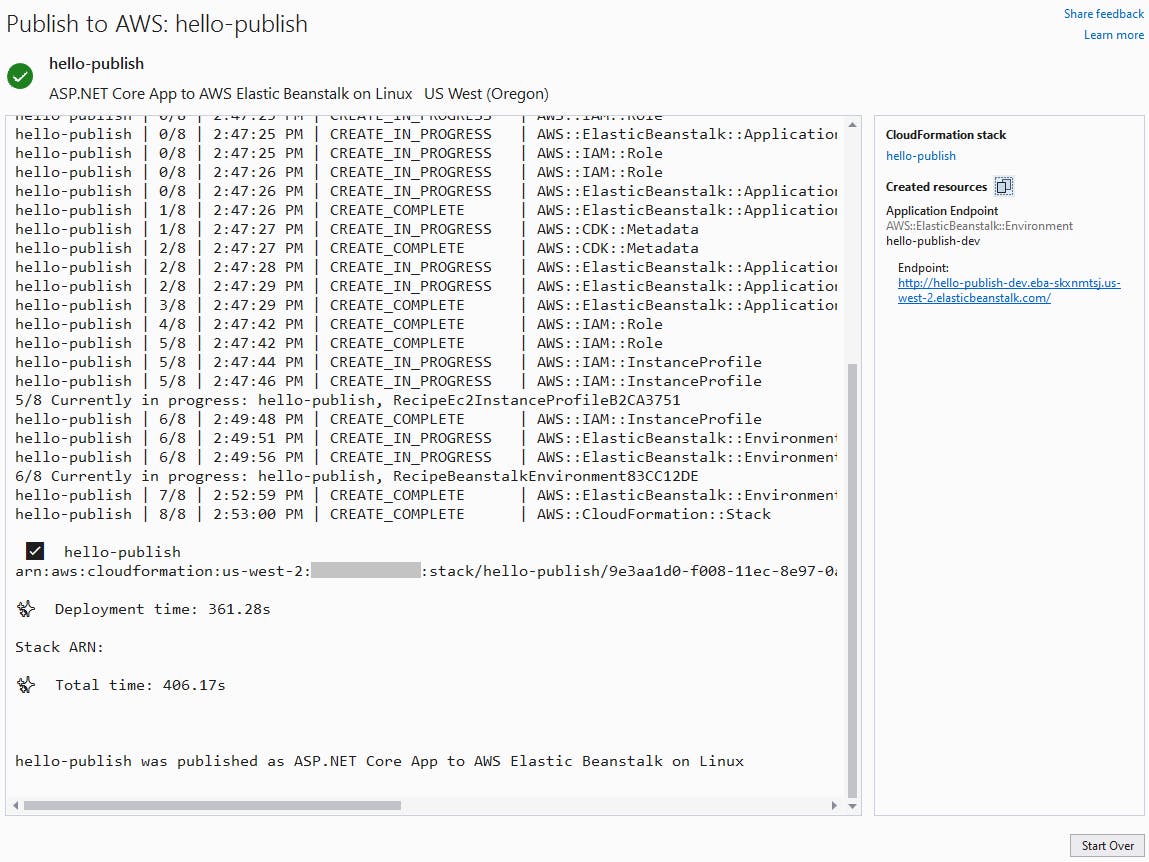
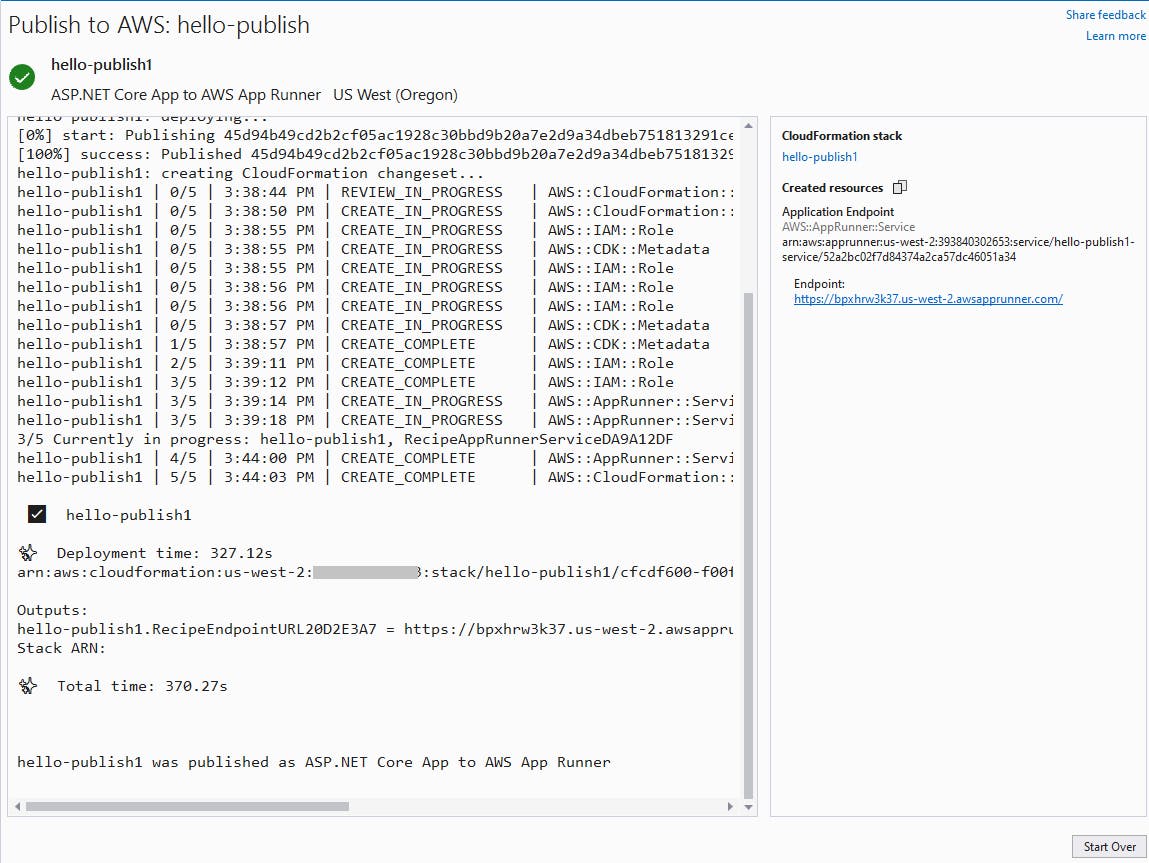
The publish operation begins. Sit back and watch, or grab a drink. You won't miss anything, because every last detail of the publish will be recorded in the output. The output will be captured in expandable sections. 1) the application will be packaged for Elastic Beanstalk in a deployment zip bundle. 2) a Cloud Development Kit (CDK) program is generated for your infrastructure-as-code. 3) the CDK executes to create your AWS infrastructure. 4) your packaged application is deployed to the service.

The publishing will either succeed or fail. If it succeeds, you'll see a green check mark at the top and confirmation the application was published at the bottom.
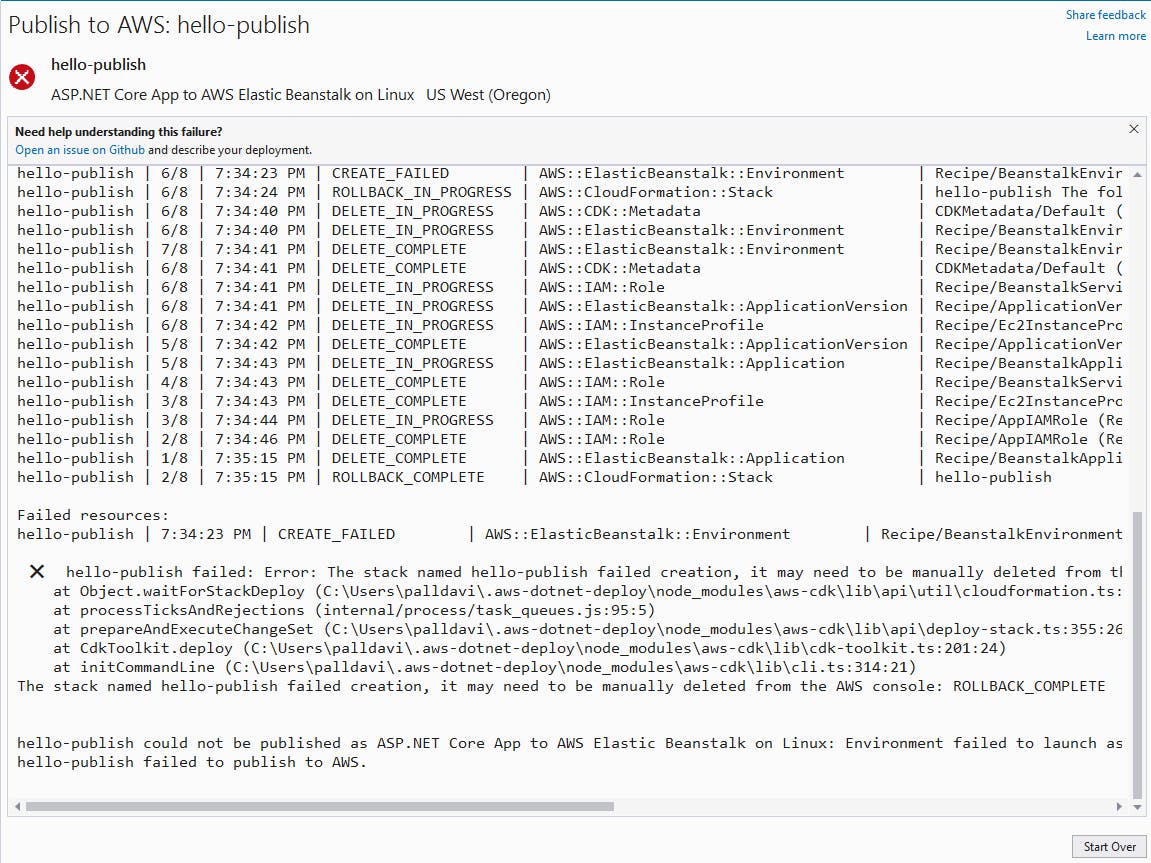
If publishing fails, you'll see a red X icon at top and a failure message at bottom. You'll need to identify the issue, attempt to correct it, and retry your publish. Read through the log to get details. In my case, I had previously removed the Internet Gateway from my default VPC. Once I restored that, my second publish attempt succeeded.
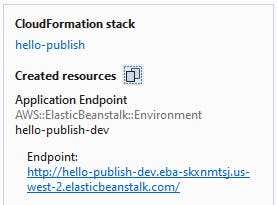
After a successful publish, Visual Studio will give you information at right you can copy to your clipboard, including the application endpoint. Record the endpoint URL.
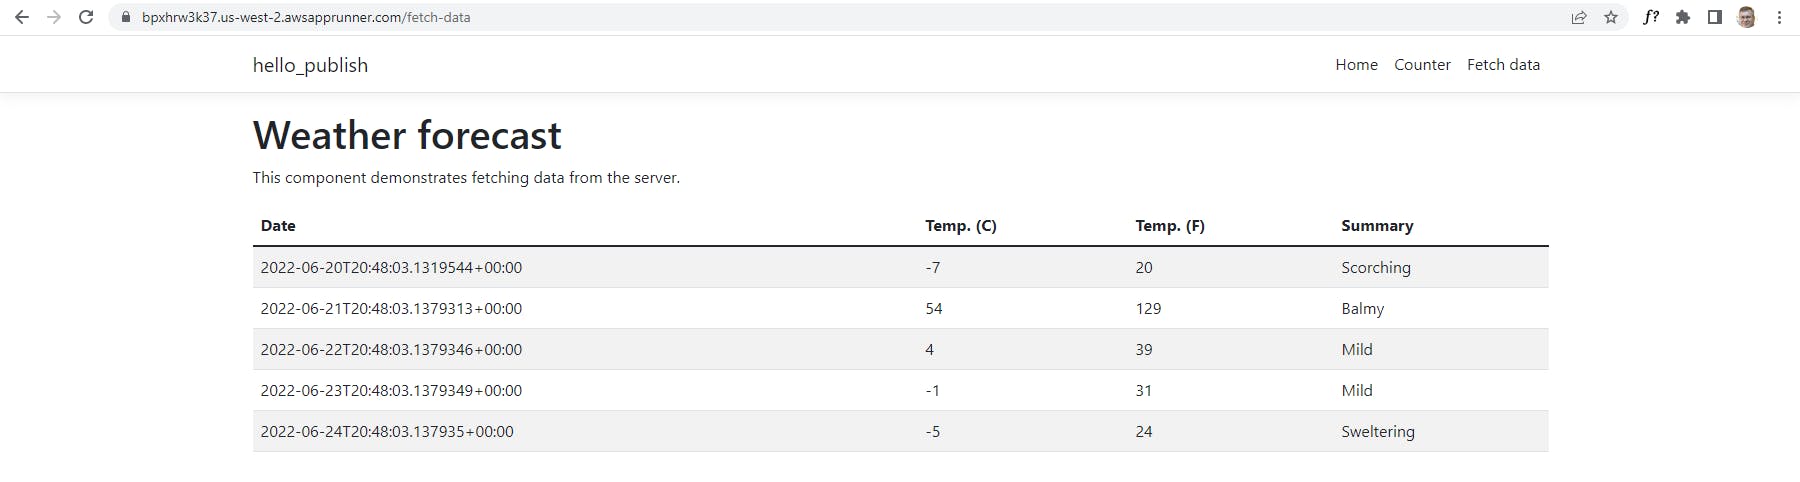
In a browser, navigate to the endpoint URL and you should see the main page web page display. Click on Fetch Data to see the weather page, confirming that your MVC web site is now working as an AWS Elastic Beanstalk service.

Sign in to the AWS console and set the region at top right to the same region you deployed to.
Navigate to AWS Elastic Beanstalk, and you should see a Beanstalk service with a name similar to
hello-publish-servicethat Publish to AWS created automatically for you. You can drill into the details to see what was created, which will match the settings that you reviewed in Step 2 #5 earlier.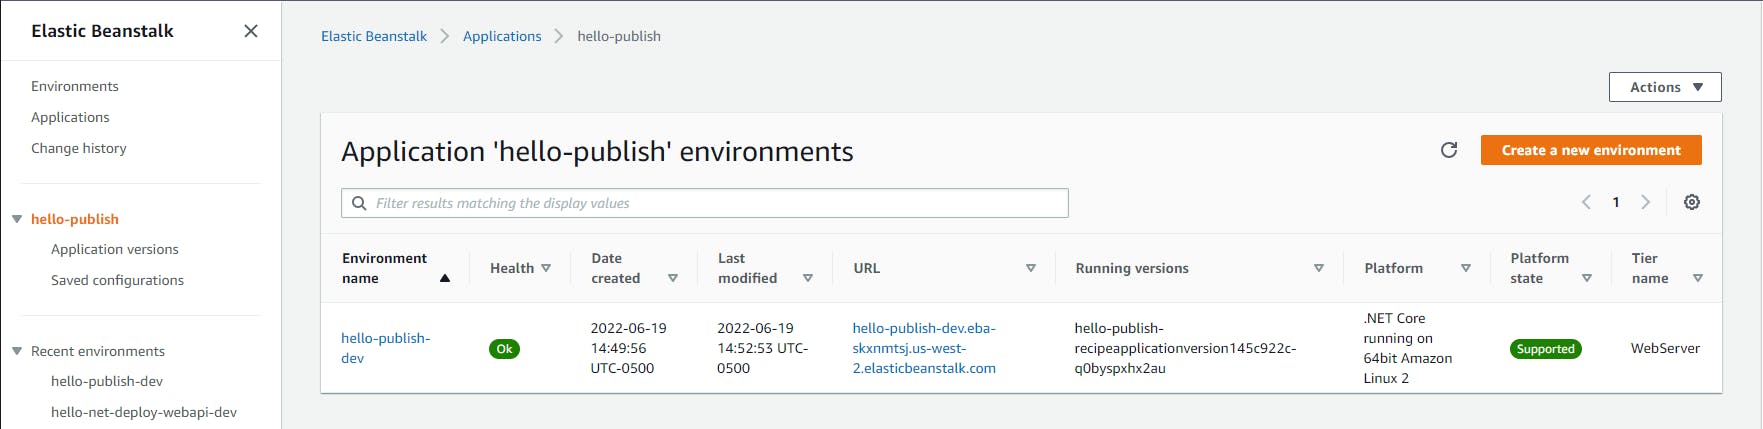

What if you update your application and want to re-deploy it? When you're on the Publish to AWS wizard, that is simply a matter of choosing the Publish to Existing Target tab and selecting the deployment to update.
Congratulations, you've used Publish to AWS to publish a web site to AWS Elastic Beanstalk. You didn't have to make any decisions about configuration, although you could have if you wanted to. The app was packaged, the AWS service and IAM roles were created, and the packaged app was deployed.
Step 3: Publish to AWS App Runner
In this step, you'll deploy the same application to AWS App Runner. Operationally, you'll again use Publish to AWS in the same way. Different things will happen under the hood. An AWS App Runner service will be allocated instead of AWS Elastic Beanstalk, and the application will be automatically containerized.
In Visual Studio, close the previous Publish to AWS window.
In Solution Explorer, right-click the
hello-publishproject and select Publish to AWS.In the Publish to AWS wizard, select AWS App Runner.
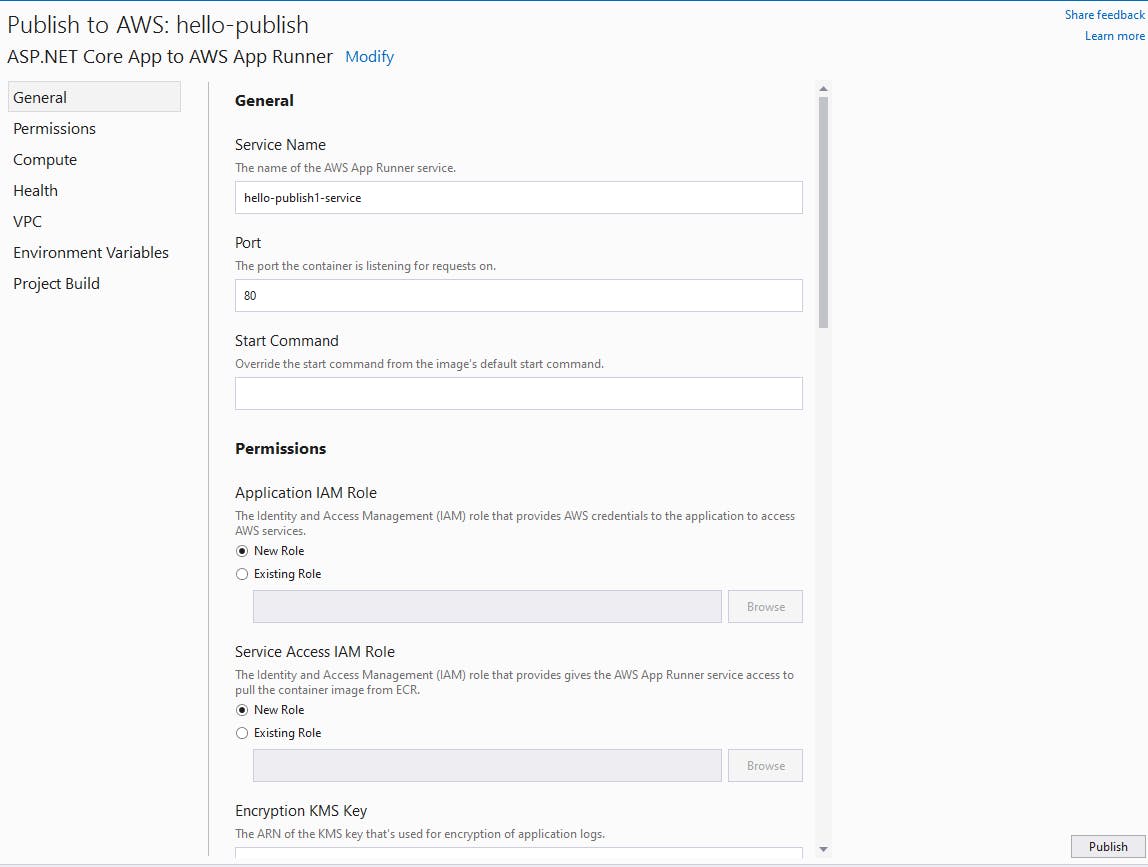
Review the plan displayed at right. Click Edit Settings to see the settings you can control for AWS App Runner.
Click Publish and confirm the prompt.
Wait for the publish action to complete. If publishing fails, review the log, correct the issue, and re-try the publish.
Note and copy the endpoint URL at right.
In a browser, visit the endpoint URL you just copied. The website should appear. Click Fetch Data to reach the weather page and test the back end.
In the AWS management console, navigate to AWS App Runner, and you should see an App Runner service with a name similar to
hello-publishthat Publish to AWS created automatically for you. You can drill into the details to see what was created, which will match the settings that you reviewed in Step 3 #4 earlier.
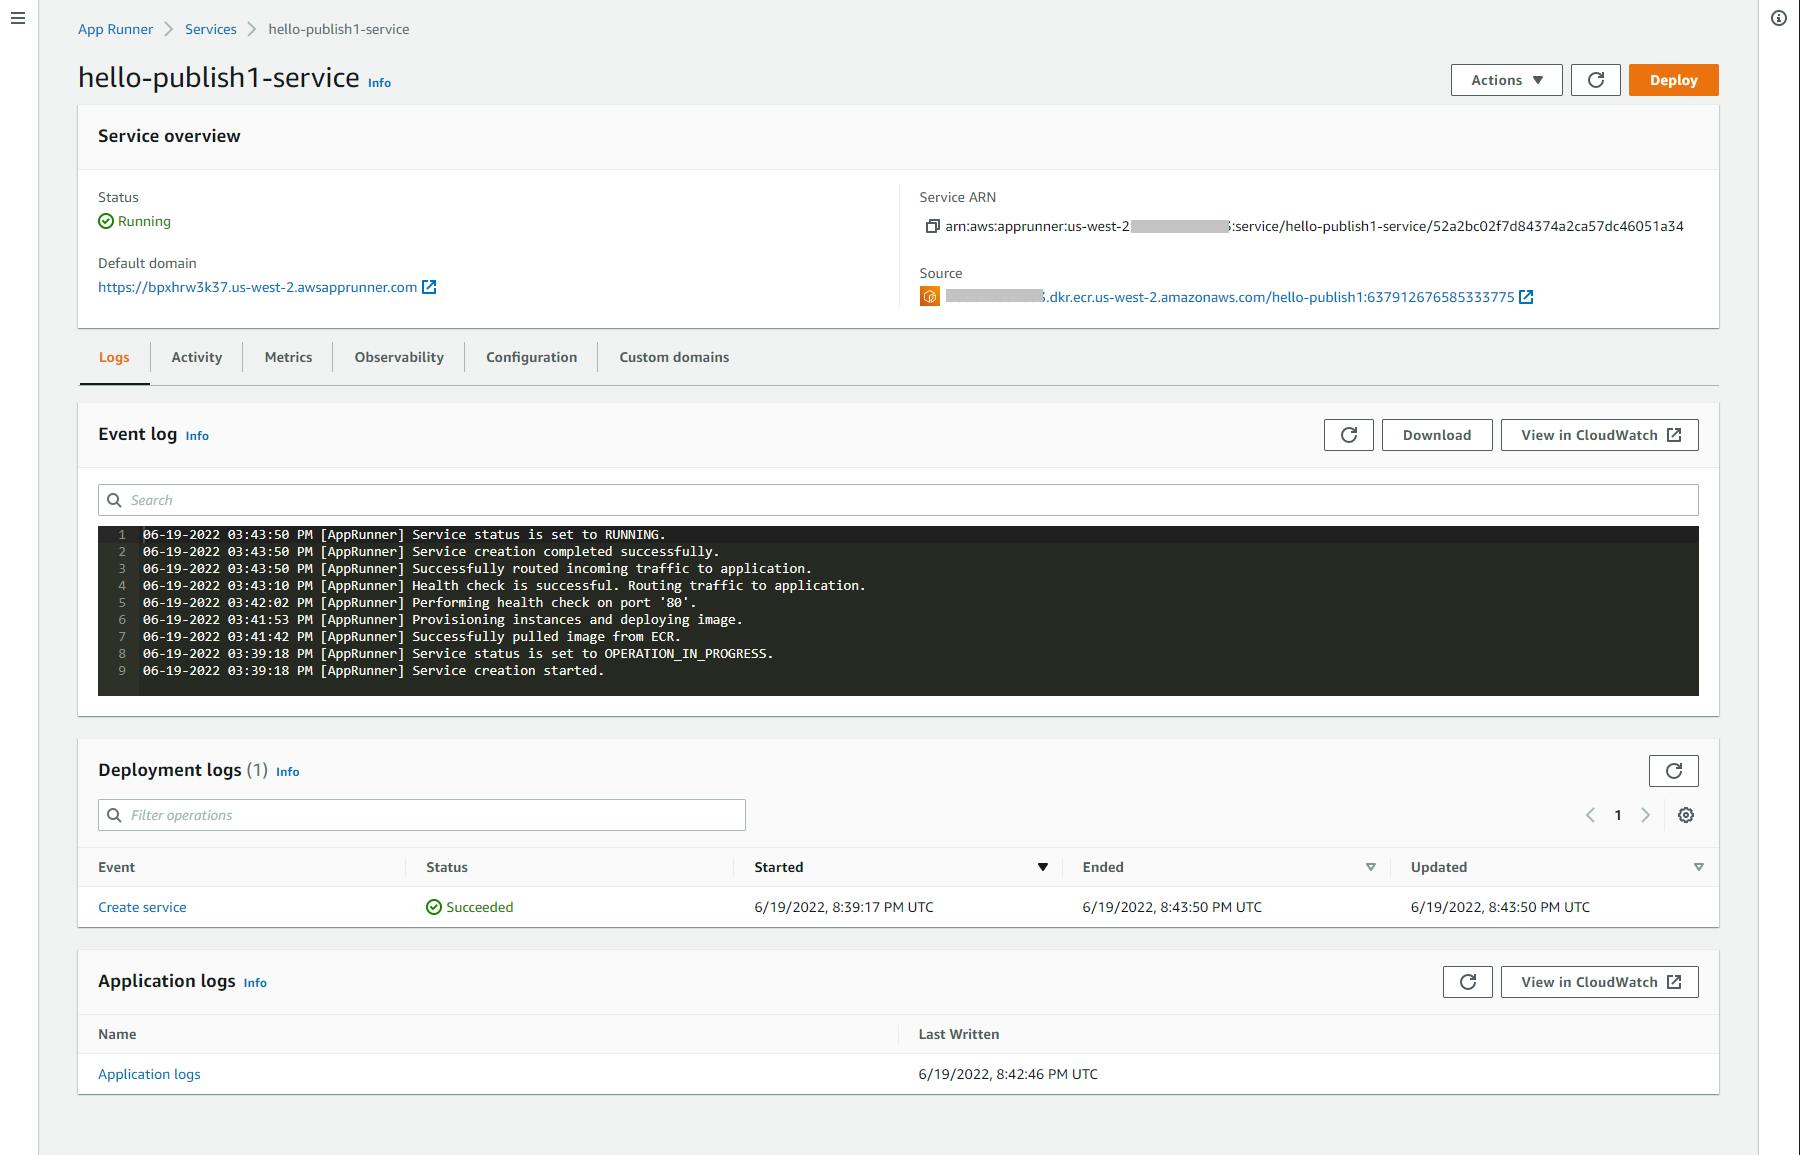
Congratulations! You've now published your app via a container to AWS App Runner, a very different service from AWS Elastic Beanstalk. In both cases, you took the same easy steps with Publish to AWS.
Step 4: Publish to Amazon ECS using AWS Fargate
In this step, you'll use Publish to AWS to send the same application to another container compute service that is also serverless, Amazon Elastic Container Service using AWS Fargate.
In Visual Studio, close the previous Publish to AWS window.
In Solution Explorer, right-click the
hello-publishproject and select Publish to AWS.In the Publish to AWS wizard, select Amazon ECS using AWS Fargate.
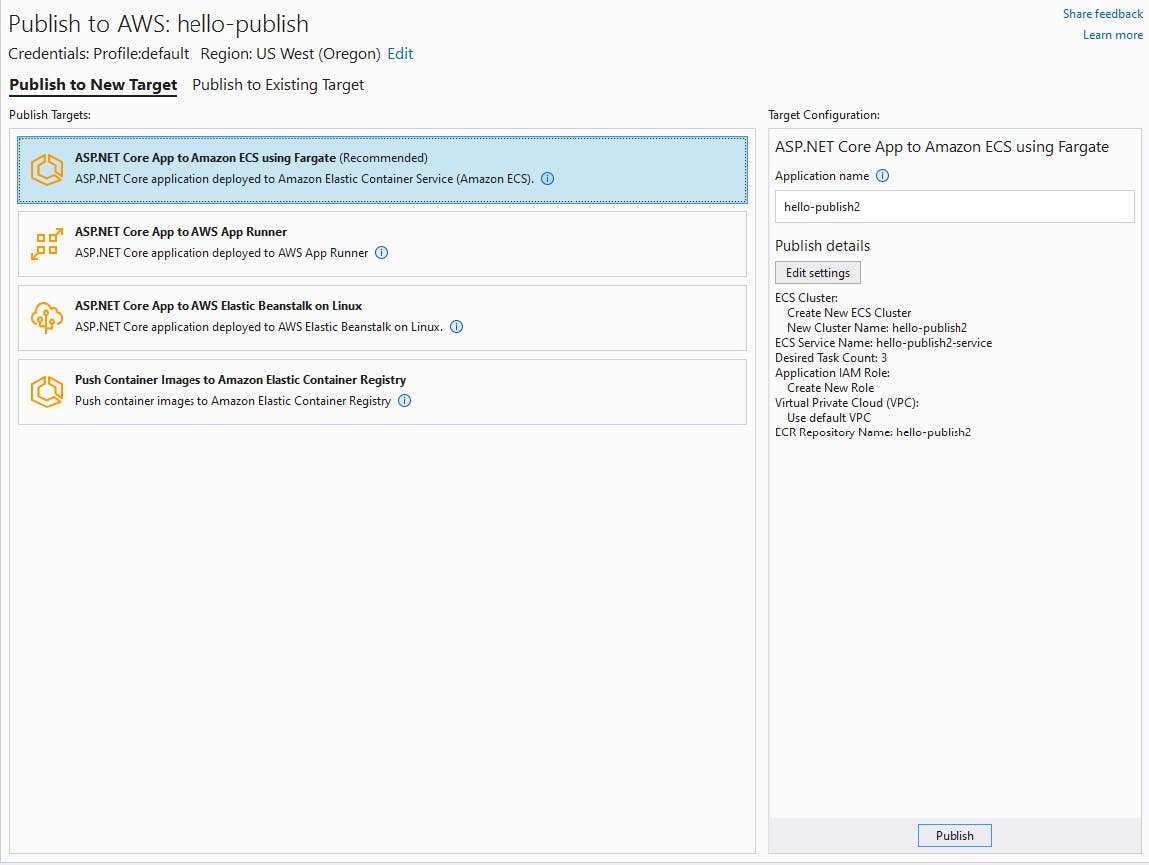
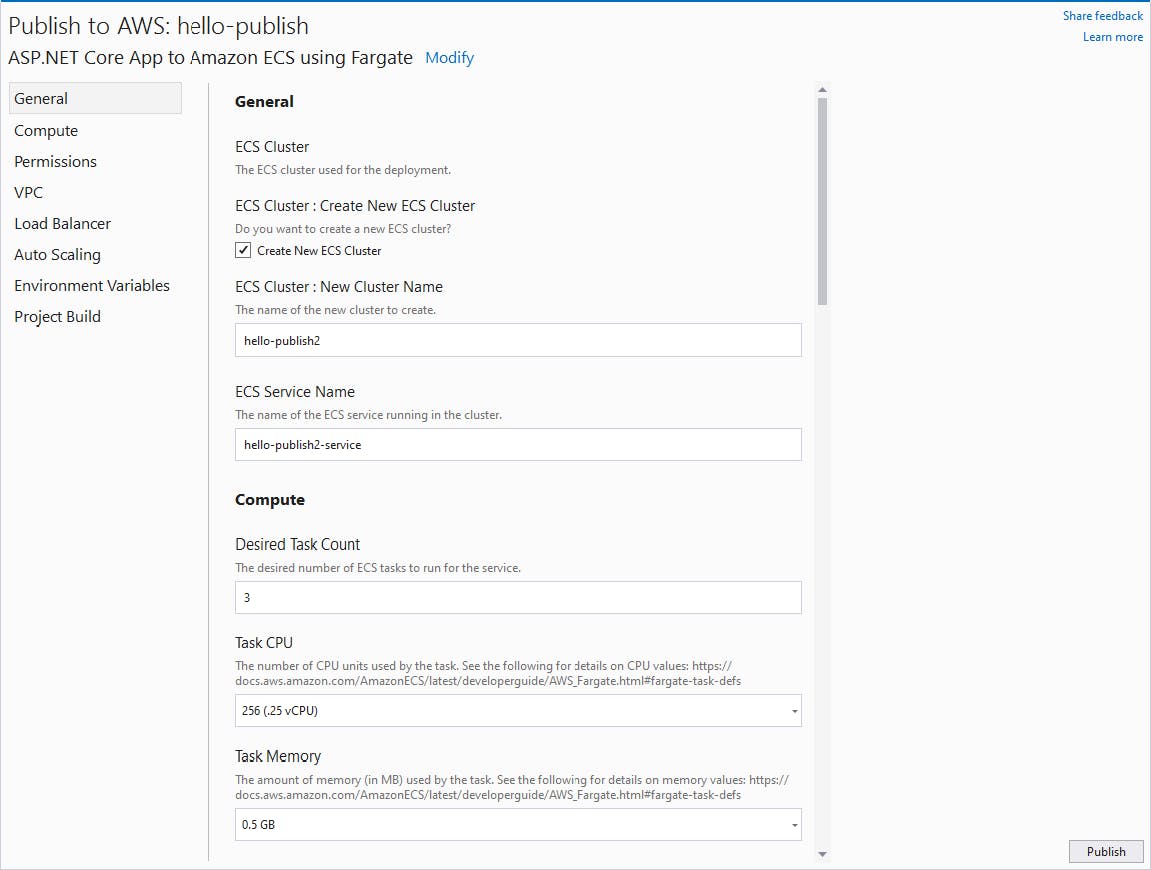
Review the plan displayed at right. Click Edit Settings to see the settings you can control for ECS.
Click Publish and confirm the prompt.

Wait for the publish action to complete. If publishing fails, review the log, correct the issue, and re-try the publish.

Note and copy the endpoint URL at right.

In a browser, visit the endpoint URL you just copied. The website should appear. Click Fetch Data to reach the weather page and test the back end.

Congratulations! You've now published your app via a container to Amazon ECS, with serverless infrastructure managed by AWS Fargate. You've now published the same website to 3 very different AWS compute services, all using the same easy process: Publish to AWS.
Step 5: Shut it Down
When you're done your Hello, Publish projects, delete them. You don't want to be charged for something you're not using.
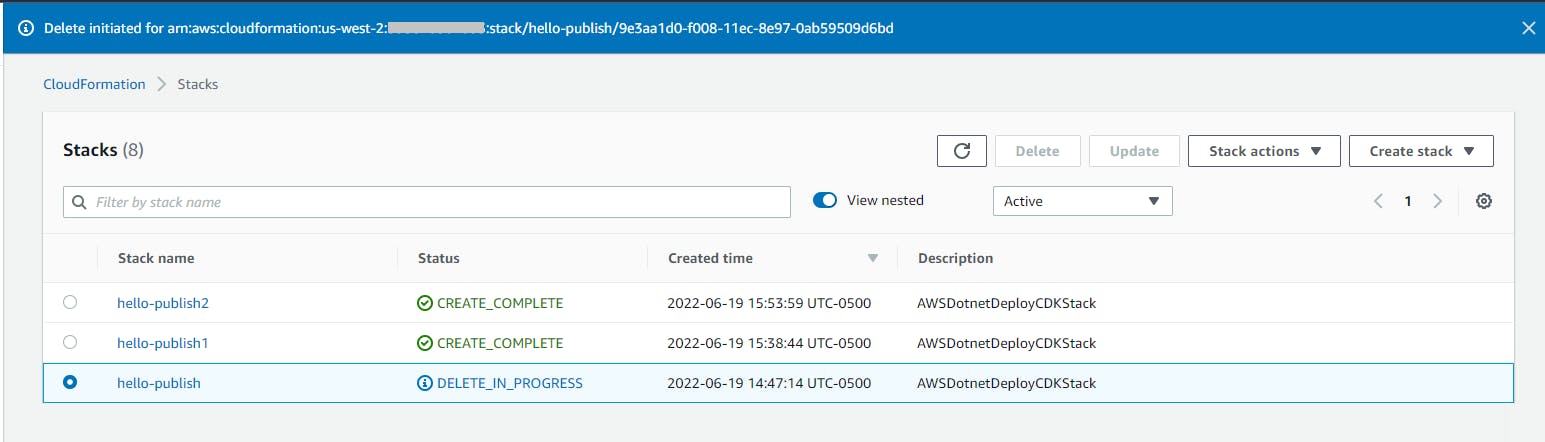
In the AWS management console, navigate to CloudFormation > Stacks.
For each application you deployed in Steps 2-4, follow the steps:
A. Find the stack that was created for the application (e.g.
hello-publish,hello-publish1,hello-publish2) and click on its name to view its detail.B. Select Delete from the Actions dropdown and confirm.
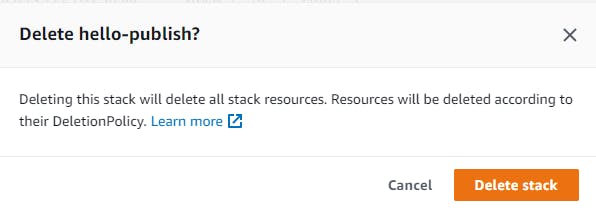
C. The stack status will change to DELETE_IN_PROGRESS. Wait for the CloudFormation stack to be deleted, which also removes its AWS resources. When the stack is no longer listed, proceed to the next.
Visit each service area and confirm the hello-publish service is no longer listed.
A. In the AWS management console, navigate to AWS Elastic Beanstalk and confirm the hello-publish service environment now listed as (terminated).
B. Navigate to AWS App Runnerand confirm the hello-publish service is no longer listed.
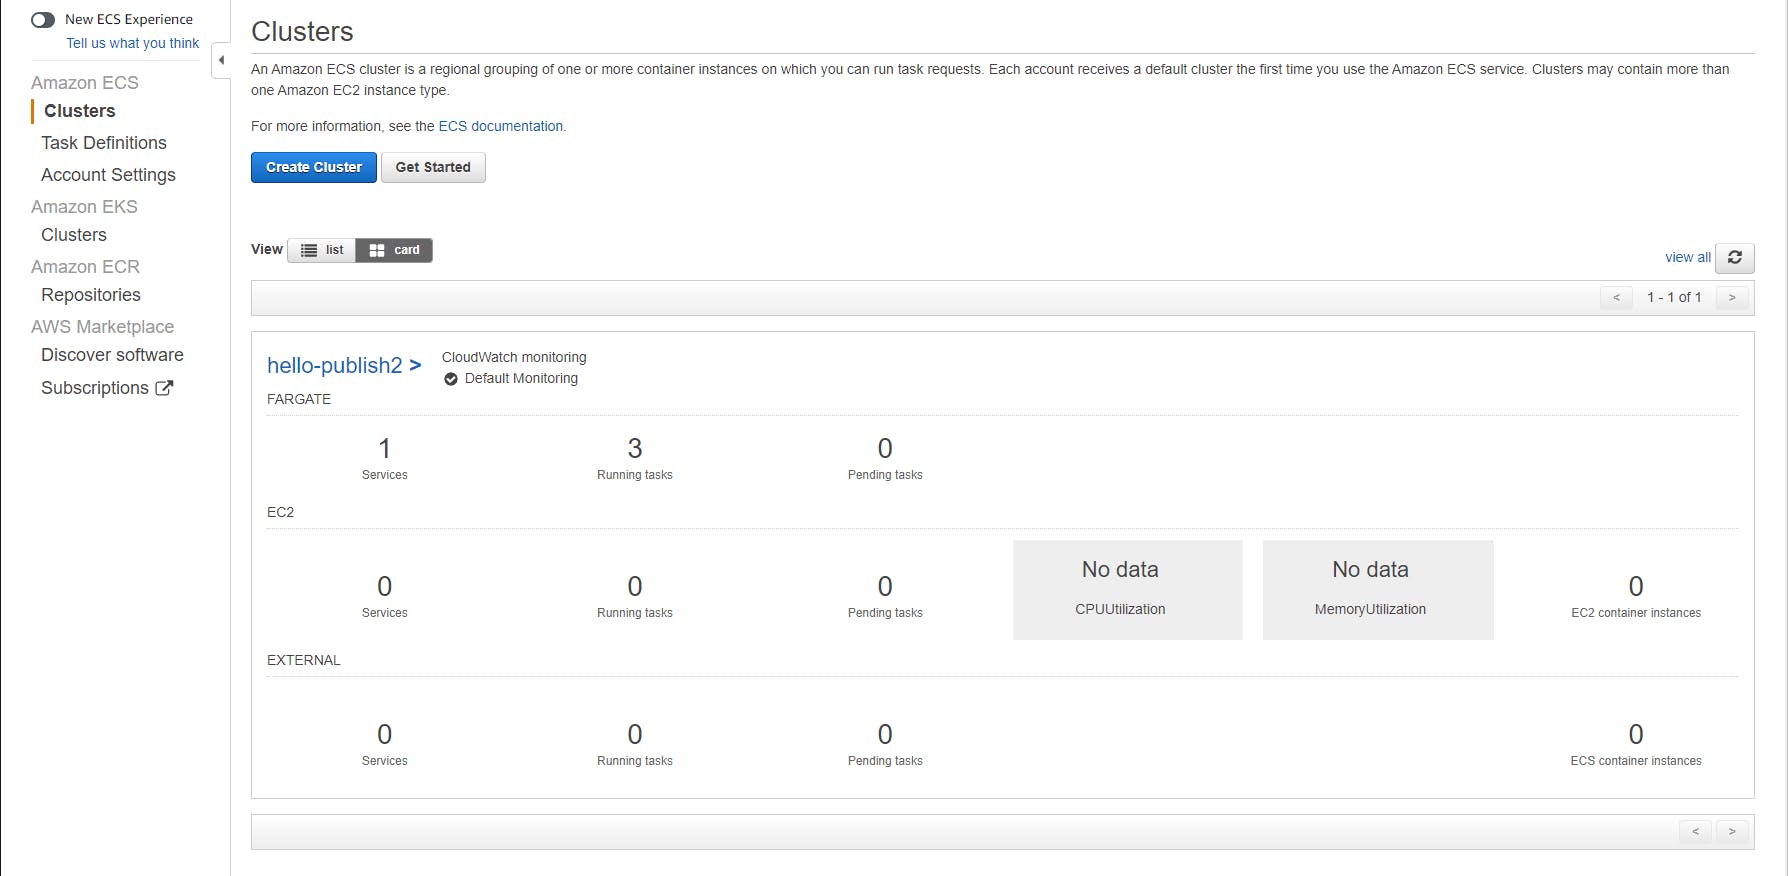
C. Navigate to Amazon ECSand confirm the hello-publish service is no longer listed.
Where to Go From Here
In this tutorial, you used the Publish to AWS feature to deploy an Angular and ASP.NET MVC web application to 3 different AWS compute services. You didn't have to do much: you invoked the publish action, confirmed your destination and settings, and watched it happen. Publish to AWS is the new, powerful way to publish cloud-native .NET applications to AWS. As Publish to AWS gains support for more target services in the future, it will become even more useful.
Publish to AWS takes care of the details so you can get to work, including your infrastructure-as-code, creating AWS services and IAM roles, packaging or containerizing your application, uploading your application, and making default decisions about your configuration. If you have proficiency with AWS and your target service, you can readily customize the settings to your liking. If you're new to AWS, you can lean on Publish to AWS, and learn what it is doing by studying the publishing output. You can experiment with changing the project settings before you deploy and observe what changes in the output and in the AWS management console.
This tutorial did not cover deploying a Blazor WebAssembly application as a static website to S3. In Hello, .NET Deploy, the tutorial includes this using the AWS deployment tool for .NET CLI. You can take the source code from that tutorial and deploy it from Visual Studio with Publish to AWS if you wish.
Further Reading
AWS Documentation
AWS Toolkit for Visual Studio - Publish to AWS
Amazon Elastic Container Service (ECS) using AWS Fargate
Videos
AWS re:Invent 2021 - What’s new with .NET development and deployment on AWS by Norm Johanson
Blogs
Update on our new AWS .NET Deployment Experience by Norm Johanson