

Hello, Location Service!
Getting Started with .NET on AWS: Amazon Location Service


Table of contents
- This episode: Amazon Location Service and geospatial location services. In this Hello, Cloud blog series, we're covering the basics of AWS cloud services for newcomers who are .NET developers. If you love C# but are new to AWS, or to this particular service, this should give you a jumpstart.
- Amazon Location Service : What is it, and why use It?
- Our Hello, Location Service Project
- Where to Go From Here
- Further Reading
This episode: Amazon Location Service and geospatial location services. In this Hello, Cloud blog series, we're covering the basics of AWS cloud services for newcomers who are .NET developers. If you love C# but are new to AWS, or to this particular service, this should give you a jumpstart.
In this post we'll introduce Amazon Location Service and use it in a "Hello, Cloud" .NET program for geocoding and route calculation, and also in a web page for interactive maps. We'll do this step-by-step, making no assumptions other than familiarity with C# and Visual Studio. We're using Visual Studio 2022 and .NET 6.
Amazon Location Service : What is it, and why use It?
“The three most important things about real estate are location, location, location.” – Harold Samuel
For the first half of my life, going somewhere new meant getting directions or consulting a printed map. If I was out somewhere, no person or system had an automatic way of knowing where I was or reaching me. Today, we're all very used to our location being known and never being lost, thanks to the devices we carry and GPS. We take location services for granted, such as maps, place name & address search, geocoding, and route calculation. How can you add location services to your own applications?
Amazon Location Service (hereafter "Location Service") is a service that allows you to integrate geospatial data and location functionality with your applications, including maps and geocoding. AWS describes it as "a service that makes it easy for developers to add location functionality, such as maps, points of interest, geocoding, routing, tracking, and geofencing, to their applications without sacrificing data security and user privacy."
The primary features of Location Service are maps, places, routes, trackers, and geofencing. Many of these features let you select from multiple geospatial data providers, including ESRI and HERE.
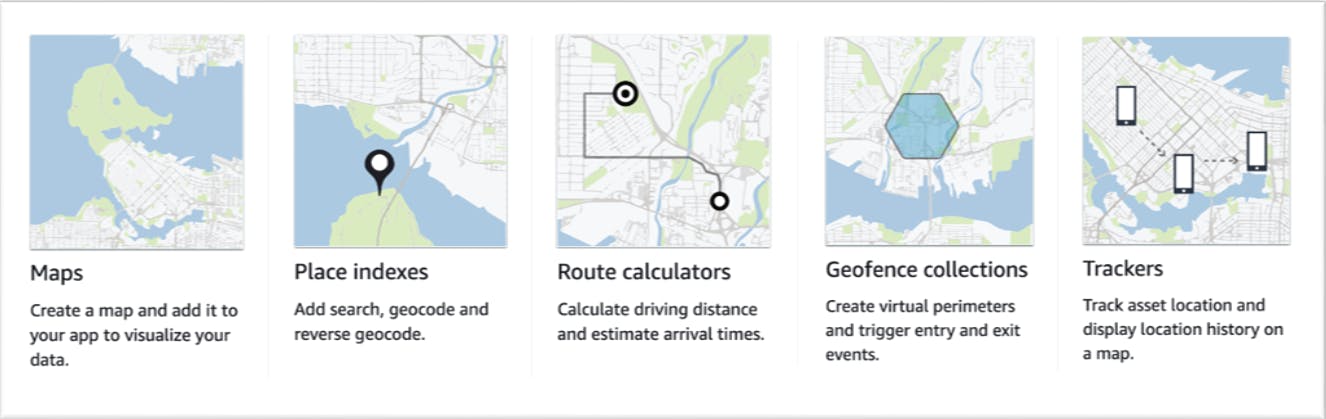
Maps visualize location information, are available in a variety of styles, and can be interleaved with your own data.
Places allows point-of-interest searches, and conversion to complete locations with coordinates (geocoding and reverse geocoding).
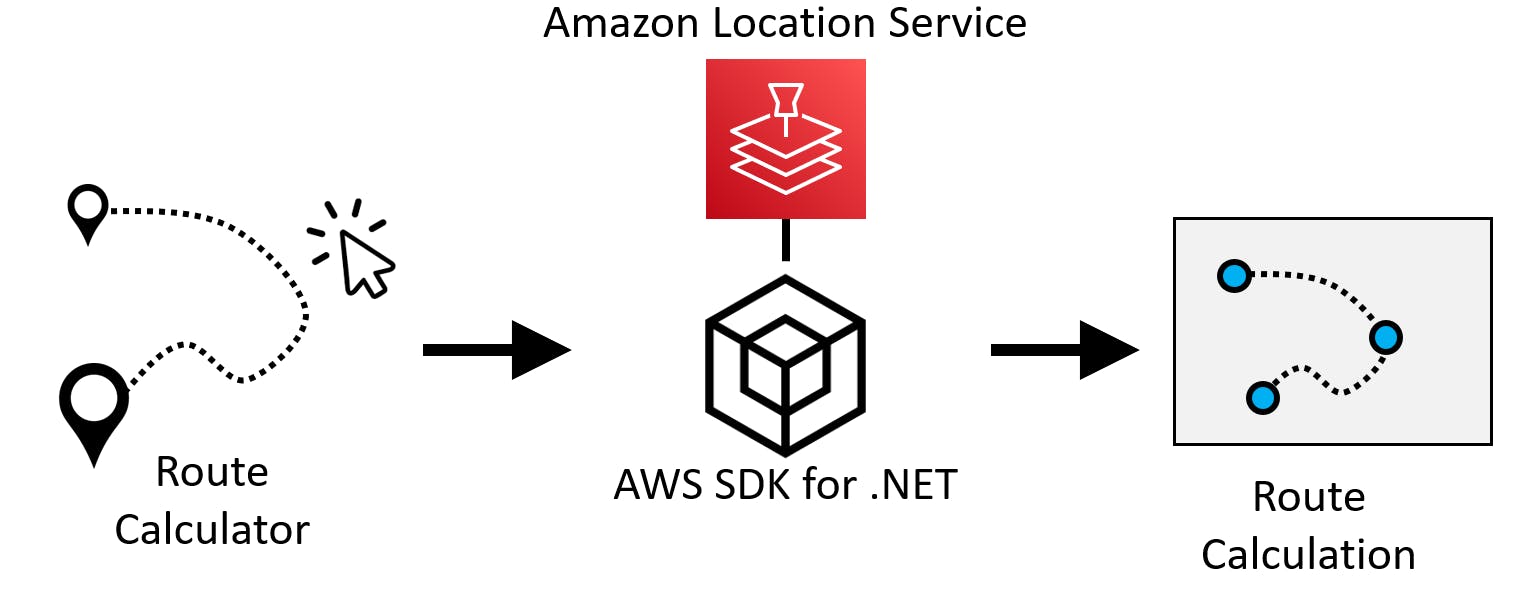
Routes calculate distance, travel time, and directions between two or more places.
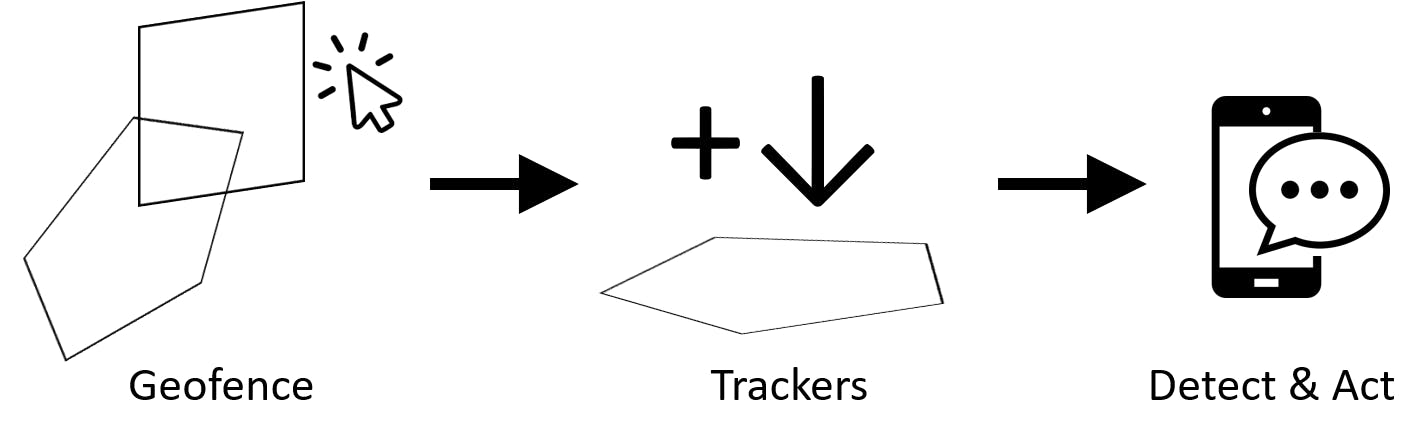
Trackers track current and historical locations of devices. Geofencing allows you detect and act when a device enters or exits a geographic boundary (geofence).
Location Service is a good fit for these use cases:
- Address enhancement
- Asset tracking
- Optimizing delivery routes
- Visualizing data on a map
The AWS Free Tier provides, for the first 3 months of usage, 500K map tiles, 10k addresses geocoded, 10k routes calculated, and more. Location Service charges vary by region, so be sure to consult the pricing page.
Our Hello, Location Service Project
We'll write a .NET program that uses Location Service to search for and geocode places by name or address, perform "near" place searches, and calculate route distance and time between two places. We'll also embed a Location Service map in a web page.


One-time Setup
For any of the tutorials in the Hello, Cloud series you need the following:
- An AWS account, and an understanding of what is included in the AWS Free Tier.
- Microsoft Visual Studio 2022. If you're using an older version of Visual Studio you won't be able to use .NET 6. If you use a different IDE, you may have to find alternatives to some tutorial steps.
- AWS Toolkit for Visual Studio. You'll need to configure the toolkit to access your AWS account and create an IAM user. Your default AWS profile will be linked to this user when running programs from the command line.
Step 1: Configure Amazon Location Service
In this step, you'll create an Amazon Location Service Place Index you can search against. We'll be using the HERE provider.
Sign in to the Amazon management console and select the region you want to work in at the upper right. We're using us-west-2 (Oregon).
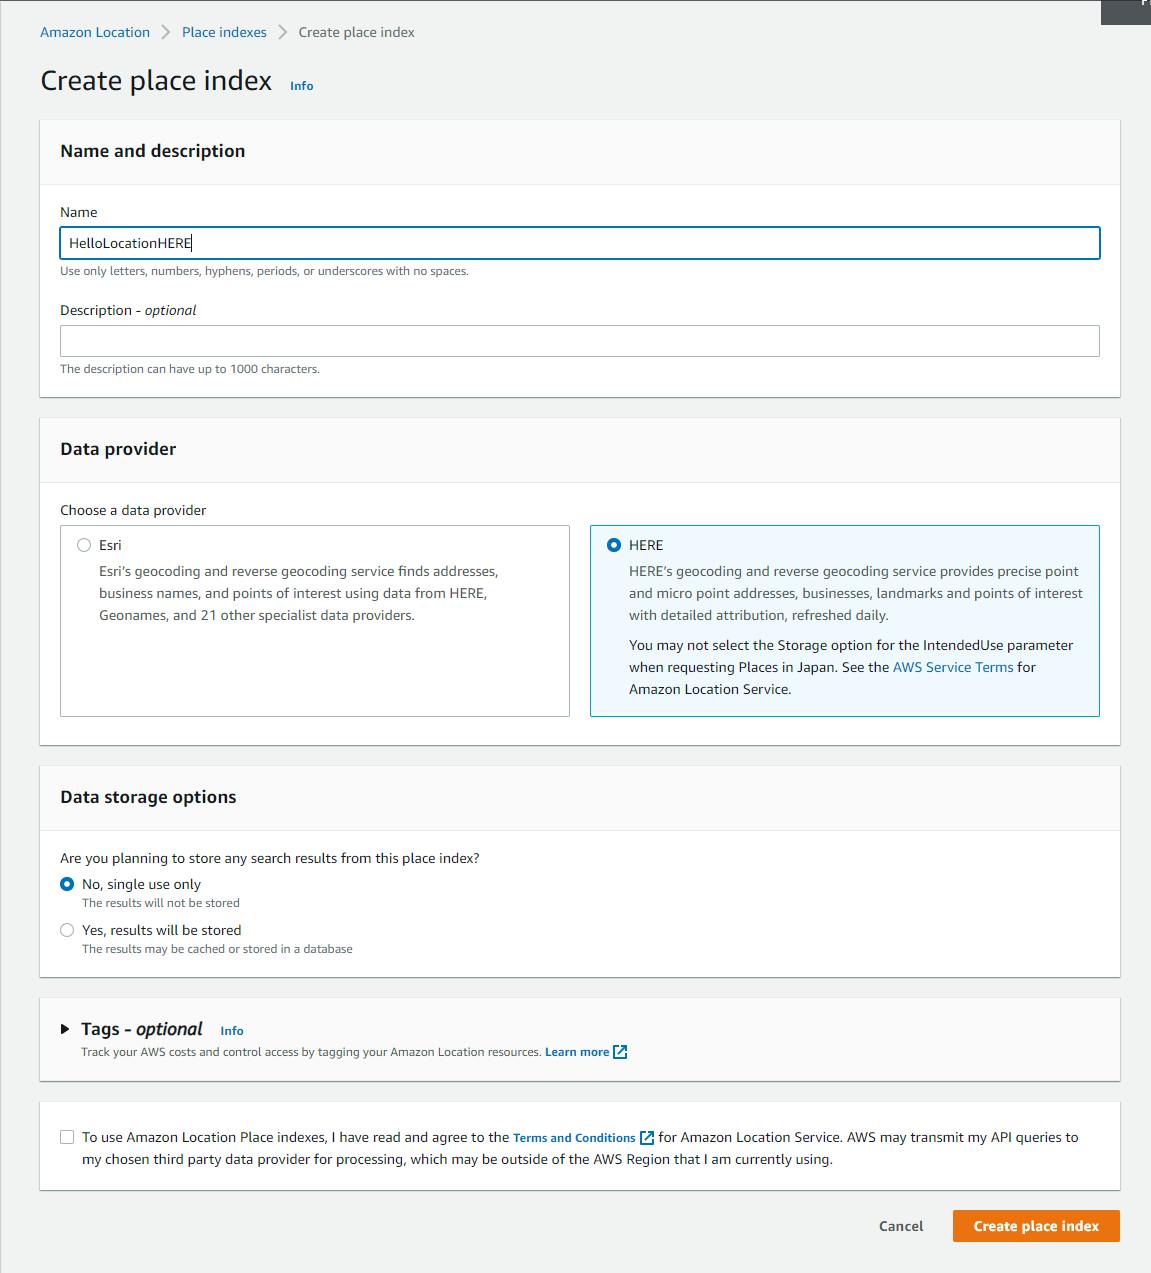
Navigate to Location Service and click Create place index.
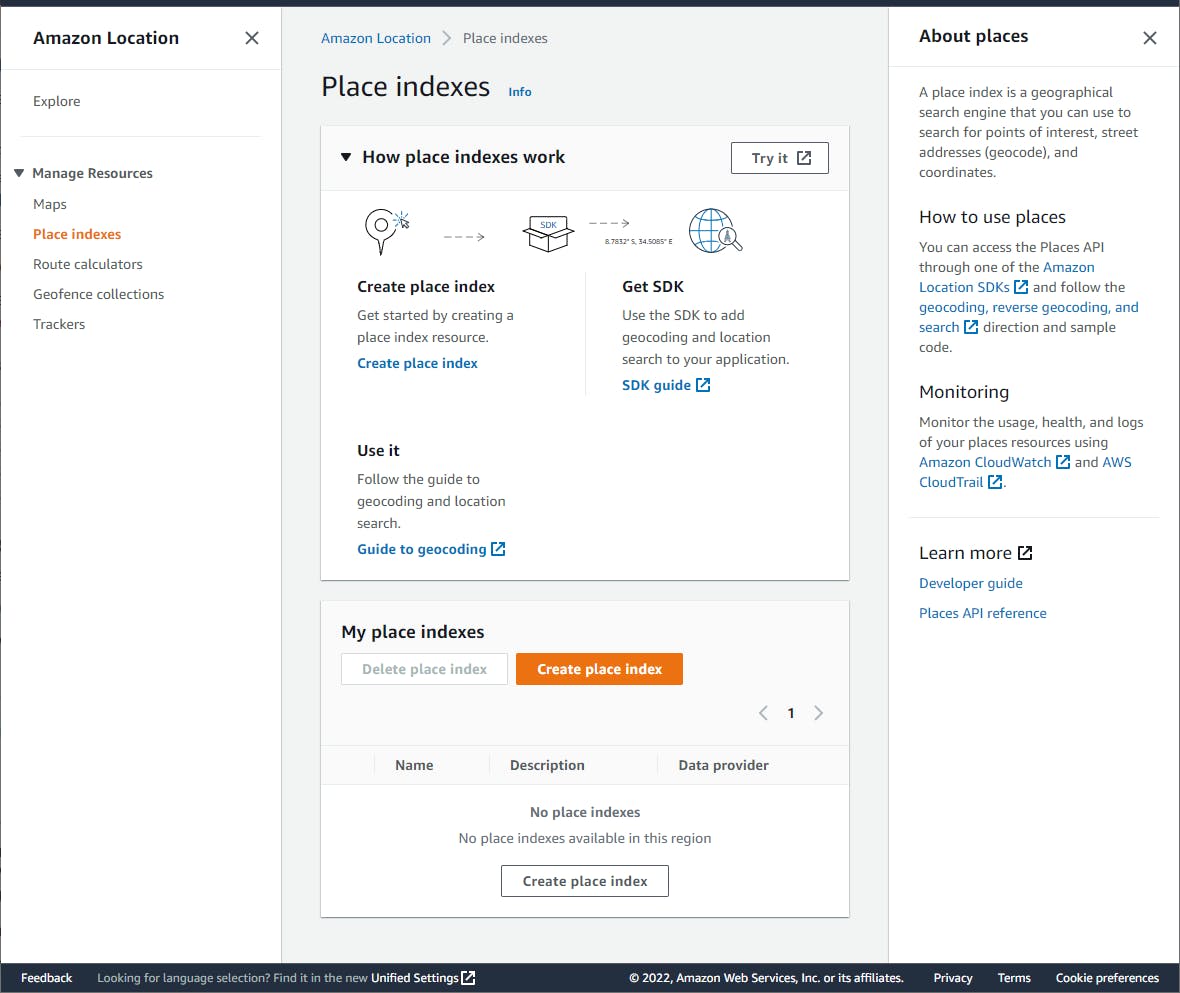
A. Name: HelloLocationHERE.
B. Data provider: select HERE.
C. Read the terms and conditions and check the box to acknowledge.
D. Click Create place index.
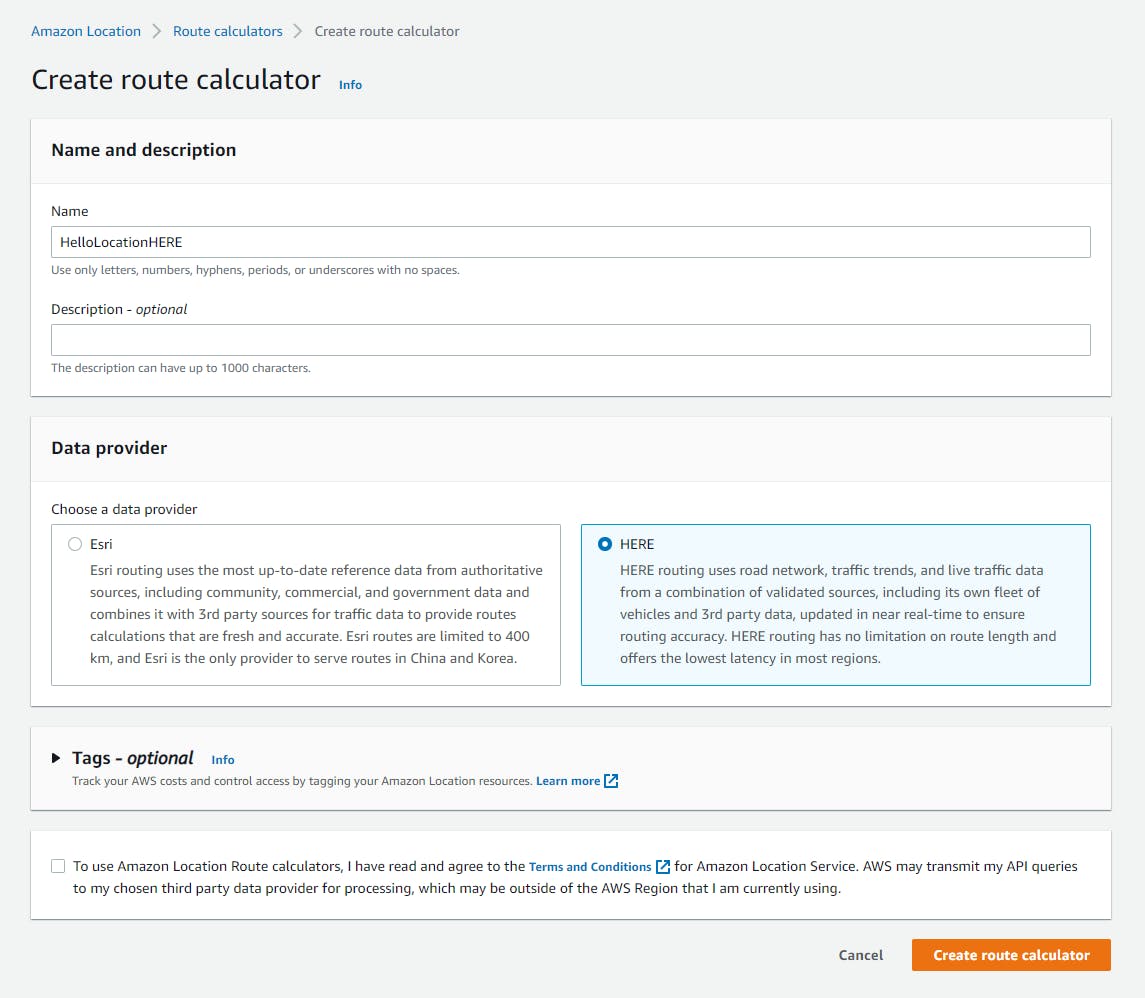
Create a route calculator:
A. Select Route calculators from the left pane.
B. Click Create route calculator.
C. Name: HelloLocationHERE.
D. Data provider: select HERE.
E. Review and agree to the terms and conditions.
F. Click Create route calculator.
Step 2: Create a .NET Program
In this step, you'll create a .NET console program that lets you exercise different features of the location service.
Open a command/terminal window and CD to a development folder.
Run the dotnet new command below create a new console program.
dotnet new console -n hello-locationOpen the project in Visual Studio.
Add the AWSSDK.Location package to the project:
A. In Solution Explorer, right-click the project and select Manage NuGet Packages....
B. Search for and install the AWSSDK.Location package.

Open Program.cs in the code editor and replace with the code below. At the top of the code, set the
RegionEndpointto the region you are using, and confirm the Place Index and Route Calculator names match what you created in the AWS console.Save your changes and ensure the program builds.
Program.cs
using Amazon;
using Amazon.LocationService;
using Amazon.LocationService.Model;

namespace HelloLocation
{
    public class Program
    {
        static RegionEndpoint Region = RegionEndpoint.USWest2;
        static AmazonLocationServiceClient Client = null!;

        const string IndexName = "HelloLocationHERE";
        const string RouteCalculatorName = "HelloLocationHERE";

        static async Task Main(string[] args)
        {
            if (args.Length < 2 || args[0] == "-h")
            {
                Console.WriteLine("Usage:   dotnet run -- <action>");
                Console.WriteLine("Actions: search \"<place> ................ searches for places matching the text");
                Console.WriteLine("Actions: near \"<place1> <place2> ........ searches for place-1 near place-2");
                Console.WriteLine("Actions: route \"<place1> <place2> ....... finds the distance and route between place-1 and place-2");
                Console.WriteLine("Example: dotnet run -- geocode \"367 Wildwood Rd, Ronkonkoma, NY\"");
                Environment.Exit(1);
            }

            Client = new AmazonLocationServiceClient(Region);

            switch (args[0].ToLower())
            {
                case "search":

                    // "search" <place> - find place

                    var searchResponse = await SearchPlace(args[1]);
                    foreach (var result in searchResponse.Results)
                    {
                        Console.WriteLine($"{result.Place.Label} ({result.Place.Geometry.Point[0]}° , {result.Place.Geometry.Point[1]}°)");
                    }
                    break;

                case "near":

                    // "near" <place1> <place2> - find place1 near place2

                    var searchPlace2Response = await SearchPlace(args[2]);
                    if (searchPlace2Response.Results.Count == 0)
                    {
                        Console.WriteLine($"I couldn't find this place: {args[2]}");
                        Environment.Exit(2);
                    }

                    Console.WriteLine($"Searching for '{args[1]}' near {args[2]}");

                    // search for place1, using place2 as a bias position

                    var searchNearRequest = new SearchPlaceIndexForTextRequest()
                    {
                        IndexName = IndexName,
                        Text = args[1],
                        BiasPosition = searchPlace2Response.Results[0].Place.Geometry.Point
                    };

                    var searchNearResponse = await Client.SearchPlaceIndexForTextAsync(searchNearRequest);
                    foreach (var result in searchNearResponse.Results)
                    {
                        Console.WriteLine($"{result.Place.Label} ({result.Place.Geometry.Point[0]}° , {result.Place.Geometry.Point[1]}°)");
                    }
                    break;

                case "route":

                    // "route" <place1> <place2> - find the distance and duration between place 1 and place 2

                    var place1Response = await SearchPlace(args[1]);
                    if (place1Response.Results.Count == 0)
                    {
                        Console.WriteLine($"I couldn't find this place: {args[1]}");
                        Environment.Exit(2);
                    }
                    var place1 = place1Response.Results[0].Place;

                    var place2Response = await SearchPlace(args[2]);
                    if (place2Response.Results.Count == 0)
                    {
                        Console.WriteLine($"I couldn't find this place: {args[2]}");
                        Environment.Exit(2);
                    }
                    var place2 = place2Response.Results[0].Place;

                    var routeResponse = await GetRoute(place1, place2);

                    Console.WriteLine($"{place1.Label}\nis {routeResponse.Summary.Distance:F2} {routeResponse.Summary.DistanceUnit} from\n{place2.Label}");
                    Console.WriteLine($"Travel time: {routeResponse.Summary.DurationSeconds / 60:F2} minutes");
                    break;

                default:
                    Console.WriteLine("Unrecognized action");
                    break;
            }
        }

        /// <summary>
        /// Search for a place.
        /// </summary>
        /// <param name="text">Place name or address</param>
        /// <returns>SearchPlaceIndexForTextResponse</returns>

        static async Task<SearchPlaceIndexForTextResponse> SearchPlace(string text)
        {
            var location1Request = new SearchPlaceIndexForTextRequest()
            {
                IndexName = IndexName,
                Text = text
            };
            return await Client.SearchPlaceIndexForTextAsync(location1Request);
        }


        /// <summary>
        /// Calculate route between 2 places.
        /// </summary>
        /// <param name="place1">First place</param>
        /// <param name="place2">Second place</param>
        /// <returns>CalculateRouteResult</returns>

        static async Task<CalculateRouteResponse> GetRoute(Place place1, Place place2)
        {
            var routeRequest = new CalculateRouteRequest()
            {
                CalculatorName = RouteCalculatorName,
                DeparturePosition = place1.Geometry.Point,
                DestinationPosition = place2.Geometry.Point,
                DistanceUnit = DistanceUnit.Miles,
                TravelMode = TravelMode.Car
            };
            return await Client.CalculateRouteAsync(routeRequest);
        }
    }
}
Understand the Code
This console program supports 3 actions: search, near, and route.
| command | description |
| dotnet run -- -h | display help |
| dotnet run -- search "place" | search for places matching the text |
| dotnet run -- near "place1" "place2" | search for place1 near place2 |
| dotnet run -- route "place1" "place2" | calculate the route from place1 to place2 |
At the top of Program.cs we set our region and the name of our Place Index and Route Calculator.
Command line processing (lines 17-29). The command line expects the first parameter (args[0]) to be the action name. A place is specified in args[1] and, if a second place is expected, args[2]. A switch statement executes code based on the action specified.
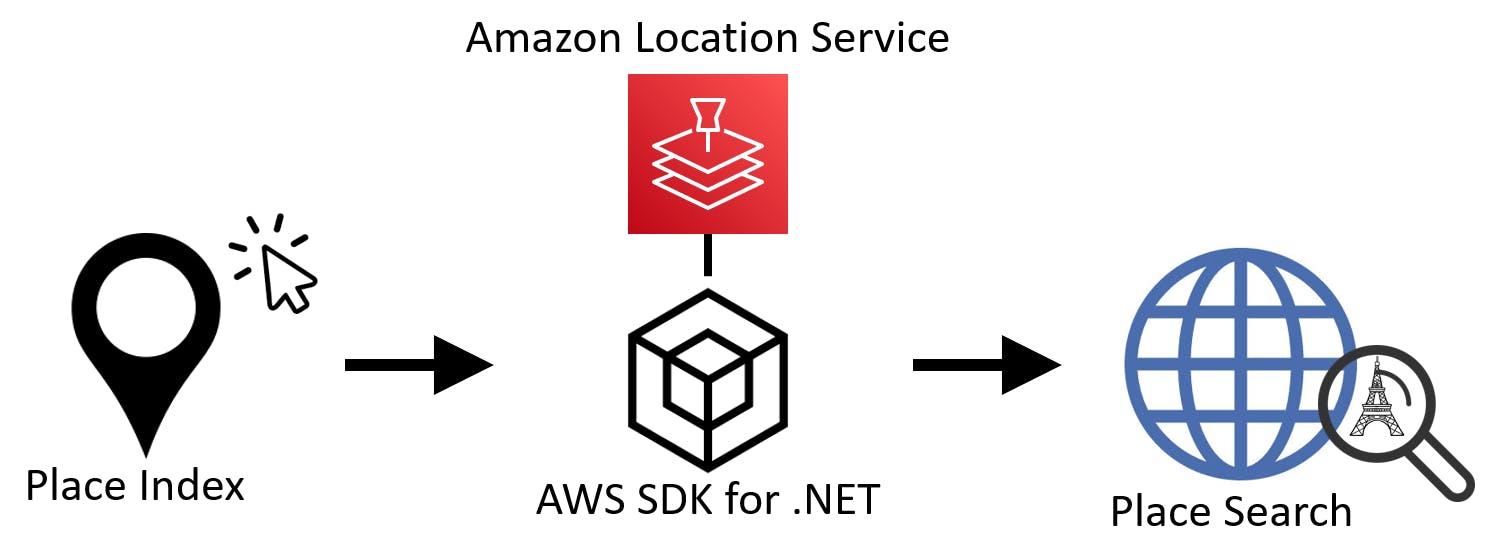
Search action (31-40): This action searches the place name or address you supply, which can be partial, and returns matches. The local function SearchPlace is invoked, which calls the SearchPlaceIndexForTextAsync SDK method. The request specifies our Place Index and the place text to search. This can be a place name or address, full or partial. The calling code in Main loops through the response's Results property to display each Place object's label (full place name/address) and coordinates.
Near action (42-69). The near action is similar to search, but specifies a bias location for the search. To get the bias location, we first call SearchPlace on place2, because we will need to pass its coordinates to the search for place1. We then do the search for place1, specifying the first place2 result's Place.Geometry.Point property to specify the location to search near.
Route action (71-95). The route action calculates the distance and travel time between two places. We call SearchPlace for place1 and for place2. Then we call our local method GetRoute, which calls the SDK's CalculateRouteAsync method. The request passes the point location of the departure and destination location. From the response, the calling code in Main displays the distance, distance unit of measurement, and travel time from theSummary property. Note that the request to CalculateRouteAsync can specify the mode of travel and unit of measurement for distance.
Step 3: Test Geocoding
In this step, you'll test the .NET console program.
In a command/terminal window, CD to the project folder.
Test the search action. This action simply takes a place name, which could be an address or a name, exact or partial, and returns a list of places.
A. Enter
dotnet run -- searchfollowed by a specific, complete address. Remember to put the address in quotes. I'm testing an address from my childhood.dotnet run -- search "367 Wildwood Rd, Ronkonkoma, NY"If you used a specific address, you'll get just one result. If you get no results, check for accuracy and spelling. If you see multiple results, your address wasn't specific enough.

B. Run the command again, and this time use a very non-specific address, such as 100 Main St.
dotnet run -- search "100 main st"You should see multiple results. 100 main st gives us results from around the world, including Gibraltar, Canada, and the US. For each results, we are displaying from the results the
Placeobject'sLabel(geocoded name/address) andPoint(coordinates) properties.
C. Run the command again, and this time use a place name instead of an address. I'm using Little Vincents Pizza, our favorite family pizza place when I was growing up.
dotnet run -- search "Little Vincents Pizza"I'm happy to see my favorite pizzeria is still around, and has expanded to 3 locations.

Test the near action. This action is similar to search, but here you specify 2 places: the place you're looking for, and a place it is near.
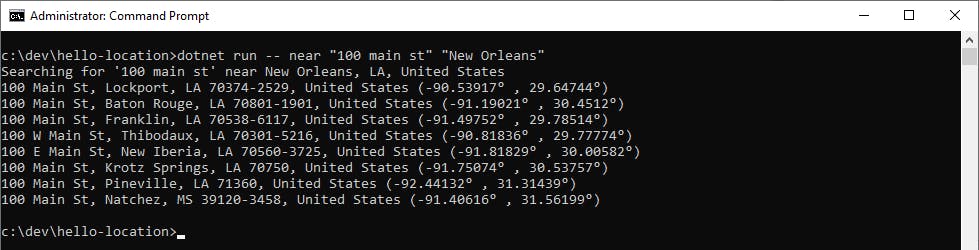
A. Enter
dotnet run -- nearfollowed by 2 parameters: "100 main st" and then "New Orleans". We did this non-specific search earlier, but this time we're doing it with the qualifier "near New Orleans"dotnet run -- near "100 main st" "New Orleans"The results are quite different from earlier. All but one of the addresses are in or near Louisiana. Some of the results in our earlier test of "100 main st" were left out, and more Louisiana results are listed here than before.
B. Enter
dotnet run -- near "Paris" "Dallas"to search for Paris, but near Dallas.dotnet run -- near "Paris" "Dallas"The results are nicely ordered by proximity to Dallas TX. The first result is on Paris St in the city of Dallas. The second is the city of Paris, TX. The third is Paris France.

Test the route action.
A. Enter the command below to get the distance between the Eiffel Tower and the Arc de Triomphe monument in Paris.
dotnet run -- route "eiffel tower" "arc de triomphe"You get a distance of 1.5 miles and a 6.15 minute duration.

B. Run the command below to get the distance from the Golden Gate Bridge in San Francisco, California to the Brooklyn Bridge in New York.
dotnet run -- route "Golden Gate Bridge" "Brooklyn Bridge"
C. Try the route action with your own places.
Congratulations! You've successfully geocoded places with Amazon Location Service in .NET code.
Step 4: Test Embedded Maps in a Web Page
This step is optional and requires Node.js on your local computer. If you've come this far, you probably want to see the Location Service's map capability. In this step, you create a map in the AWS console, create a Cognito identity pool for authentication, and embed the map in a web page, backed up Node.js.
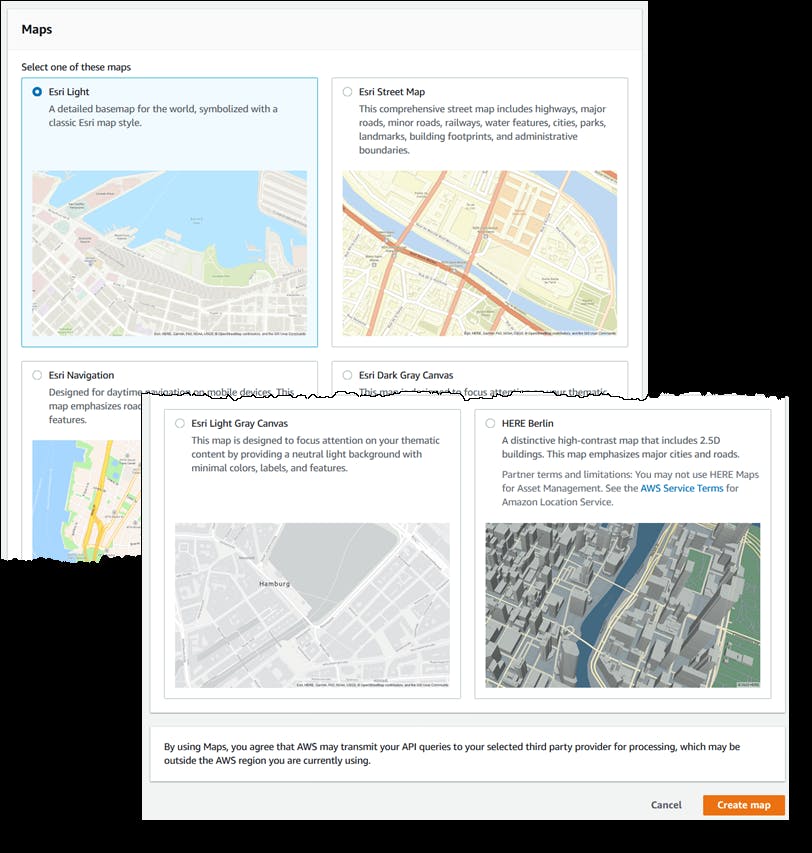
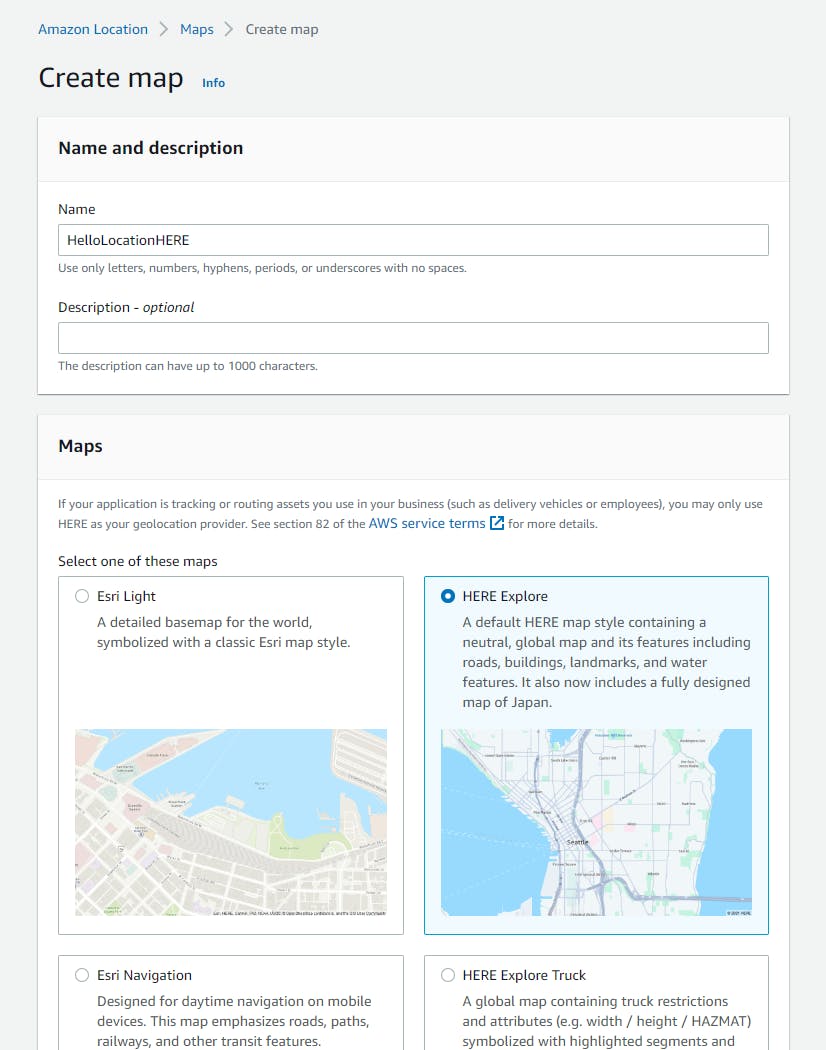
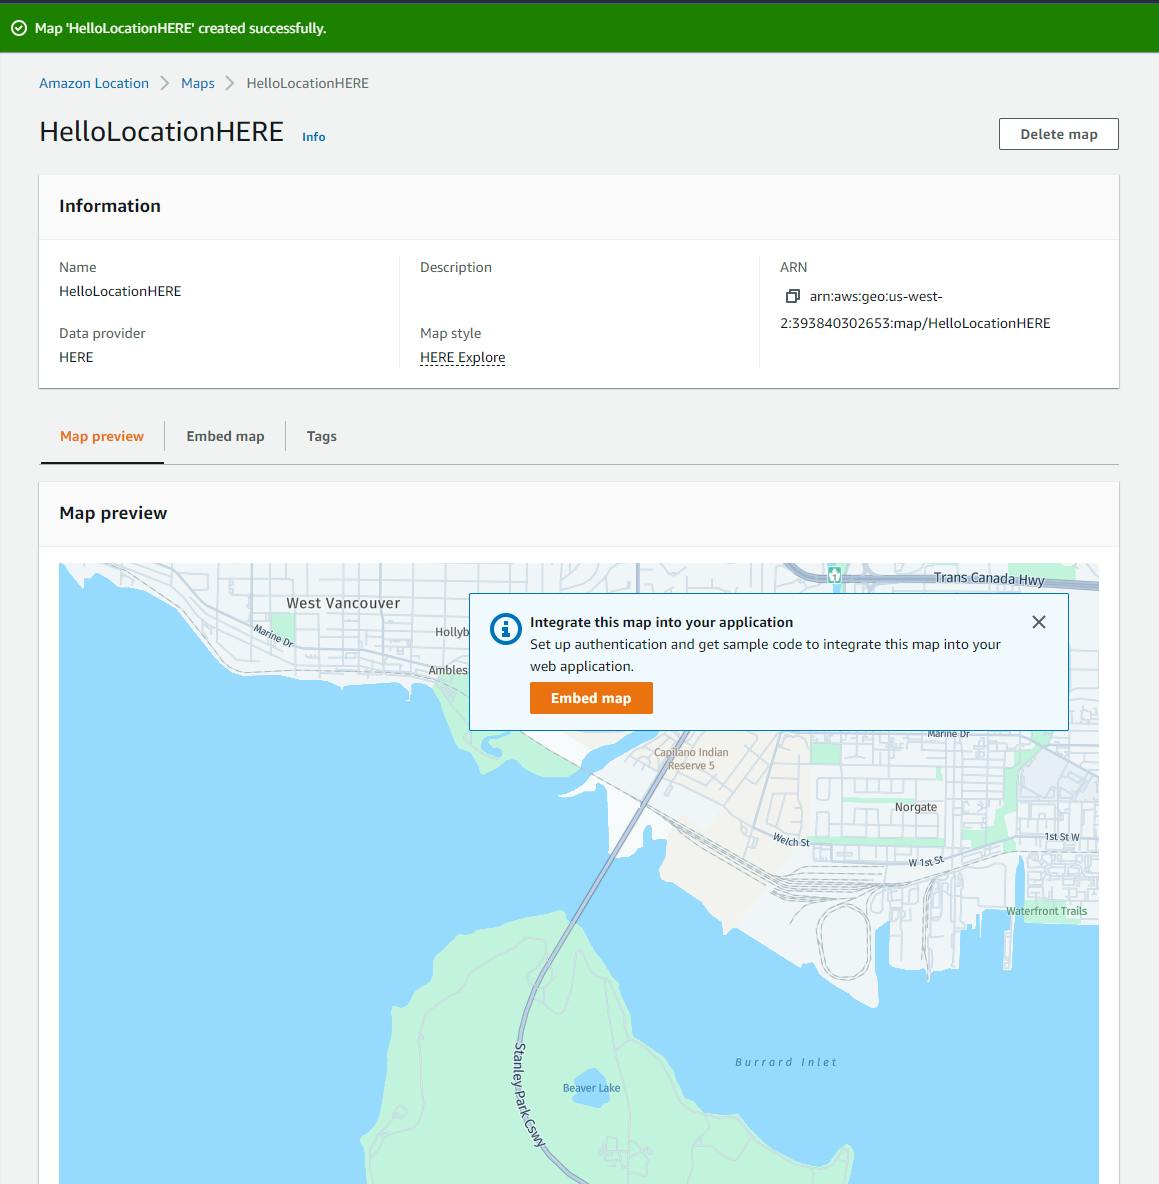
Create a map in the AWS console:
A. Select Maps from the left pane.
B. Click Create map.
C. Name: HelloLocationHERE.
D. Data provider: select HERE Explore.
E. Review and agree to the terms and conditions.
F. Click Create map.
Set up authentication for embedding the map. There are a lot of instructions presented in the console, you need to follow them carefully and completely.
A. Click Embed map.
B. Expand the Set up authentication section.
C. Follow the instructions under To create a new Amazon identity pool for use with this Amazon Location map and perform all the steps, including adding an inline policy for the IAM role that is created.
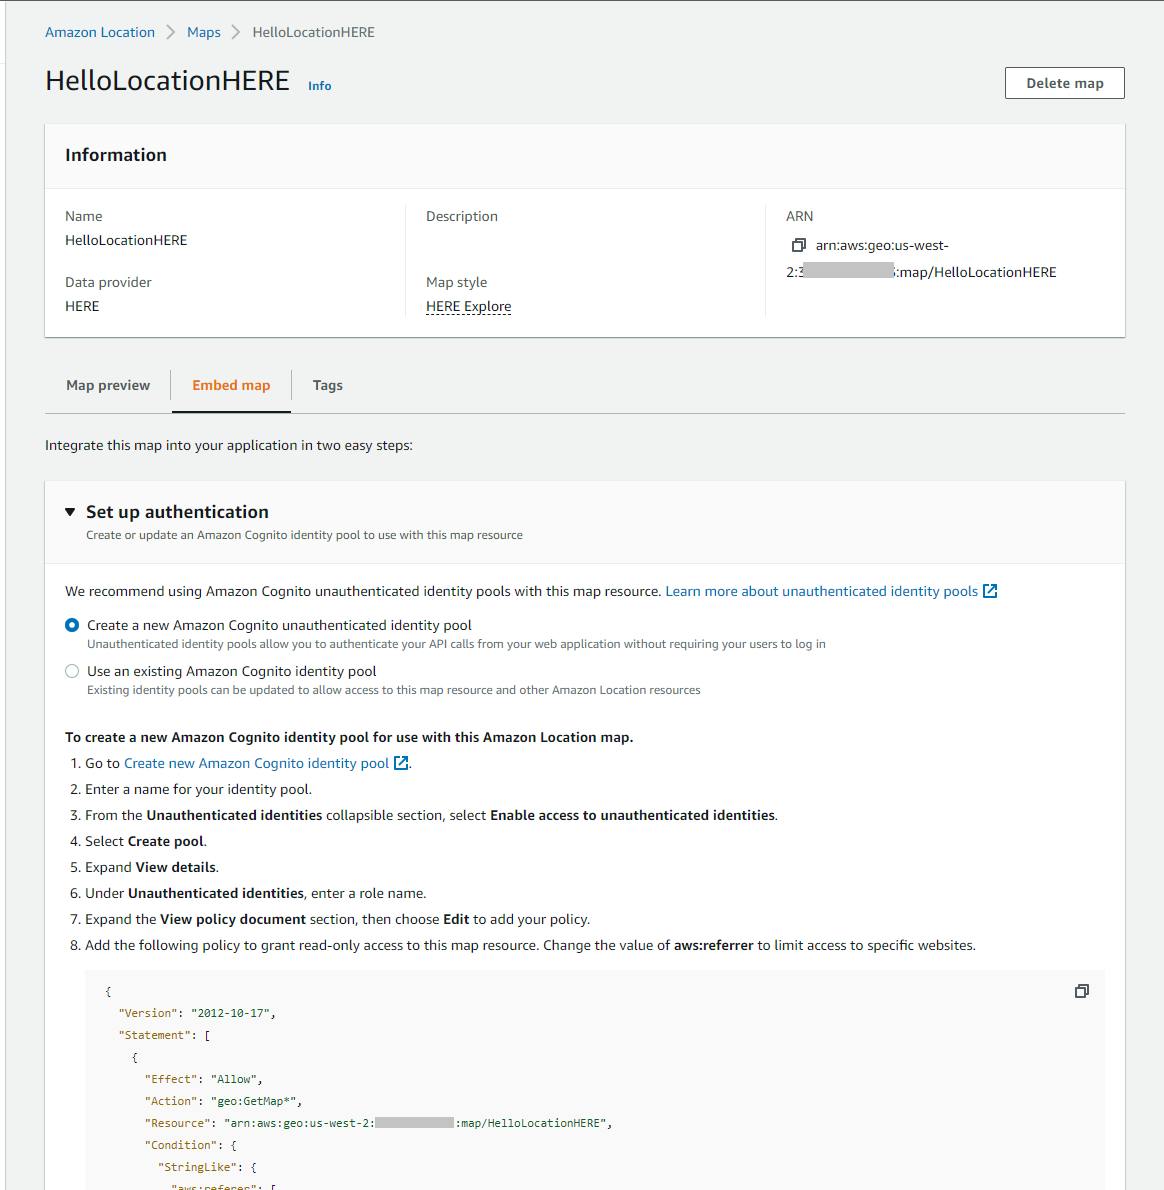
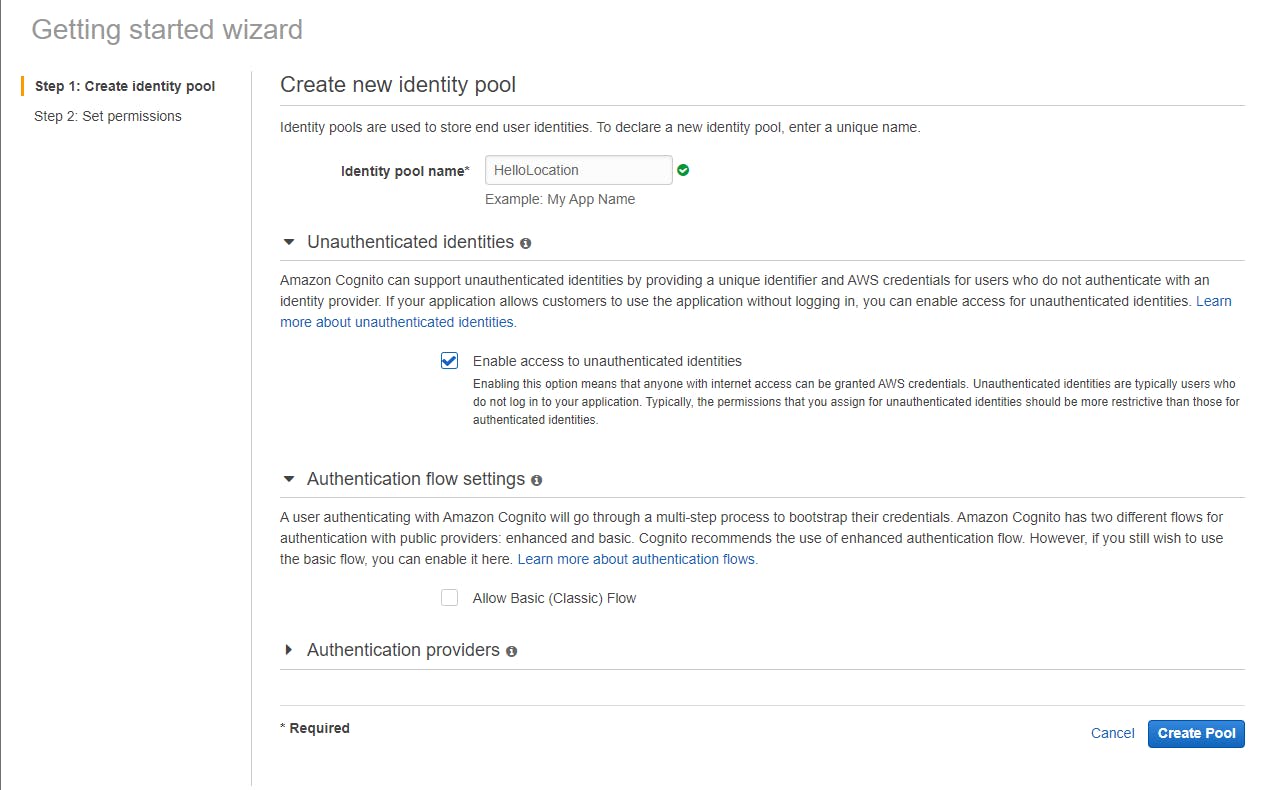
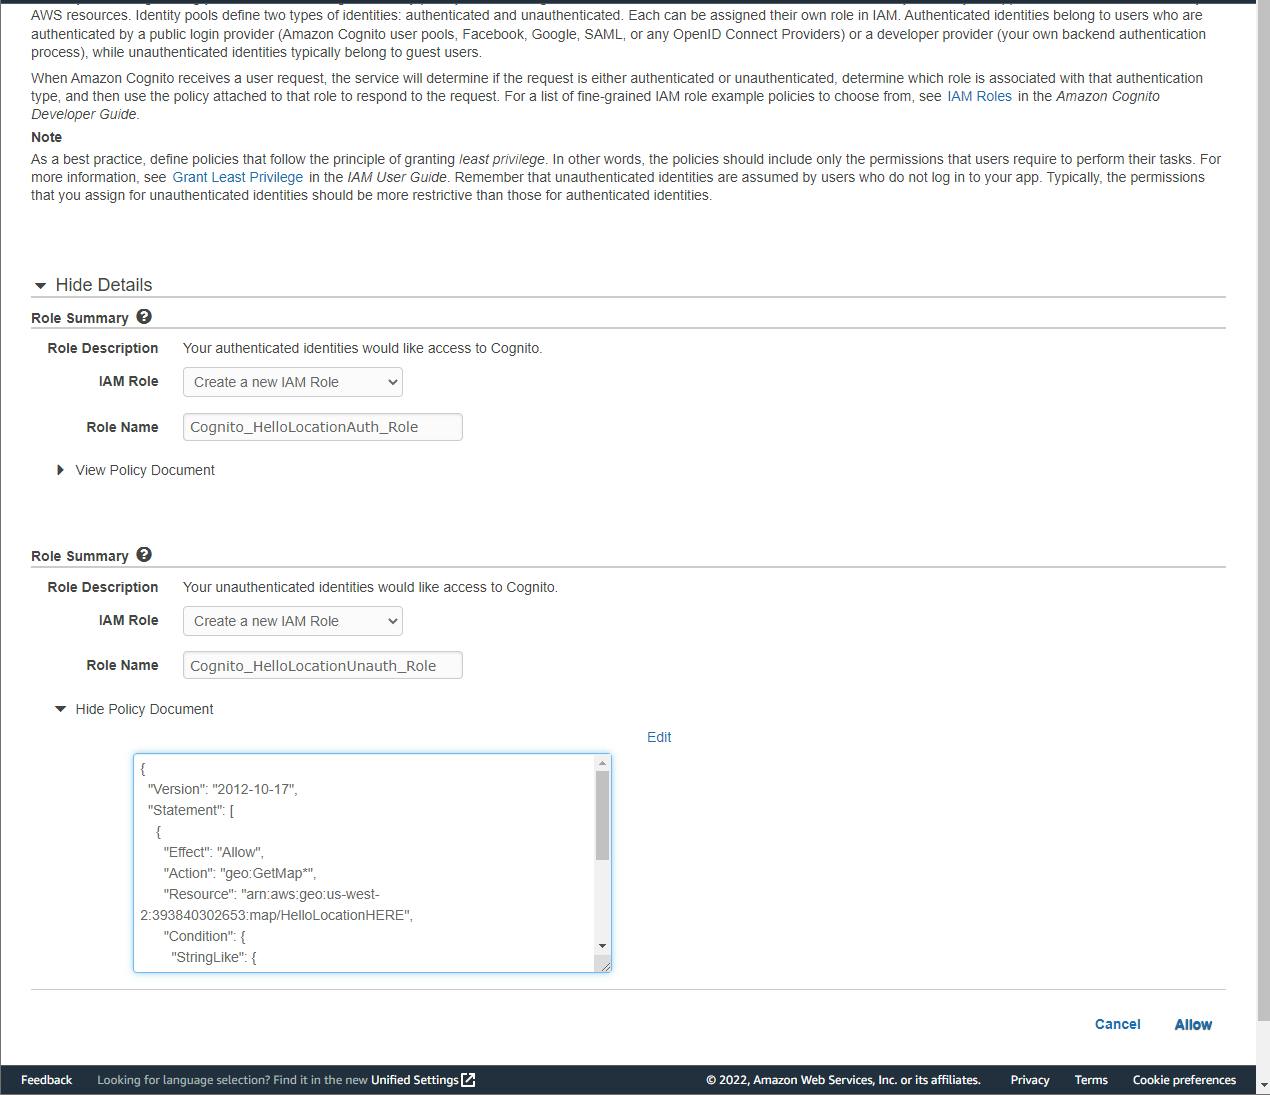
D. Record your identity pool ID and the code snipped displayed under Sample Code - Get AWS Credential.
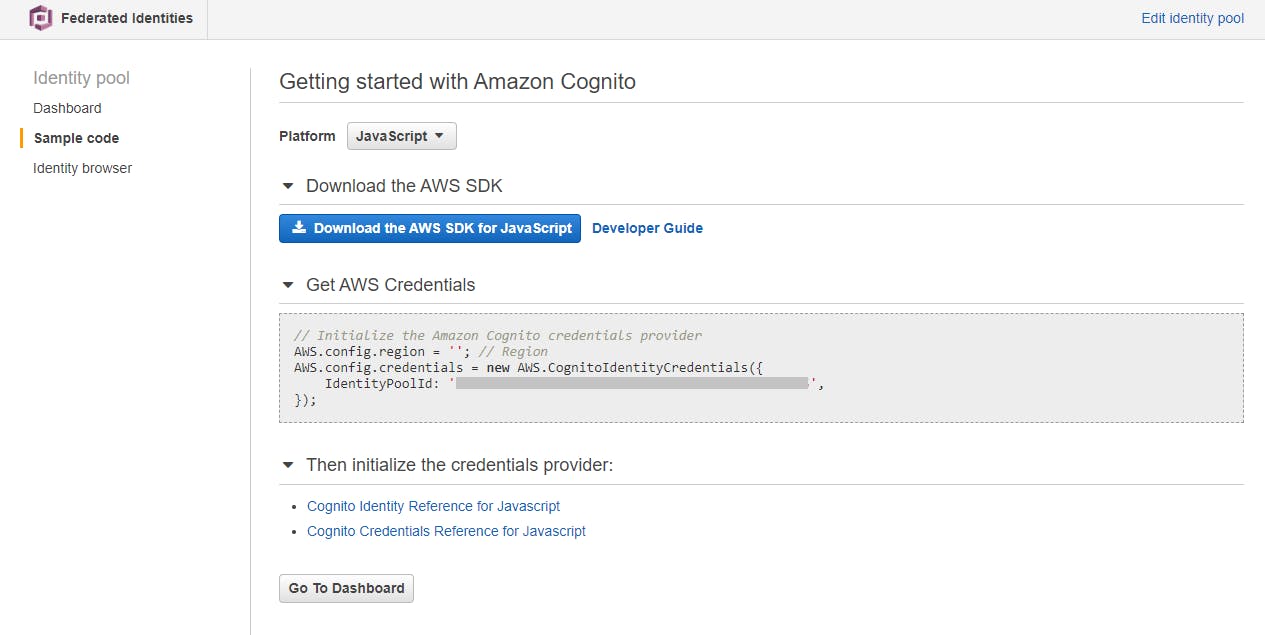
E. Expand the Embed this map in your web application section, and copy the HTML into a local file named index.html. In the
Authblock, replaceREPLACE_WITH_POOL_IDwith the identity pool ID you just noted.Launch the web page
A. In a command/terminal window, CD to the project folder.
B. Run the command
npx serve. If the command is unknown, install Node.js, open a new command window, and retry.npx serve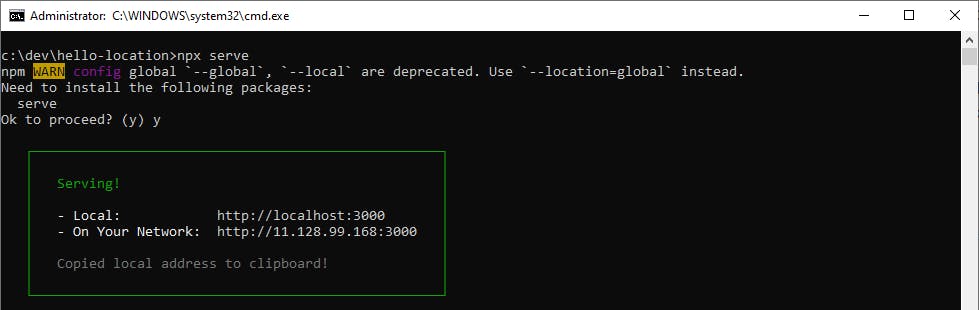
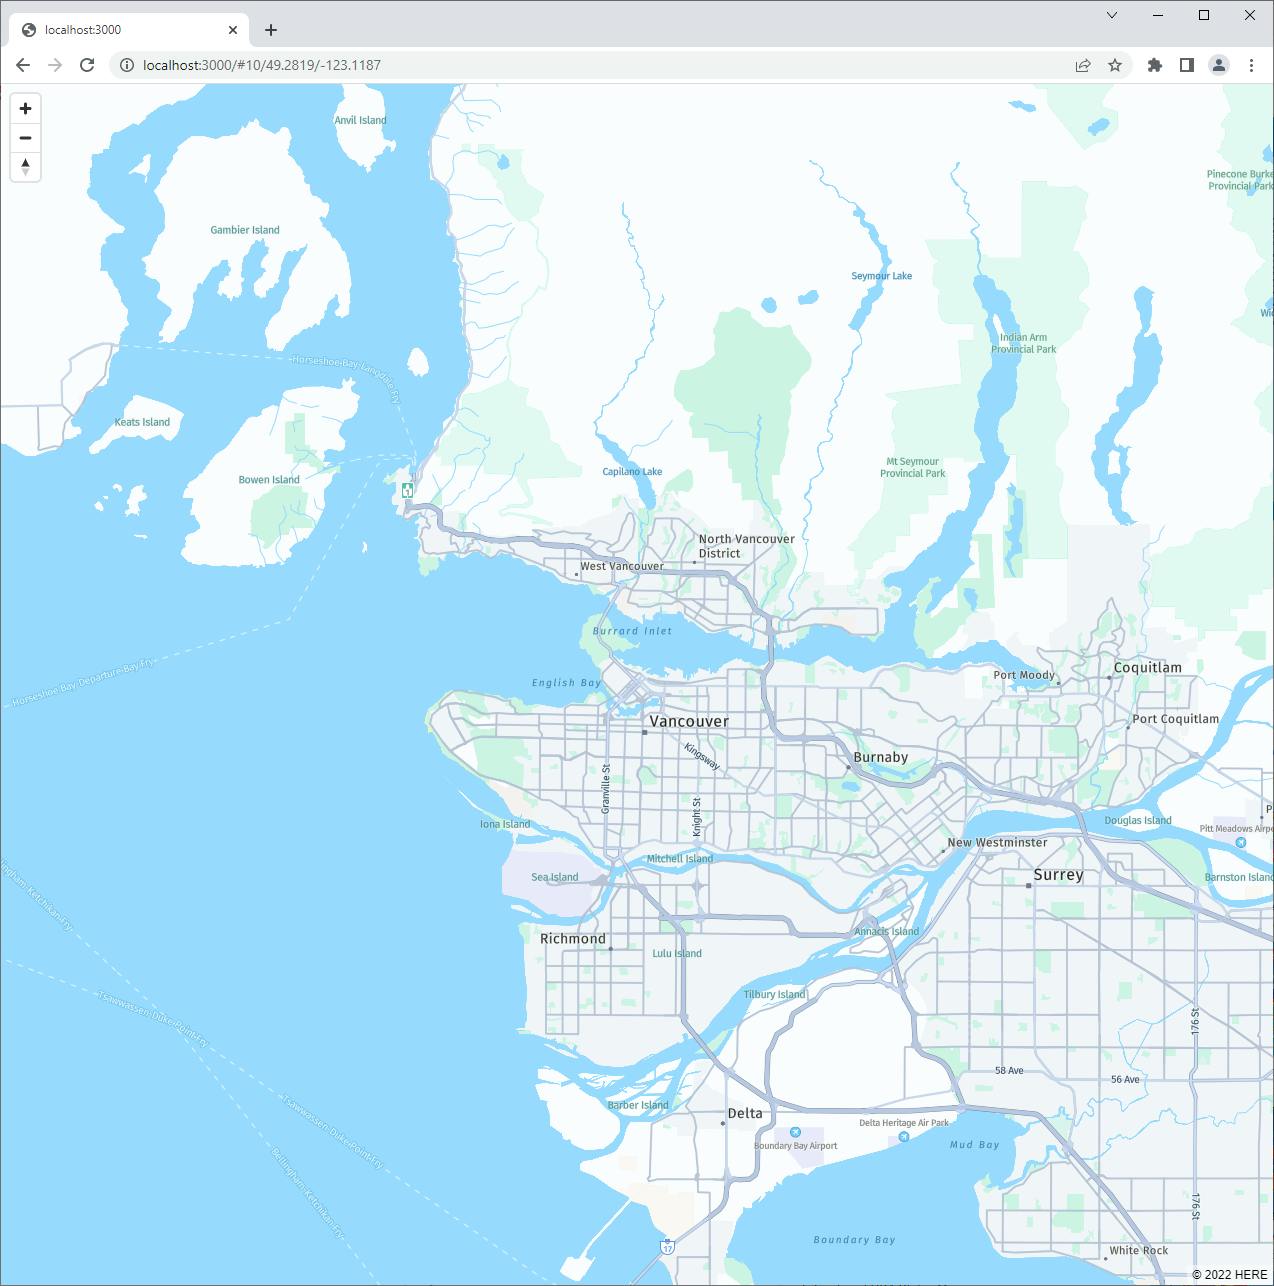
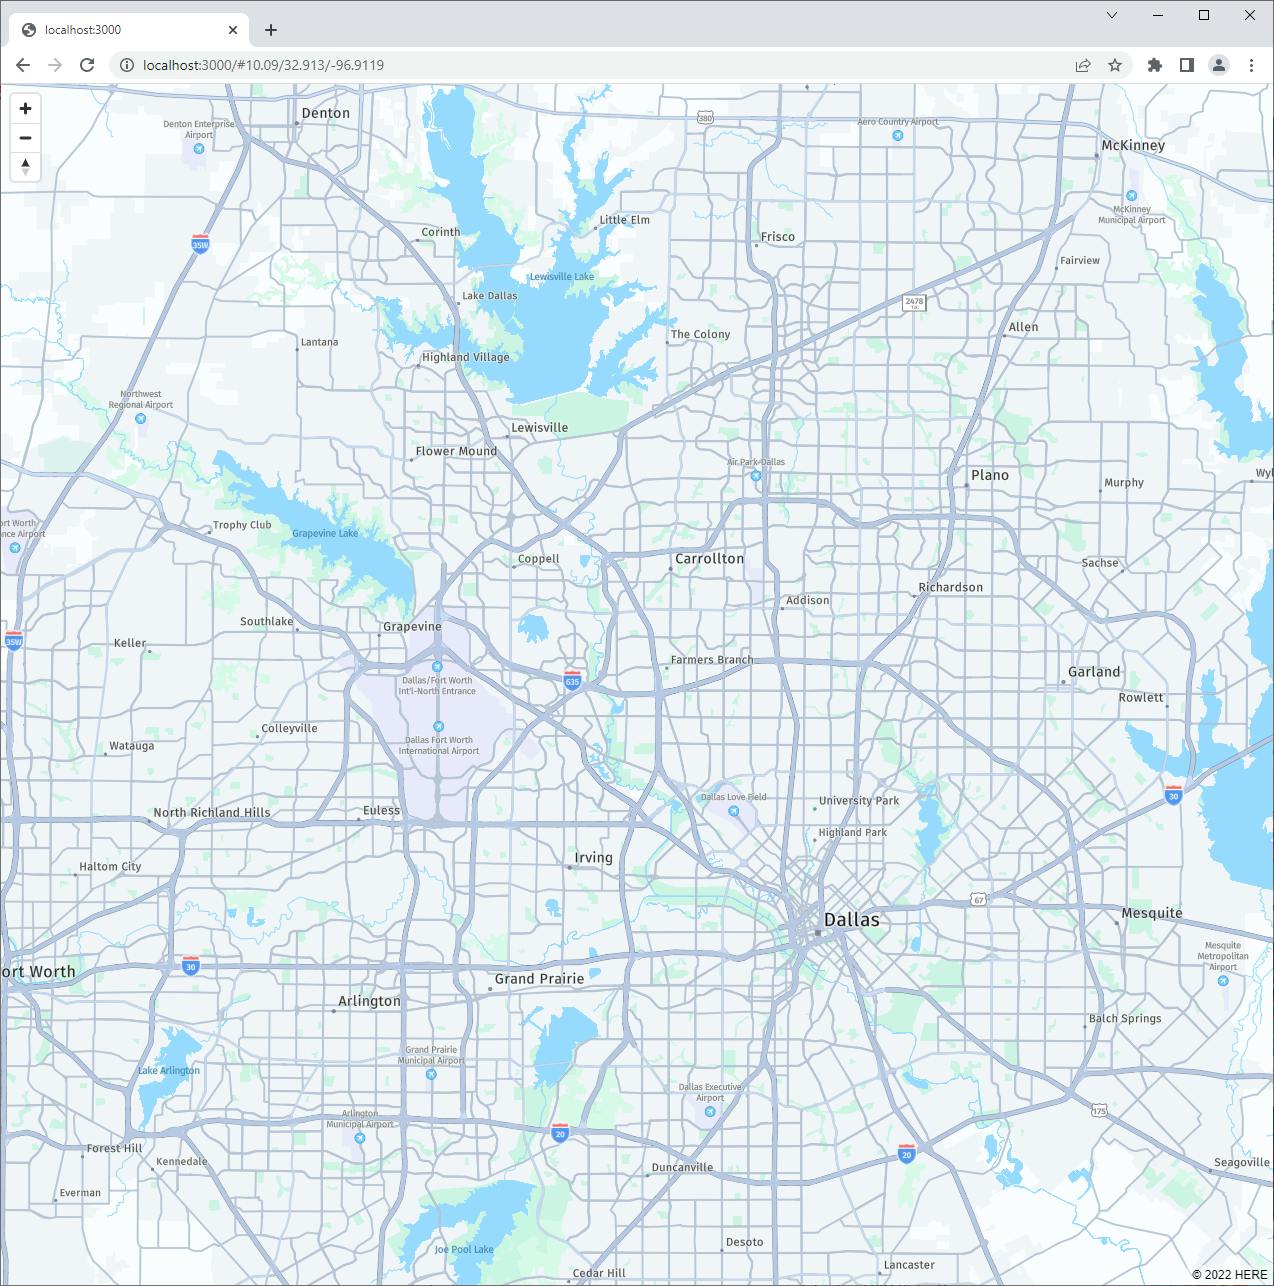
C. Note the URL displayed in the npx window, and browse to it. You should see a map.

D. Interact with the map. Zoom in and out. Navigate to your home town.
E. Stop
npx servefrom running in the command window.
Congratulations! You've successfully embedded an Amazon Location Services map in a web page.
Step 5: Change Your Configuration and Experiment
This step is optional. You can change configuration to try different providers and map views.
Try an ESRI Place Index.
A. Create another Place Index in the AWS console, as you did in Step 1, this time with ESRI as a provider. Name it HelloLocationESRI.
B. In your project, change the PlaceIndex constant in Program.cs to the new name.
C. Build and run the program. Repeat the
searchandnearaction runs in Step 3, and note how the ESRI provider results differ from the HERE provider.Try an ESRI Route Calculator.
A. Create another Route Calculator in the AWS console, as you did in Step 1, this time with ESRI as a provider. Name it HelloLocationESRI.
B. In your project, change the RouteCalculator constant in Program.cs to the new name.
C. Build and run the program. Repeat the
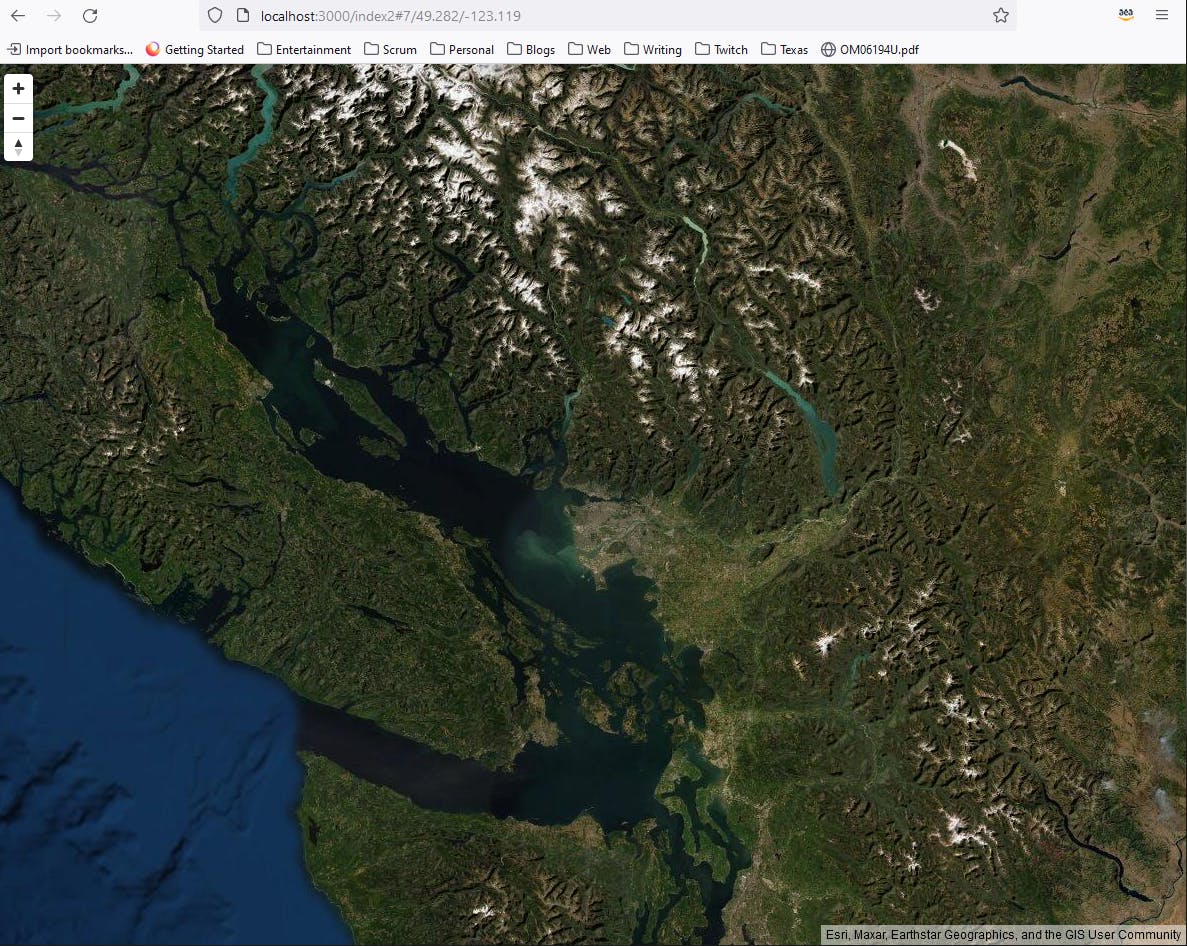
routeaction runs in Step 3, and note how the ESRI provider results differ from the HERE provider.Try a different map view
A. Create a new Map in the console, as you did in Step 4-1, but choose a different map view this time.
B. Select Embed Map and create an Index2.html on your local computer to reference the new map name.
C. Edit the IAM policy you added in Step 4 and replace or add the new map resource name.
D. In your command/terminal window, again run
npx serveto run the web site, as you did in Step 4-3.E. Browse to the URL displayed by npx serve, and specify /Index2.html at the end of the path.
F. How does the experience change with the new map?
Step 6: Shut it Down
When you're completed with the Hello, Location Service project, delete its resources. You won't want to accrue charges for something you're not using.
In the AWS console, navigate to Location Service and delete each of the Map, Route, and Place Index resources.
Navigate to Cognito and delete the identity pool.
Where to Go From Here
Location services are becoming ubiquitous, and that means you likely have a need to provide them in your applications. Amazon Location Service provides maps, place search, routes, trackers, and geofencing capabilities. Many of these can be leveraged on the back end with the AWS SDK for .NET. Maps can be embedded in web site front ends.
In this tutorial, you created a Place Index and a Route Calculator in the AWS consoie. You wrote a .NET console program that performed place search, place search near another place, and route calculation. You also created a Map in the AWS console. You configured Cognito authentication and IAM role permissions for the map. You embedded the map in a local web page, served it with npx serve, and interacted with the map.
We did not go deeply into route calculation to retrieve route details, adding your own data to maps, or trackers and geofencing. To go further, you'll want to delve deep into understanding the features you have use cases for. As always, practice building things to gain familiarity and proficiency with Amazon Location Service. Take advance of the AWS free tier.
Further Reading
AWS Documentation
AWS SDK for .NET Documentation
Videos
Amazon Location Service - Getting Started Videos
Blogs
Getting started with Amazon Location by Shu Sia Lukito
Enriching addresses with AWS Lambda and the Amazon Location Service by James Beswick
Amazon Location - Add Maps and Location Awareness to Your Applications by Jeff Barr
Resources to Integrate with Amazon Location Service by Drishti Arora and Panna Shetty
Add a map to your webpage with Amazon Location Service by Kyle Lee
Add Maps to your App in 3 Steps with AWS Amplify Geo powered by Amazon Location Service by Harshita Daddala
Add Interactive Maps in React using Amplify Geo, powered by Amazon Location Service