


Table of contents
- This episode: Amazon ElastiCache and distributed caching. In this Hello, Cloud blog series, we're covering the basics of AWS cloud services for newcomers who are .NET developers. If you love C# but are new to AWS, or to this particular service, this should give you a jumpstart.
- ElastiCache : What is it, and why use It?
- Our Hello, ElastiCache Project
- Where to Go From Here
- Further Reading
This episode: Amazon ElastiCache and distributed caching. In this Hello, Cloud blog series, we're covering the basics of AWS cloud services for newcomers who are .NET developers. If you love C# but are new to AWS, or to this particular service, this should give you a jumpstart.
In this post we'll introduce Amazon ElastiCache and use it in a "Hello, Cloud" .NET website. We'll do this step-by-step, making no assumptions other than familiarity with C# and Visual Studio. We're using Visual Studio 2022 and .NET 6.
ElastiCache : What is it, and why use It?
"There are only two hard things in Computer Science: cache invalidation and naming things." —Phil Karlton
Modern cloud applications can often benefit from a third data storage option in addition to in-memory variables and persistent storage: a distributed caching layer. You can make use of caching to boost appication performance, reduce pressure on your back-end database, or as the store for non-durable datasets. A caching layer provides a high-speed data store for efficient re-use of previously retrieved data. A distibuted cache uses multiple servers for high availabiliy.
Amazon ElastiCache is a distributed memory cache service. AWS describes it as "a fully managed, in-memory caching service supporting flexible, real-time use cases". Elasticache is fast, with sub-millisecond response times.
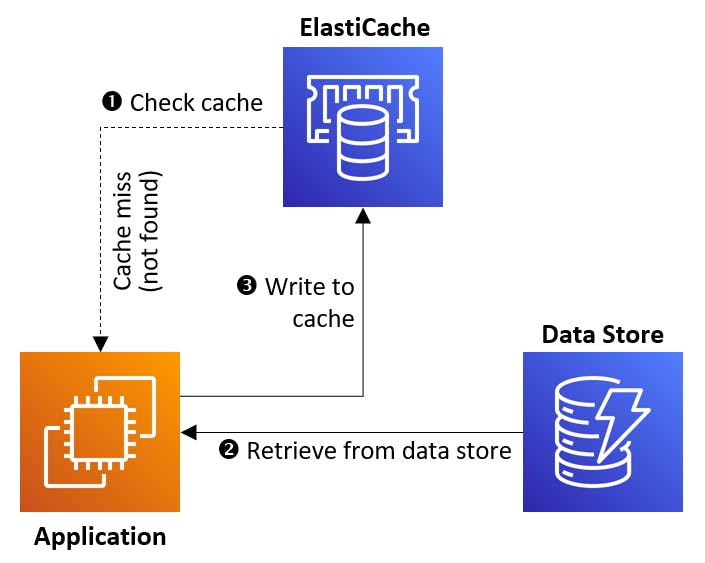
When using the cache in front of a data store, you can use the following pattern. An application wanting to retrieve data can first check the cache. if the desired data is not found (a cache miss), the data is fetched from the data store, but is also written to the cache to benefit future requests.
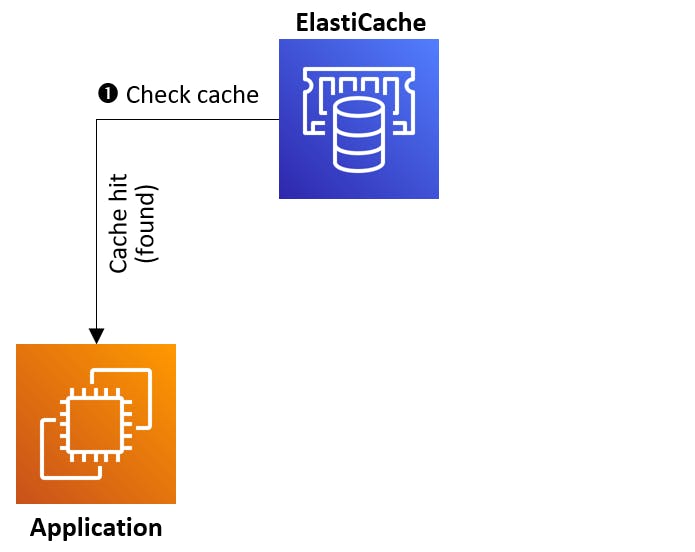
The next time the same data is needed, it's found in cache (a cache hit) if it hasn't expired. The trip to the data store is unnecessary, and data retrieval is faster.
However, front-ending a data store is not the only use for a cache. You can also use it as the primary store for some short-lived data where no persistent data store is needed. For example, you could capture votes for a survey that way, where only the results need to saved.
ElastiCache supports two engines, Redis and Memcached. Both are in-memory key-value stores that support a popular caching protocol. If your applications already use Redis or Memcached, that will make choosing easy. If not, see Comparing Memcached and Redis.
You don't need the AWS SDK to talk to your Redis ElastiCache clusters. You can use the StackExchange.Redis API. This means your cache code can stay the same across environments, even if some of them use Redis caches not hosted on AWS.
A limitation of ElastiCache clusters is that they can only be accessed by EC2 instances. That means you can't get to the cache when testing locally from your development machine. If you want to test your application locally, you'll need to code around this limitation. For local testing, you can either use a different Redis cache not hosted in ElastiCache, or use a mock for the cache.
With ElastiCache, you are charged hourly based on the number of nodes, node type, and pricing model you select. The AWS Free Tier allows new AWS customers to receive 750 hours of ElastiCache cache.t2.micro or cache.t3.micro node usage for free for up to 12 months. See the Pricing Page for details.
Our Hello, ElastiCache Project
Our project will create a handful of simple Razor pages for voting on a cuisine for a team dinner. Vote results will be captured in an ElastiCache Redis cluster.


One-time Setup
For any of the tutorials in the Hello, Cloud series you need the following:
- An AWS account, and an understanding of what is included in the AWS Free Tier.
- Microsoft Visual Studio 2022. If you're using an older version of Visual Studio you won't be able to use .NET 6. If you use a different IDE, you may have to find alternatives to some tutorial steps.
- AWS Toolkit for Visual Studio. You'll need to configure the toolkit to access your AWS account and create an IAM user. Your default AWS profile will be linked to this user when running programs from the command line.
Step 1: Create an ElastiCache Redis Cluster
In this step, you'll use the AWS consile to create an ElastiCache Cluster with the Redis engine.
Sign in to the AWS console. At top right, select the region you want to work in. You can check supported regions for [ElastiCache] on the Supported regions & endpoints page. I'm using us-west-2 (Oregon).
Navigate to ElastiCache.
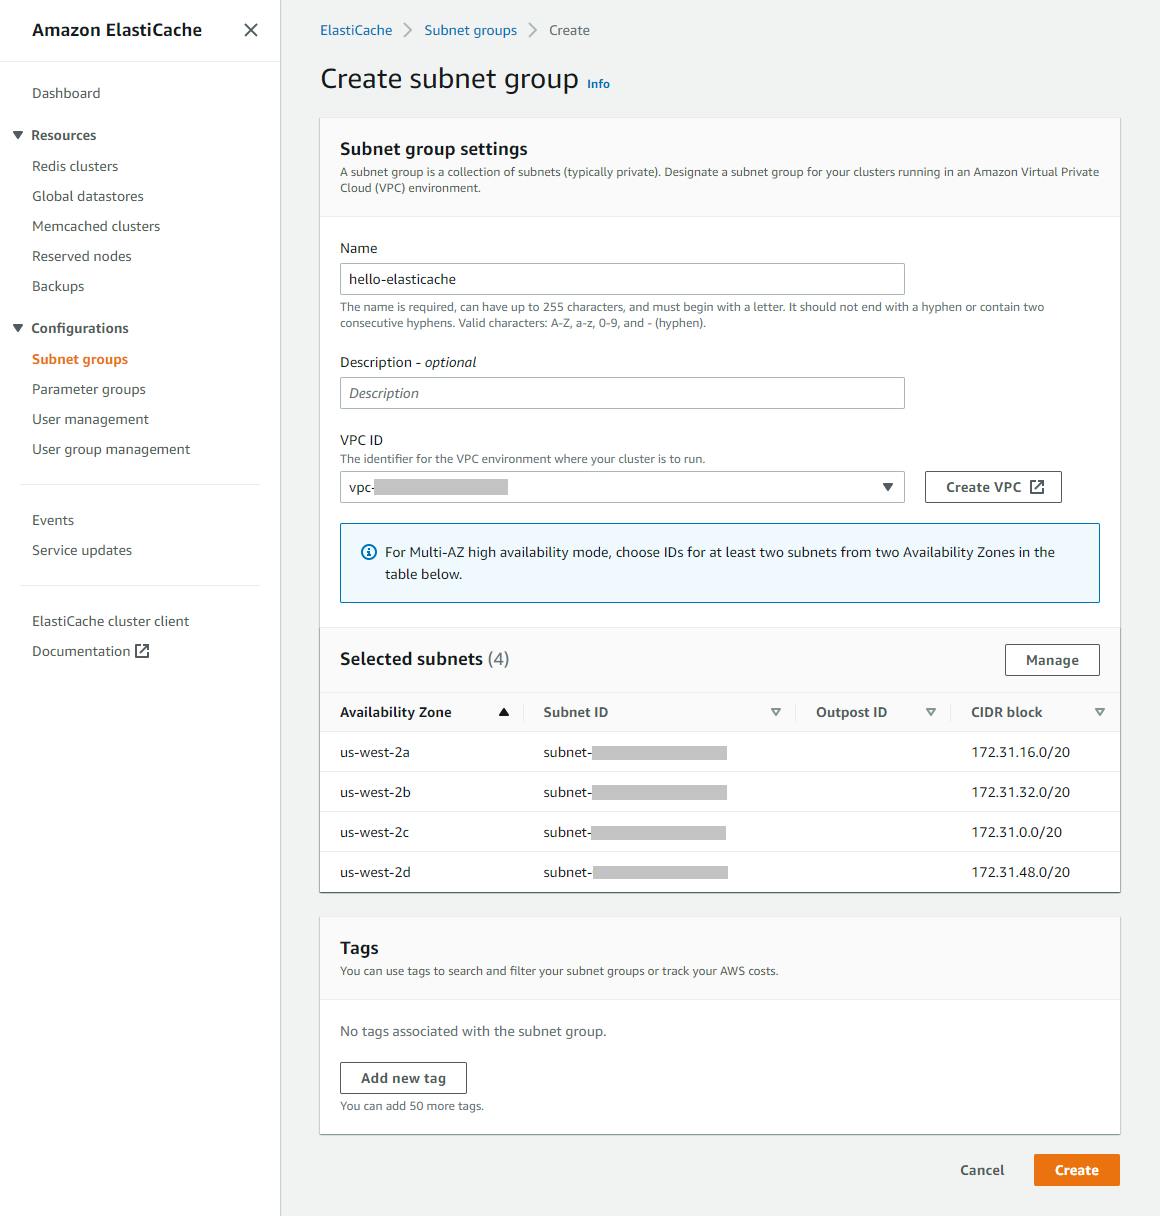
Create a subnet group:
A. On the left pane, select Subnet groups.
B. Click Create subnet group.
C. Name: hello-elasticache.
D. VPC ID: Select your default VPC.
E. Ensure you have multiple subnets listed across multiple availability zones.
F. Click Create.
Click Create cluster and make the following selections:
A. On the left pane, select Redis clusters.
B. Click Create Redis cluster.
C. Choose a cluster creation method: Configure and create a new cluster (default).
D. Cluster mode: Disabled (default).
E. Name: hello-elasticache (if name is in use, create a variation)
F. Location: AWS Cloud (default).
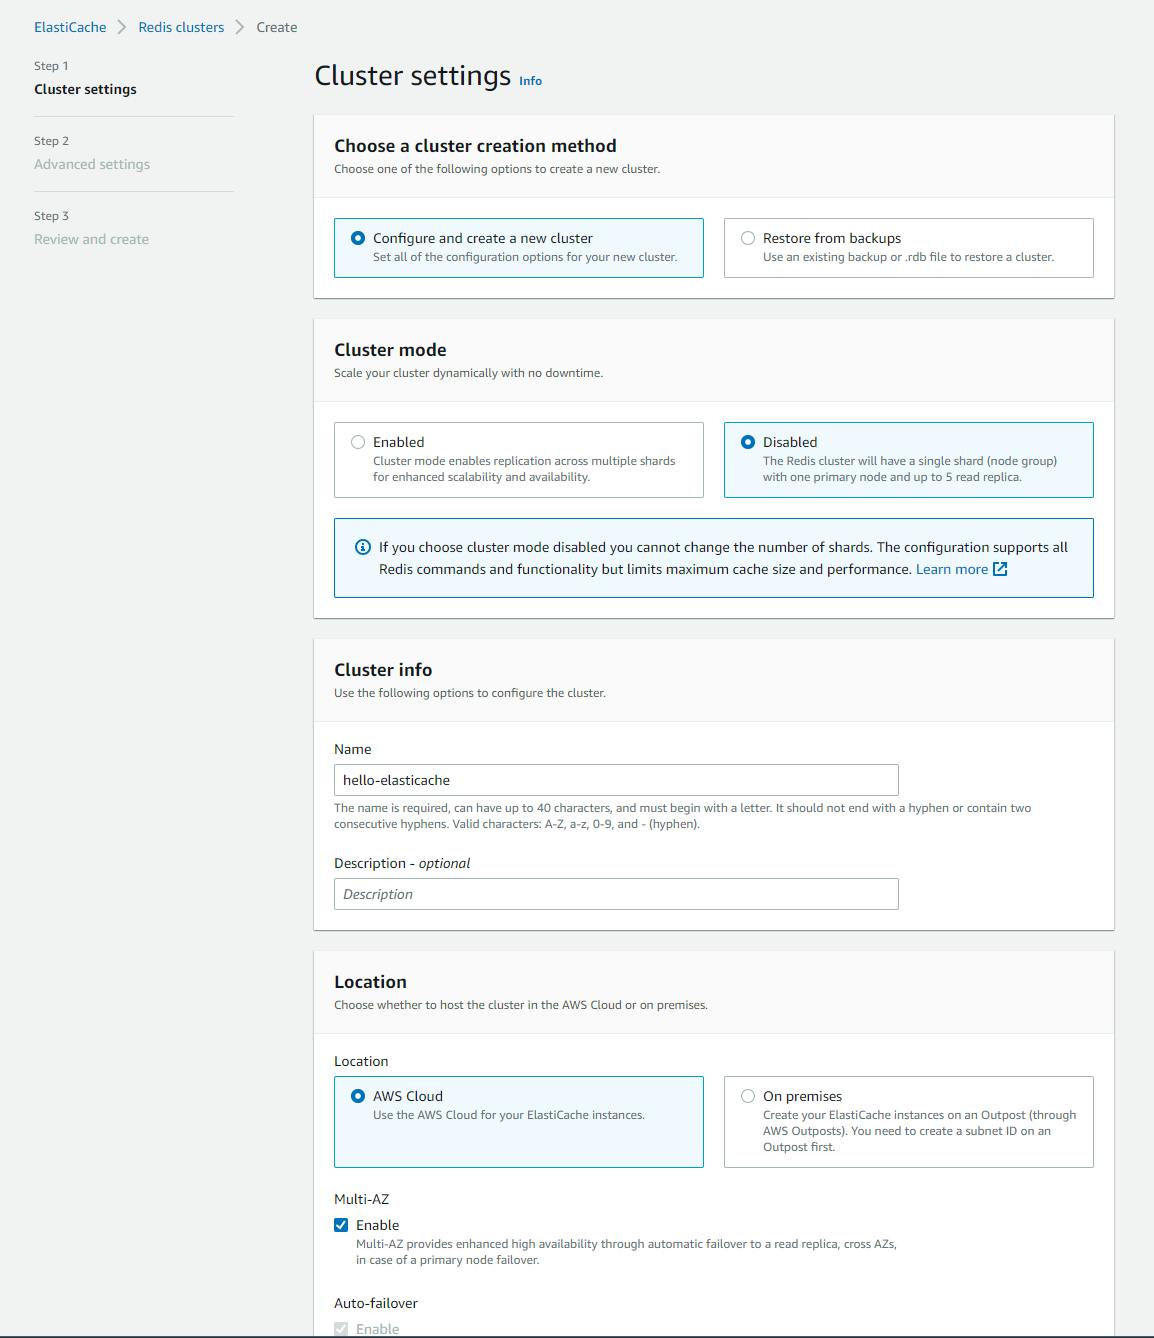
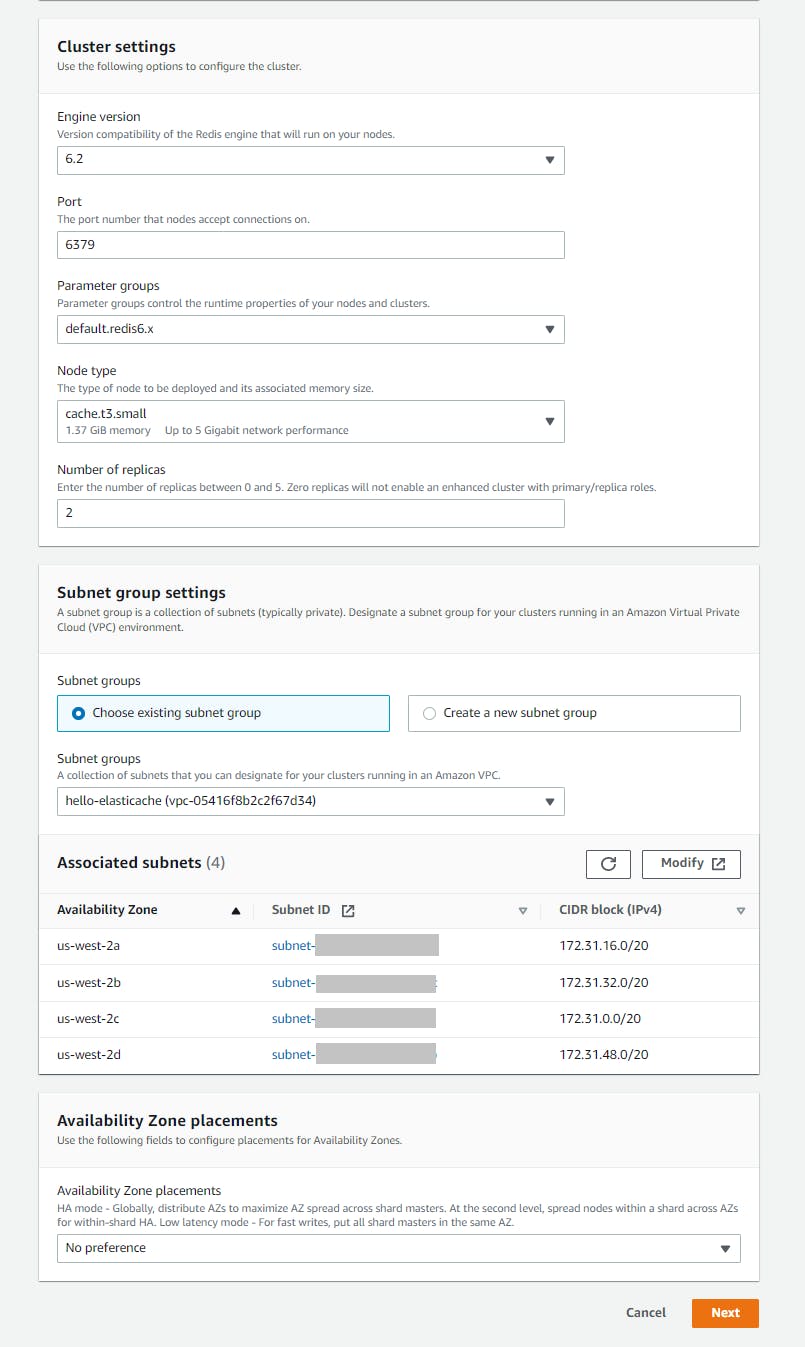
G. Engine version: latest choice (default).
H. Port: 6379 (default).
I. Node type: cache.t3.small.
J. Number of replicas: 2 (default).
K. Subnet groups: select the hello-elasticache subnet group you created earlier.
L. Click Next, Next, and Create.
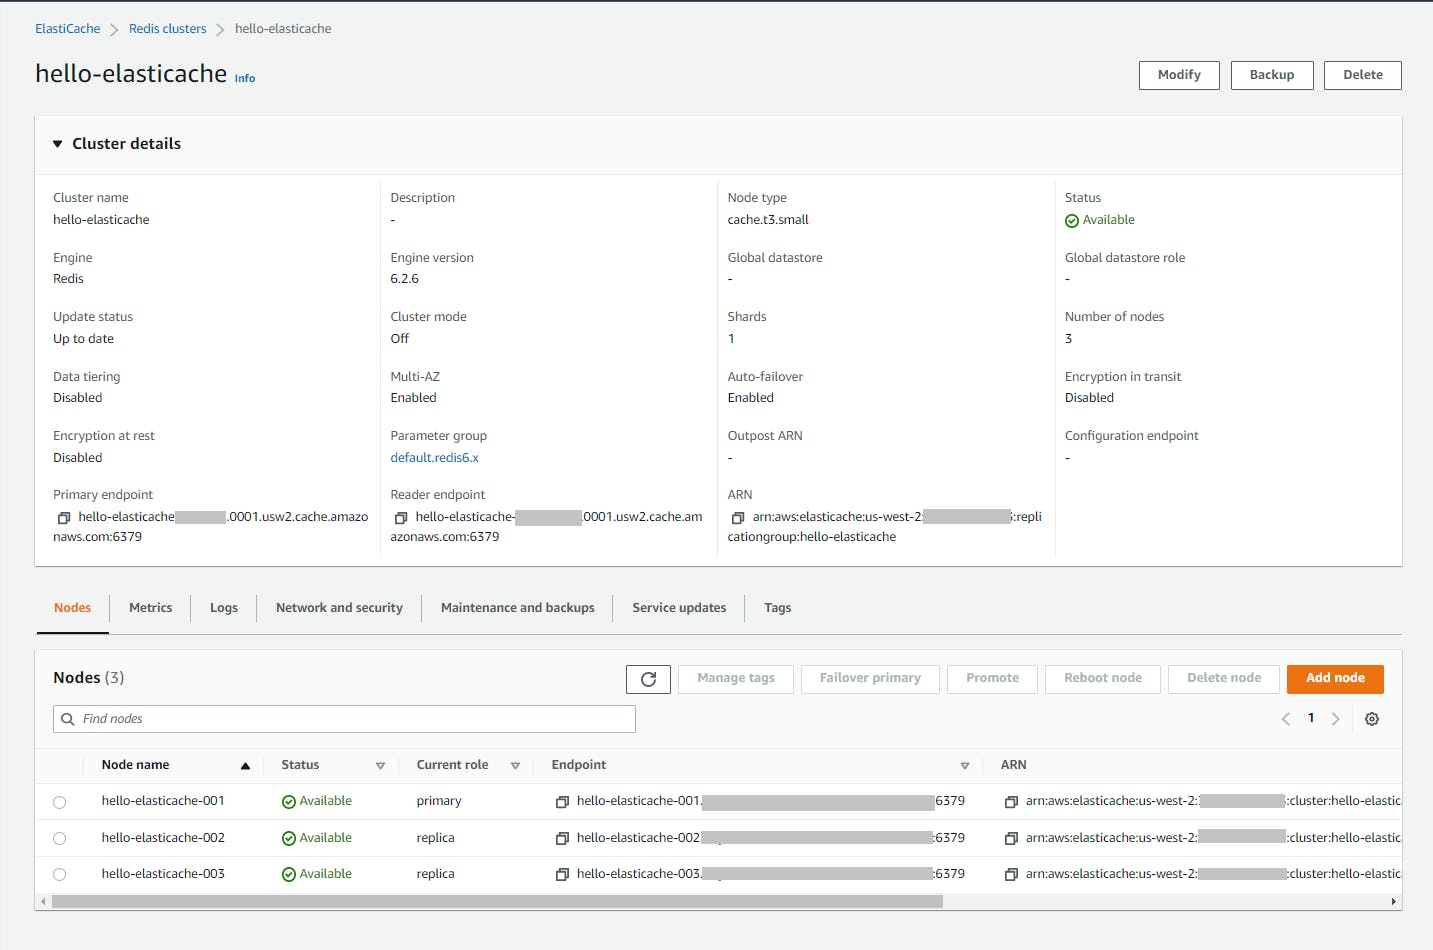
M. It may take a few minutes for the cluster to be created. When the cluster status shows Available, it is ready for use.
Get the cluster endpoints. Click the hello-elasticache cluster to views its detail. Record the Primary endpoint and Reader endpoint URLs.
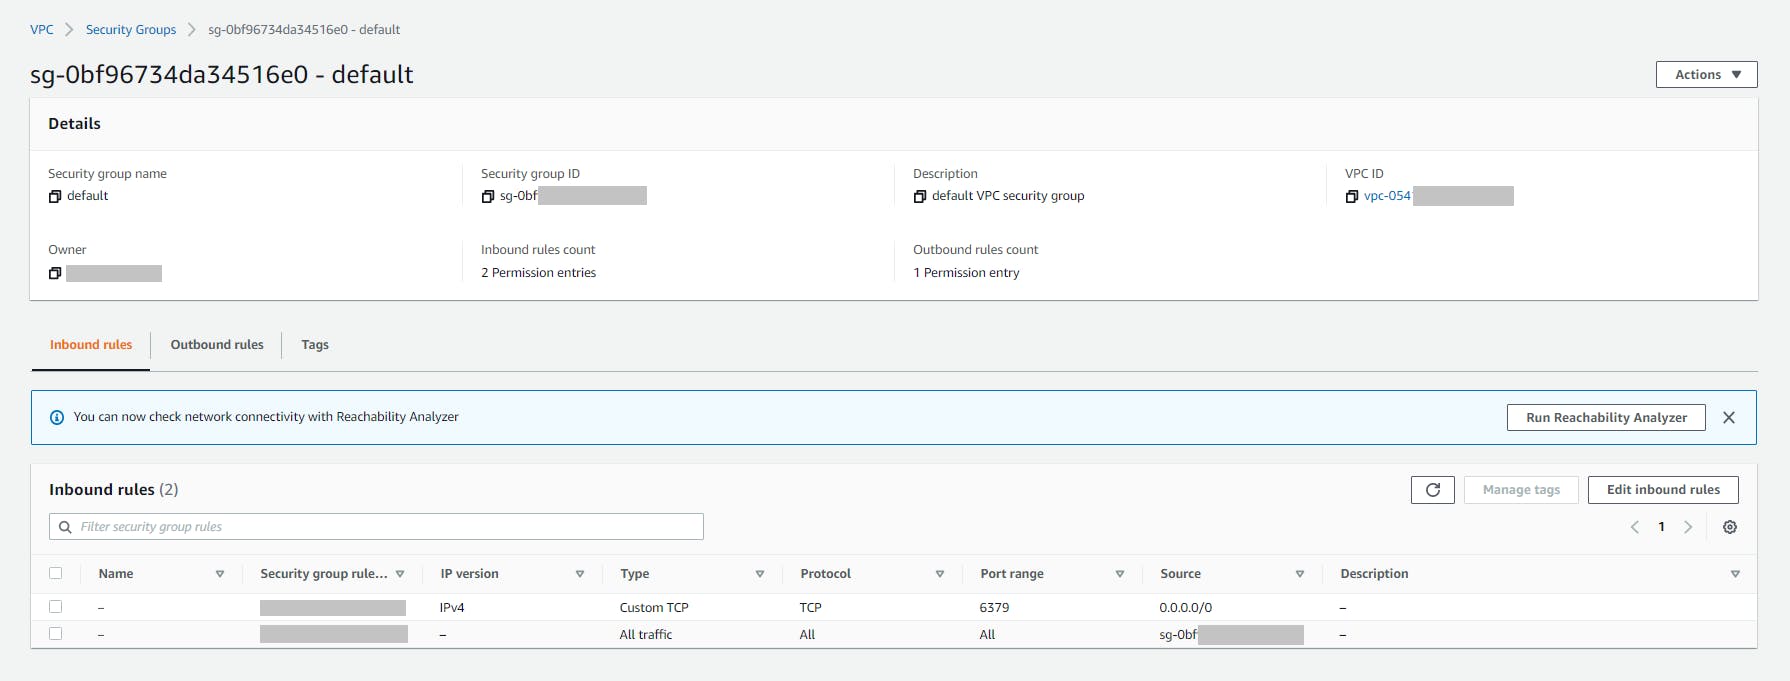
Add an inbound rule to your default VPC allowing port 6379:
A. Navigate to VPC > Security Groups.
B. Click on the security group for your default VPC, which should say default VPC security group in its Description.
C. On the Inbound rules tab, click Edit inbound rules.
D. and add an inbound rule to your default VPC permitting access over port 6379:
E. Add a rule for Type Custom TCP, port 6379, Source 0.0.0.0/0.
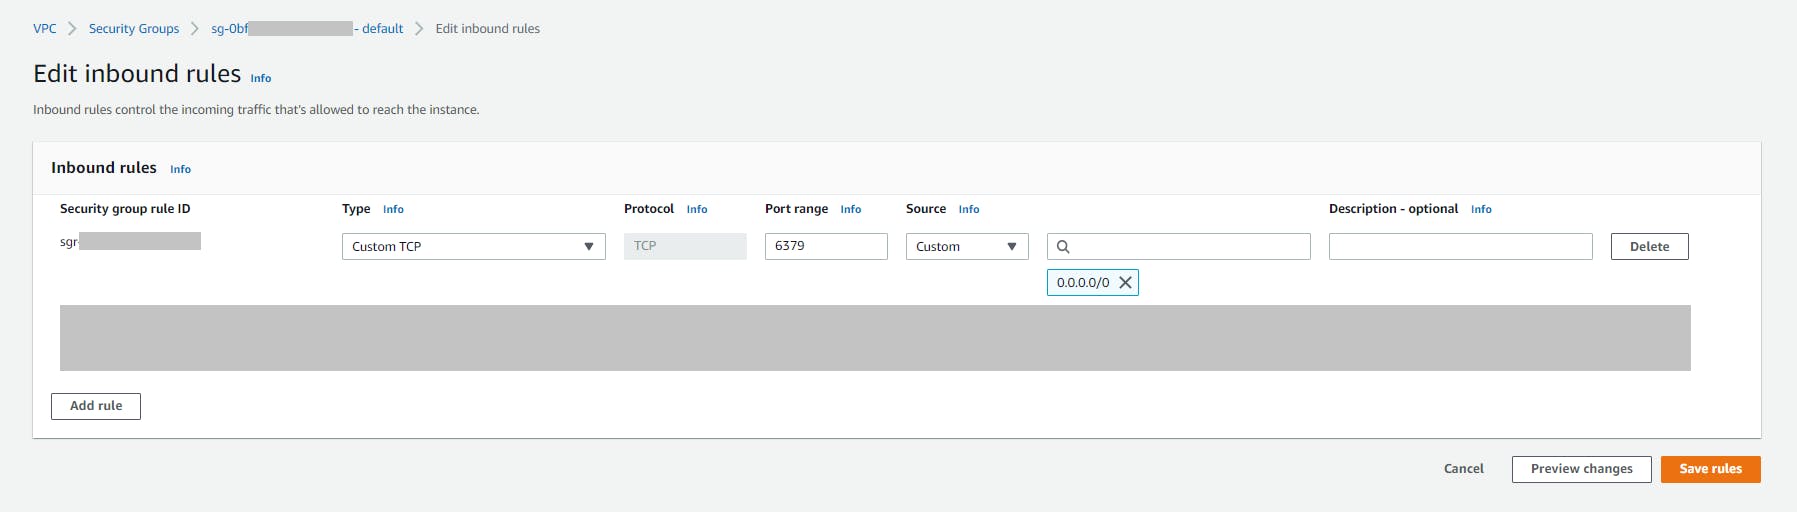
F. Click Save rules.
Step 2: Develop a Voting Web App
In this step, you'll create a web project with the dotnet new command, then write code to make it a voting app that uses ElastiCache to store votes. We'll have these Razor pages:
| Razor Page | Code-behind | Purpose |
| Index.cshtml | Index.cshtml.cs | Shows the question and links to vote |
| Vote.cshtml | Vote.cshtml.cs | Casts a vote |
| Votes.cshtml | Votes.cshtml.cs | Shows the voting results |
Open a command/terminal window and CD to a development folder.
Run the
dotnet newcommand below to create a new web project named hello-elasticache.dotnet new webapp -n hello-elasticache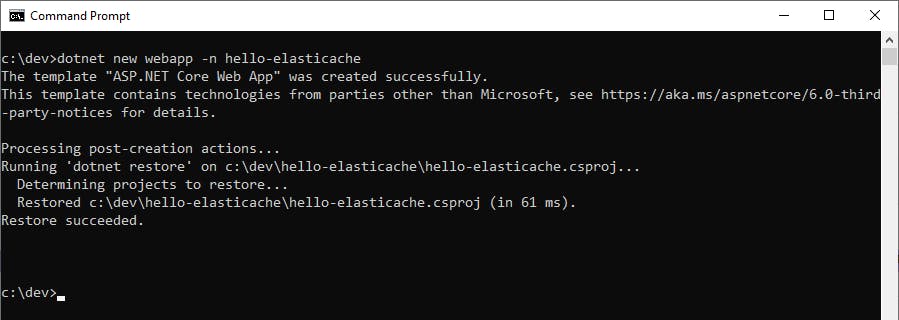
Open the
hello-elasticacheproject in Visual Studio.Add NuGet packages Microsoft.Extensions.Configuration.Json and StackExchange.Redis.
Update the code to make this a voting application:
A. Open
appsettings.jsonin the code editor, and replace with the code below at the end of this step. Replacehello-elasticache-primary-endpoint:6379with the primary endpoint you recorded in Step 1. Replacehello-elasticache-reader-endpoint:6379with the reader endpoint. When the code-behind pages need to access the Redis cache, they will retrieve these configuration endpoints.B. Open
Index.cshtmlin the code editor, and replace with the code below at the end of this step. This is a voting page that allows users to vote on a dinner choice by selecting a button. The vote links invoke the Vote page, specifying a cache key parameter.C. Open
Index.cshtml.csin the code editor, and replace with the code below at the end of this step. This is the landing page code-behind page. There's no code of interest here.D. In Solution Explorer, create
Vote.cshtmlby making a copy ofIndex.cshtmland renaming it Vote.cshtml. OpenVote.cshtmlin the code editor, and replace with the code below at the end of this step. This page casts a vote.E. Open
Vote.cshtml.csin the code editor, and replace with the code below at the end of this step. This is the voting code-behind page. In this and the voting results page, the cache is accessing using the StackExchange.Redis API. To access the cache, theOnGetAsyncmethod retrieves the primary and reader endpoints from appsettings.json and callsConnectionMultiplexor.Connect' to create a ConnectionMultiplexor namedRedis. CallingRedis.GetDatabasemethod gives us anIDatabaseinterface, which is what the code uses to store or retrieve cache values. To cast a vote,db.StringIncrementAsync` increments a string value by one, using the cuisine cache key that was passed as a query parameter. This method automatically creates the key if it doesn't already exist. This is how we remember votes that have been cast.F. Add a new Razor page named
Votes.cshtml. This page will show the voting results.G. Open
Votes.cshtmlin the code editor, and replace with the code below at the end of this step. The code retrieves the vote count for each cuisine from cache and stores it in its model, which the Razor page displays.H. Save all changes and ensure the project builds.
appsettings.json
{
  "Logging": {
    "LogLevel": {
      "Default": "Information",
      "Microsoft.AspNetCore": "Warning"
    }
  },
  "AllowedHosts": "*",
  "redis": {
    "primarysEndpoint": "hello-elasticache-primary-endpoint:6379",
    "readerEndpoint": "hello-elasticache-reader-endpoint:6379"
  }
}
Index.cshtml
@page
@model IndexModel
@{
    ViewData["Title"] = "Home page";
}

<div class="text-center">
    <h1 class="display-4">Welcome</h1>
    <p>Please vote for a dinner choice for our next in-person team meeting.</p>


    <div style="text-align: left">
        <p><b>Team Dinner - Vote for a cuisine</b></p>
            <ol type="A">
               <li><a href="/vote?id=cuisine-Barbecue">Barbecue</a></li>
               <li><a href="/vote?id=cuisine-Cajun">Cajun</a></li>
               <li><a href="/vote?id=cuisine-Italian">Italian</a></li>
               <li><a href="/vote?id=cuisine-Japanese">Japanese</a></li>
               <li><a href="/vote?id=cuisine-Mexican">Mexican</a></li>
               <li><a href="/vote?id=cuisine-Thai">Thai</a></li>
            </ol>
            <br/>
            <p><a href="Votes">See Votes</a></p>
        </div>
</div>
Index.cshtml.cs
using Microsoft.AspNetCore.Mvc;
using Microsoft.AspNetCore.Mvc.RazorPages;

namespace hello_elasticache.Pages;

public class IndexModel : PageModel
{
    private readonly ILogger<IndexModel> _logger;

    public IndexModel(ILogger<IndexModel> logger)
    {
        _logger = logger;
    }
}
Vote.cshtml
@page
@model VoteModel
@{
    ViewData["Title"] = "Vote";
}

<div class="text-center">@Model.Message</div>
<p>Thank you for voting.</p>
<br/>
<p><a href="Votes">See Votes</a></p>
Vote.cshtml.cs
using Microsoft.AspNetCore.Mvc;
using Microsoft.AspNetCore.Mvc.RazorPages;
using StackExchange.Redis;

namespace hello_elasticache.Pages;

public class VoteModel : PageModel
{
    private readonly ILogger<IndexModel> _logger;
    private ConnectionMultiplexer Redis = null!;
    private IDatabase db = null;
    private readonly IConfiguration _config;
    public string Message { get; set; } = "Please Wait";
    public long Count { get; set; } = 0;

    public VoteModel(IConfiguration config, ILogger<IndexModel> logger)
    {
        _config = config;
        _logger = logger;
    }

    public async Task OnGetAsync(string id)
    {
        try
        {
            var primaryEndpoint = _config["redis:primaryEndpoint"];
            var readerEndpoint = _config["redis:readerEndpoint"];
            Redis = ConnectionMultiplexer.Connect($"{primaryEndpoint},{readerEndpoint}");
            IDatabase db = Redis.GetDatabase();
            Count = await db.StringIncrementAsync(id, 1, CommandFlags.DemandMaster);
            Message = "Vote recorded";
        }
        catch(Exception ex)
        {
            Message = ex.ToString() + "<br/>" + ex.StackTrace;
        }
    }

}
Votes.cshtml
@page
@model VotesModel
@{
    ViewData["Title"] = "Voting Results";
}

<div class="text-center">
    <h1 class="display-4">Voting Results</h1>
    <p>Here are the voting results.</p>
    <p>@Model.Message</p>

    <div style="text-align: left">
        <p><b>Team Dinner - cuisine</b></p>
        <table>
            <thead>
                <tr><th>Cuisine</th><th>Votes</th></tr>
            </thead>
            <tbody>
                <tr><td>Barbecue</td><td>@Model.VotesBarbecue</td></tr>
                <tr><td>Cajun</td><td>@Model.VotesCajun</td></tr>
                <tr><td>Italian</td><td>@Model.VotesItalian</td></tr>
                <tr><td>Japanese</td><td>@Model.VotesJapanese</td></tr>
                <tr><td>Mexican</td><td>@Model.VotesMexican</td></tr>
                <tr><td>Thai</td><td>@Model.VotesThai</td></tr>
            </tbody>
        </table>
        <br/>
            <p><a href="Votes?reset=1">Reset votes</a></p>
    </div>
</div>
Votes.cshtml.cs
using Microsoft.AspNetCore.Mvc;
using Microsoft.AspNetCore.Mvc.RazorPages;
using StackExchange.Redis;
using System.Web;

namespace hello_elasticache.Pages;

public class VotesModel : PageModel
{
    private readonly ILogger<IndexModel> _logger;
    private ConnectionMultiplexer Redis = null!;
    private IDatabase db = null;
    private readonly IConfiguration _config;
    public string Message { get; set; } = null;

    public int VotesBarbecue { get; set; } = 0;
    public int VotesCajun { get; set; } = 0;
    public int VotesItalian { get; set; } = 0;
    public int VotesJapanese { get; set; } = 0;
    public int VotesMexican  { get; set; } = 0;
    public int VotesThai  { get; set; } = 0;


    public VotesModel(IConfiguration config, ILogger<IndexModel> logger)
    {
        _config = config;
        _logger = logger;
    }

    public async Task OnGetAsync()
    {
        try
        {
            var primaryEndpoint = _config["redis:primaryEndpoint"];
            var readerEndpoint = _config["redis:readerEndpoint"];
            Redis = ConnectionMultiplexer.Connect($"{primaryEndpoint},{readerEndpoint}");
            IDatabase db = Redis.GetDatabase();

            if (Request != null && Request.Query != null && Request.Query.ContainsKey("reset"))
            {
                await db.StringSetAsync("cuisine-Barbecue", 0);
                await db.StringSetAsync("cuisine-Cajun", 0);
                await db.StringSetAsync("cuisine-Italian", 0);
                await db.StringSetAsync("cuisine-Japanese", 0);
                await db.StringSetAsync("cuisine-Mexican", 0);
                await db.StringSetAsync("cuisine-Thai", 0);
                Message = "Votes have been reset";
            }

            VotesBarbecue = (int)(await db.StringGetAsync("cuisine-Barbecue"));
            VotesCajun = (int)(await db.StringGetAsync("cuisine-Cajun"));
            VotesItalian = (int)(await db.StringGetAsync("cuisine-Italian"));
            VotesJapanese = (int)(await db.StringGetAsync("cuisine-Japanese"));
            VotesMexican = (int)(await db.StringGetAsync("cuisine-Mexican"));
            VotesThai = (int)(await db.StringGetAsync("cuisine-Thai"));
        }
        catch (Exception ex)
        {
            Message = ex.ToString() + "<br/>" + ex.StackTrace;
        }
    }
}
Step 3: Publish to AWS Elastic Baanstalk
In this step, you will deploy your Razor page voting app to AWS Elastic Beanstalk from Visual Studio. Since you can't access ElastiCache from your local machine, we'll need to test it in the cloud.
In Solution Explorer, right click the
hello-elasticacheproject and select Publish to AWS.Select Publish to New Target and ASP.NET Core App to AWS Elastic Beanstalk on Linux.
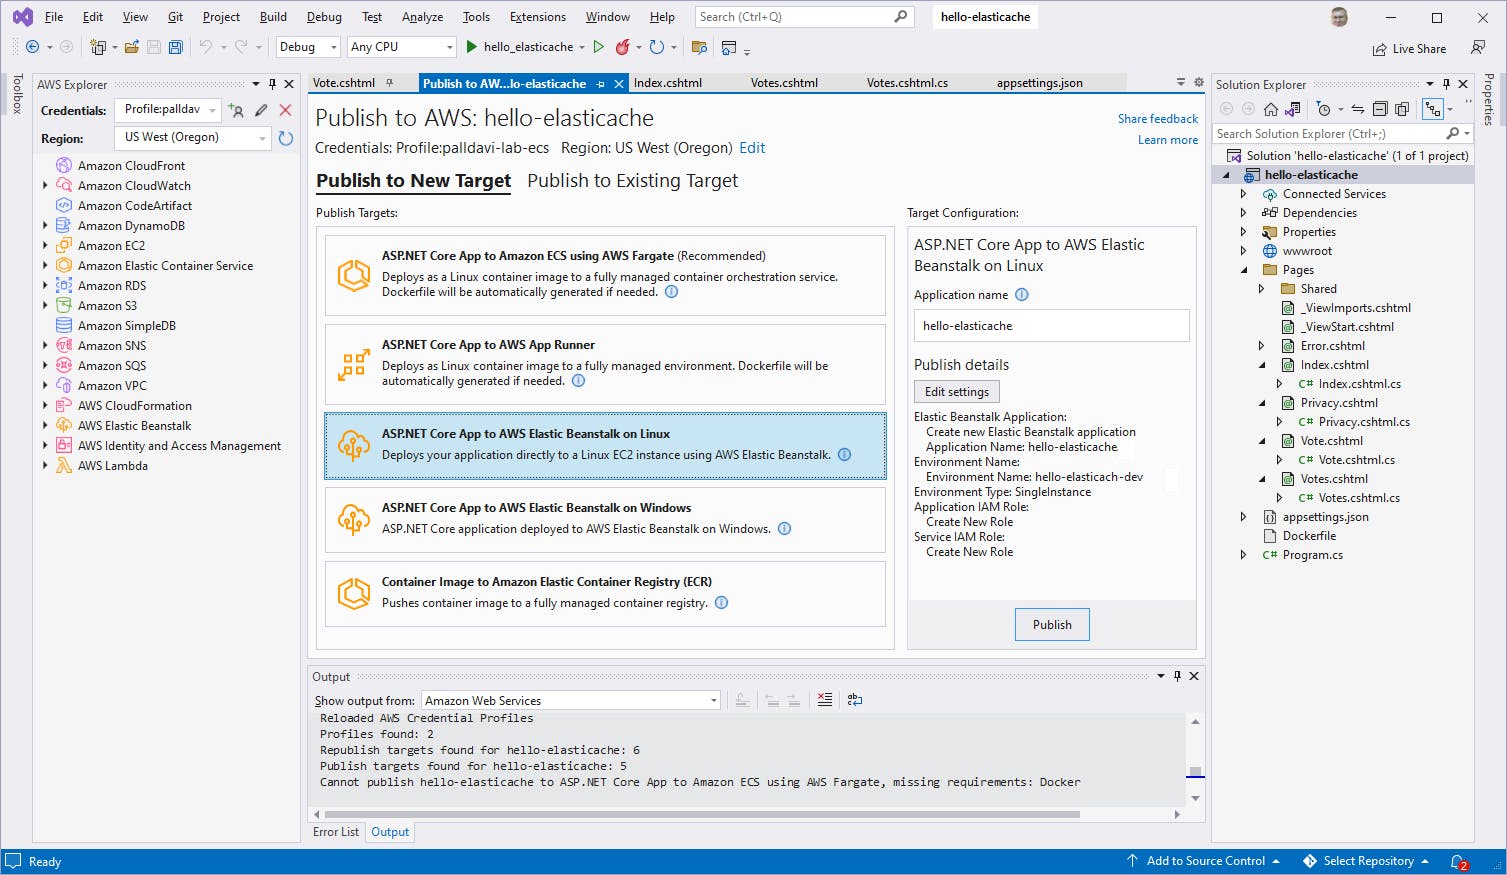
Keep all defaults, and click Publish.
Wait for the Publish action to complete.
Copy the details at right, and note the endpoint address of the published web application.
Step 4: Run the Program and Test ElastiCache
Now it's time to run our .NET code and see ElastiCache work.
In a browser, navigate to your web application's endpoint URL you copied in the previous step.
You see a welcome page, with a question and some choices.
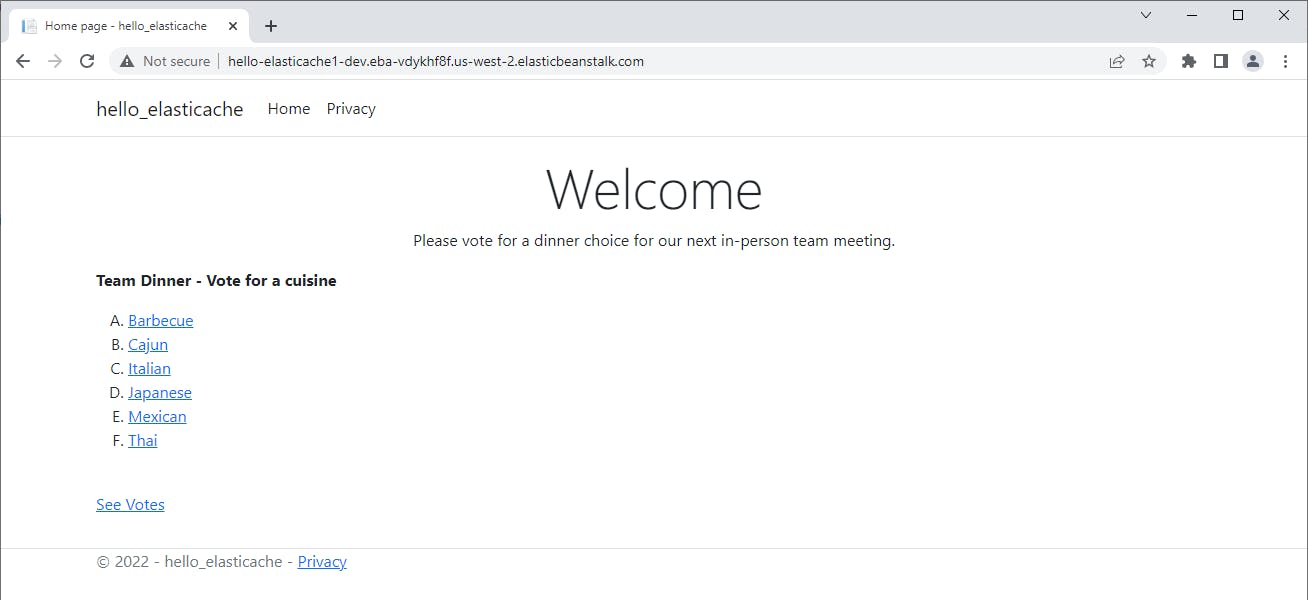
Click on one of the choices, such as Italian, which takes you to the vote page, with the cuisine cache key in a query parameter:
http://hello-elasticache.....elasticbeanstalk.com/vote?id=cuisine-Italian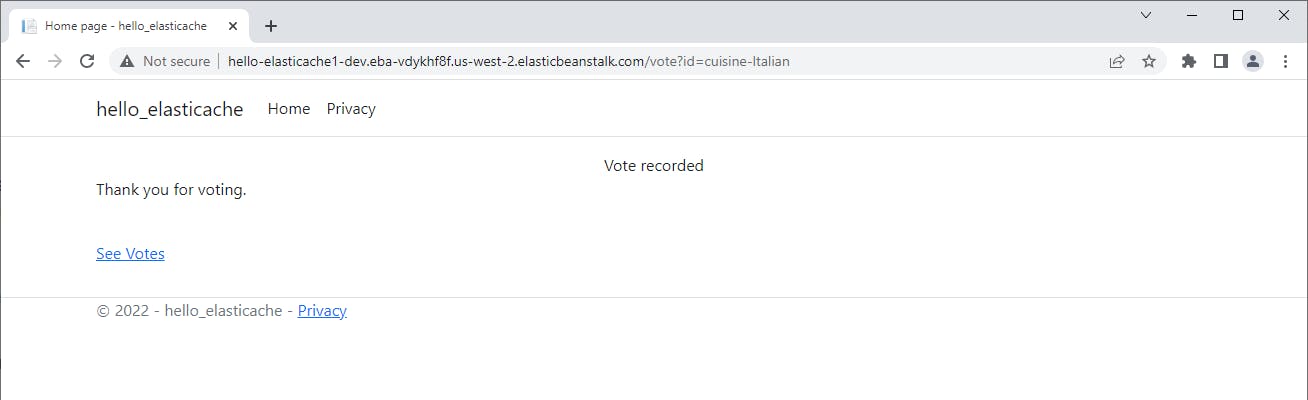
Click See Votes, which will take you to the votes page. You see the vote you cast, confirming that the vote was stored in cache and was retrieved successfully.
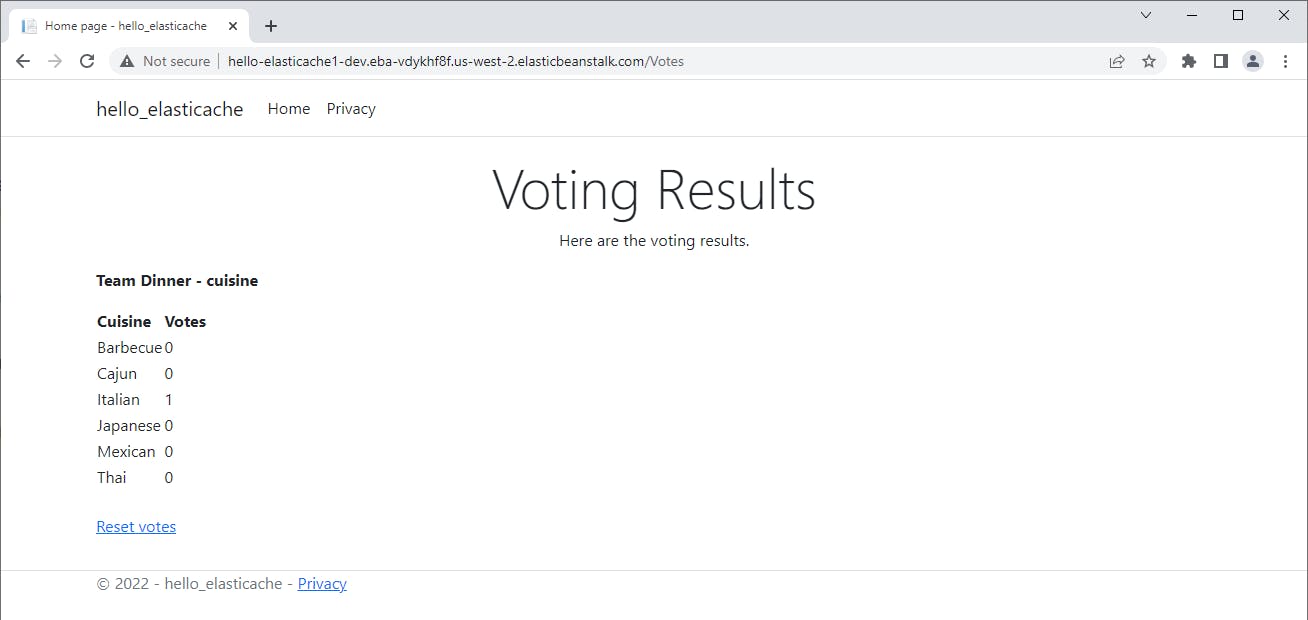
Return to the original page and cast more votes.
Click See Votes to see the results, confirming that the cache has captured all the votes.

Congratulations! You've used ElastiCache to store and retrieve values from .NET code using the StackExchange Redis API.
Step 5: Shut it Down
When you're finished with the tutorial, delete the AWS resources. You don't want to be charged for something you're not using.
Delete the Elastic Beanstalk deployment:
A. Open a command window, and navigate to the project folder.
B. Delete the Publish to AWS deployment with this command:
dotnet aws delete-deployment hello-elasticache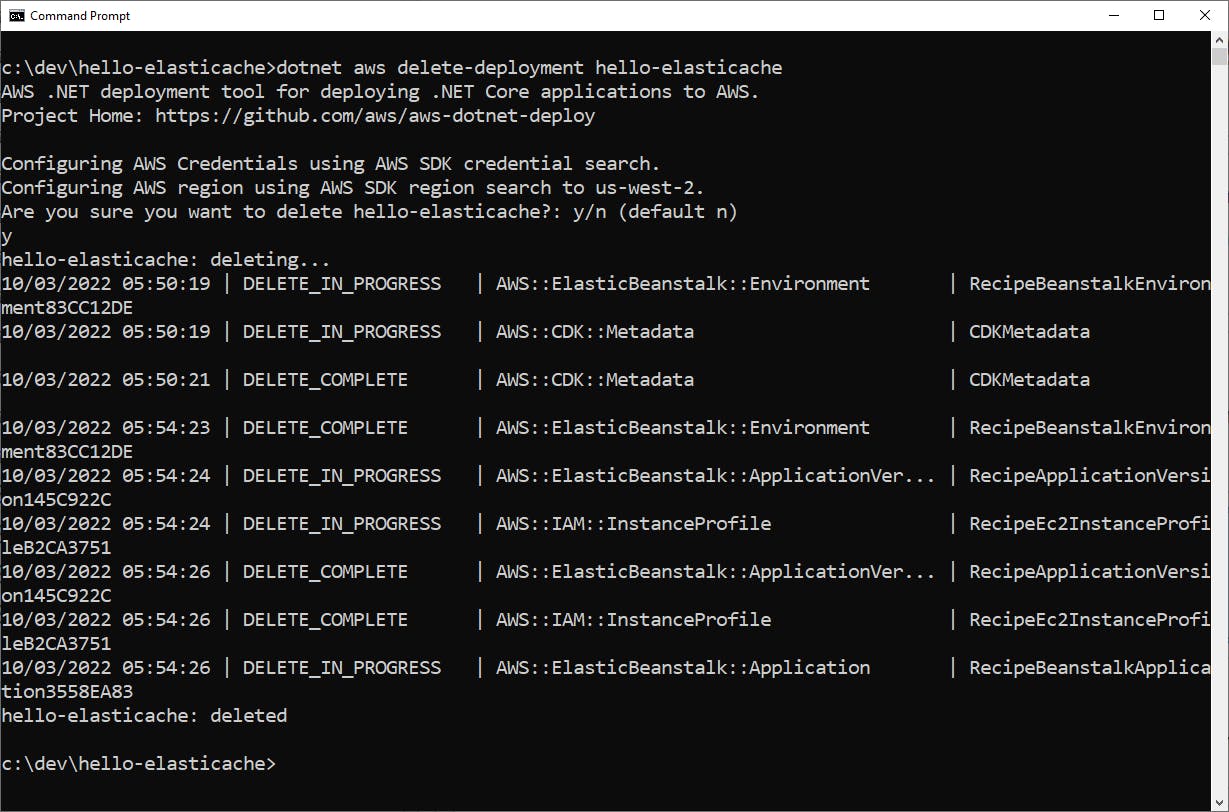
Delete the ElastiCache cluster:
A. In the AWS console, navigate to ElastiCache > Redis clusters.
B. Select your
hello-elasticachecache cluster.C. Select Delete from the Actions dropdown, and confirm.

Where to Go From Here
Caching makes your web applications faster and more efficient, and relieves database pressure. Amazon ElastiCache is AWS's fully managed, in-memory caching service that you can use with Redis or Memcached engines.
In this tutorial, you learned the basics of ElastiCache for Redis and wrote a simple .NET voting application that stored vote counts and retrieved them. You used the StackExchange Redis API to access the cache, just as you typically would any Redis cache.
This tutorial did not cover the Memcached engine, and only lightly explored Redis. To go further, work with ElastiCache in a real use case, learn Redis well, and review the resources linked below.
Further Reading
AWS Documentation
Overview of managing access permissions to your ElastiCache resources
Performance at Scale with Amazon Elasticache
Videos
How to add a Caching Layer for .NET Applications with Amazon ElastiCache for Redis by Sriwantha Attanahayake
How to effectively use Redis Cache in .NET Core (Framework, Standard)
Blogs
ElastiCache as an ASP.NET Session Store by Brian Beach