


Table of contents
- This episode: Amazon API Gateway. In this Hello, Cloud blog series, we're covering the basics of AWS cloud services for newcomers who are .NET developers. If you love C# but are new to AWS, or to this particular service, this should give you a jumpstart.
- Amazon API Gateway : What is it, and why use It?
- Our Hello, API Gateway Project
- One-time Setup
- Step 1: Create AWS Artifacts Create an S3 Bucket
- Step 2: Create the MenuPut Lambda Function
- Step 3: Create the MenuGet Lambda Function
- Step 4: Create API Gateway API and the PUT method
- Step 5: Create API Gateway GET method
- Step 6: Extend the PUT API method to support a REST path parameter
- Step 7: Extend the GET API method to support a REST path parameter
- Step 8: Deploy the API
- Step 9: Delete AWS Artifacts
- Where to Go From Here
- Further Reading
This episode: Amazon API Gateway. In this Hello, Cloud blog series, we're covering the basics of AWS cloud services for newcomers who are .NET developers. If you love C# but are new to AWS, or to this particular service, this should give you a jumpstart.
In this post we'll introduce API Gateway and use it to create a "Hello, Cloud" .NET API to store and retrieve restaurant menus. We'll do this step-by-step, making no assumptions other than familiarity with C# and Visual Studio. We're using Visual Studio 2022 and .NET 6.
Amazon API Gateway : What is it, and why use It?
"Anyone can dream up great ideas, but an idea is nothing until it's realized, be it as a website, a physical product, an app, or a user interface." —Jens Martin Skibsted
The importance of APIs continues to rise, in concert with worldwide demand for more integration and automation. APIs are becoming a widespread expectation. Some companies' entire product lines are APIs, such as Stripe or Twilio. APIs put your products and services in reach of others, and enable you to use the products and services of others.
The "API Gateway" design pattern provides a single entry point that clients can use to talk to your services, and bears some similarities to the Facade pattern. Think of it as the front door to your business logic, functionality, and data. This pattern is particularly useful for microservices, where the facade of an API Gateway can cater to client needs. Different clients might require varying protocols, API versions, authentication, orchestration, or transient fault retries. An API Gateway can provide these features, and it often makes sense to handle them there rather than implement them in each individual microservice.
Amazon API Gateway (hereafter "API Gateway") is the API Gateway design pattern as a service. AWS describes it as "a fully managed service that makes it easy for developers to create, publish, maintain, monitor, and secure APIs at any scale". API Gateway allows you to build HTTP APIs, RESTful APIs, and Websocket APIs (useful for real-time chat and streaming). With API Gateway providing your public API endpoints, your microservices and their supporting resources can stay private.
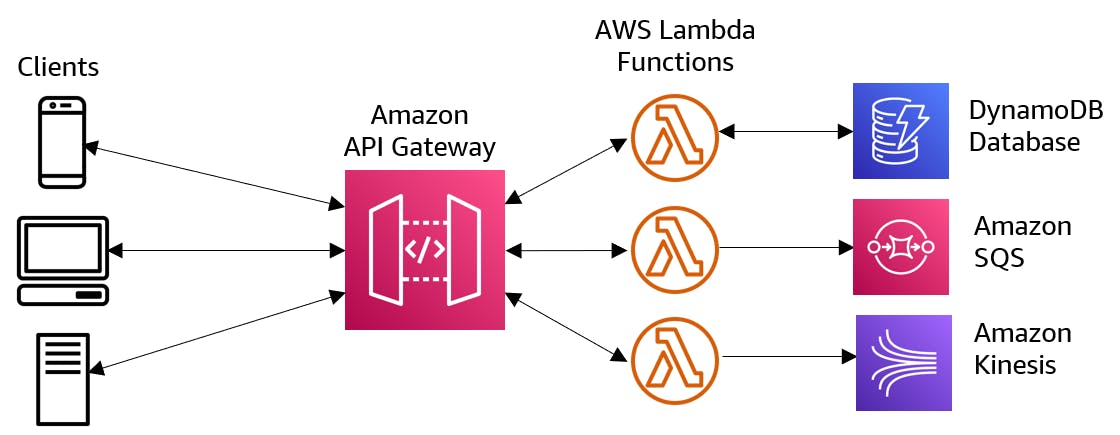
Features of API Gateway include multiple options for authentication, canary release deployments, logging to AWS CloudTrail and Amazon CloudWatch, CloudFormation template support, custom domain names, and integration with AWS Web Application Firewall and AWS X-Ray. You can access API Gateway via the AWS management console, the AWS SDK, the AWS CLI, and AWS Tools for Windows PowerShell. API Gateway integrates particularly well with AWS Lambda functions, which will be the focus of our tutorial.
Amazon API Gateway is priced per millions of requests per month and rates vary by region. The AWS Free Tier provides 1 million free API calls per month for 12 months.
Our Hello, API Gateway Project
We will create a simple API for storing and retrieving restaurant menu data. We will create 2 AWS Lambda functions, one for storing menu data and one for retrieving it. Menu data will be stored in and retrieved from S3. Then, we'll create a REST API for storing and retrieving restaurant menus that integrates to the AWS Lambda functions.
The API we'll create has these methods. and will be backed by 2 Lambda functions, one to store menu JSON data in S3 and one to retrieve menu data from S3.
| Path | Method | Description | Example |
| / | GET | retrieve default menu | GET / |
| / | PUT | store default menu | PUT / |
| /name | GET | retrieve named menu | GET /breakfast |
| /name | PUT | store named menu | PUT /breakfast |
One-time Setup
For any of the tutorials in the Hello, Cloud series you need the following:
- An AWS account, and an understanding of what is included in the AWS Free Tier.
- Microsoft Visual Studio 2022. If you're using an older version of Visual Studio you won't be able to use .NET 6. If you use a different IDE, you may have to find alternatives to some tutorial steps.
- AWS Toolkit for Visual Studio. You'll need to configure the toolkit to access your AWS account and create an IAM user. Your default AWS profile will be linked to this user when running programs from the command line.
Step 1: Create AWS Artifacts Create an S3 Bucket
In this step, you'll create some artifacts in the AWS console, including an S3 bucket for storage, two AWS Lambda functions, and an IAM role allowing the Lambda functions to access the S3 bucket.
Sign in to the AWS management console. At the top right, select a region you want to work in that supports Amazon API Gateway and AWS Lambda. We're using us-west-1 (N. California). Set the same region consistently as you go through these steps.
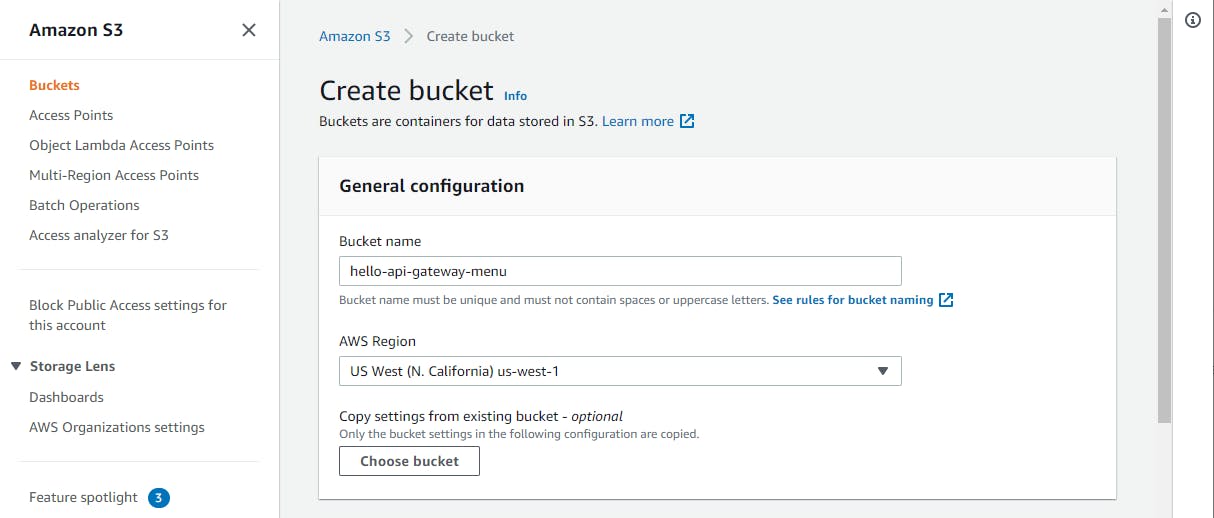
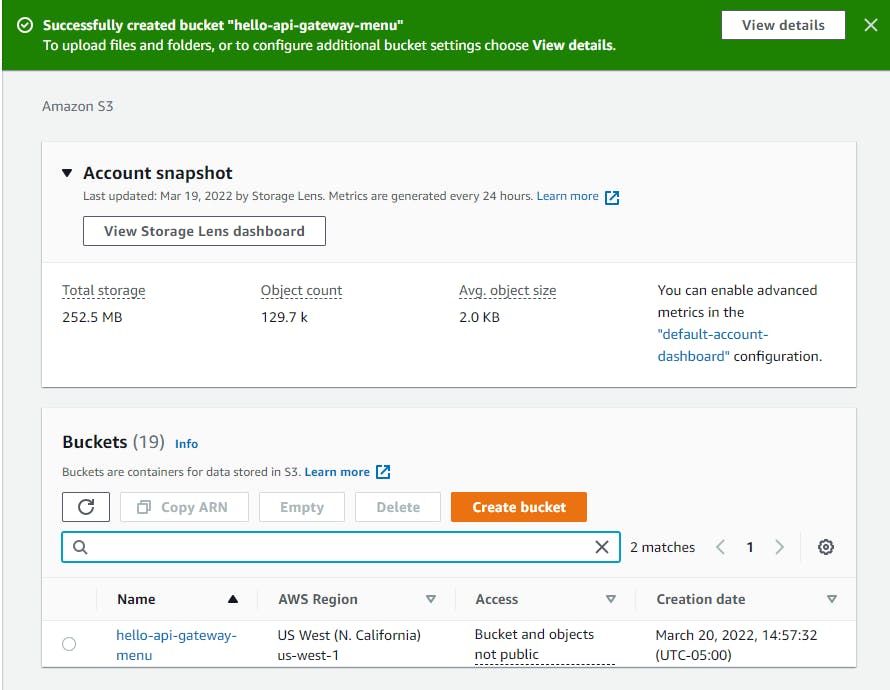
Create an S3 bucket with a unique name for menu storage. We named ours hello-api-gateway-menu.
A. Navigate to Amazon S3. You can enter s3 in the search bar.
B. Click Buckets on the left panel.
C. Click the Create bucket button at right.
D. Enter a unique bucket name to store your menu data.
E. Set the desired region.
F. At the bottom of the page, click Create bucket. After a moment, you should see your new bucket listed under Buckets.
G. Click on the bucket name to view its detail. On the Properties tab, find and record the Amazon Resource Name (ARN) of the bucket. Ours is
arn:aws:s3:::hello-api-gateway-menu.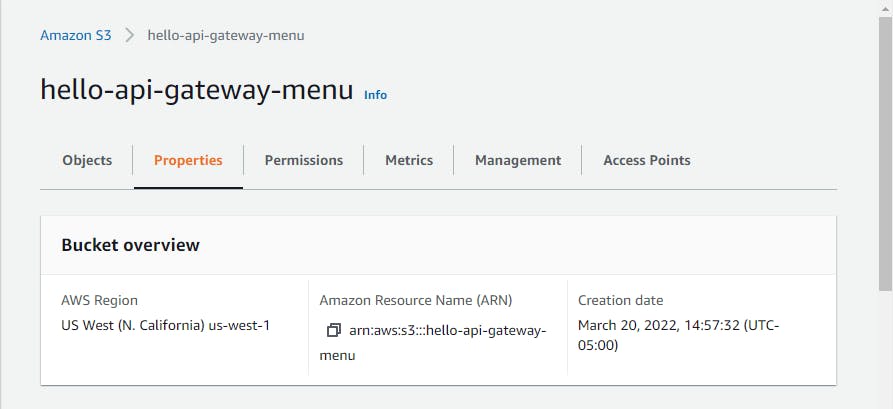
Create the MenuPut Lambda function. This function will store menu data.
A. Navigate to AWS Lambda. You can enter lambda in the search box.
B. On the left panel, click Functions.
C. Click Create Function.
D. Select Author from Scratch, since this will be a simple, self-contained function.
E. For Function name, enter MenuPut.
F. Under Runtime, select .NET 6 (C#/PowerShell).
G. Expand the Change default execution role section and select Create a new role with basic Lambda permissions. Look below for "Lambda will create an execution role named [role]", and record the execution role name. Ours is
MenuPut-role-vrb0zu5u.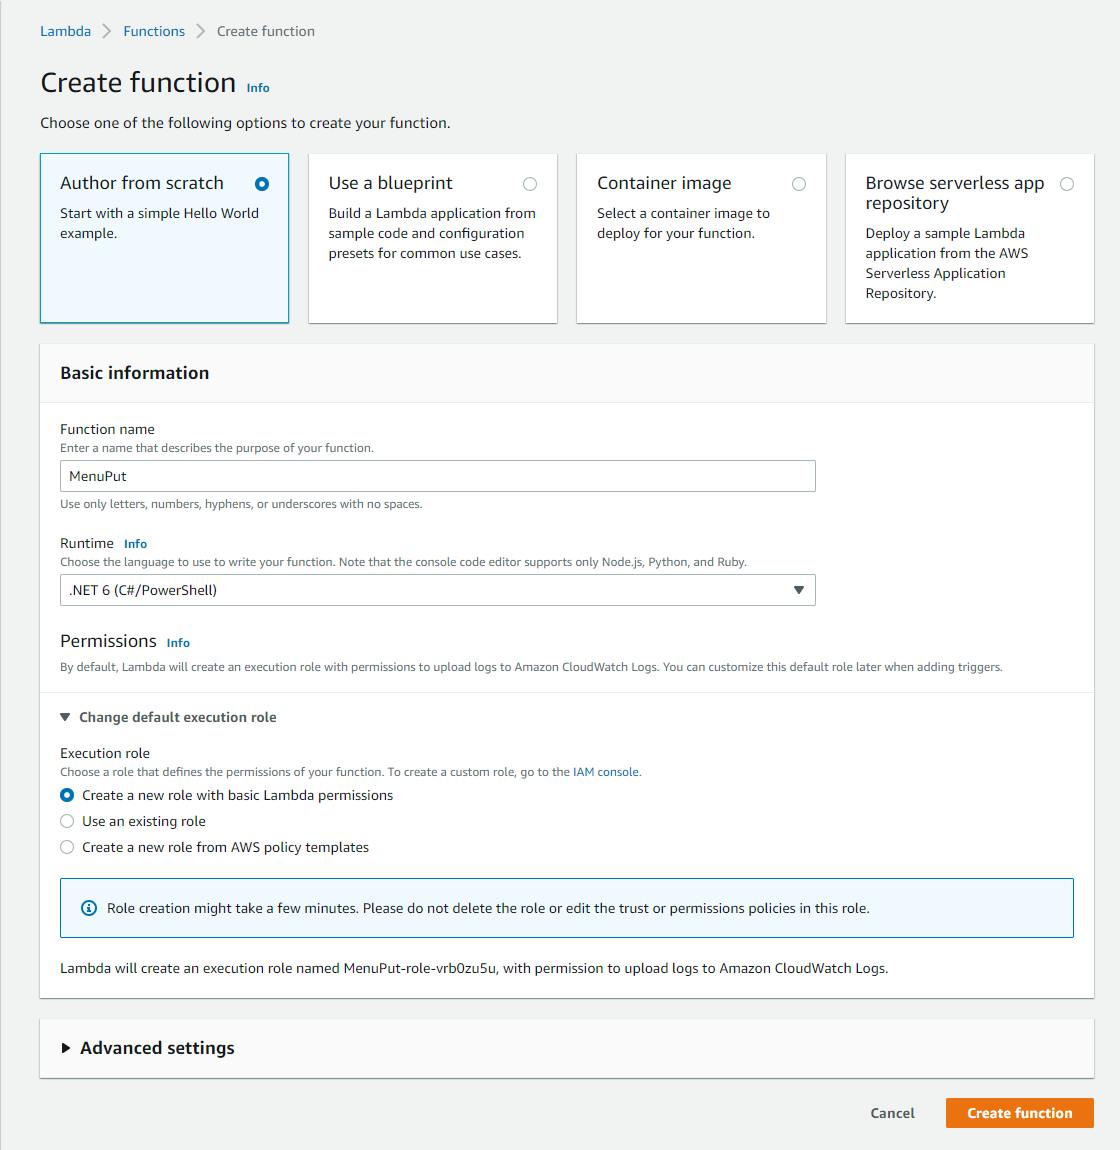
H. Click Create Function and wait for the function to be created.

Create the MenuGet Lambda function. This function will retrieve the menu.
A. Navigate back to AWS Lambda > Functions.
B. Click Create Function.
C. Select Author from Scratch.
D. For Function name, enter MenuGet.
E. Under Runtime, select .NET 6 (C#/PowerShell).
F. Expand the Change default execution role section and select Use an existing role. For *Existing role, enter the role name you recorded in #3-G above.
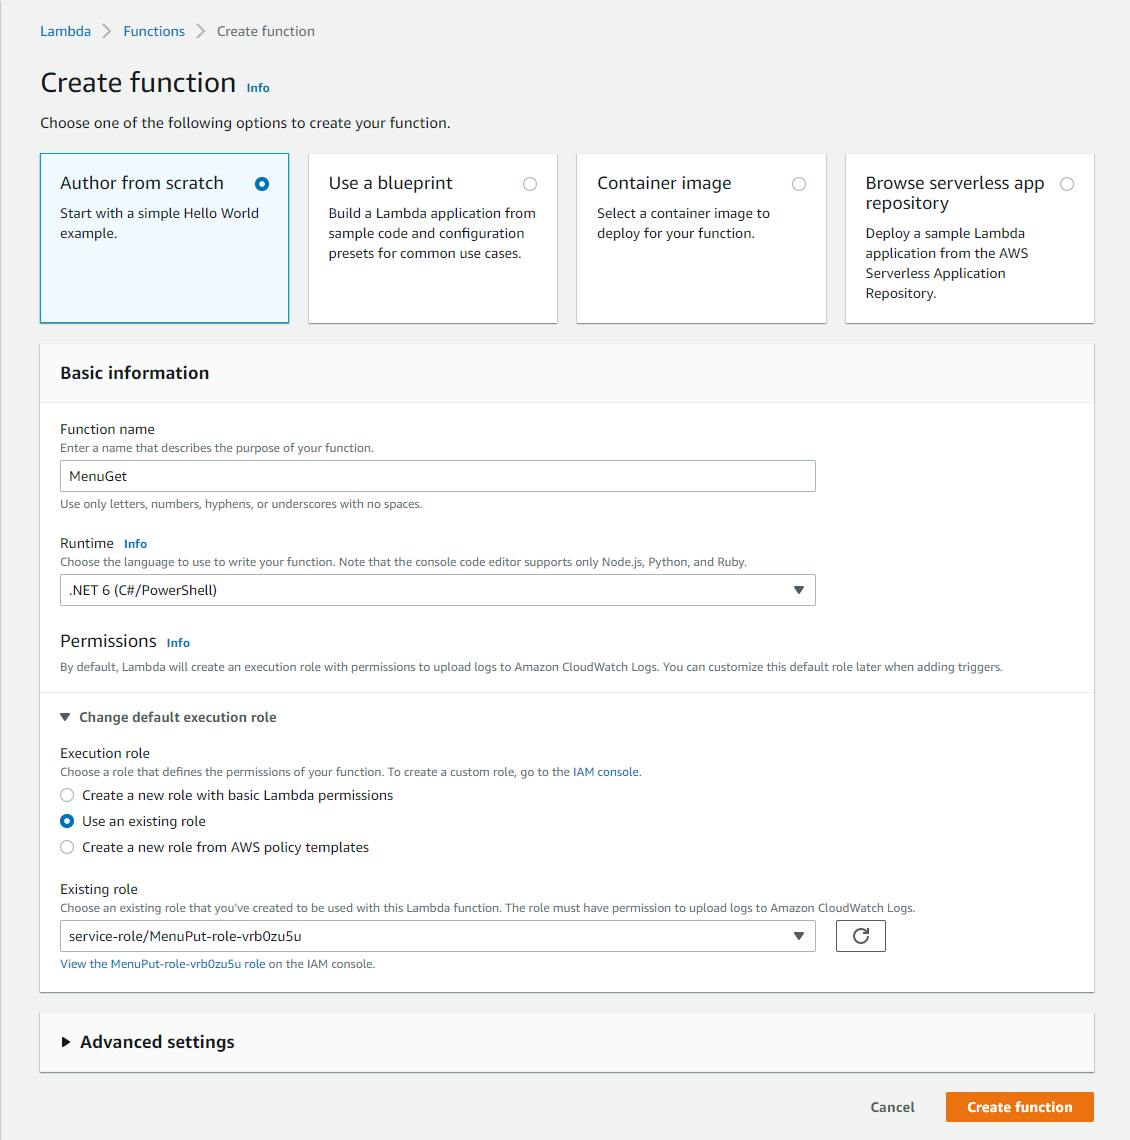
G. Click Create Function and wait for the function to be created.
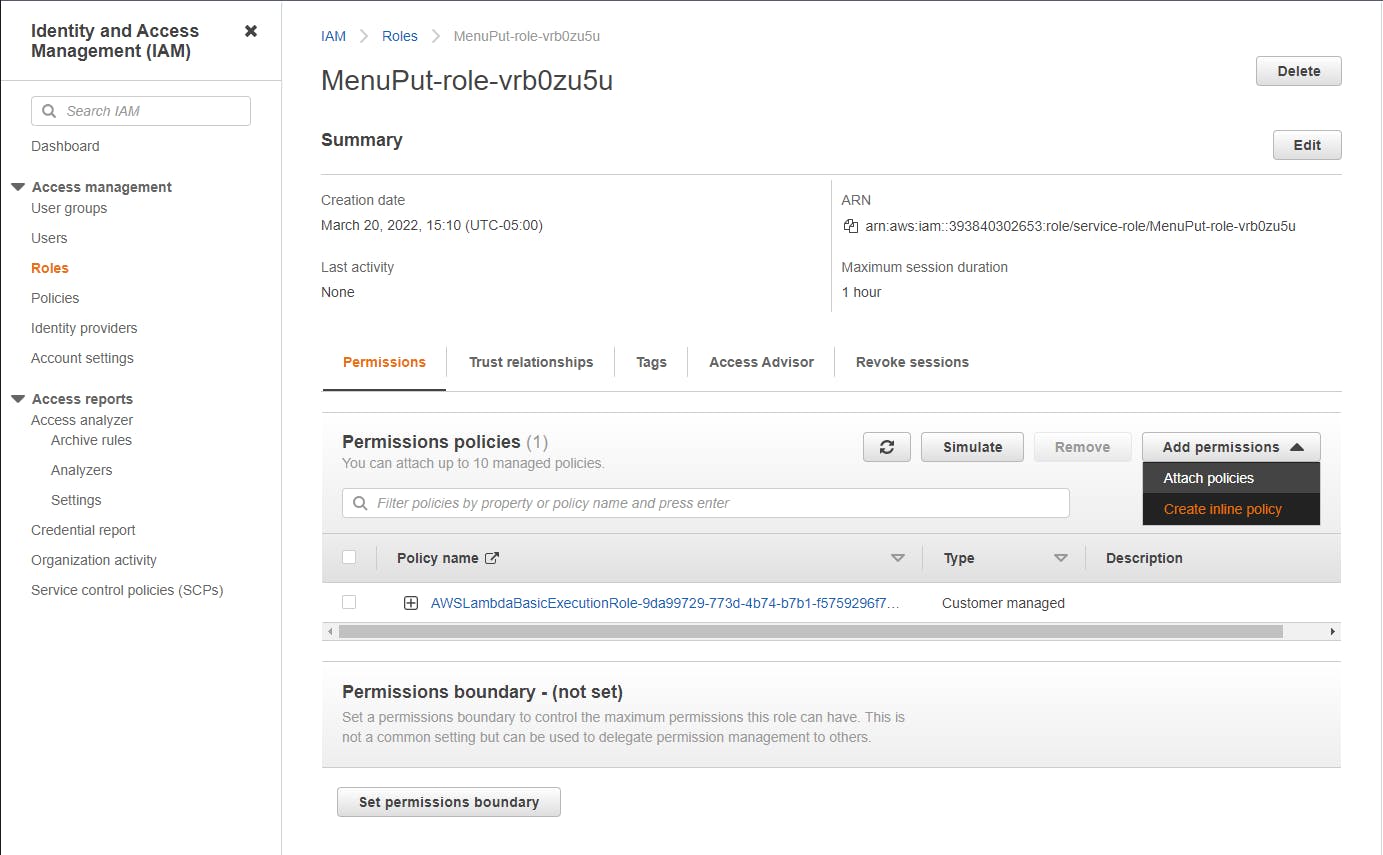
Create an IAM Role giving the Lambda execution role permission to access the S3 bucket.
A. Navigate to the Identity and Access Management (IAM) area. You can enter iam in the search box.
B. In the left panel, click Roles.
C. Search for the Lambda execution role name you recorded in #3-G above and click on it to views its details.
D. On the permissions tab, select Create inline policy under the Add permissions dropdown.
E. On the JSON tab, enter the JSON below at the end of this step. Replace [BUCKET-ARN] with the ARM for your S3 bucket in #2-G above.
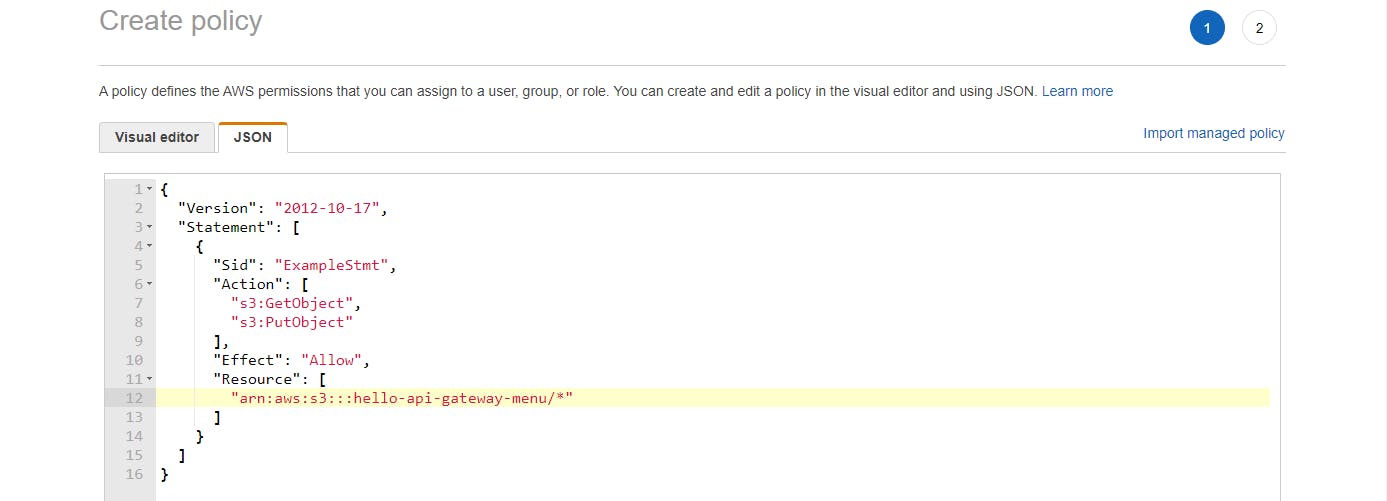
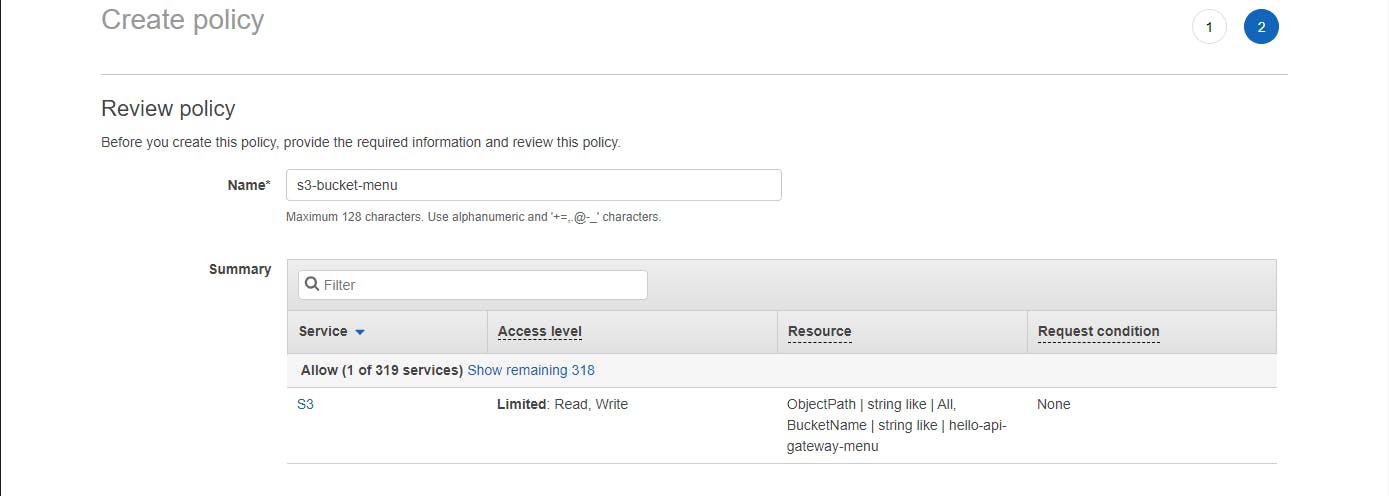
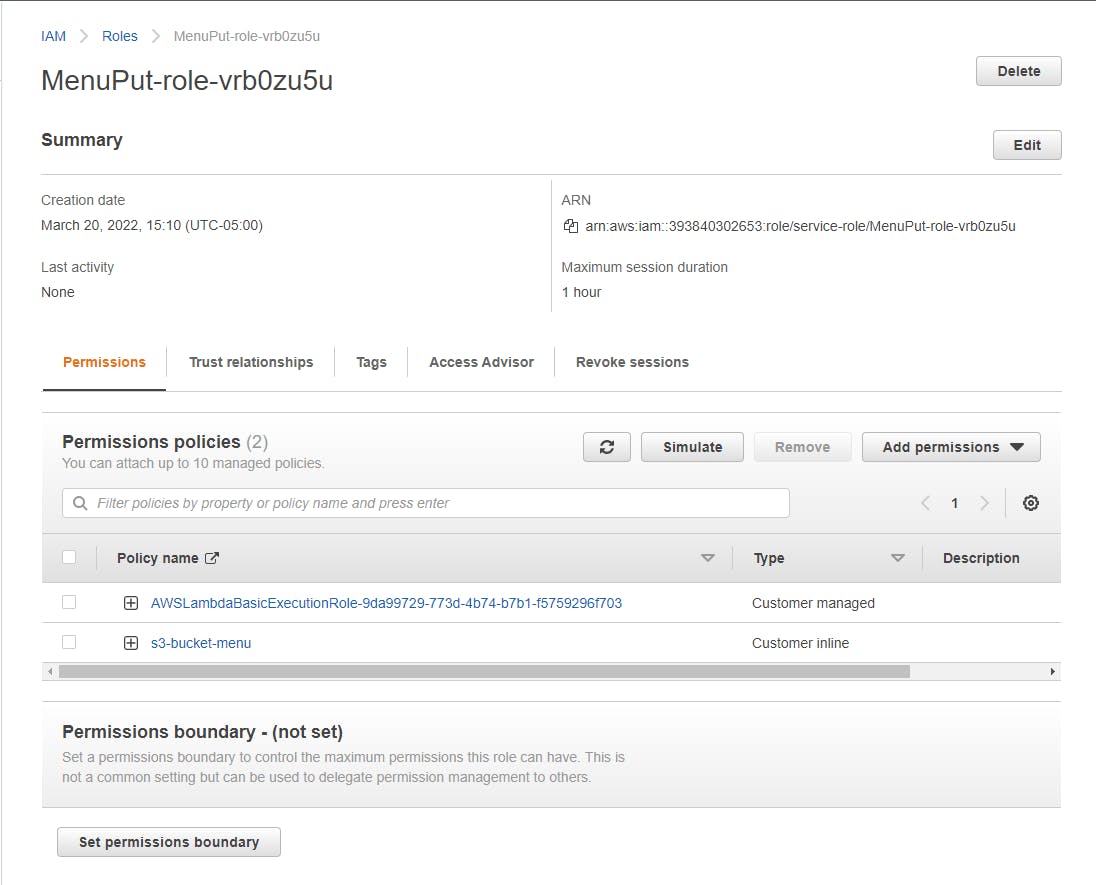
F. Click Review policy. Name the policy s3-bucket-menu and click Create policy. You should now see your s3-bucket-menu inline policy as well as the auto-generated Lambda basic execution role policy attached to the role.
Inline Policy JSON
{
  "Version": "2012-10-17",
  "Statement": [
    {
      "Sid": "ExampleStmt",
      "Action": [
        "s3:GetObject",
        "s3:PutObject"
      ],
      "Effect": "Allow",
      "Resource": [
        "arn:aws:s3:::[BUCKET-ARN]/*"
      ]
    }
  ]
}
Step 2: Create the MenuPut Lambda Function
In this step, you'll create a Lambda function named MenuPut that can store a menu in an S3 bucket.
Launch Visual Studio and select Create Project.
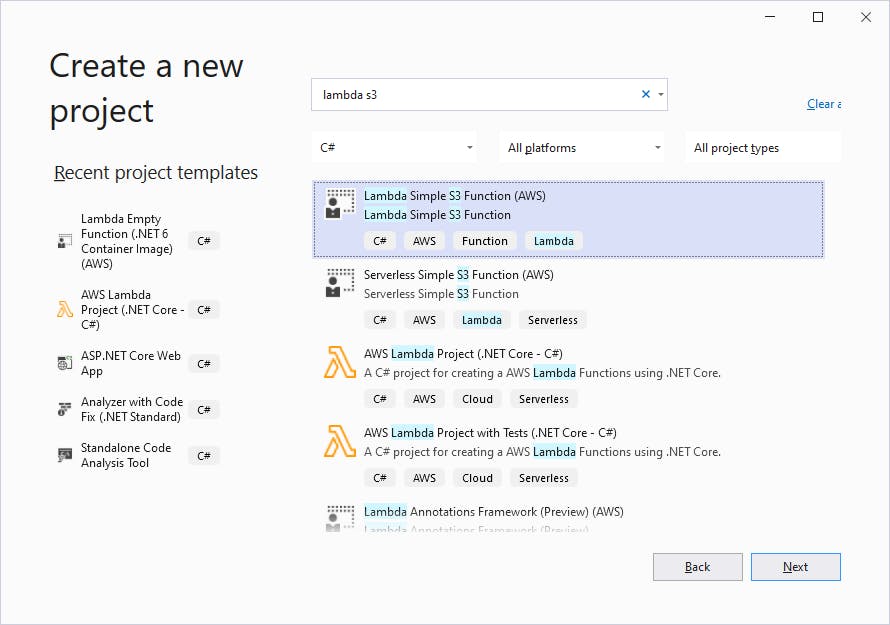
A. Find and select the Lambda Simple S3 Function template and click Next.
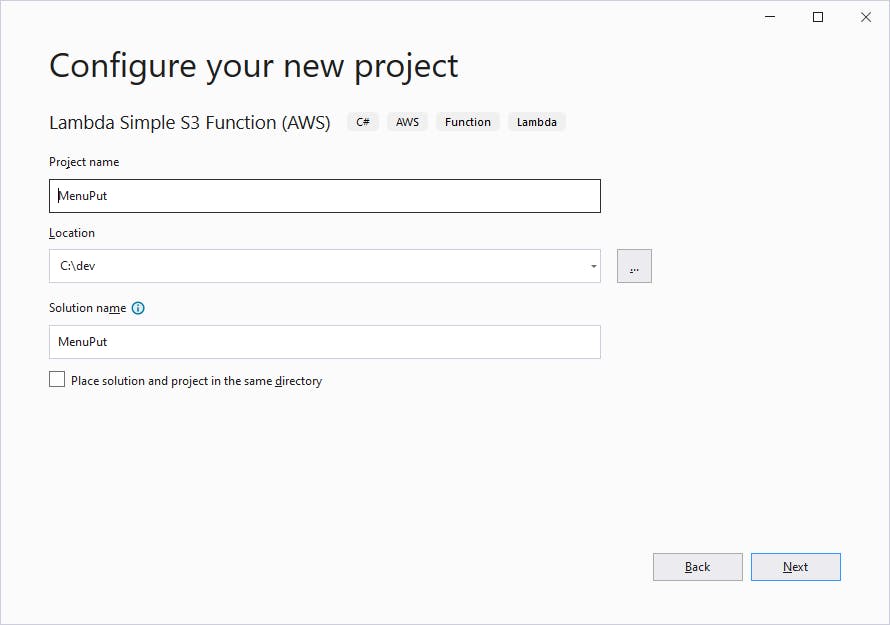
B. On the Configure your new project page, name the project MenuPut and choose a development folder to work in. Then click Next.
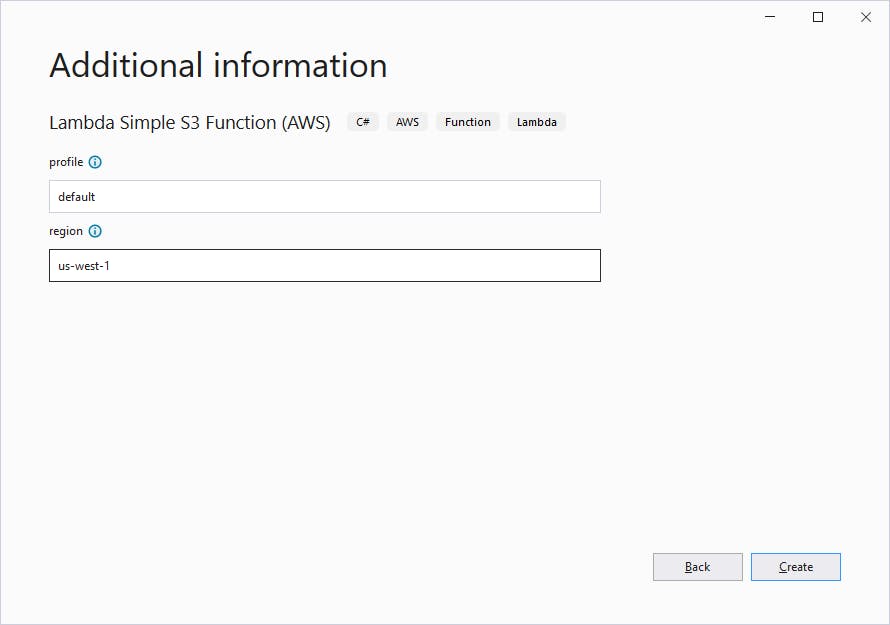
C. On the Additional information page, set Profile to default and Region to your region. We're using us-west-1. Then click Create.
In the AWS Explorer pane, set your region.
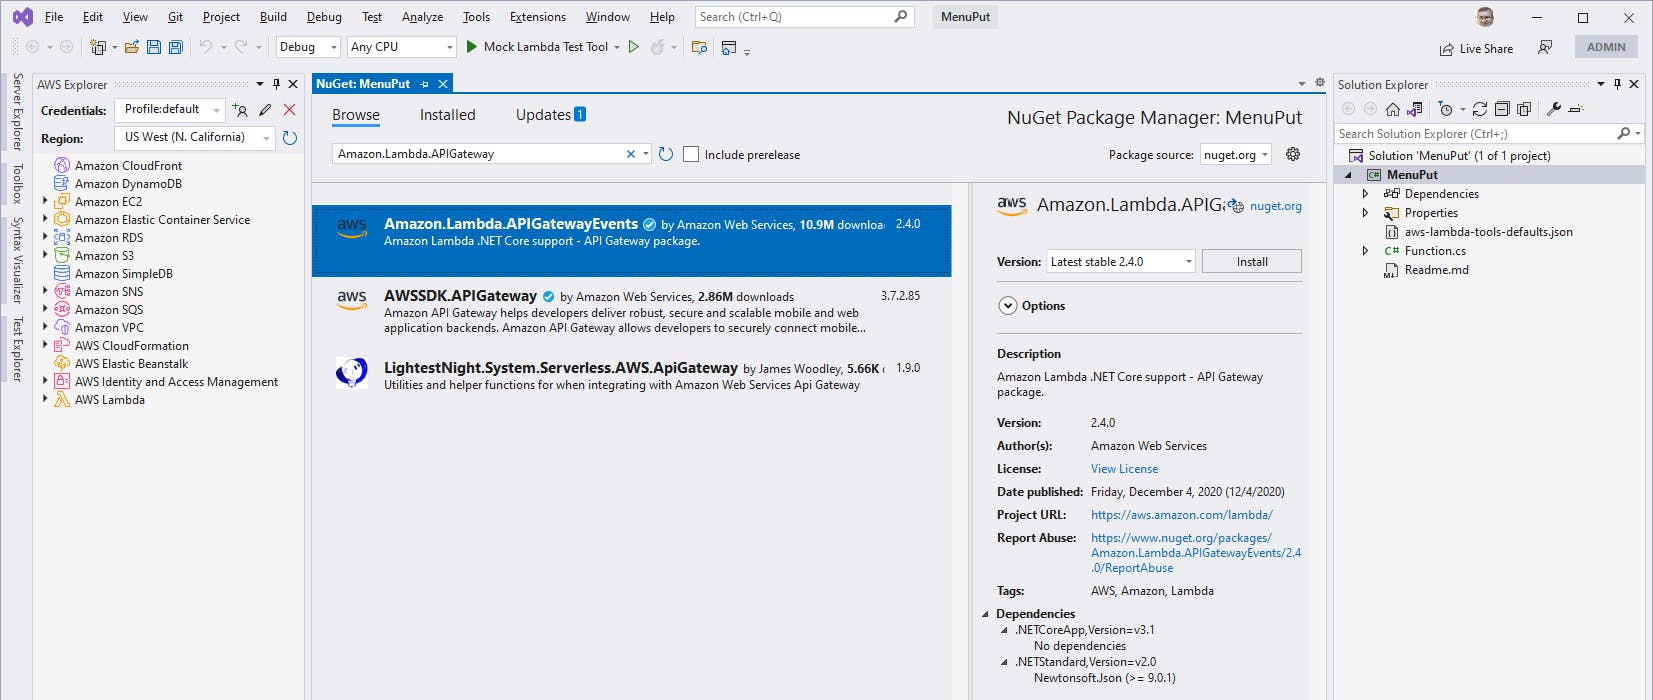
In Solution Explorer, right-click the MenuPut project and select Manage NuGet Packages.... Find and install the Amazon.APIGateway.LambdaEvents package.
Open Function.cs in the code editor, and replace with the code at the end of this step. Replace [BUCKET-NAME] with the name of your S3 bucket created in Step 1.
Save your changes and build the project.
In Solution Explorer, right-click the MenuPut project and select Publish to AWS Lambda. Enter/select the following in the publishing wizard:
A. Function Name: select MenuPut.
B. Function Handler: MenuPut::MenuPut.Function::FunctionHandler.
C. Click Upload.
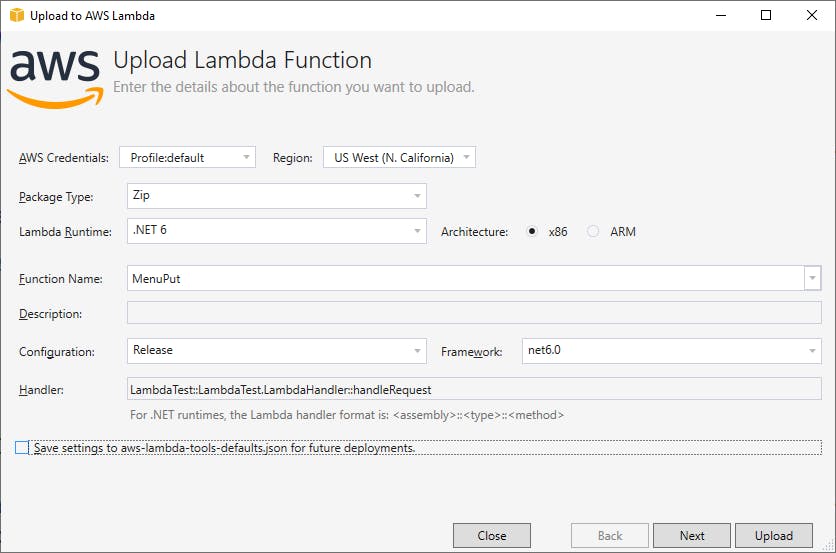
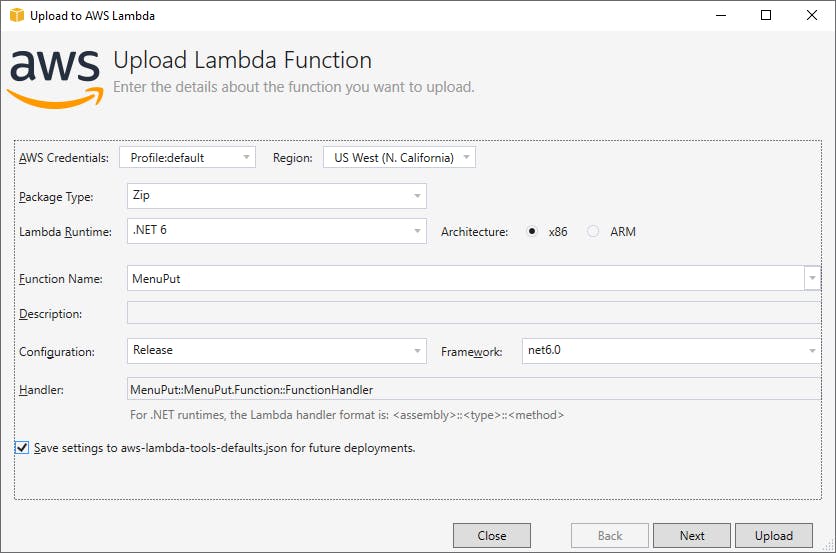
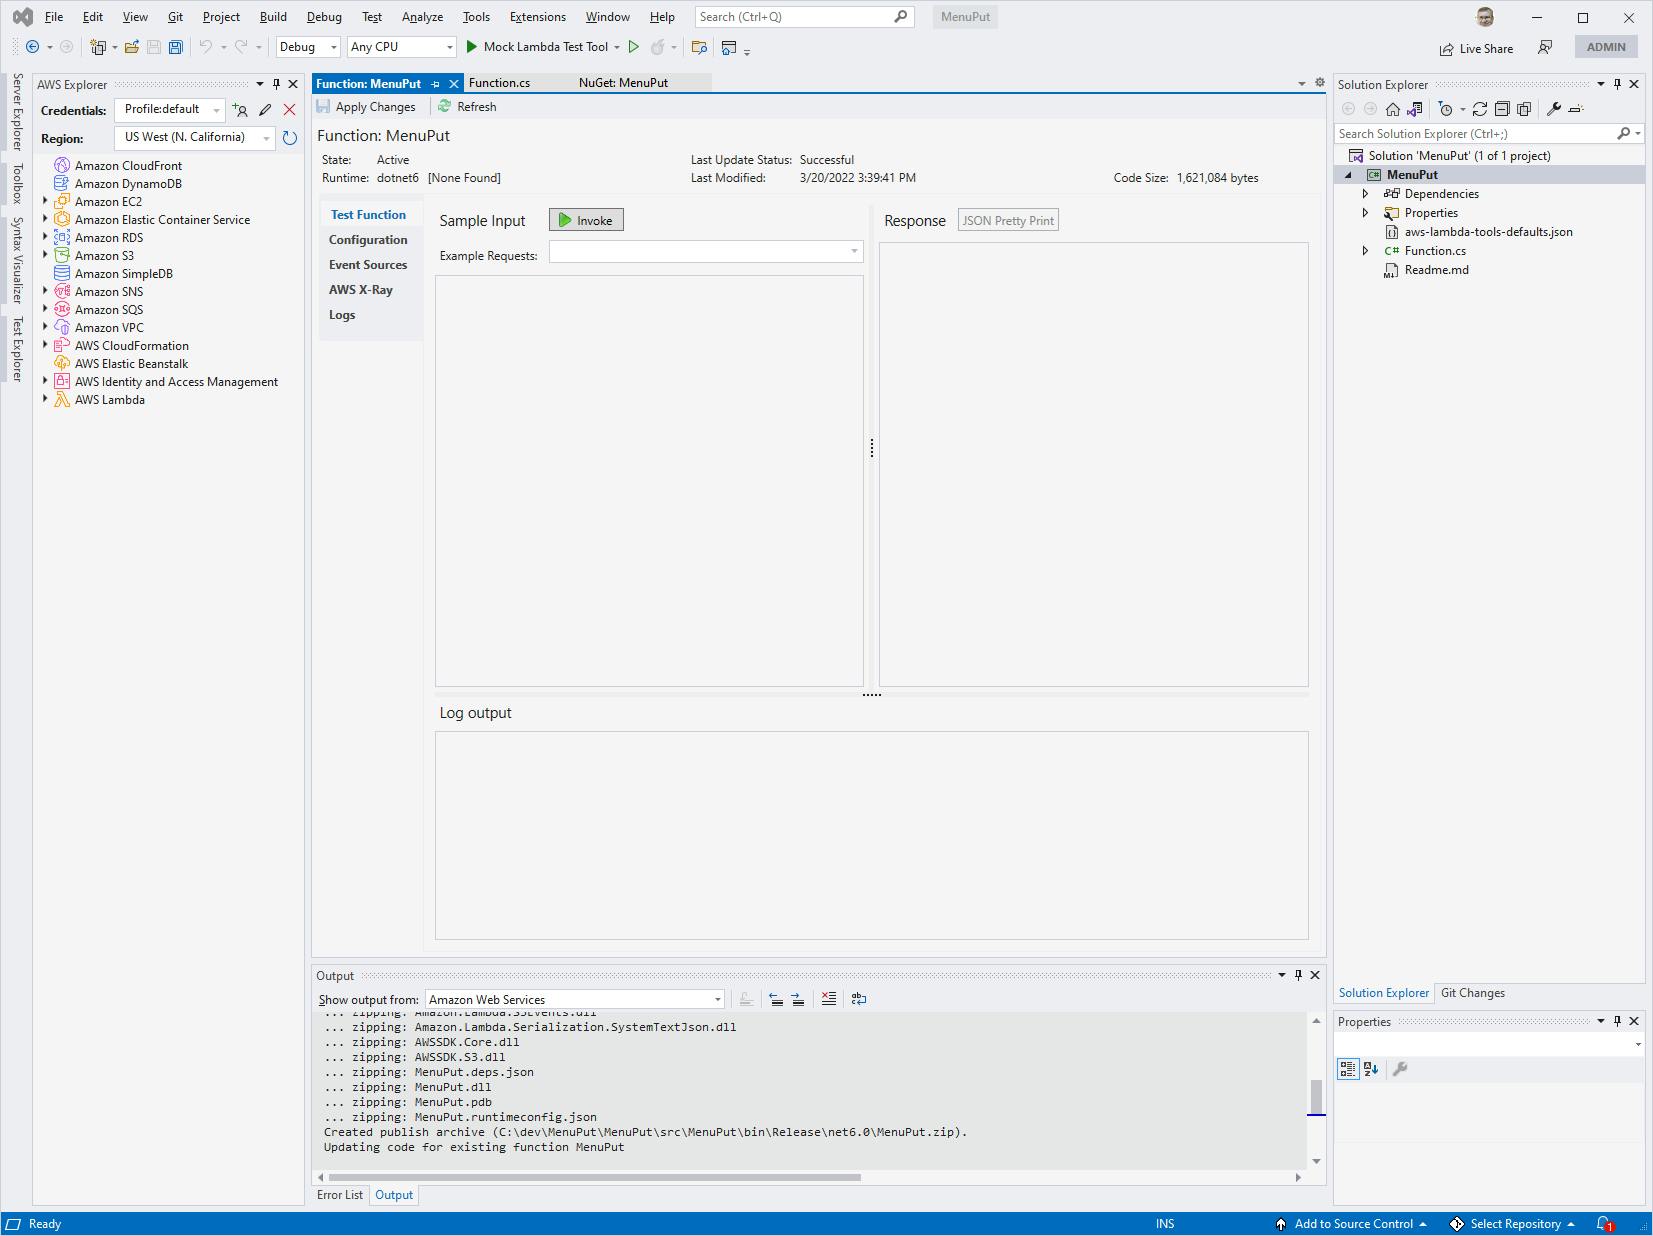
D. Wait for the function to upload. If successful, you will end up at the function test page with the message Last Update Status: Successful at top.
Function.cs
using Amazon.Lambda.APIGatewayEvents;
using Amazon.Lambda.Core;
using Amazon.S3;

[assembly: LambdaSerializer(typeof(Amazon.Lambda.Serialization.SystemTextJson.DefaultLambdaJsonSerializer))]

namespace MenuPut
{
    public class Function
    {
        const string BUCKET = "[BUCKET-NAME]";

        IAmazonS3 S3Client { get; set; }

        /// <summary>
        /// Constructor. Create S3 client.
        /// </summary>
        public Function()
        {
            S3Client = new AmazonS3Client();
        }

        /// <summary>
        /// Constructs an instance with a preconfigured S3 client. This can be used for testing the outside of the Lambda environment.
        /// </summary>
        /// <param name="s3Client"></param>
        public Function(IAmazonS3 s3Client)
        {
            this.S3Client = s3Client;
        }

        /// <summary>
        /// Store menu JSON in S3 menu object.
        /// </summary>
        /// <param name="request">API Gateway proxy request containing body (menu JSON).</param>
        /// <param name="context">Lambda context object used for logging</param>
        /// <returns></returns>
        public async Task<APIGatewayProxyResponse> FunctionHandler(APIGatewayProxyRequest request, ILambdaContext context)
        {
            try
            {
                context.Logger.LogLine($"Updating menu");
                await PutMenu(request.Body);

                return new APIGatewayProxyResponse
                {
                    StatusCode = 200
                };
            }
            catch (Exception ex)
            {
                return new APIGatewayProxyResponse
                {
                    StatusCode = 500,
                    Body = ex.ToString()
                };
            }
        }

        private async Task PutMenu(string menuJson)
        {
            var response = await S3Client.PutObjectAsync(new Amazon.S3.Model.PutObjectRequest()
            {
                BucketName = BUCKET,
                Key = "menu.json",
                ContentType = "text/json",
                ContentBody = menuJson
            });
        }
    }
}
Step 3: Create the MenuGet Lambda Function
In this step, you'll create a Lambda function named MenuGet that can retrieve a menu from an S3 bucket.
In Visual Studio, close the previous solution and select Create Project.
A. Find and select the Lambda Simple S3 Function template and click Next.
B. On the Configure your new project page, name the project MenuGet and choose a development folder to work in. Then click Next.
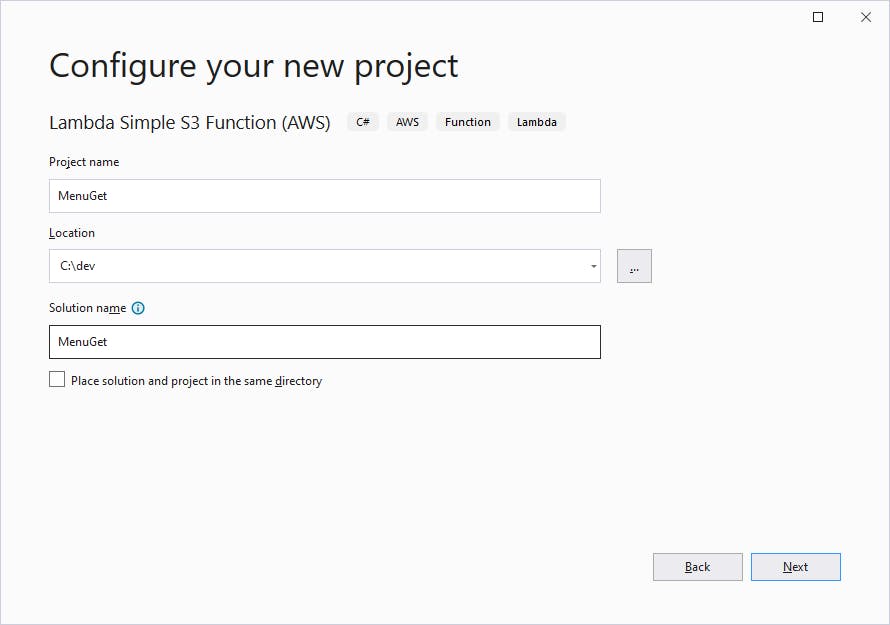
C. On the Additional information page, set Profile to default and Region to your region. We're using us-west-1. Then click Create.
In Solution Explorer, right-click the MenuGet project and select Manage NuGet Packages.... Find and install the Amazon.APIGateway.LambdaEvents package.
Open Function.cs in the code editor, and replace with the code at the end of this step. Replace [BUCKET-NAME] with the name of your S3 bucket created in Step 1.
Save your changes and build the project.
In Solution Explorer, right-click the MenuGet project and select Publish to AWS Lambda. Enter/select the following in the publishing wizard:
A. Function Name: select MenuGet.
B. Handler: MenuGet::MenuGet.Function::FunctionHandler.
C. Click Upload.
D. Wait for the function to upload. If successful, you will end up at the function test page with the message Last Update Status: Successful at top.
Function.cs
using Amazon.Lambda.APIGatewayEvents;
using Amazon.Lambda.Core;
using Amazon.S3;

[assembly: LambdaSerializer(typeof(Amazon.Lambda.Serialization.SystemTextJson.DefaultLambdaJsonSerializer))]

namespace MenuGet
{
    public class Function
    {
        const string BUCKET = "[BUCKET-NAME]";

        IAmazonS3 S3Client { get; set; }

        /// <summary>
        /// Constructor. Create S3 client.
        /// </summary>
        public Function()
        {
            S3Client = new AmazonS3Client();
        }

        /// <summary>
        /// Constructs an instance with a preconfigured S3 client. This can be used for testing the outside of the Lambda environment.
        /// </summary>
        /// <param name="s3Client"></param>
        public Function(IAmazonS3 s3Client)
        {
            this.S3Client = s3Client;
        }

        /// <summary>
        /// Retrieve menu JSON from S3 menu object.
        /// </summary>
        /// <param name="request">API Gateway proxy request.</param>
        /// <param name="context">Lambda context object used for logging</param>
        /// <returns>menu JSON</returns>
        public async Task<APIGatewayProxyResponse> FunctionHandler(APIGatewayProxyRequest request, ILambdaContext context)
        {
            try
            {
                context.Logger.LogLine($"Retrieving menu");
                var menuJson = await GetMenu();

                return new APIGatewayProxyResponse
                {
                    StatusCode = 200,
                    Body = menuJson
                };
            }
            catch (Exception ex)
            {
                return new APIGatewayProxyResponse
                {
                    StatusCode = 500,
                    Body = ex.ToString()
                };
            }
        }

        private async Task<string> GetMenu()
        {
            var response = await S3Client.GetObjectAsync(BUCKET, "menu.json");
            using (var reader = new StreamReader(response.ResponseStream))
            {
                return await reader.ReadToEndAsync();
            }
        }
    }
}
Step 4: Create API Gateway API and the PUT method
In this step, you'll use the AWS Console to configure an API for with API Gateway. We'll define a PUT method for the / path, that invokes the MenuPut Lambda function to store a menu in our S3 menu.json object.
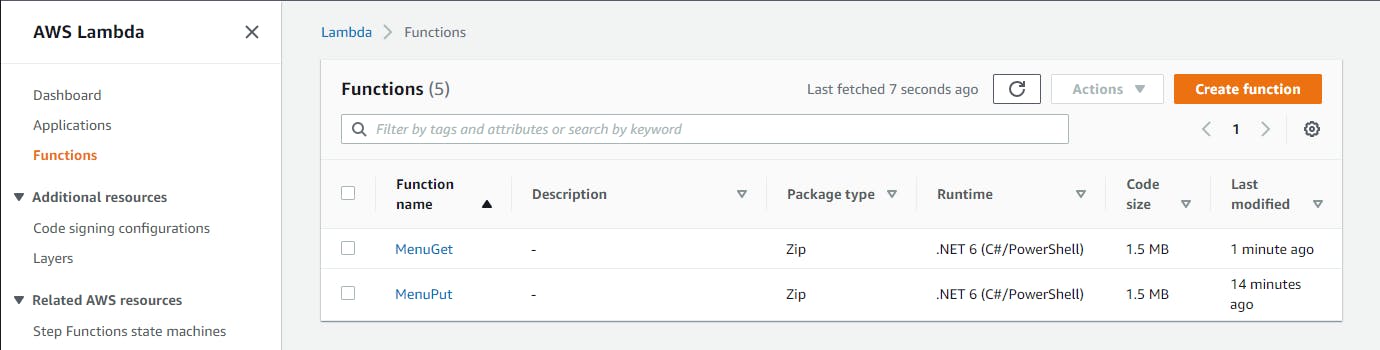
In the AWS console, navigate to AWS Lambda and confirm the 2 Lambda functions you created and deployed in Steps 2 and 3 are present.
Navigate to API Gateway in the console. You can enter api in the search box.
On the Lambda > APIs page, find the REST API panel and click Build.
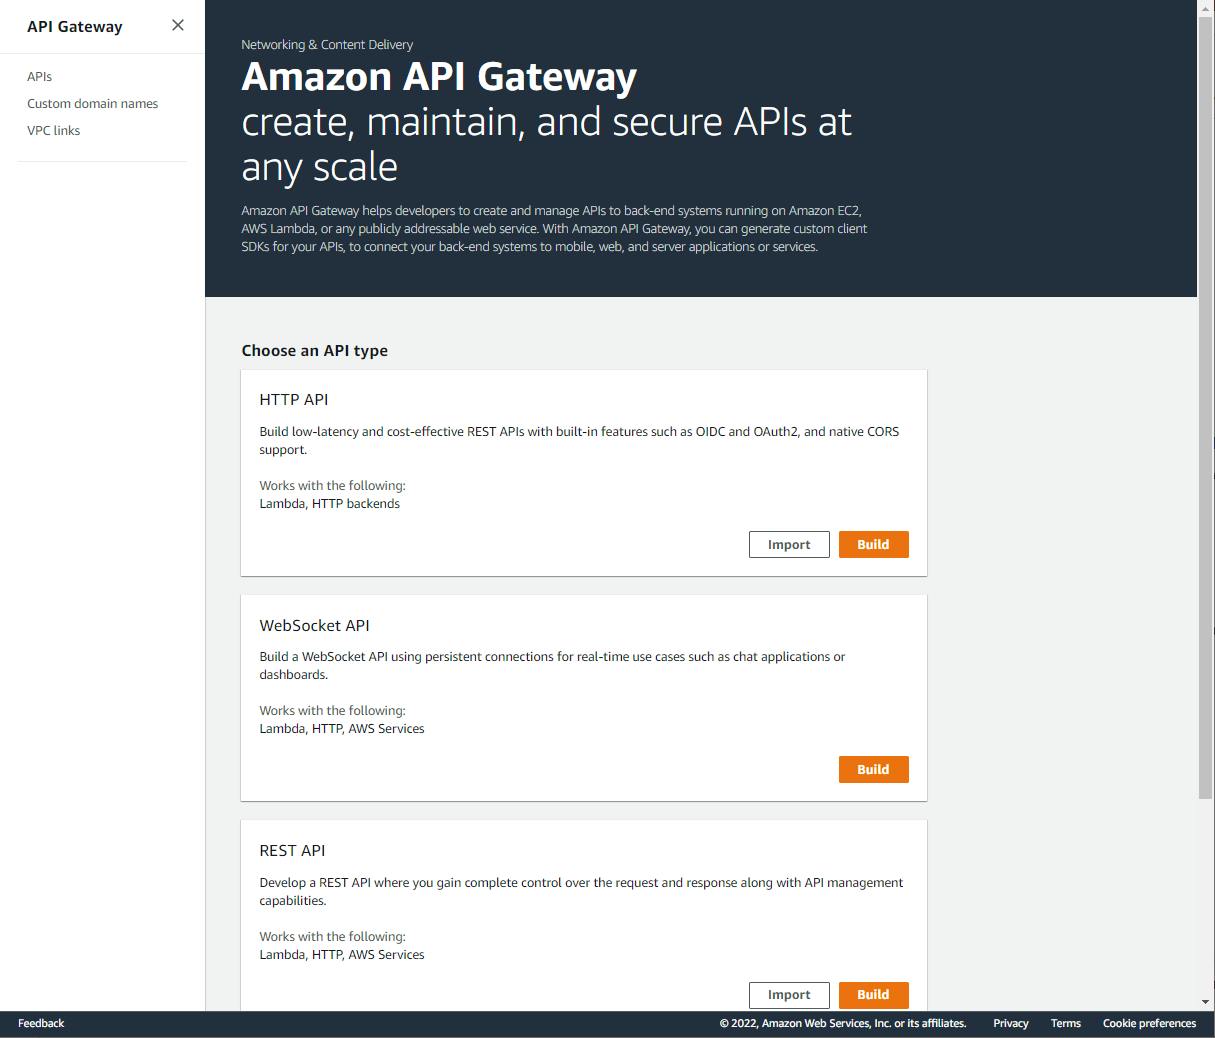
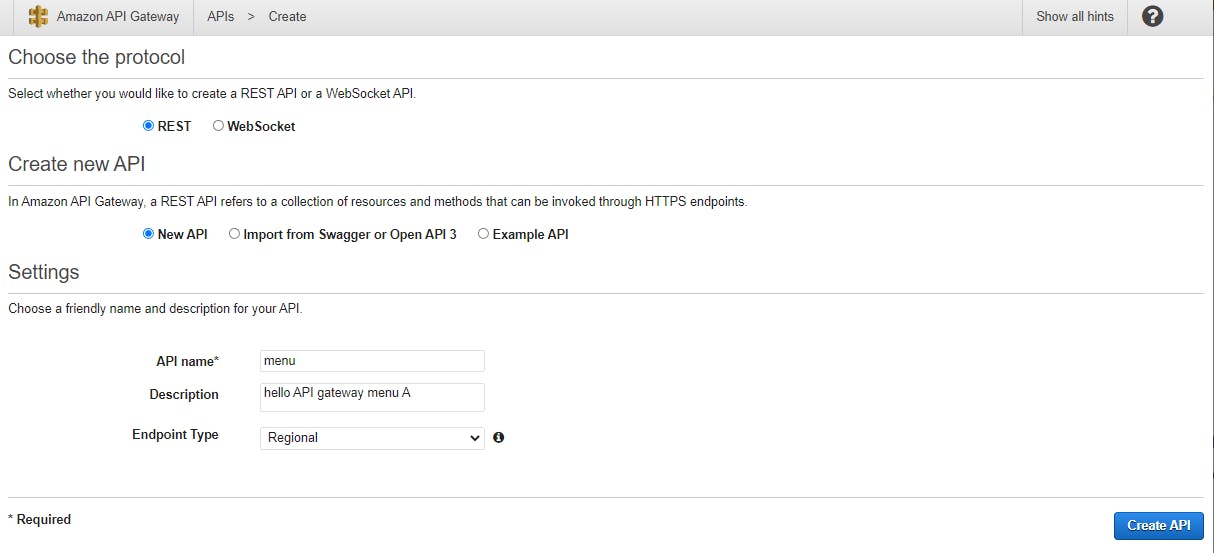
On the APIs > Create page, enter/select the following:
A. Choose the protocol: REST
B. Create new API: New API
C. Settings - API name: menu
D. Description: hello API gateway menu API.
E. Endpoint Type: Regional.
F. Click Create API.
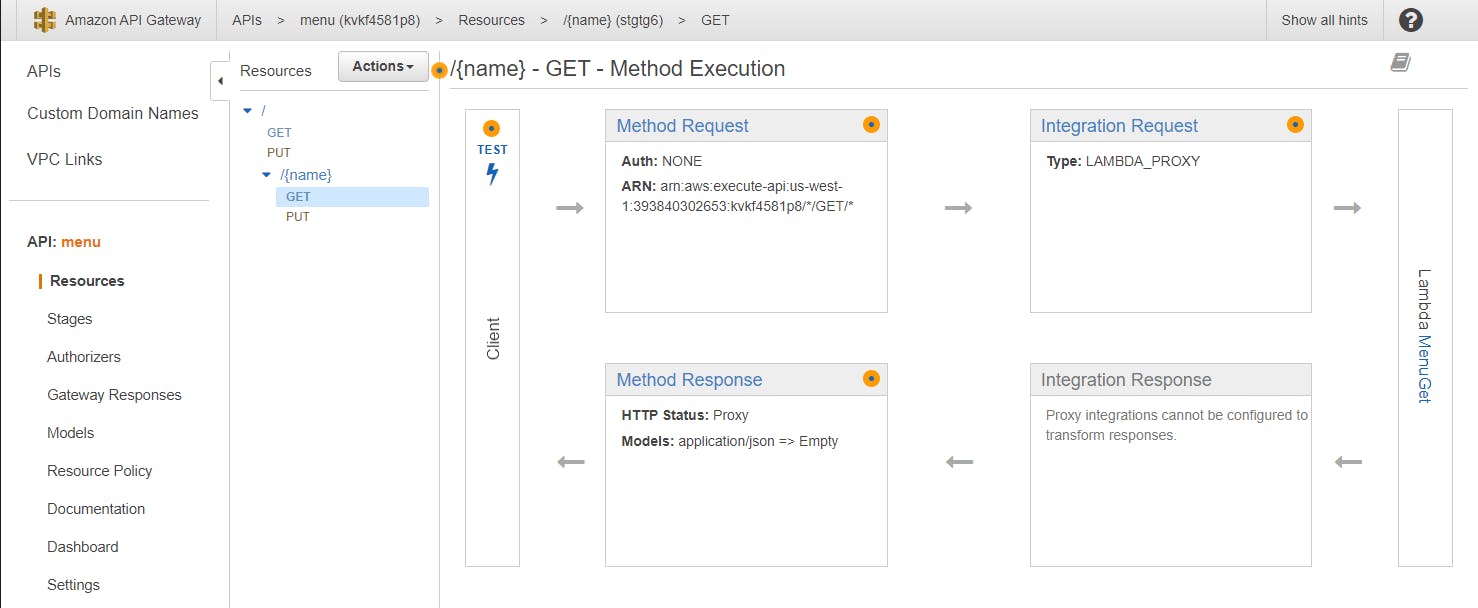
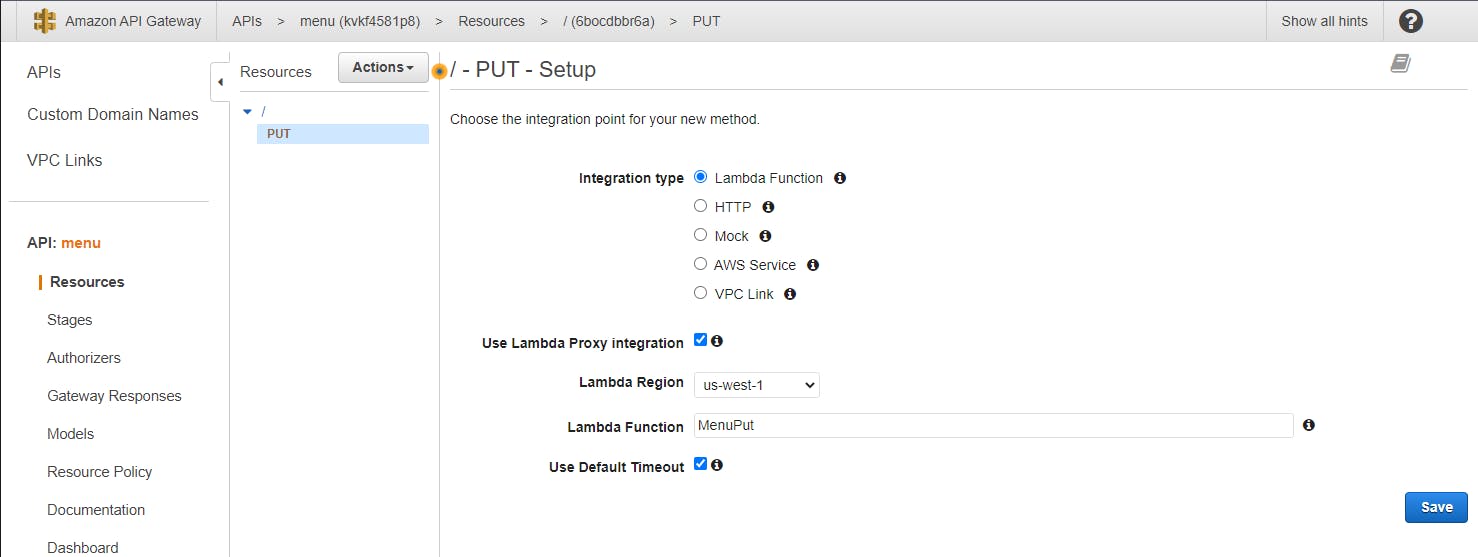
Next, we'll define a PUT method for storing menu JSON. On the / Methods page, select Create Method from the Actions dropdown, and enter/select the following:
A. set the action dropdown to PUT and click the checkbox icon button.
B. Integration type: Lambda Function.
C. Use Lambda Proxy Integration: check.
D. Lambda Region: the region where your Lambda is deployed. We're using us-west-1.
E. Lambda Function: MenuPut.
F. Use Default Timeout: (check).
G. Click Save and click OK for the Add Permission to Lambda Function confirmation.
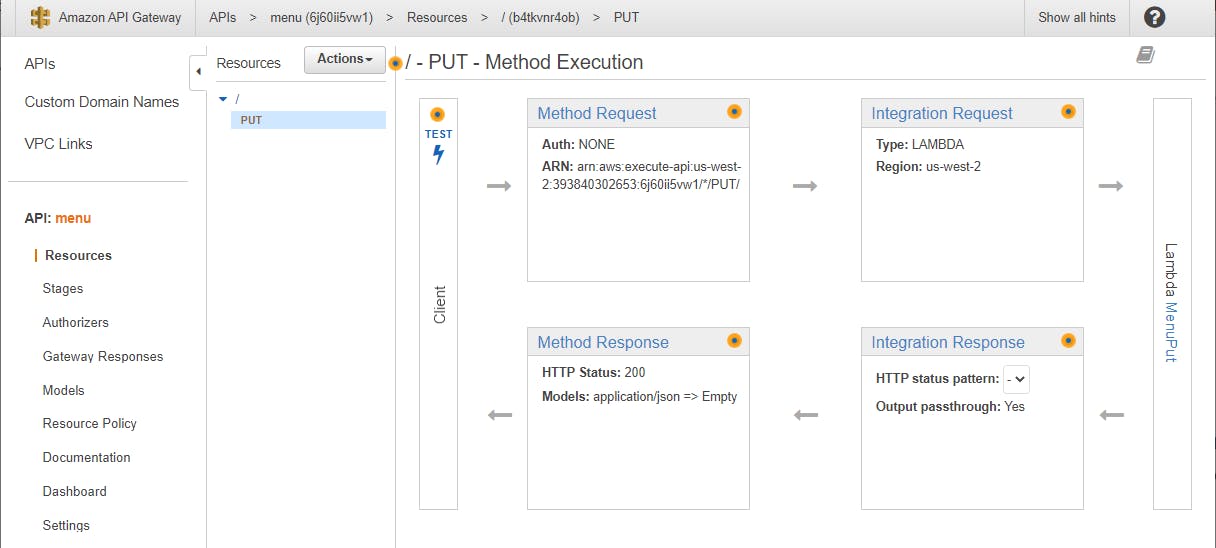
You now see a visualization of how the API method will integrate with the Lambda function. If not, select PUT from the left panel.
Click the Test section of the Client part of the diagram. On the / - PUT - Method Test page:
A. Enter the JSON below in the Request Body input box.
{
 "menu": {
     "items": [
         {
             "item": "dinner-rolls",
             "name": "Dinner Rolls",
             "qty": 3,
             "price": 2.99
         }
     ]
 }
}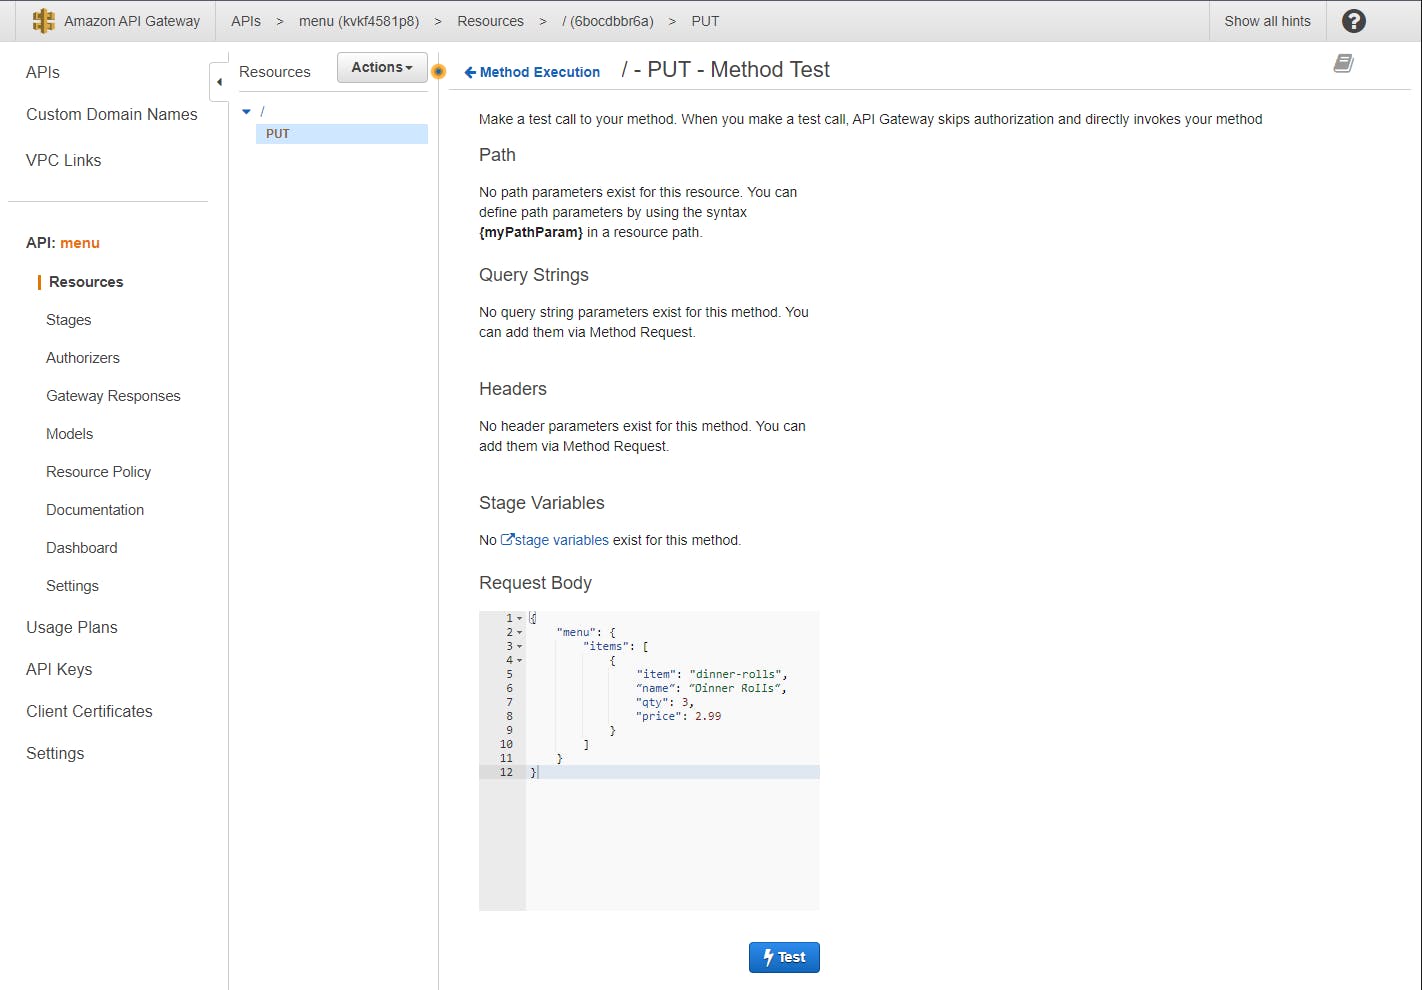
B. Click Test. The API method will execute, calling the MenuPut Lambda function. Results will be displayed at right, including the response JSON, response headers, and execution log. If all goes well, you will receive a 200 response. If instead you get an error response, use the exception detail and log to troubleshoot.
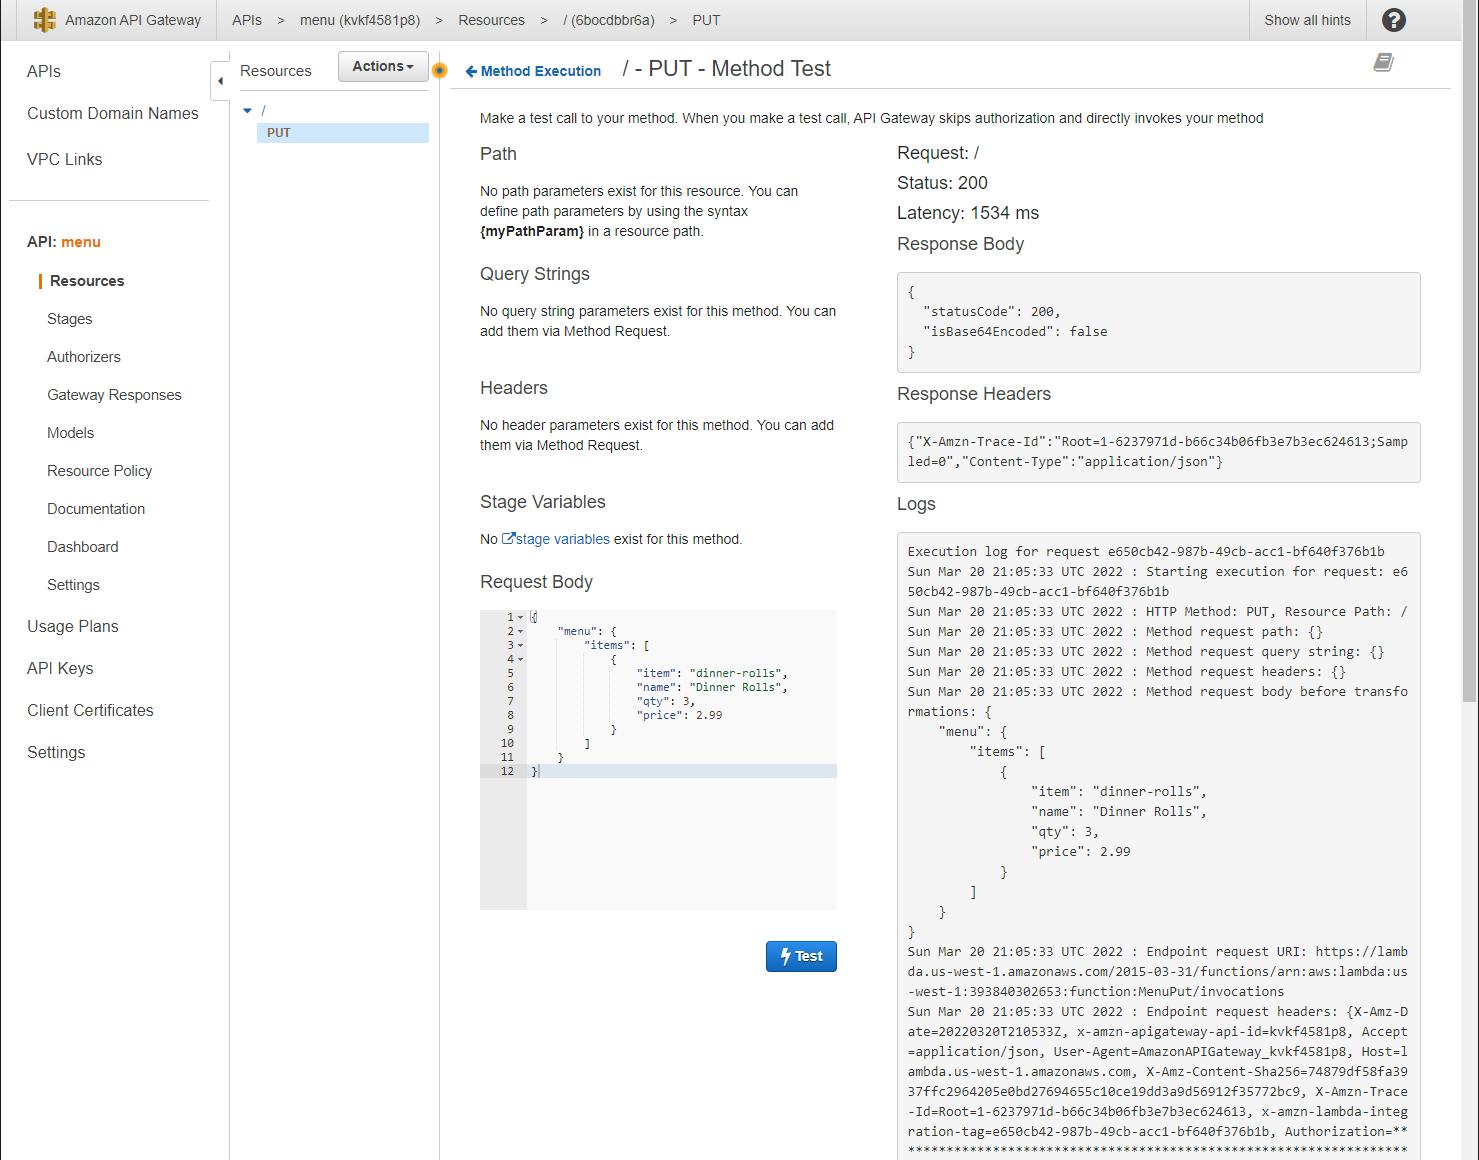
In the AWS console, navigate to your S3 bucket. It should now contain an object named
menu.jsonwhich should contain the JSON you entered in #7 above.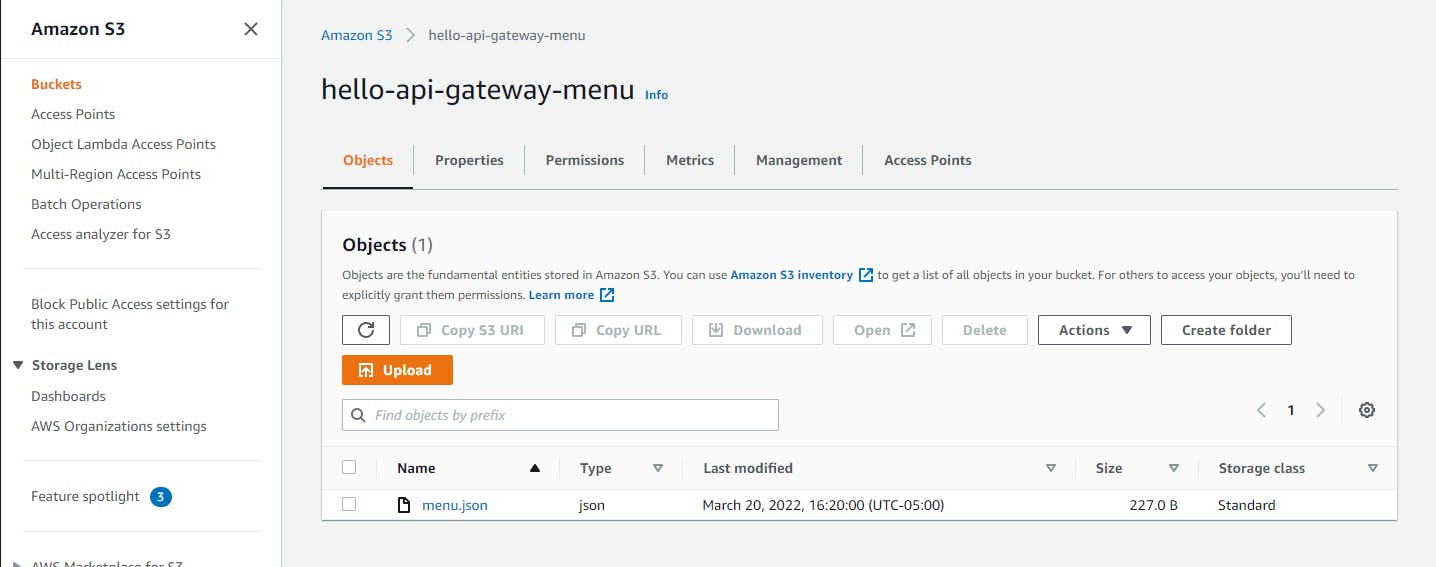
Step 5: Create API Gateway GET method
In this step, well extend the API by adding a GET method for the / path. This method will call the MenuGet Lambda function to retrieve the stored menu from our S3 menu.json object.
Navigate back to API Gateway and select your menu API.
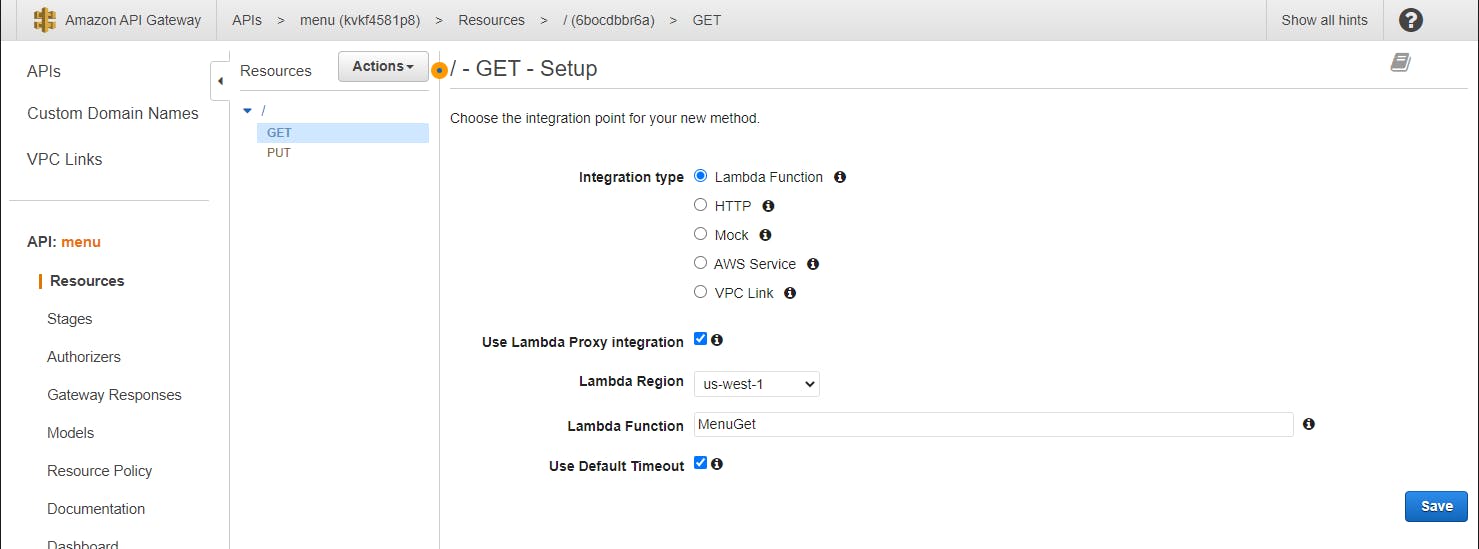
Add a GET method and configure it to call your MenuGet Lambda function:
A. With / selected in the left panel, select Create Method from the Actions dropdown.
B. Select GET and click the checkmark icon button.
C. On the / - GET - Setup page, check Use Lambda Proxy Integration.
D. For Lambda Function, select MenuGet.
E. Click Save and click OK to confirm the notification about Lambda function permissions.
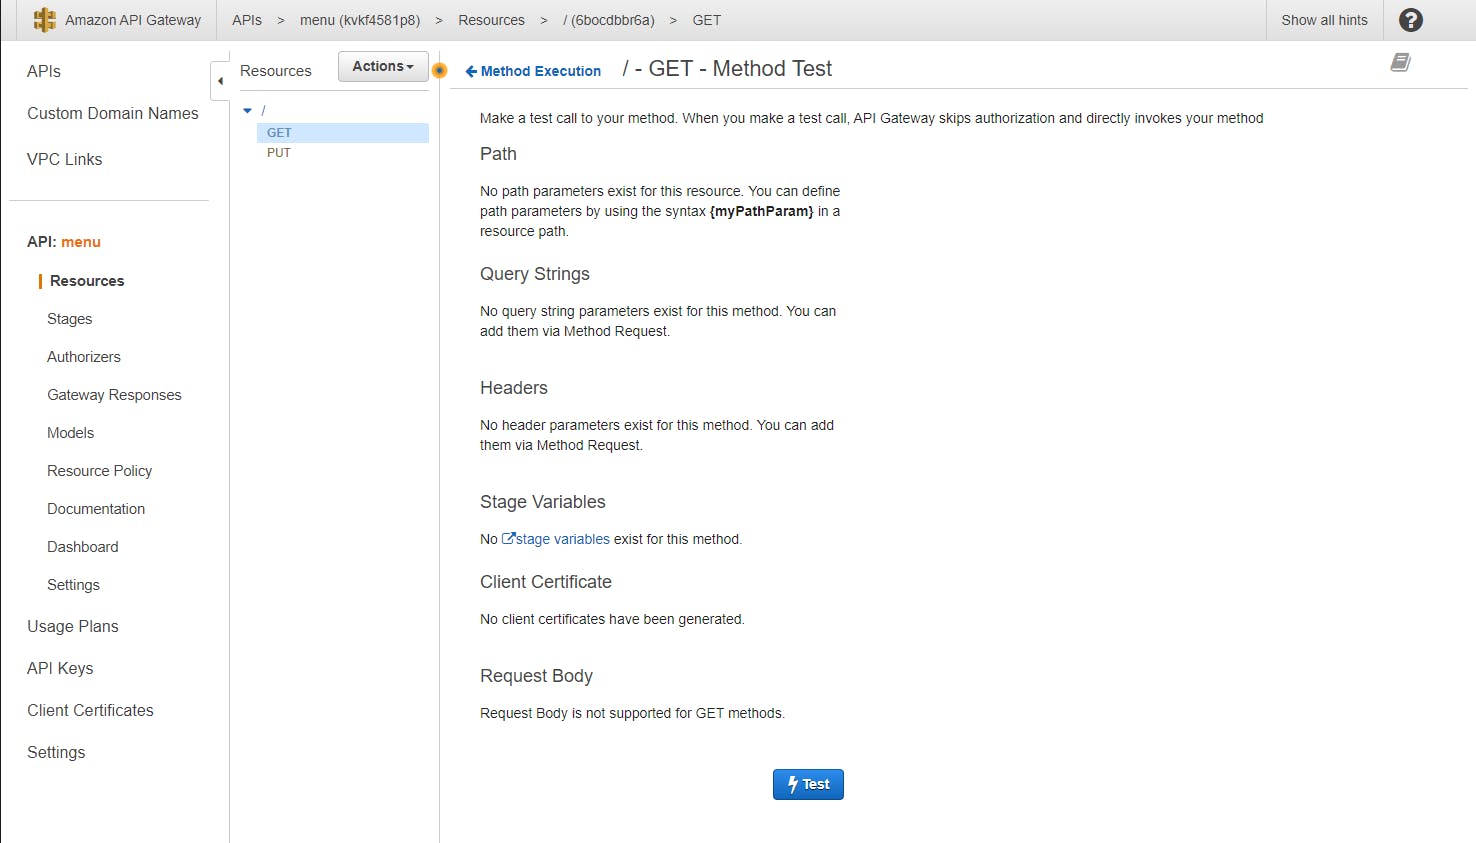
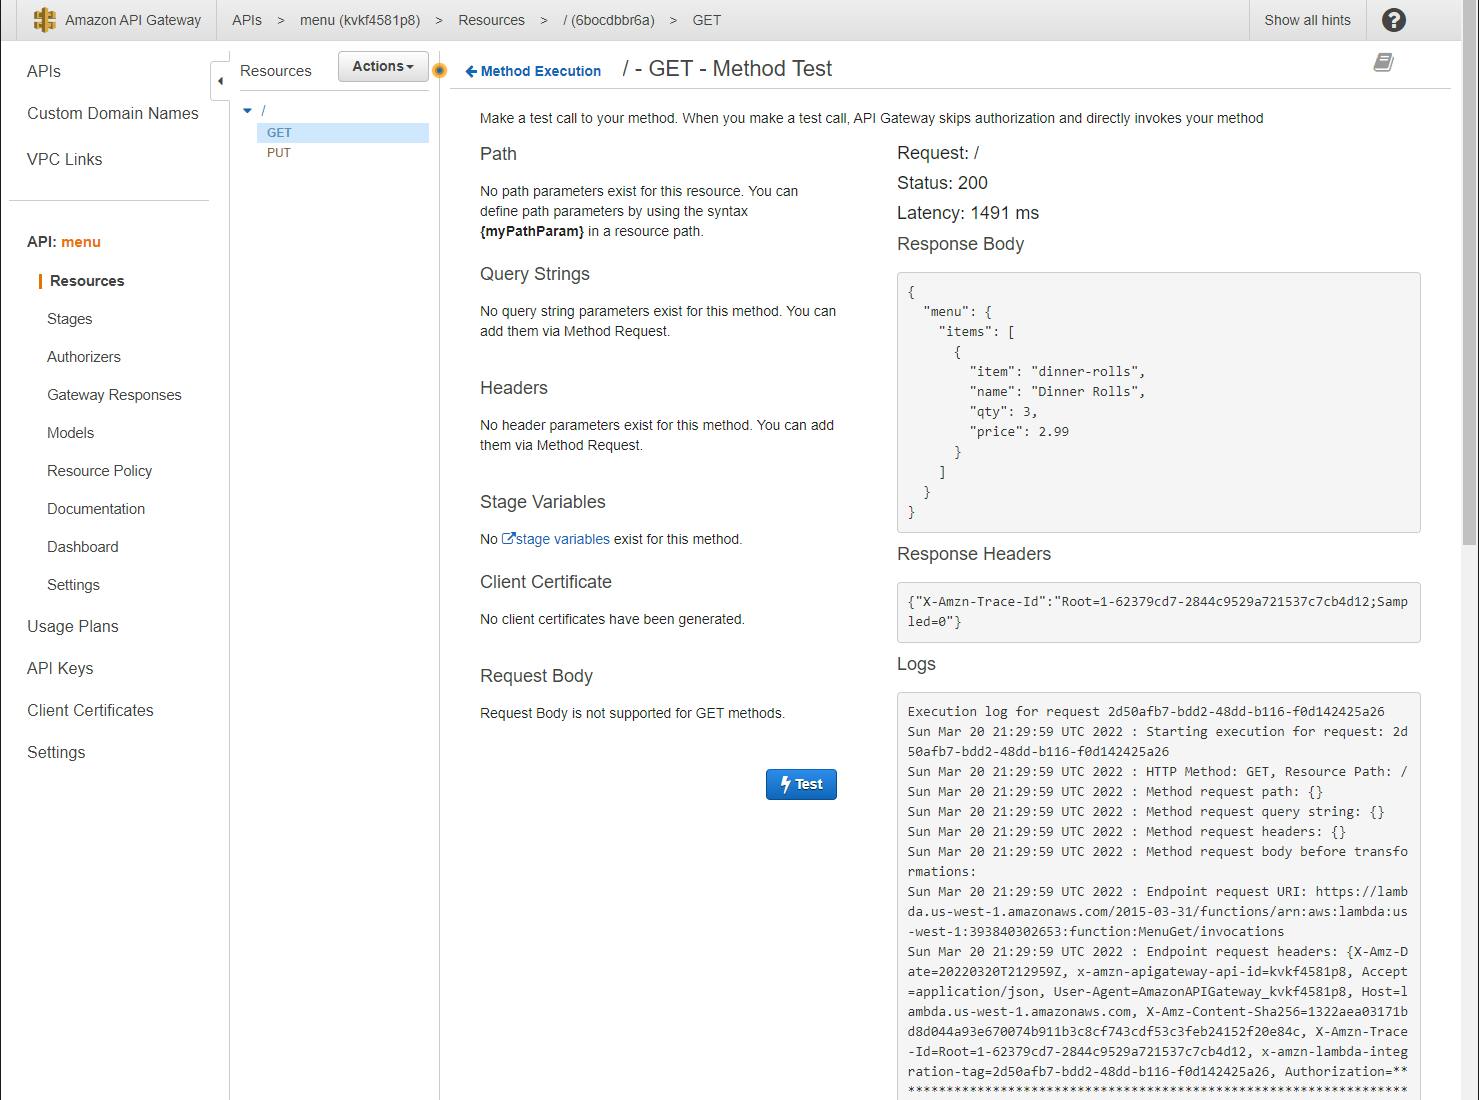
With GET selected in the left panel, click TEST and then Test.

Wait for the API call to complete. If all goes well, the response body should be the menu JSON you stored when you tested the PUT operation earlier.
Optional: if you want to see how your Lambda function configuration has changed as a result of this step, navigate to AWS Lambda and view either of your functions. On the Configuration tab, select Triggers. You'll see that an API Gateway trigger has been configured for your menu API's GET and PUT method.
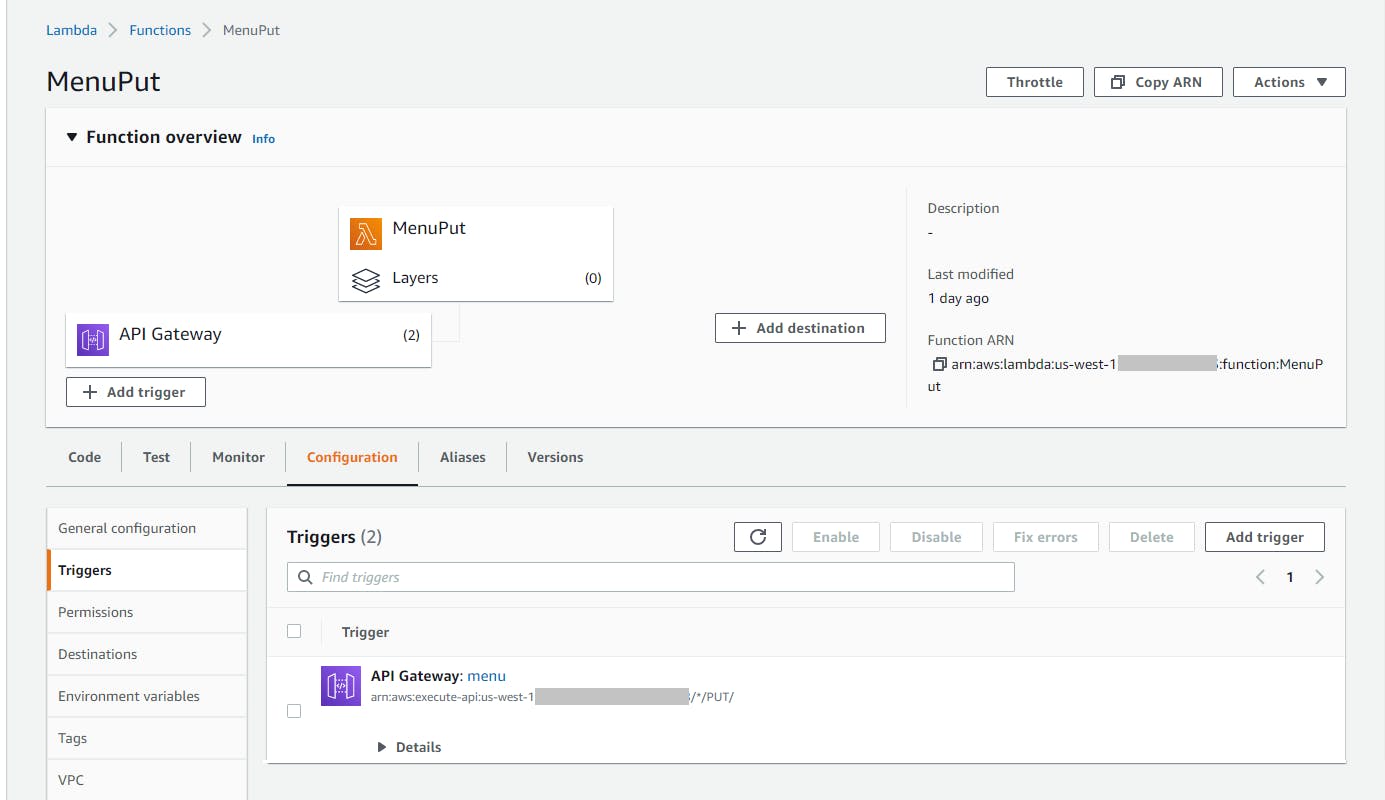
Congratulations! You've used Amazon API Gateway to invoke Lambda functions!
Step 6: Extend the PUT API method to support a REST path parameter
Currently, we can store a menu with the PUT / method, but there is only a single menu name menu.json. In this step, you'll add API Gateway support for PUT /{name}, which will allow multiple menus, such as breakfast, lunch, and dinner menus.
In the AWS console, navigate to API Gateway.
Select the menu API.
In the left panel, select /.
In the Actions dropdown, select Create resource. On the New Child Resource page enter/select the following:
A. Resource Name: name.
B. Resource Path: {name}.
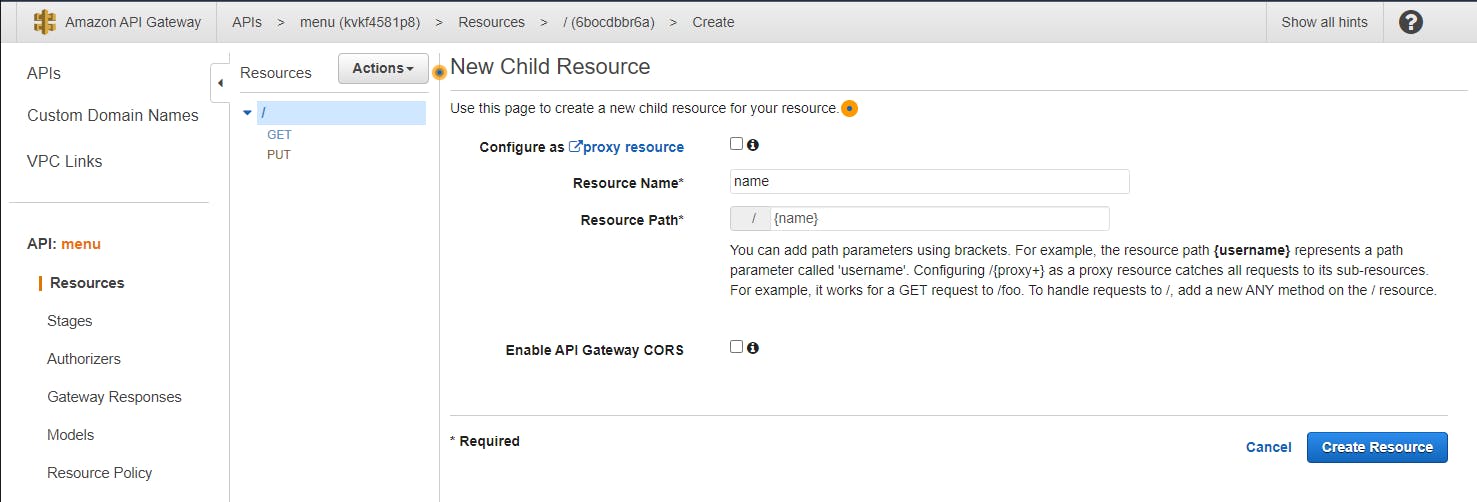
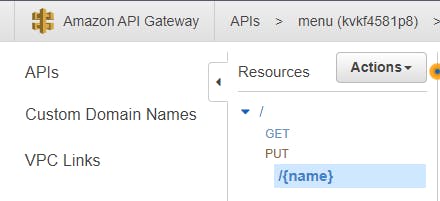
C. Click Create resource. You should now see the /{name} parameter listed in the left panel.
From the Action drop-down, select Create Method and enter/select the following:
A. Select PUT and click the checkbox icon button.
B. Integration type: Lambda Function.
C. Use Lambda Proxy Integration: check.
D. Lambda Region: your region.
E. Lambda Function: select MenuPut.
F. Click Save.
In Visual Studio, open the MenuPut solution and open Function.cs in the code editor. Replace FunctionHandler with the updated code at the end of this step. Replace [BUCKET-NAME] with your bucket name. Save your change and build the code.
The new code checks whether API Gateway has provided a path parameter name. If it is, that name is used for the menu name. If not, the default of menu is used as in the original implementation.
In Solution Explorer, right-click the MenuPut project and select Publish to AWS Lambda. Complete the wizard and deploy the updated MenuPut function to AWS Lambda. Wait for deployment to complete.
In the AWS console, navigate to API Gateway and view the menu API.
On the left panel, select the bottom item (the second PUT method).
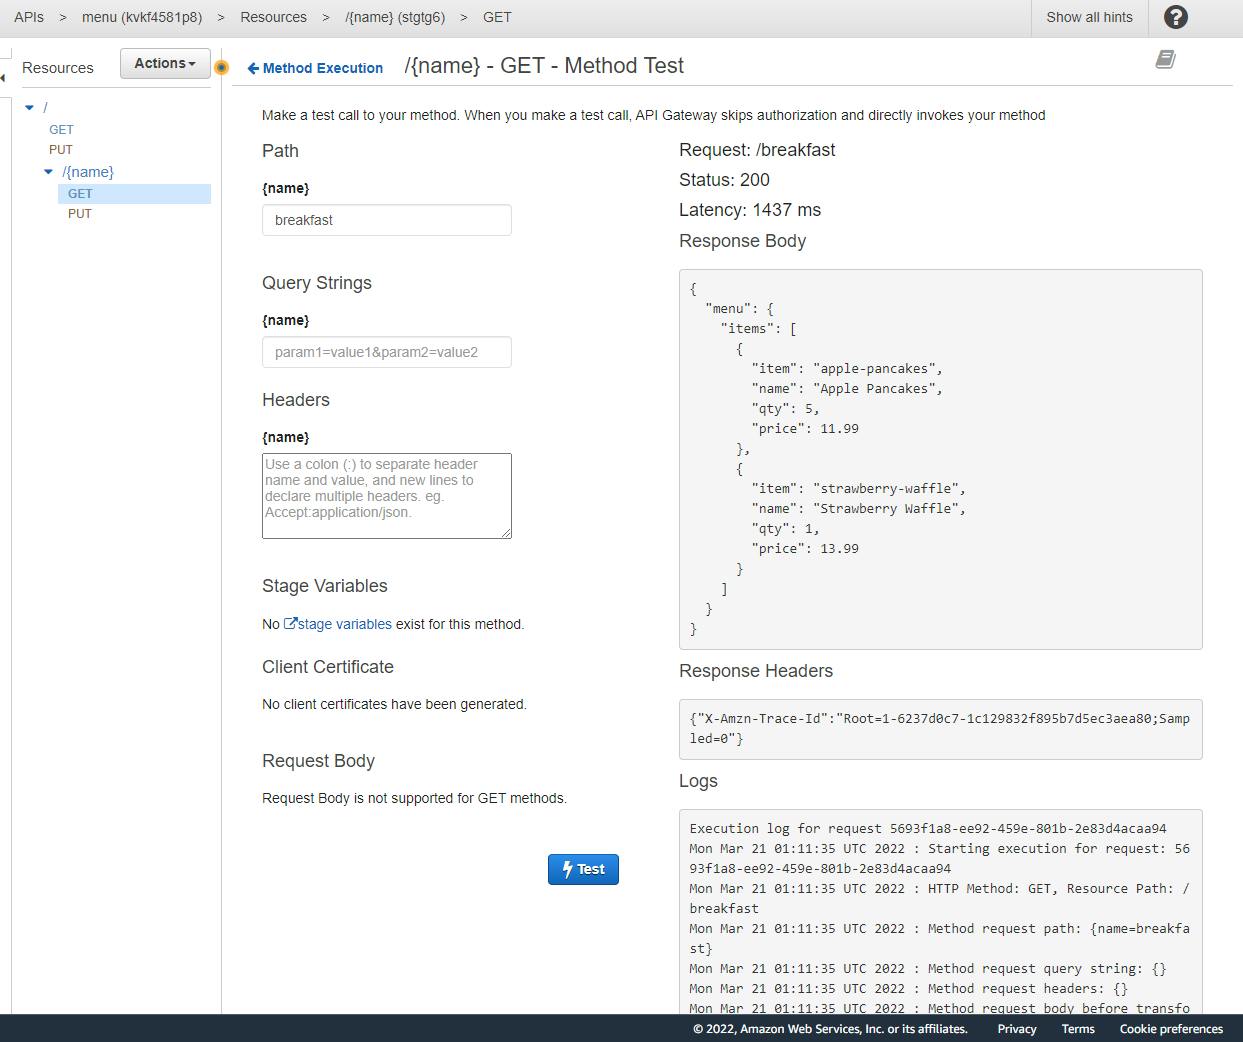
To the right click Test and enter/select the following:
A. {name}: breakfast.
B. Enter this JSON:
{
"menu": {
    "items": [
        {
            "item": "apple-pancakes",
            "name": "Apple Pancakes",
            "qty": 5,
            "price": 11.99
        },
        {
            "item": "strawberry-waffle",
            "name": "Strawberry Waffle",
            "qty": 1,
            "price": 13.99
        }
    ]
}
}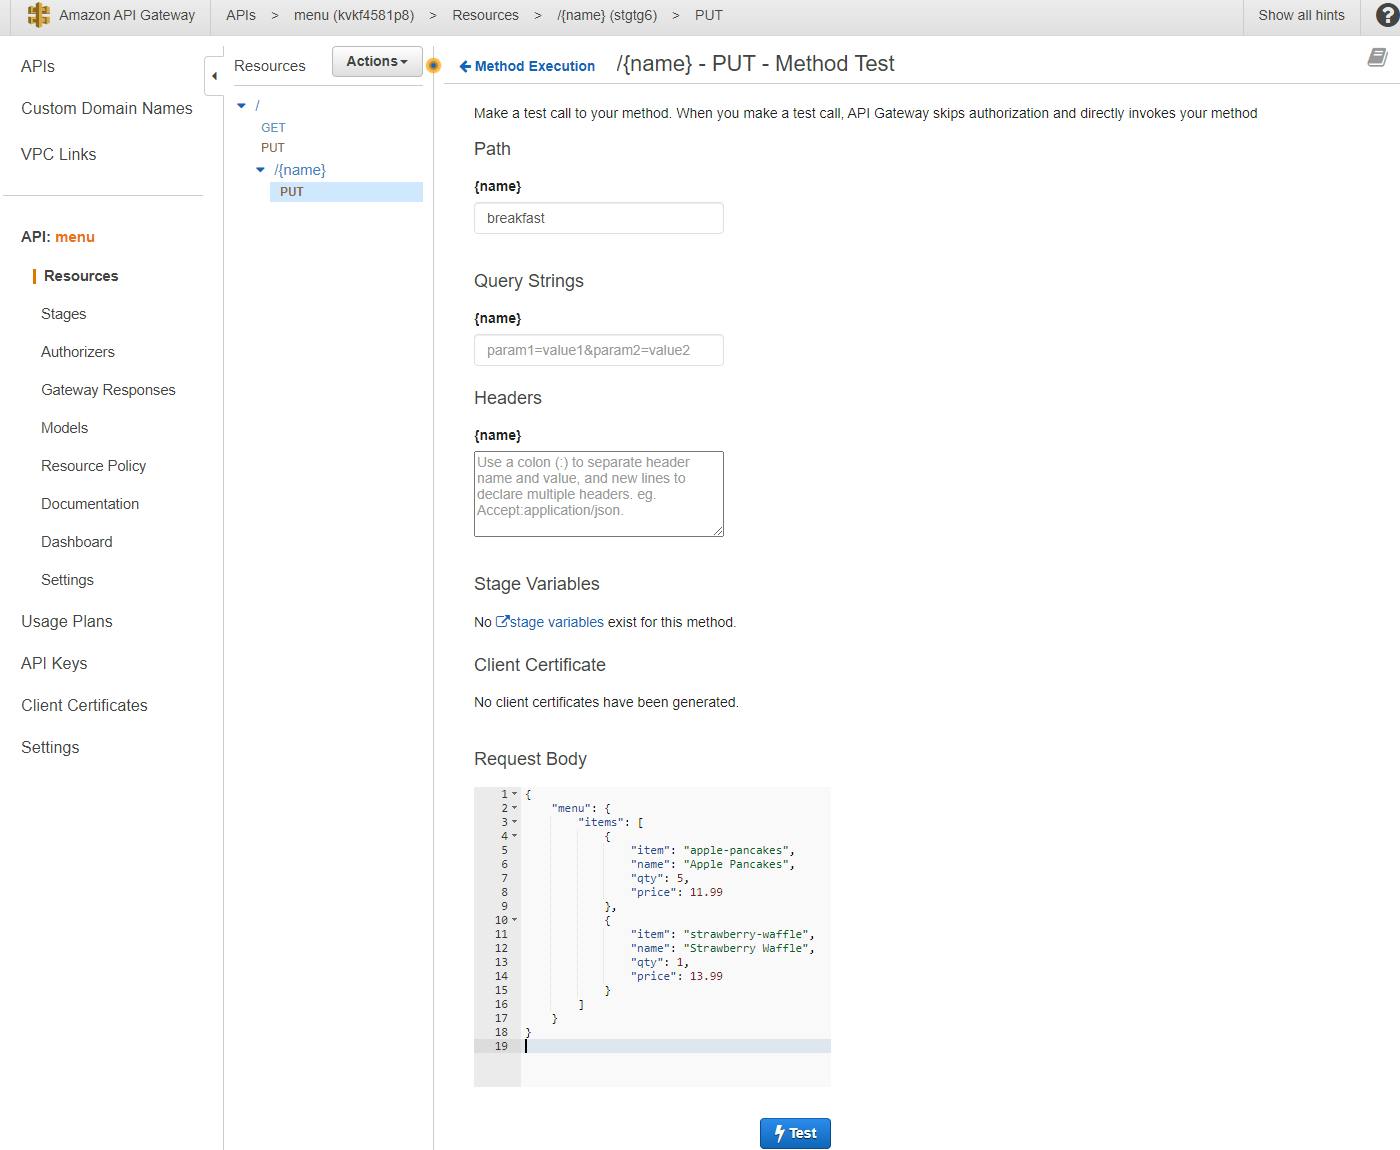
C. Click Test to call the API method. The response should confirm that the menu name was taken from the
nameparameter (breakfast).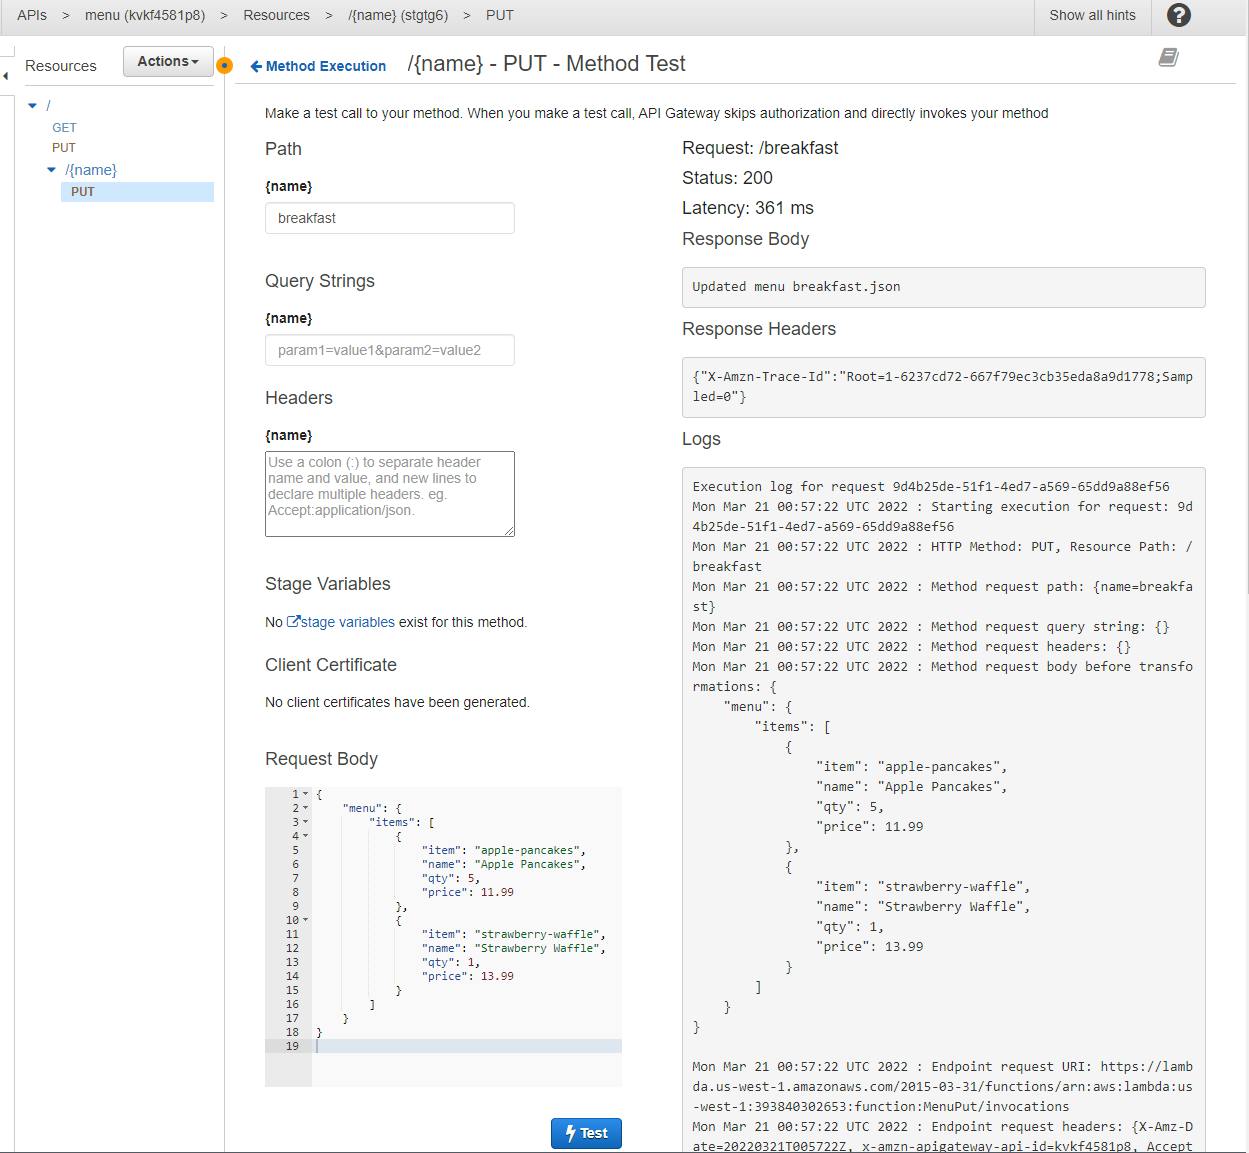
Verify the new object was created by navigating to S3 and your bucket, where you should now see a
breakfast.jsonobject as well as the originalmenu.jsonobject.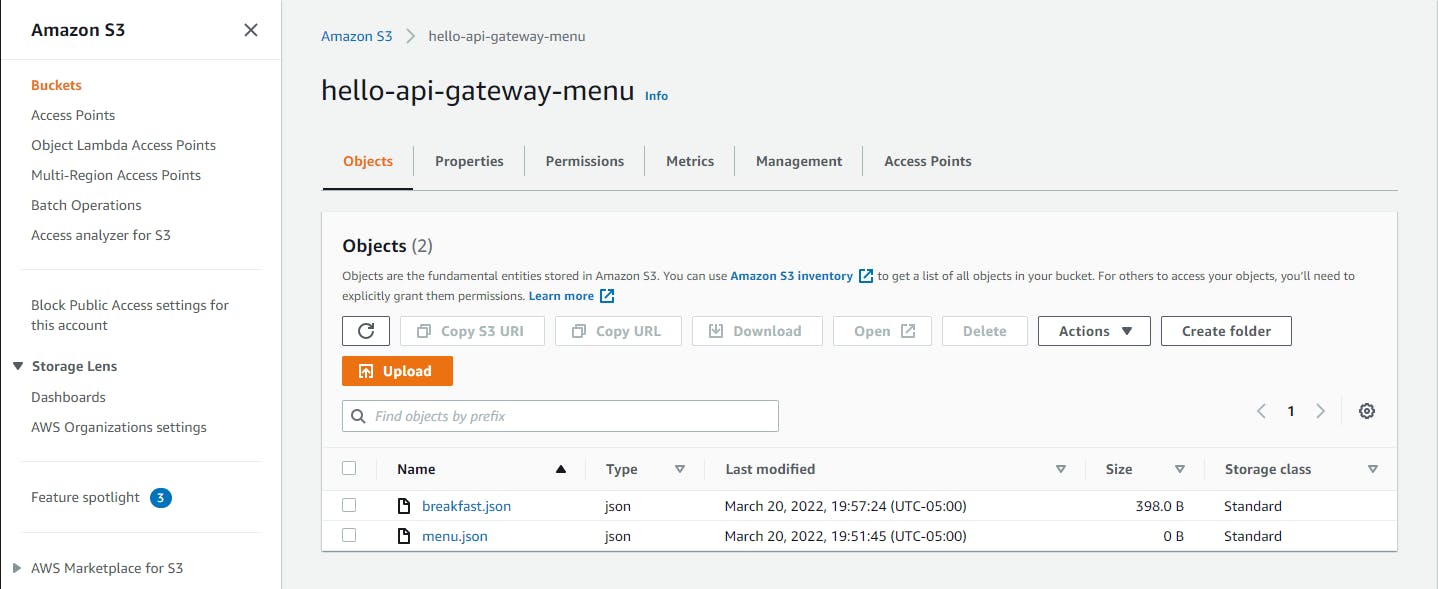
Give yourself a pat on the back. You've now passed a REST path parameter to a Lambda function via Amazon API Gateway.
Function.cs
using Amazon.Lambda.APIGatewayEvents;
using Amazon.Lambda.Core;
using Amazon.S3;

[assembly: LambdaSerializer(typeof(Amazon.Lambda.Serialization.SystemTextJson.DefaultLambdaJsonSerializer))]

namespace MenuPut
{
    public class Function
    {
        const string BUCKET = "[BUCKET-NAME]";

        IAmazonS3 S3Client { get; set; }

        /// <summary>
        /// Constructor. Create S3 client.
        /// </summary>
        public Function()
        {
            S3Client = new AmazonS3Client();
        }

        /// <summary>
        /// Constructs an instance with a preconfigured S3 client. This can be used for testing the outside of the Lambda environment.
        /// </summary>
        /// <param name="s3Client"></param>
        public Function(IAmazonS3 s3Client)
        {
            this.S3Client = s3Client;
        }

        /// <summary>
        /// Store menu JSON in S3 menu object.
        /// </summary>
        /// <param name="request">API Gateway proxy request containing body (menu JSON) and optional path parameter 'name'.</param>
        /// <param name="context">Lambda context object used for logging</param>
        /// <returns></returns>
        public async Task<APIGatewayProxyResponse> FunctionHandler(APIGatewayProxyRequest request, ILambdaContext context)
        {
            try
            {
                var menuJson = request.Body;
                context.Logger.LogLine($"Menu JSON: {menuJson}");

                var name = "menu";
                if (request.PathParameters != null && request.PathParameters.ContainsKey("name"))
                {
                    name = request.PathParameters["name"];
                }

                context.Logger.LogLine($"Updating menu {name}");
                await PutMenu(name, menuJson);

                return new APIGatewayProxyResponse
                {
                    StatusCode = 200,
                    Body = $"Updated menu {name}.json"
                };
            }
            catch (Exception ex)
            {
                return new APIGatewayProxyResponse
                {
                    StatusCode = 500,
                    Body = ex.ToString()
                };
            }
        }

        private async Task PutMenu(string name, string menuJson)
        {
            var response = await S3Client.PutObjectAsync(new Amazon.S3.Model.PutObjectRequest()
            {
                BucketName = BUCKET,
                Key = name + ".json",
                ContentType = "text/json",
                ContentBody = menuJson
            });
        }
    }
}
Step 7: Extend the GET API method to support a REST path parameter
In this step, you'll make a similar change so the GET method can also use a name path parameter. This will allow retrieval of menus by name.
In the AWS console, navigate to API Gateway.
Select the menu API.
In the left panel, select /{name}.
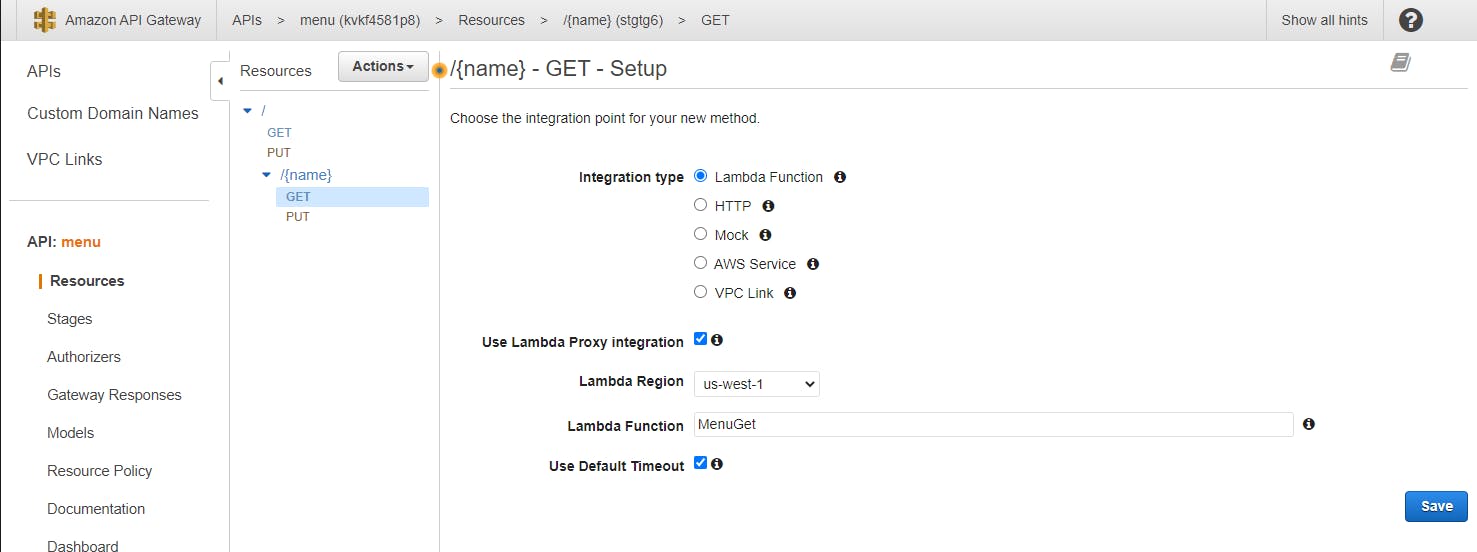
From the Action drop-down, select Create Method and enter/select the following:
A. Select GET and click the checkbox icon button.
B. Integration type: Lambda Function.
C. Use Lambda Proxy Integration: check.
D. Lambda Region: your region.
E. Lambda Function: select MenuGet.
F. Click Save and click OK to confirm the permission notification.
In Visual Studio, open the MenuGet solution and open Function.cs in the code editor. Replace FunctionHandler with the updated code at the end of this step. Replace [BUCKET-NAME] with your bucket name. Save your change and build the code.
The new code checks whether API Gateway has provided a path parameter name. If it is, that name is used for the menu name. If not, the default of menu is used as in the original implementation.
In Solution Explorer, right-click the MenuGet project and select Publish to AWS Lambda. Complete the wizard and deploy the updated MenuGet function to AWS Lambda. Wait for deployment to complete.
In the AWS console, navigate to API Gateway and view the menu API.
On the left panel, select the bottom item (the second GET method).

To the right click Test and enter/select the following:
A. {name}: breakfast.
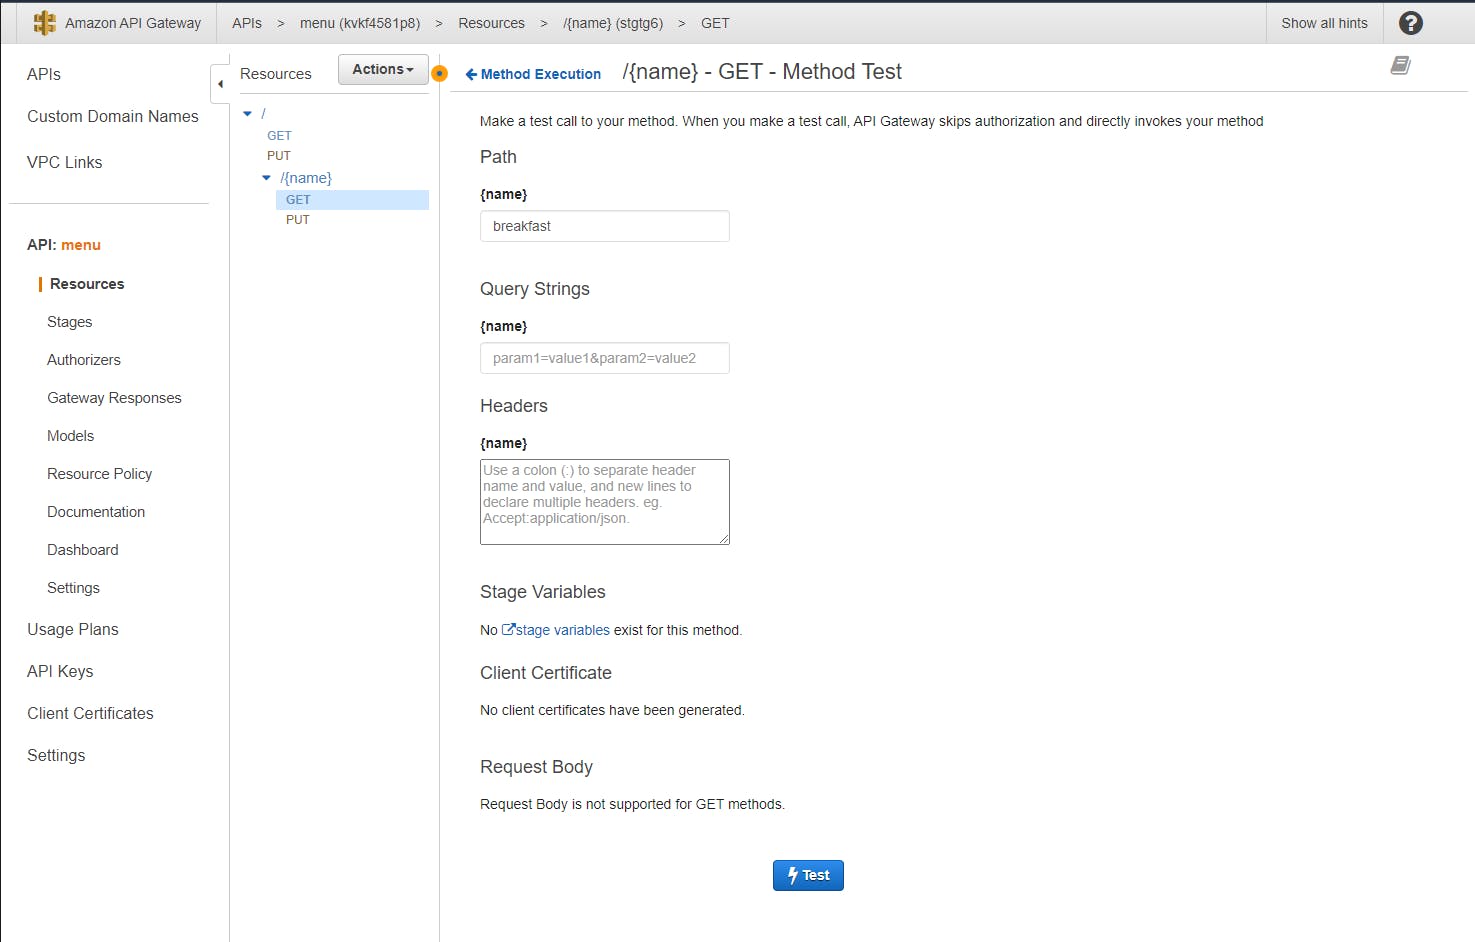
B. Click Test to call the API method. The response should contain the breakfast menu JSON you stored in Step 6.
You've now fully implemented our API.
Function.cs
using Amazon.Lambda.APIGatewayEvents;
using Amazon.Lambda.Core;
using Amazon.S3;

[assembly: LambdaSerializer(typeof(Amazon.Lambda.Serialization.SystemTextJson.DefaultLambdaJsonSerializer))]

namespace MenuGet
{
    public class Function
    {
        const string BUCKET = "[BUCKET-NAME]";

        IAmazonS3 S3Client { get; set; }

        /// <summary>
        /// Constructor. Create S3 client.
        /// </summary>
        public Function()
        {
            S3Client = new AmazonS3Client();
        }

        /// <summary>
        /// Constructs an instance with a preconfigured S3 client. This can be used for testing the outside of the Lambda environment.
        /// </summary>
        /// <param name="s3Client"></param>
        public Function(IAmazonS3 s3Client)
        {
            this.S3Client = s3Client;
        }

        /// <summary>
        /// Retrieve menu JSON from S3 menu object.
        /// </summary>
        /// <param name="request">API Gateway proxy request.</param>
        /// <param name="context">Lambda context object used for logging</param>
        /// <returns>menu JSON</returns>
        public async Task<APIGatewayProxyResponse> FunctionHandler(APIGatewayProxyRequest request, ILambdaContext context)
        {
            try
            {
                context.Logger.LogLine($"Retrieving menu");

                var name = "menu";
                if (request.PathParameters != null && request.PathParameters.ContainsKey("name"))
                {
                    name = request.PathParameters["name"];
                }

                var menuJson = await GetMenu(name);

                return new APIGatewayProxyResponse
                {
                    StatusCode = 200,
                    Body = menuJson
                };
            }
            catch (Exception ex)
            {
                return new APIGatewayProxyResponse
                {
                    StatusCode = 500,
                    Body = ex.ToString()
                };
            }
        }

        private async Task<string> GetMenu(string name)
        {
            var response = await S3Client.GetObjectAsync(BUCKET, name + ".json");
            using (var reader = new StreamReader(response.ResponseStream))
            {
                return await reader.ReadToEndAsync();
            }
        }
    }
}
Step 8: Deploy the API
Although we've been testing our API in the console, it is not yet deployed. In this step, you'll deploy the API so that it can be accessed over the Internet.
Be security-conscious: since we are not securing our API in this tutorial, do not leave the API published for very long. The final step in this tutorial deletes the AWS artifacts.
In the AWS console, navigate to API Gateway > APIs. Click on the menu API to view its detail.
Select / in the left panel.
From the Actions menu, select Deploy API.
A. Deployment stage: select [New Stage].
B. Stage name: test.
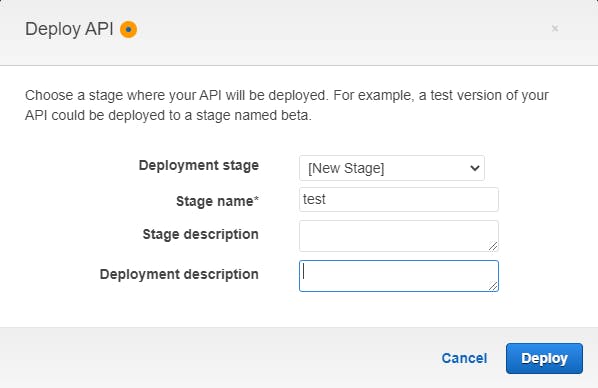
C. Click Deploy. Your API is deployed, and you see a page full of details about it.
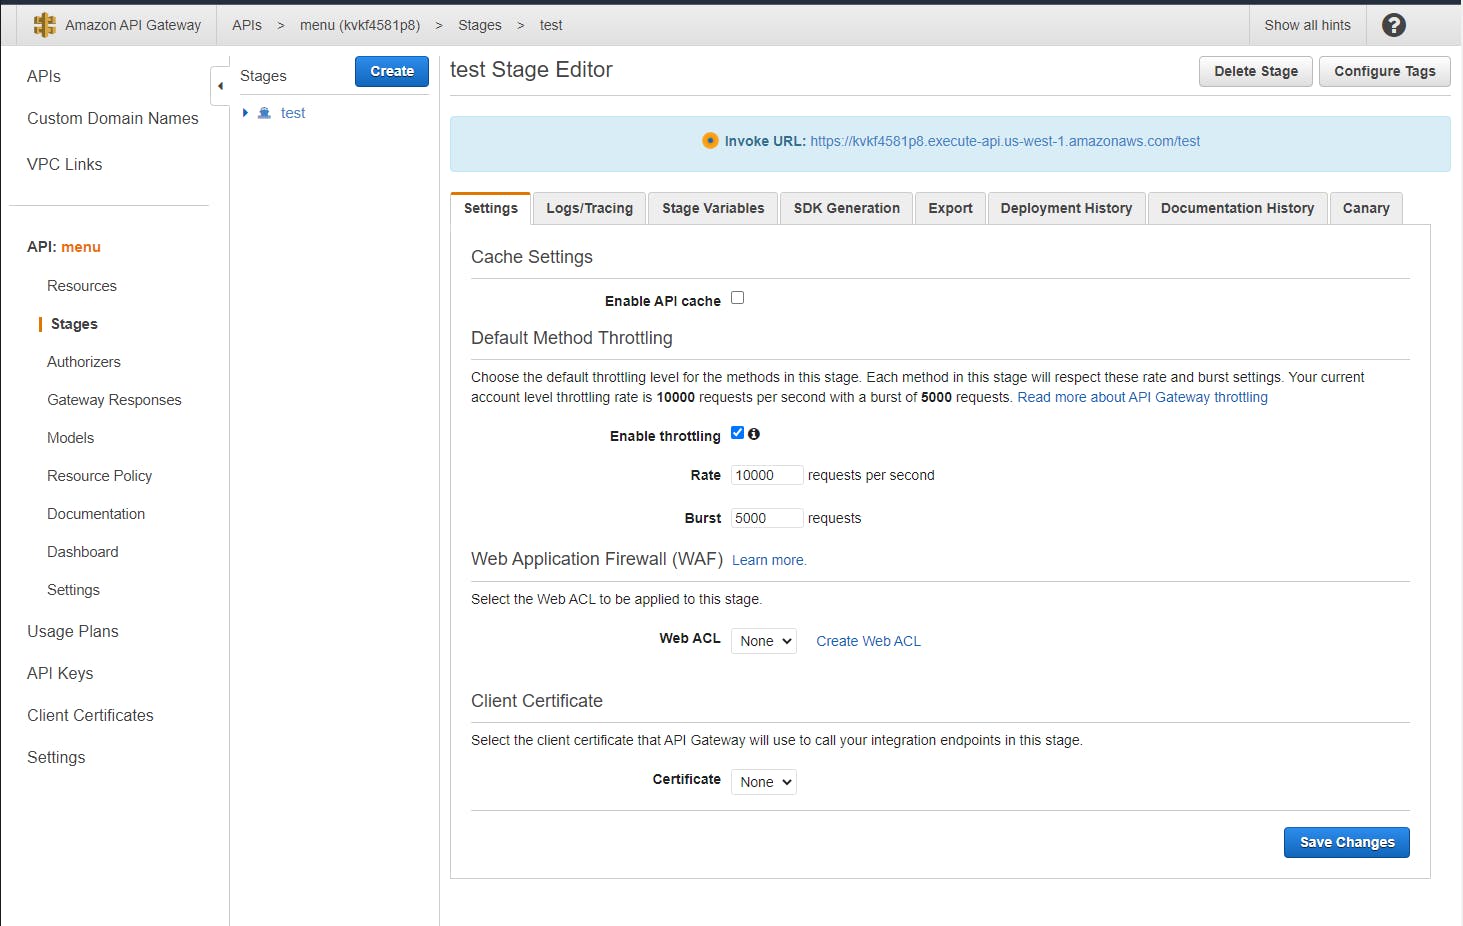
D. An Invoke URL is displayed at top. Copy the URL to the clipboard.
E. In a browser, visit the URL, and your original menu.json should appear. Next, add "/breakfast" to the end of the path. Your breakfast.json should appear.
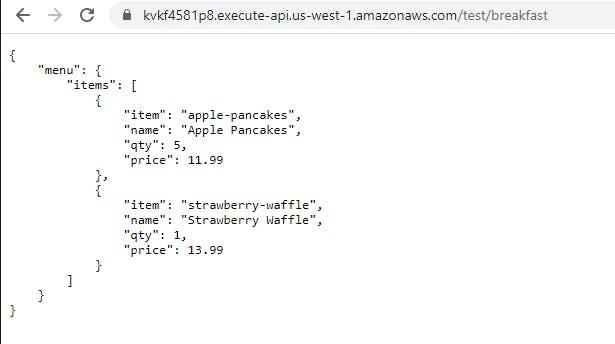
Congratulations! You've now accessed your API publicly and seen it retrieve data from S3. If you like, you can exercise your API using Curl, Postman, or whatever tool you prefer for testing HTTP requests.
Step 9: Delete AWS Artifacts
When you're finished with the Hello, API Gateway project, follow these steps to shut it down. You don't want to risk unintentional charges for something you're not using. Since we did not secure our API in this tutorial, it's important to not leave it active.
In the AWS console, navigate to API Gateway > APIs. Select the menu API and choose Delete from the Actions menu. Confirm the prompts to delete the API.
Navigate to AWS Lambda > Functions. Check the boxes next to the MenuGet and MenuPut functions, then select Delete from the Actions dropdown. Confirm the prompts to delete the functions.
Navigate to Amazon S3. Select your menu bucket. Delete each object in the bucket, and then the bucket itself. Confirm the prompts.
Where to Go From Here
Amazon API Gateway makes it easy to define APIs and connect them to your back-end systems. In this tutorial, you defined two Lambda functions to store and retrieve a menu, then defined an API that connected them to PUT and GET methods. After that, you added a REST path parameter for menu name and updated those Lambda functions to use the parameter when present. As we did so, you received some exposure to the API Gateway UI for defining APIs.
We did not cover API security in this tutorial, and you'll want to get that in place before doing anything more than a Hello, Cloud. You'll want to understand the differences between HTTP, REST, and Websocket APIs, explore API Gateway's features, and understand how to observe and monitor your APIs.
Further Reading
AWS Documentation
Announcing HTTP APIs for Amazon API Gateway
Announcing WebSocket APIs in Amazon API Gateway
Controlling and managing access to A REST API in API Gateway
Integrate a REST API with an Amazon Cognito user pool
Control access to a REST API using Amazon Cognito user pools as authorizer
Reference
Forbes: The History and Rise of APIs
Microservice Architecture: Pattern: API Gateway / Backends for Frontends
Videos
Amazon API Gateway - How to Build HTTP APIs by Rahul Nath
An Introduction to AWS API Gateway with AWS Lambda (.NET Core 3.1 Application by DotNetCore Central
Secure Amazon API Gateway REST API using Lambda Authorizer - C# and .NET Core 3.1
Blogs
Amazon API Gateway for the .NET Developer - How to Build HTTP APIs by Rahul Nath