


Table of contents
- This episode: Amazon Alexa and voice applications. In this Hello, Cloud blog series, we're covering the basics of AWS cloud services for newcomers who are .NET developers. If you love C# but are new to AWS, or to this particular service, this should give you a jumpstart.
- Amazon Alexa : What is it, and why use It?
- Our Hello, Alexa Project
- Where to Go From Here
- Further Reading
This episode: Amazon Alexa and voice applications. In this Hello, Cloud blog series, we're covering the basics of AWS cloud services for newcomers who are .NET developers. If you love C# but are new to AWS, or to this particular service, this should give you a jumpstart.
In this post we'll introduce Amazon Alexa and use it in a "Hello, Cloud" .NET program to create a simple voice skill. We'll do this step-by-step, making no assumptions other than familiarity with C# and Visual Studio. We're using Visual Studio 2022 and .NET 6.
Amazon Alexa : What is it, and why use It?
"The human voice is the most beautiful instrument of all, but it is the most difficult to play. —Richard Strauss
Voice assistants are cropping up everywhere, and there's a simple reason for that: they work well, and they're free. The notion of a computer you could talk to in natural language was popularized back in the original 1960's Star Trek TV series, and I remember well various attempts by tech companies to bring this vision to life over the decades that followed. They were anything but promising. You had to train them to understand your voice, or perhaps it was more accurate to say that they trained you. All of that changed in the last decade, with voice assistants that require no training and just work.
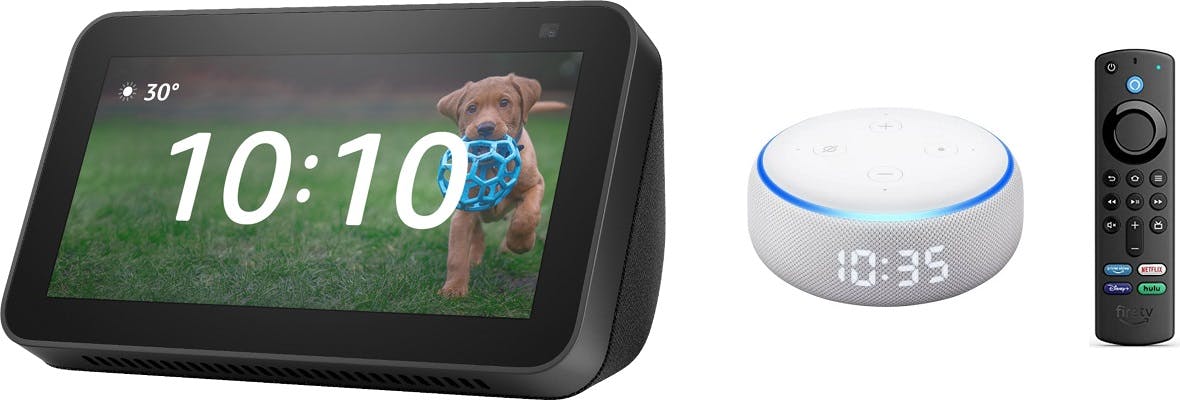
Amazon Alexa (hereafter "Alexa") is Amazon's voice assistant. Amazon describes it as "a cloud-based voice service available on millions of devices from Amazon and third-party manufactures." Today, Alexa integrates into a great many devices, including a variety of Amazon Echo and Amazon Fire TV devices, some of which have displays. My clock radio has been replaced by an Amazon Echo Show 5. I have an Echo Dot in my home office. I have a Fire TV Stick. I can talk to all of these devices.
Alexa features include smart home, productivity, shopping, entertainment, news, routines, information, games, photos, and audio. There is no charge or monthly fee for Alexa, aside from the cost of purchasing an Alexa-enabled device. If having listening devices in your home concerns you, read up on Alexa Privacy, which explains Alexa's privacy and security protections.
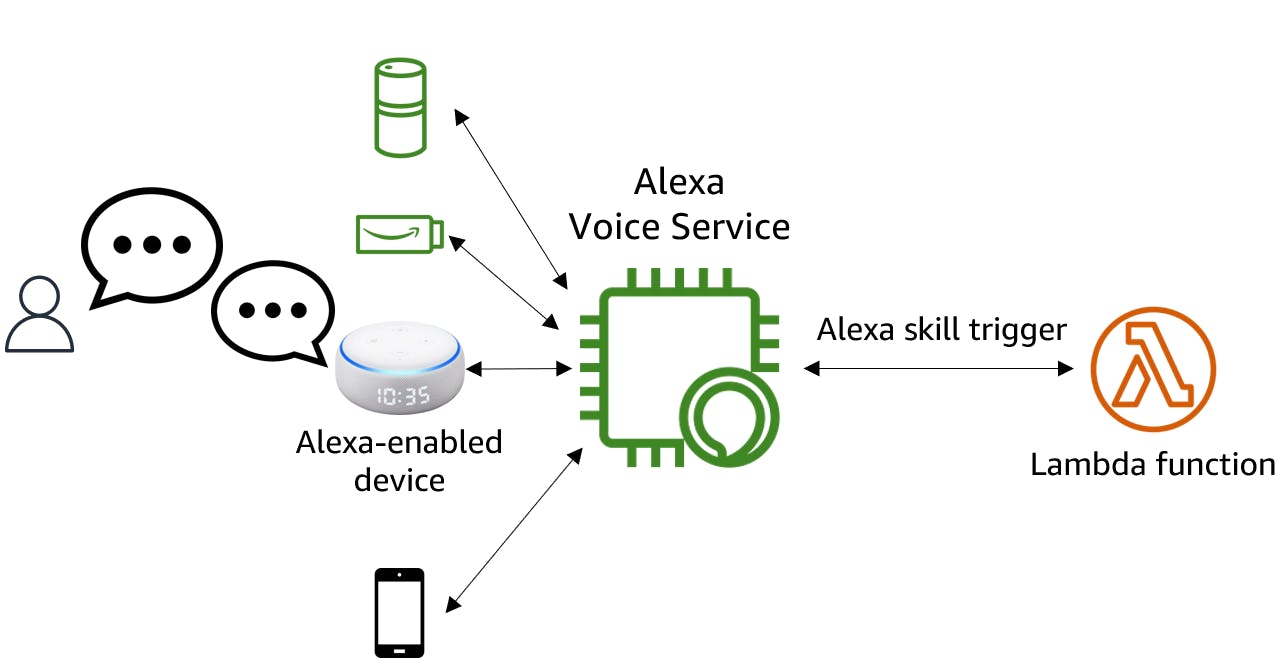
The user experience with Alexa is easy to understand, since you've probably experienced it already—but how does it work, and how can you work with Alexa programmatically? Developers can create their own Alexa voice applications, called skills. An Alexa skill triggers an AWS Lambda function, which responds to voice queries and can drive a dialog.
Concepts
An Alexa skill is defined with a model, composed of the following:
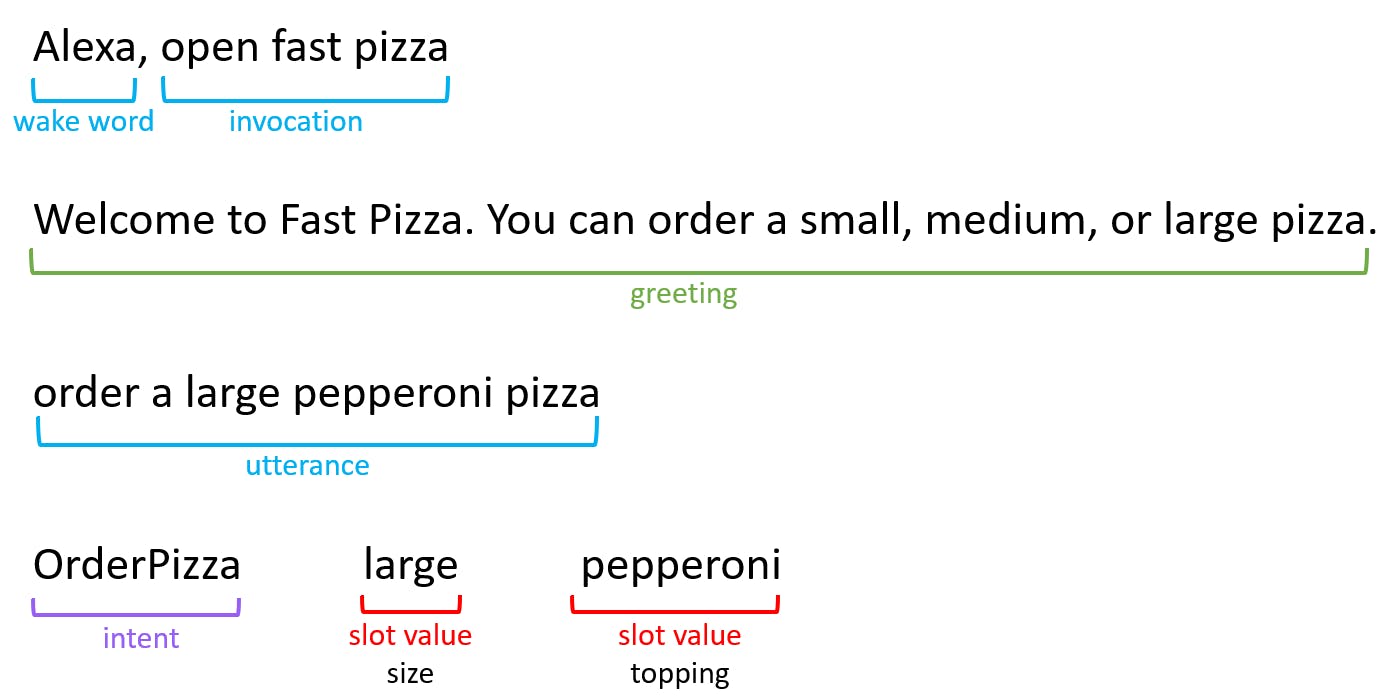
- An invocation name is what identifies the skill so it can be invoked. Example: "fast pizza".
- Intents are actions the user can do with the skill. For example, "OrderPizza".
- Utterances are phrases that signal an intent. For example, "I want pizza" and "order a pizza" are two utterances that might signal the same intent, "OrderPizza".
- A slot is a variable that can appear in utterances, which the user can supply with recognized values. For example, in the utterance "order a {size} {topping} pizza", the
sizeslot could accept small, medium, and large and thetoppingslot could allow tomatoes, sausage, cheese, or pepperoni as values. - An endpoint is a service that responds to intents. This can be an AWS Lambda function, but doesn't have to be.
Our Hello, Alexa Project
We will create a simple Alexa skill that reports the current time in a variety of locations. We'll write a C# Lambda function to be the back-end for this skill. In future posts, we'll build more elaborate skills that sustain a dialog.
One-time Setup
For any of the tutorials in the Hello, Cloud series you need the following:
- An AWS account, and an understanding of what is included in the AWS Free Tier.
- Microsoft Visual Studio 2022. If you're using an older version of Visual Studio you won't be able to use .NET 6. If you use a different IDE, you may have to find alternatives to some tutorial steps.
- AWS Toolkit for Visual Studio. You'll need to configure the toolkit to access your AWS account and create an IAM user. Your default AWS profile will be linked to this user when running programs from the command line.
Step 1: Create an Alexa Skill
In this step, you'll set up an Amazon Developer Account and create an Alexa skill.
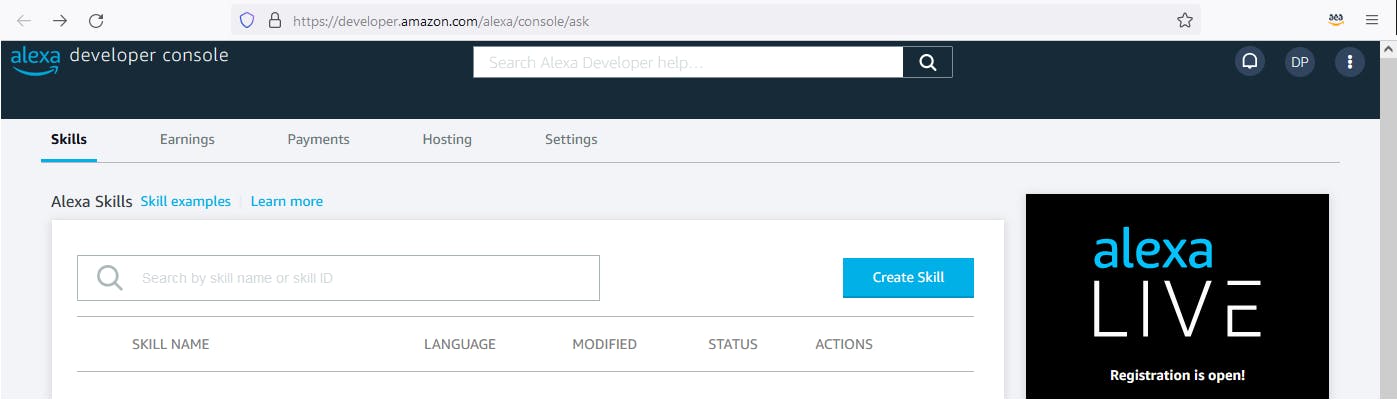
To develop for Alexa, you'll need to sign up for an Amazon Developer Account.
Once you have your developer account, sign in and navigate to the Amazon Alexa area.
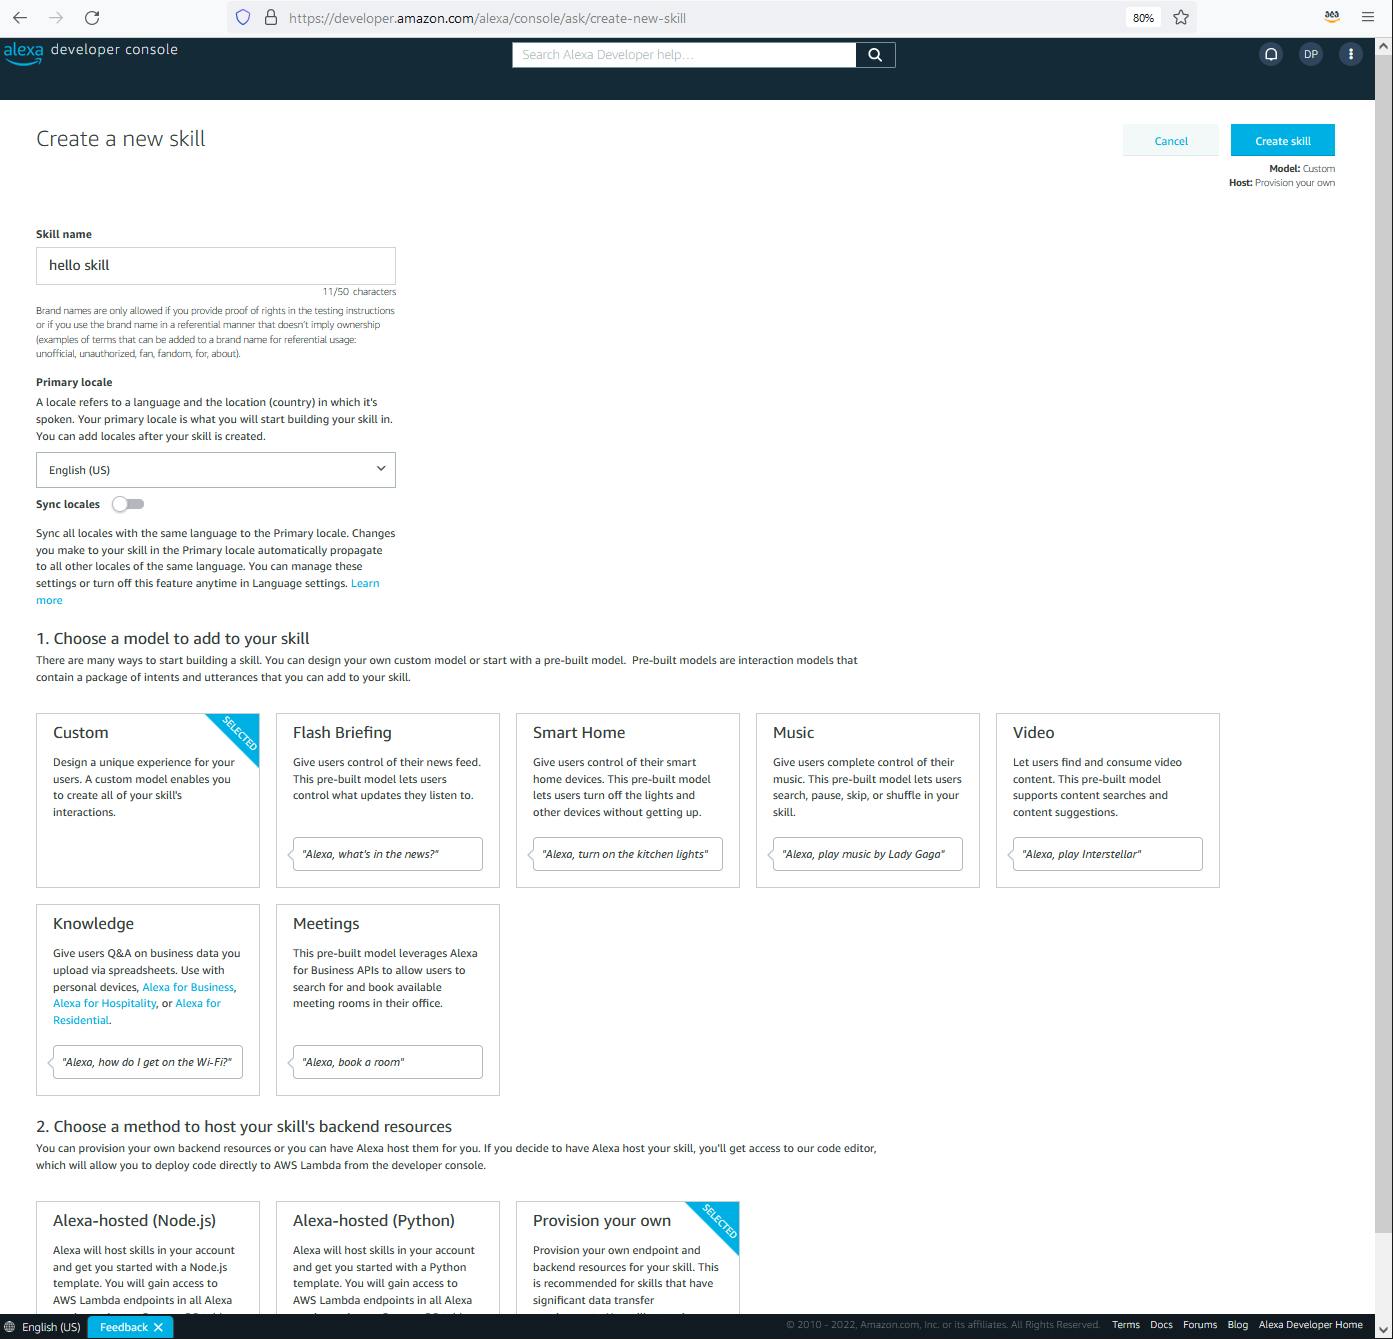
Create a new skill:
A. Click the Create Skill button.
B. Skill name: hello skill (hello alexa is not allowed).
C. Choose a model to add to your skill: select Custom.
D. Choose a method to host your skill's backend resources: select Provision your own.
E. Click Create skill.
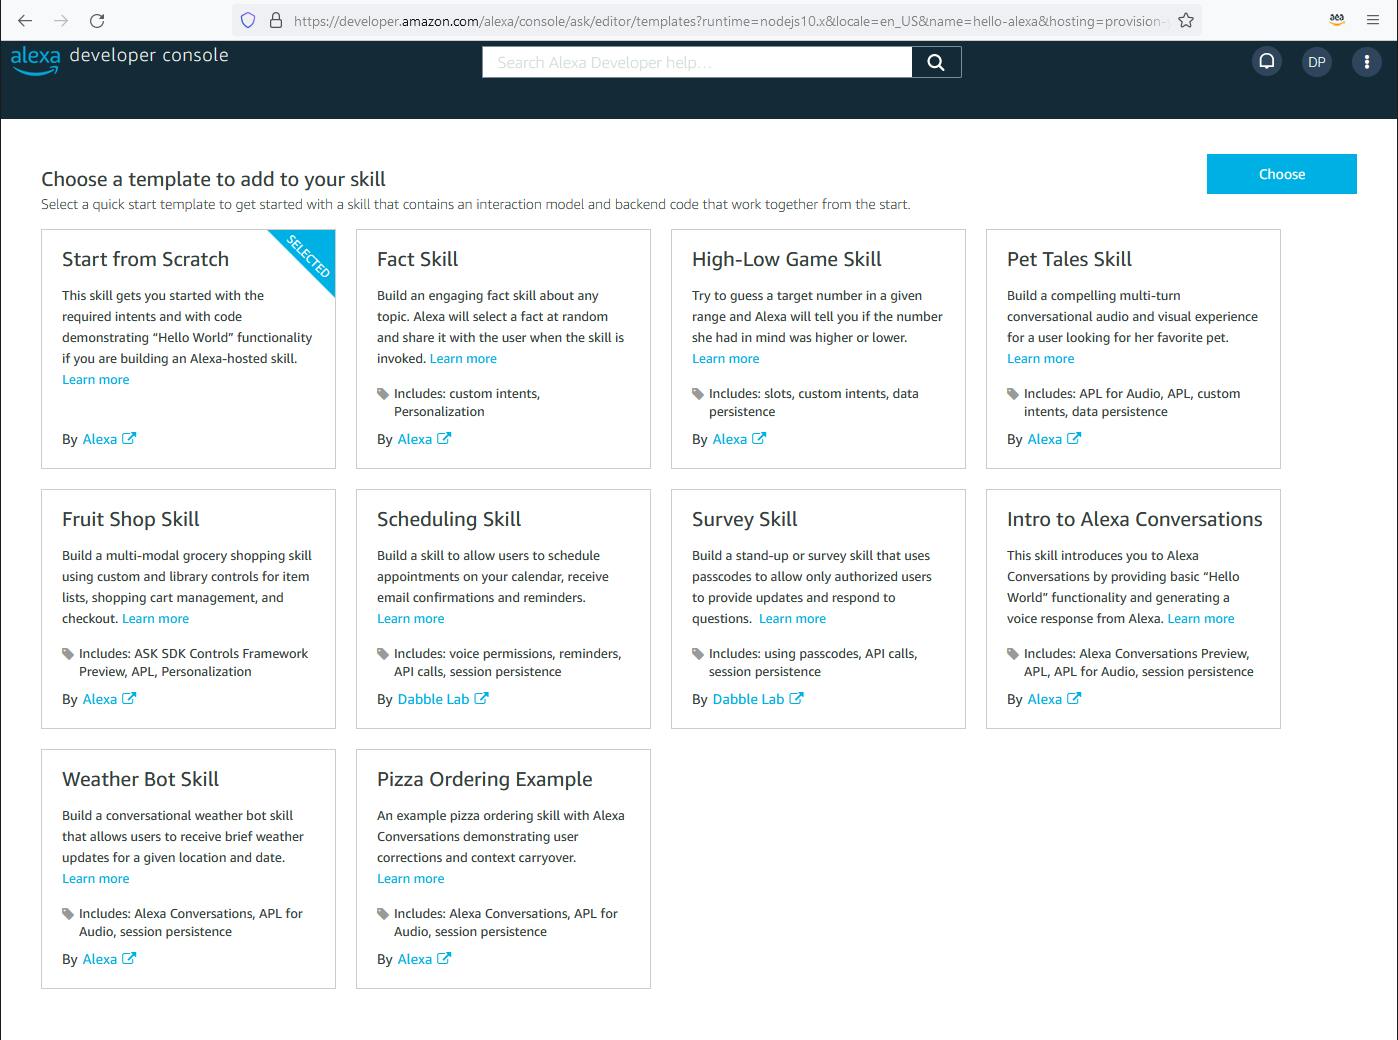
F. Choose a template to add to your skill: select Start from Scratch.
G. Click the Choose button.
D. Wait for your skill to be created.
Once you see the main development dashboard displayed without any wait messages, continue on.
Step 2: Build a Model for the Skill
In this step, you'll define the model for your skill, which consists of intents, utterances, and slots. We'll be creating a simple skill that tells you what time it is in a location - for example, "What time is it in Chicago?"
On the Developer dashboard, find the checklist at right and click on 1. Invocation.
A. Skill invocation name: hello skill.
B. Click the Save Model toolbar button at top.
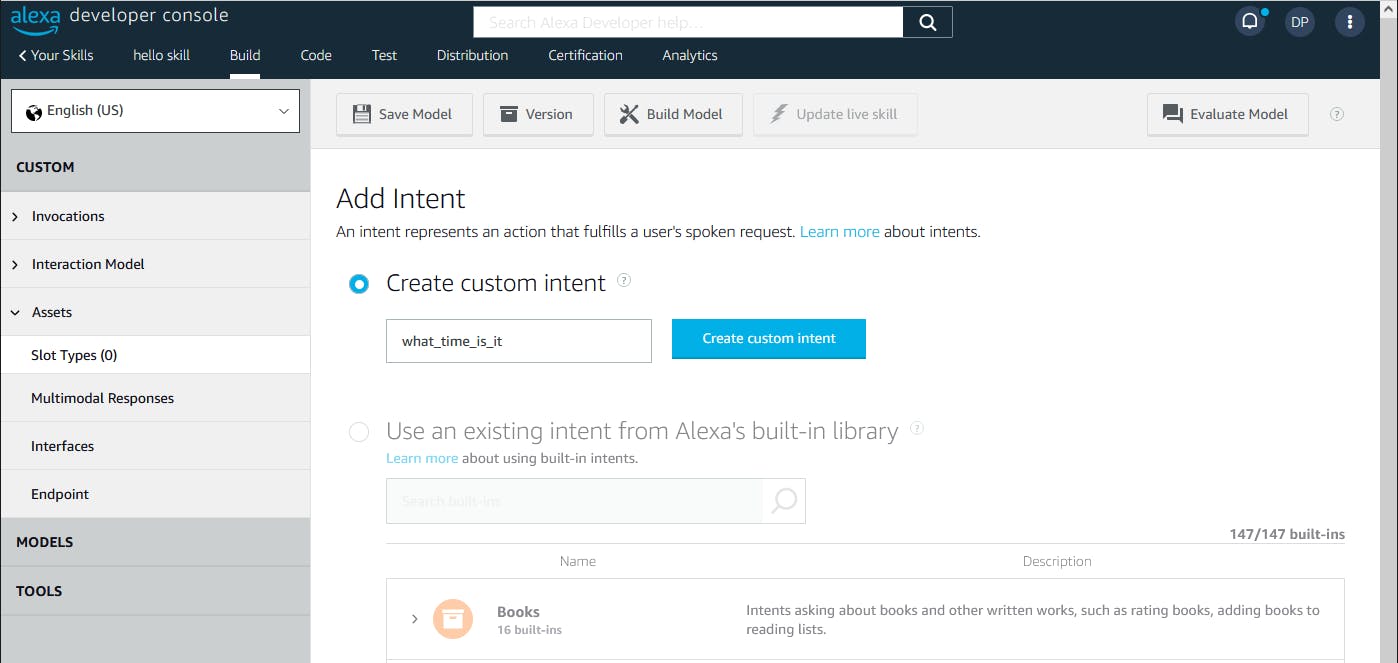
Select Build in the top navigation to return to checklist, and click 2. Intents, Samples, and Slots. Then do the following to add an intent:
A. On the Add intent page, select Create custom intent and enter name what_time_is_it.
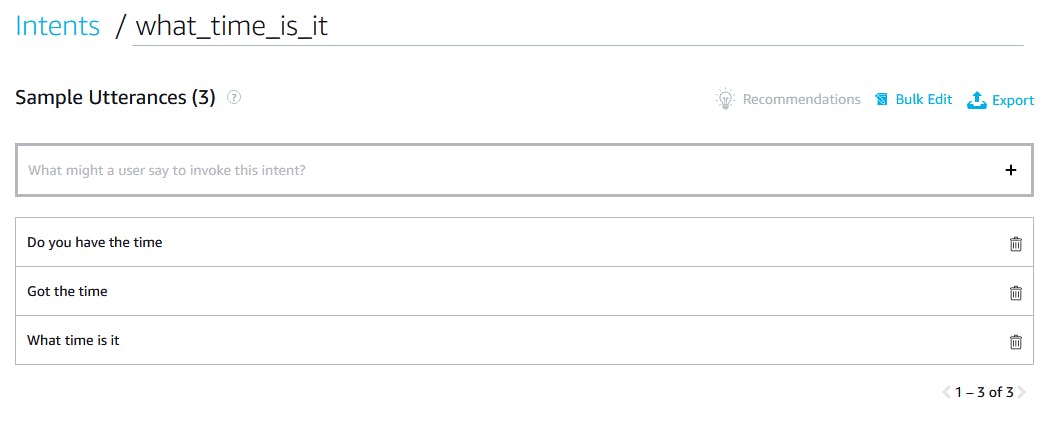
B. Click Create custom intent. Now you are on the Intents / what_time_is_it page.
C. In the Sample Utterances input box, enter What time is it and click the plus sign (+) at right.
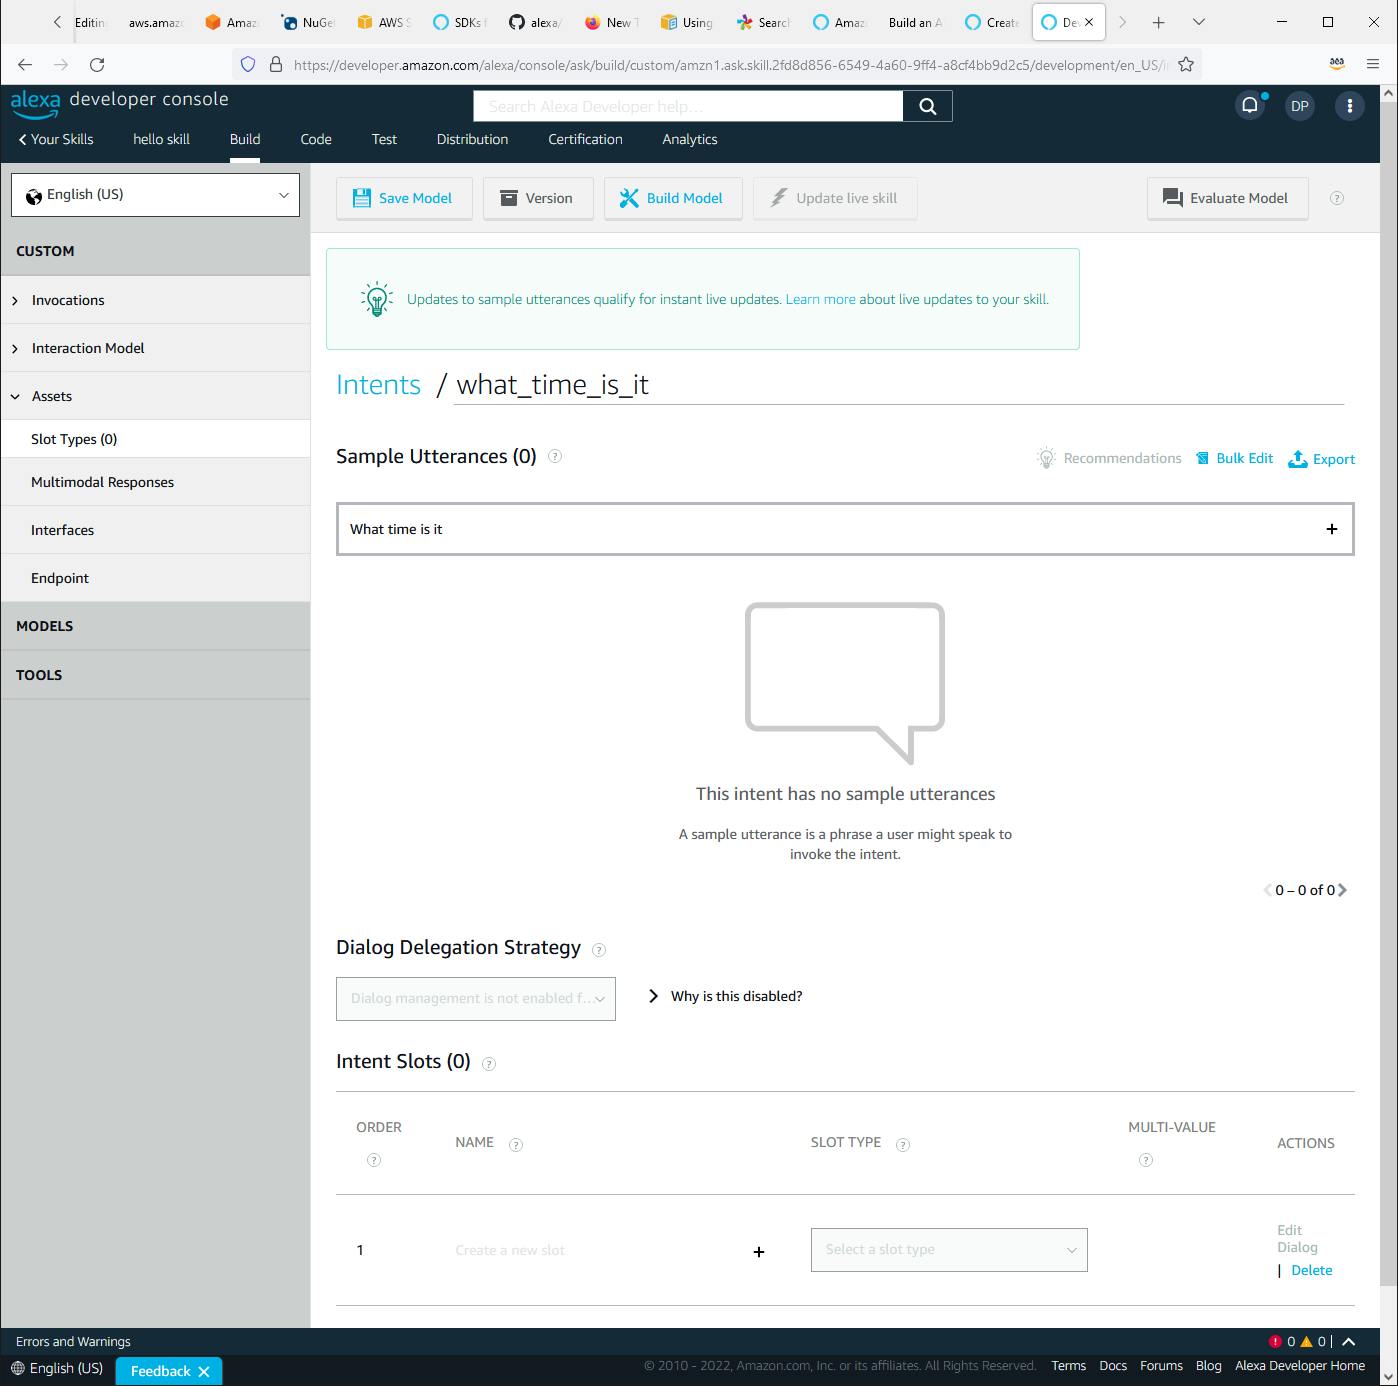
D. Enter several more utterance phrases, such as Got the time and Do you have the time. Feel free to add other phrases that signal the intent of inquiring what time it is.
E. Enter this utterance: What time is it in {location}. {location} is a placeholder for a place the user can say, such as "Chicago" or "Dallas". As you enter the phrase, a pop-up asks you to select an existing slot or add a new one.
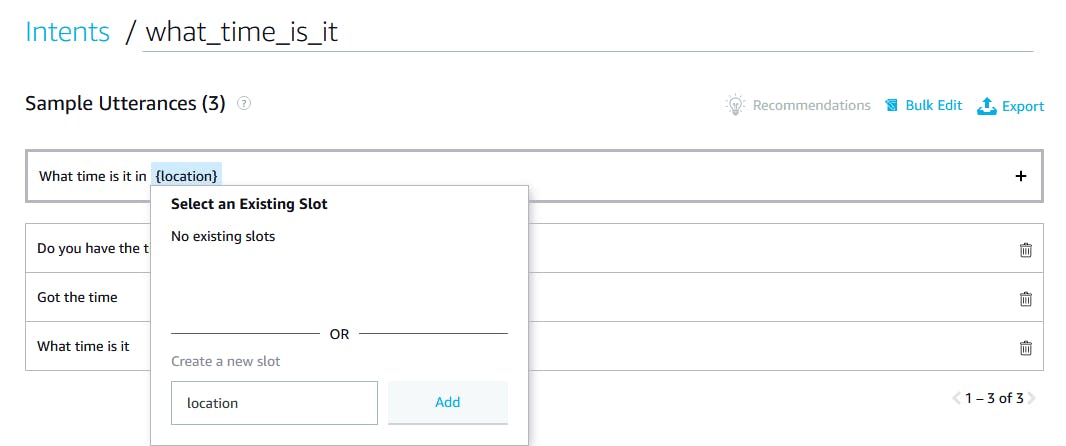
F. Click Add to add a new slot named location.
G. Click the plus sign (+) to add the utterance.
H. Click Save Model.
In the outline at left, select Slot Types.
A. Click Add Slot Type.
B. Select Create a custom slot type with values.
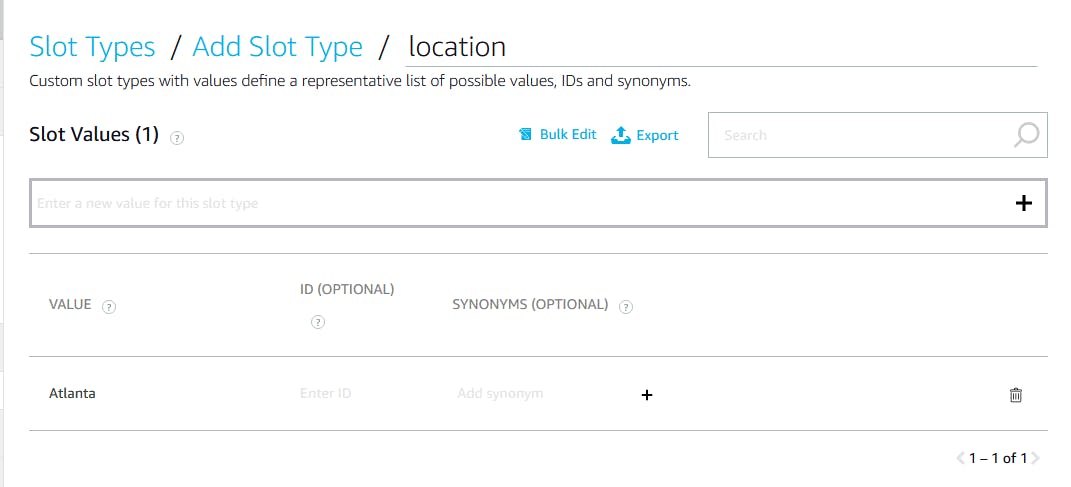
C. In the input box, enter a place name location and click Next.

D. On the Slot Types / Add Slot Type / location page, set Slot Type to location.
E. enter a city name such as Atlanta and click the plus sign (+).
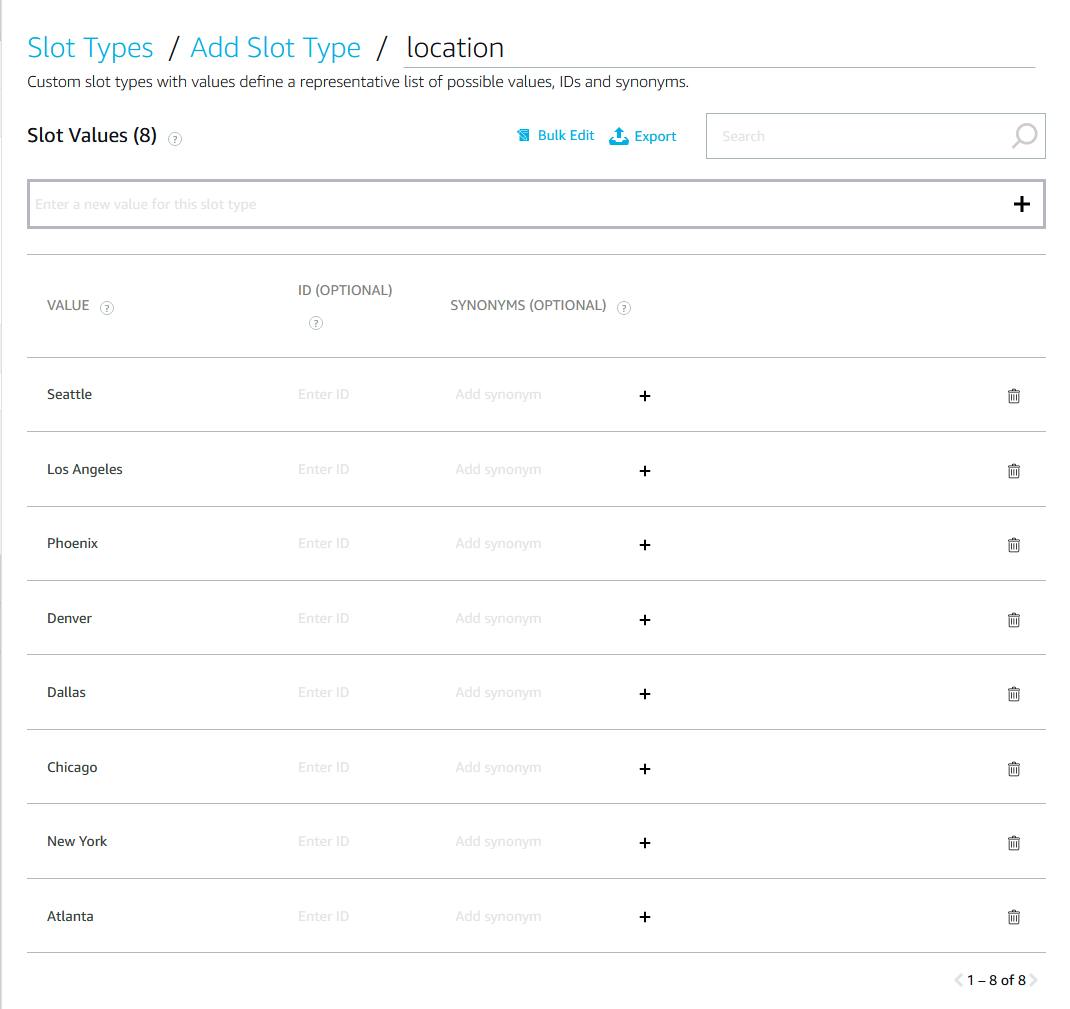
F. Repeat sub-step D to enter more city names so that you have cities covering several time zones. We are using Atlanta, New York (US eastern time), Chicago, Dallas (central time), Denver, Phoenix (mountain time), Los Angeles and Seattle (western time).
G. Under Slot Filling - Is the slot required to fulfill the intent?, toggle the switch on.
H. Click Save Model.
We now have a handful of cities defined, any of which will be understood as a valid value for {location} in our utterance, "What time is in in {location}?"
Do a sanity check in the developer portal against the definitions below. Make sure that everything is there, and that you have saved your changes with Save Model.
| Artifact | Property | Value |
| Invocation | Skill Invocation Name | hello skill |
| Intents / HelloWorldIntent | ... | (auto-generated from template) |
| Intents / what_time_is_it | Sample Utterances | what time is it in {location} |
| Do you have the time | ||
| Got the time | ||
| What time is it | ||
| Intents / what_time_is_it | Intent Slots | name location, slot type location |
| Intents / what_time_is_it / location | Slot Type | location |
| Intents / what_time_is_it / location | Slot Filling - Is this slot required to fulfill the intent? | YES |
| Intents / what_time_is_it / location | Slot Filling - Alexa speech prompts | What location do you want the time for? |
| Assets / Endpoint | Your Skill ID | amzn1.ask.skill.xxxxxxxxxxxxxxxxx |
| Assets / Endpoint | Default Region | arn:aws:lambda:xxxxxxxxxx |
| Slot Types | NAME | location |
| Slot Types / location | VALUE | Seattle |
| Slot Types / location | VALUE | Los Angeles |
| Slot Types / location | VALUE | Phoenix |
| Slot Types / location | VALUE | Denver |
| Slot Types / location | VALUE | Dallas |
| Slot Types / location | VALUE | Chicago |
| Slot Types / location | VALUE | New York |
| Slot Types / location | VALUE | Atlanta |
| Slot Types / location | Slots Using (location) | what_time_is_it |
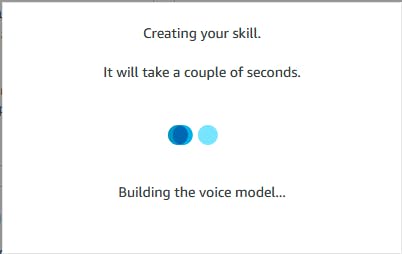
Click Build Model to build your model. Wait for a Build Completed message. If any errors are reported, double check that you correctly completed the above steps.

Select JSON Editor from the outline at left, and you'll see your model of intents, utterances, and slots in JSON form. You'll notice this includes what you have defined, plus a "Hello, World" definition that was auto-generated for you. Ignore that pre-generated model for now, and notice that the intent, utterances, and slots you defined are listed in the JSON: you see your
what_time_is_itintent.

On the outline left, click Slot Types > Endpoint. Look for Your Skill ID and record it, which will look like
amzn1.ask.skill.xxxxxxxxxx-xxxx-xxxx-xxxx-xxxxxxxx.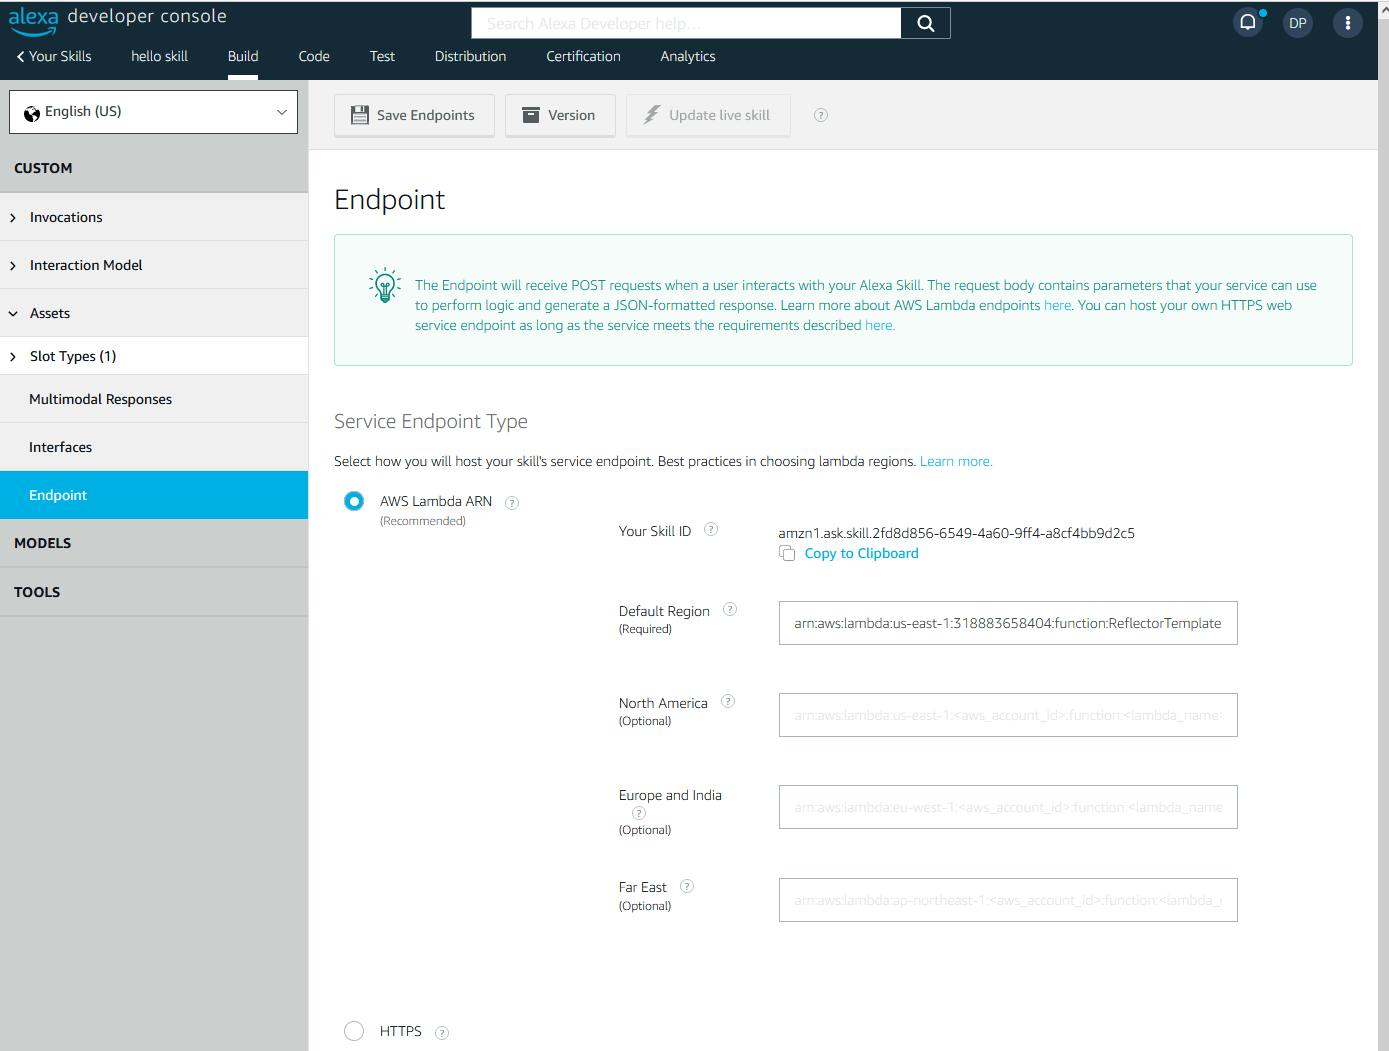
Step 3: Create a Lambda Function for the Back-end
In this step, you'll create the back-end for the Alexa skill, a C# Lambda function.
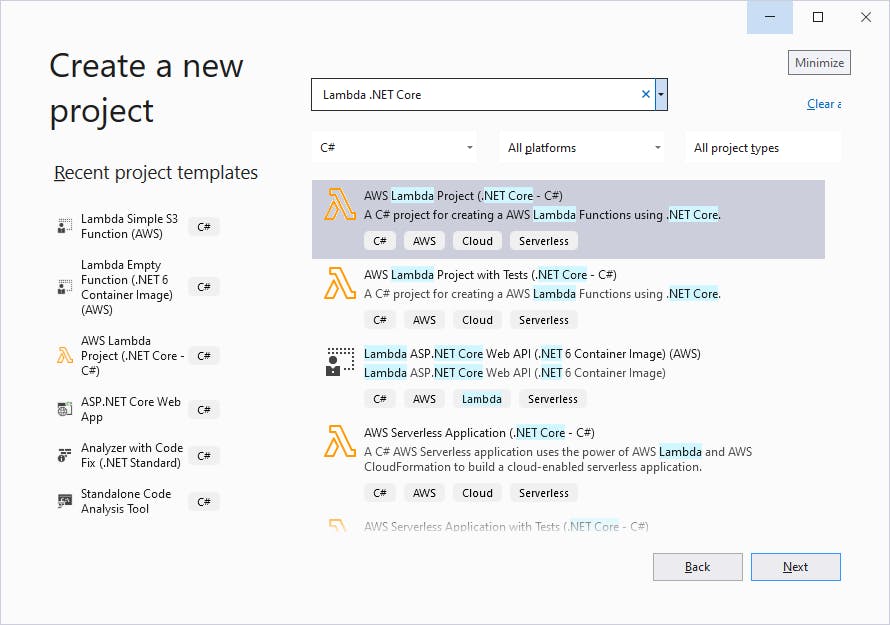
Launch Visual Studio 2022 and select Create a new project.
In the Create a new project wizard, find and select AWS Lambda Project (.NET Core - C#). Click Next.
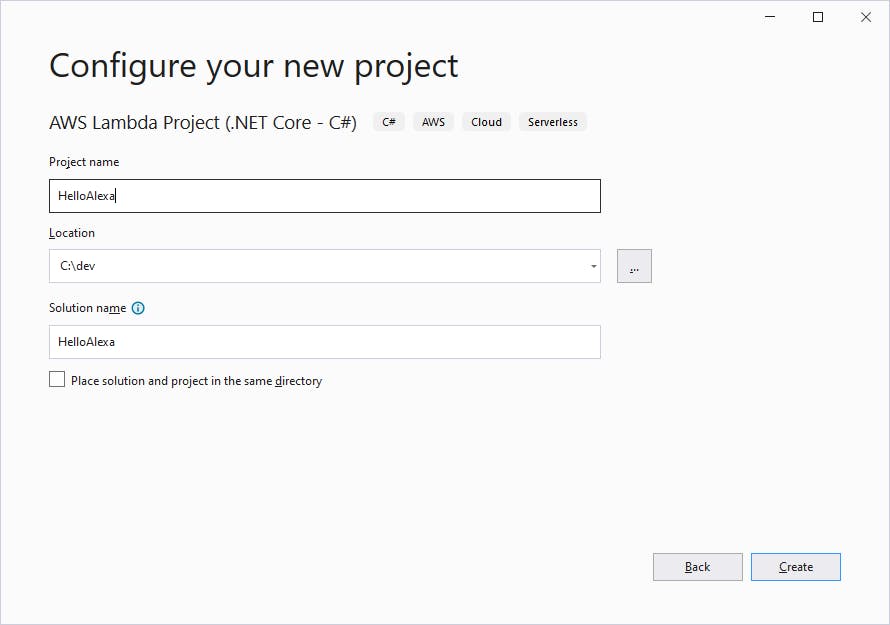
Name the project and solution HelloAlexa, select a development folder. Click Create.
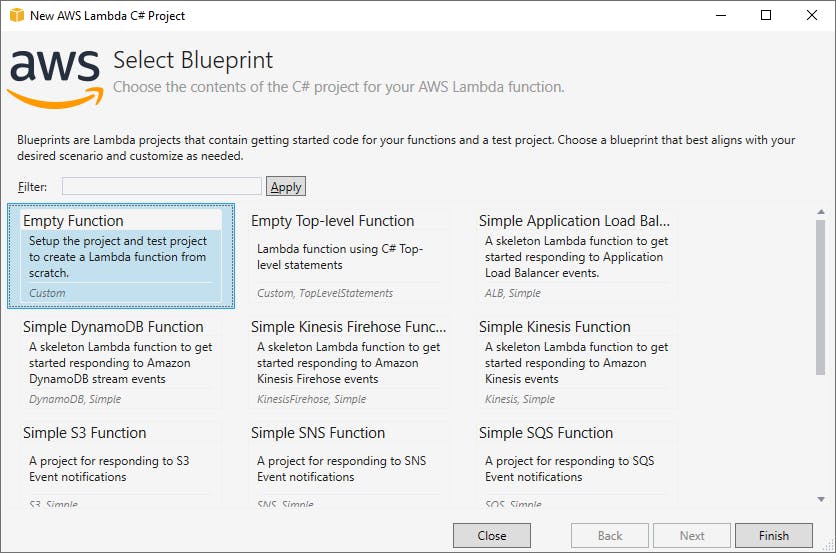
On the Select Blueprint page, select Empty Function and click Finish.
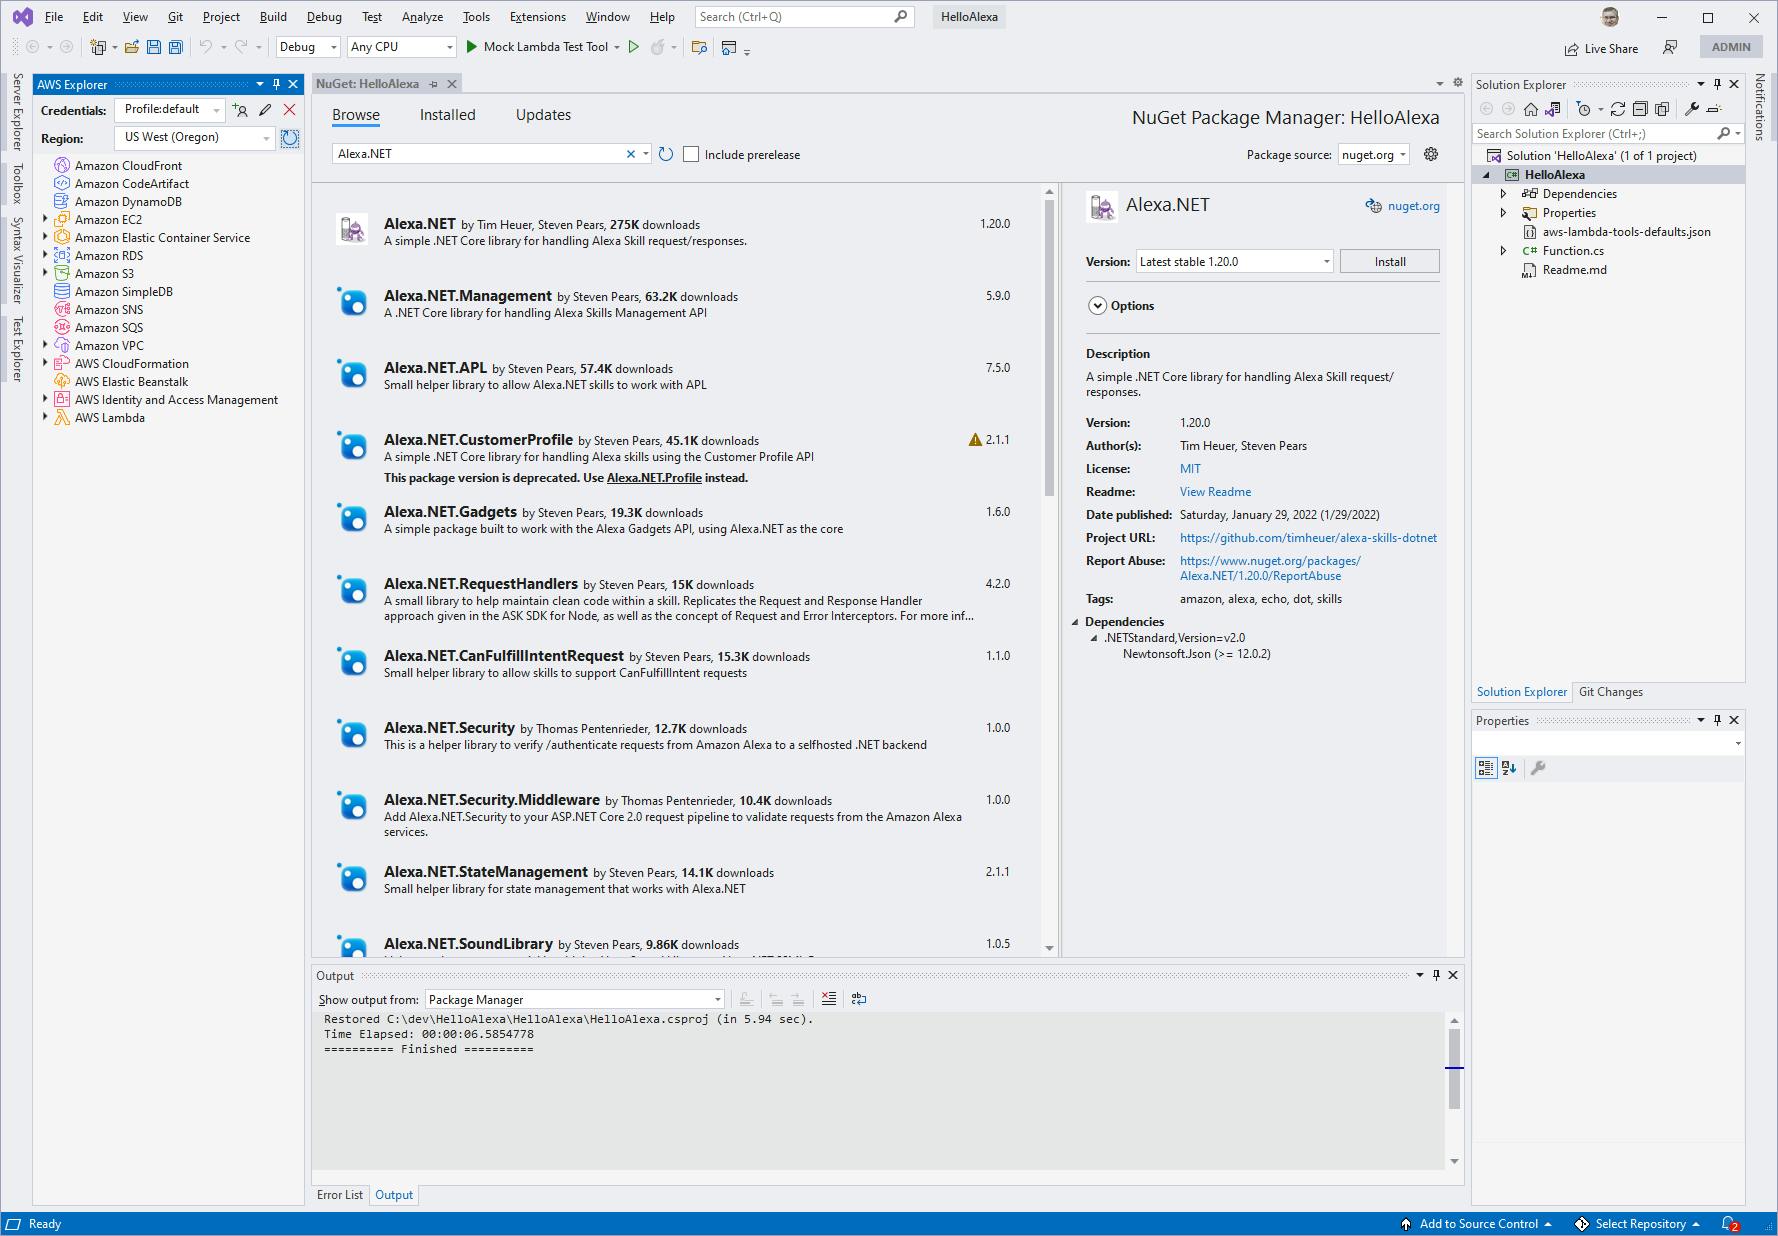
Add NuGet packages Alexa .NET and Amazon.Lambda.Serialization.Json:
A. In Solution Explorer, right-click the HelloAlexa project and select **Manage NuGet Packages..."
B. On the Browse tab, search for and install Alexa .NET. This package by Tim Heuer provides convenient .NET classes for working with the Alexa API from .NET.
C. In the same way, find and add the Amazon.Lambda.Serialization.Json package.
Open Function.cs in the code editor. The template provides a very simple default function that accepts a string and returns an upper-case version of it.
Replace the code with code at the end of this step.
Function.cs
using Amazon.Lambda.Core;
using Alexa.NET.Response;
using Alexa.NET.Request;
using Alexa.NET.Request.Type;
using Newtonsoft.Json;
using Alexa.NET;

// Assembly attribute to enable the Lambda function's JSON input to be converted into a .NET class.
[assembly: LambdaSerializerAttribute(typeof(Amazon.Lambda.Serialization.Json.JsonSerializer))]

namespace HelloAlexa;

public class Function
{
    public SkillResponse FunctionHandler(SkillRequest input, ILambdaContext context)
    {
        ILambdaLogger log = context.Logger;
        log.LogLine($"Skill Request Object:" + JsonConvert.SerializeObject(input));

        Session session = input.Session;
        if (session.Attributes == null)
            session.Attributes = new Dictionary<string, object>();

        Type requestType = input.GetRequestType();
        if (input.GetRequestType() == typeof(LaunchRequest))
        {
            string speech = "Welcome! I can tell you the time in different cities.";
            Reprompt rp = new Reprompt("Say what time is it in a city");
            return ResponseBuilder.Ask(speech, rp, session);
        }
        else if (input.GetRequestType() == typeof(SessionEndedRequest))
        {
            return ResponseBuilder.Tell("Goodbye!");
        }
        else if (input.GetRequestType() == typeof(IntentRequest))
        {
            var intentRequest = (IntentRequest)input.Request;
            switch (intentRequest.Intent.Name)
            {
                case "AMAZON.CancelIntent":
                case "AMAZON.StopIntent":
                    return ResponseBuilder.Tell("Goodbye!");
                case "AMAZON.HelpIntent":
                    {
                        Reprompt rp = new Reprompt("What's next?");
                        return ResponseBuilder.Ask("Here's some help. What's next?", rp, session);
                    }
                case "what_time_is_it":
                    {
                        string location = intentRequest.Intent.Slots["location"].Value;
                        DateTime now = DateTime.UtcNow;
                        (string place, int offset, string timezone) localTime = GetLocationOffset(location);
                        string message = $"Right now in {localTime.place} it is {now.AddHours(localTime.offset).ToShortTimeString()} {localTime.timezone}.";
                        return ResponseBuilder.Tell(message, session);
                    }
                default:
                    {
                        log.LogLine($"Unknown intent: " + intentRequest.Intent.Name);
                        string speech = "I didn't understand - try again?";
                        Reprompt rp = new Reprompt(speech);
                        return ResponseBuilder.Ask(speech, rp, session);
                    }
            }
        }
        return ResponseBuilder.Tell("Goodbye!");
    }

    private (string location, int offset, string timezone) GetLocationOffset(string location)
    {
        switch(location)
        {
            case "Los Angeles":
            case "Seattle":
                return (location, -8, "Pacific Standard Time");
            case "Denver":
            case "Phoenix":
                return (location, -7, "Mountain Standard Time");
            case "Chicago":
            case "Dallas":
                return (location, -6, "Central Standard Time");
            case "Atlanta":
            case "New York":
                return (location, -5, "Eastern Standard Time");
            default:
                return ("Greenwich", 0, "Greenwich Mean Time");
        }
    }
}
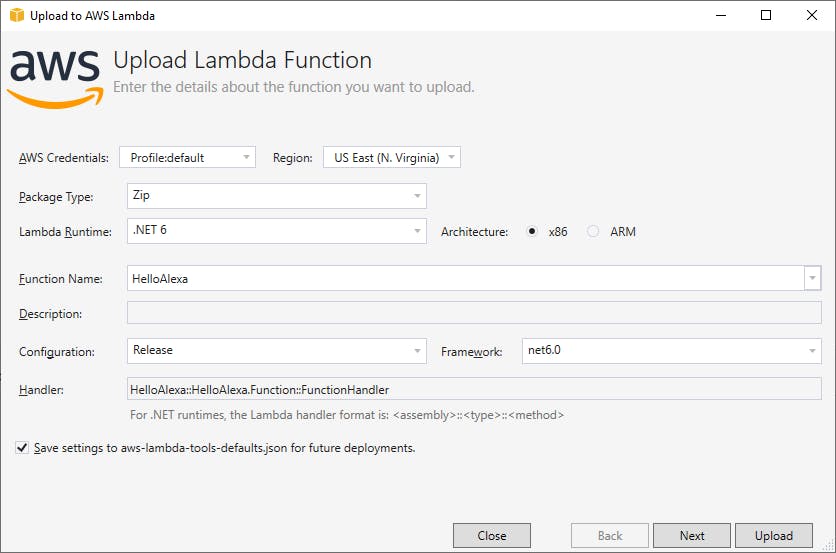
Publish your function to AWS.
A. In the AWS Explorer view, set region us-east-1 (N. Virginia).
B. In Solution Explorer, right-click the HelloAlexa project and select Publish to AWS Lambda.
C. Set Function Name to HelloAlexa.
D. Confirm the region is set to us-east-1 (N. Virginia).
E. Under Handler, enter HelloAlexa::HelloAlexa.Function::FunctionHandler. This identifies the
assembly:namespace.className:methodNameof the function handler.D. Click Next.
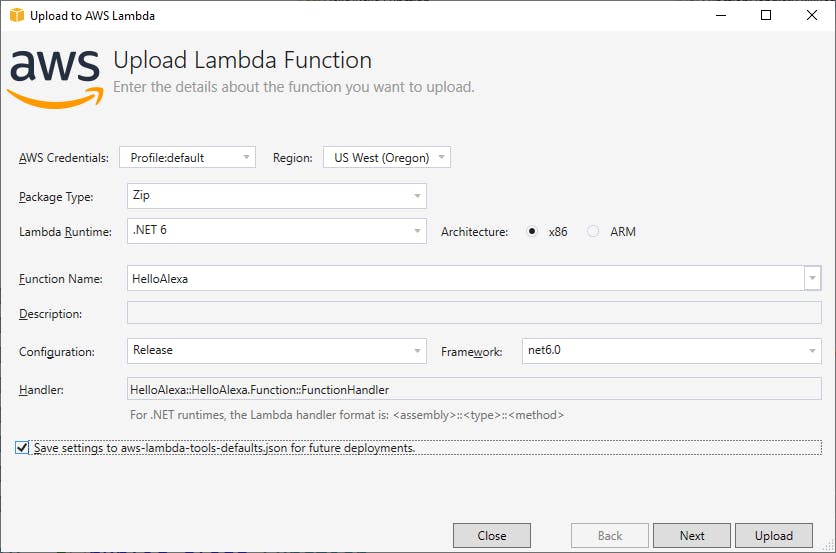
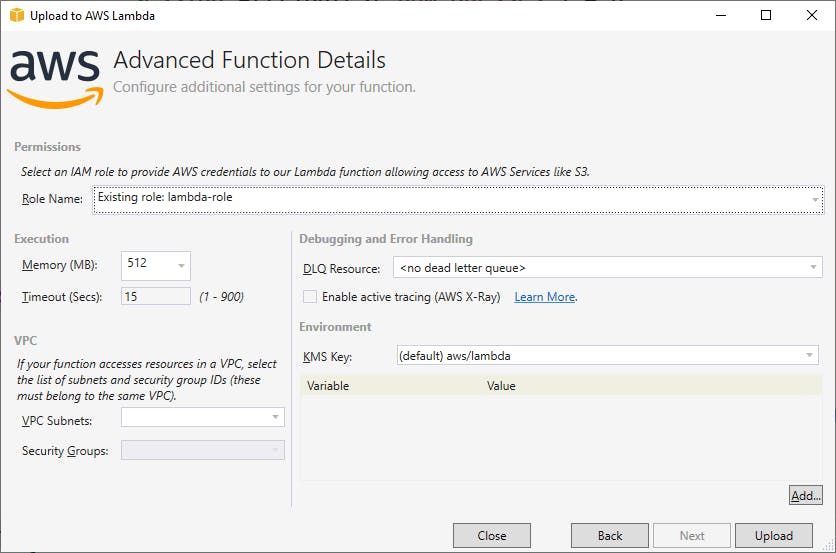
E. Under Role Name, let the wizard create a role or select an existing role with Lambda execution permissions.
F. Click Upload.
G. Wait for the publish action to complete. When it completes, you should be on the Function:HelloAlexa test page in Visual Studio, and see Last Update Status: Successful at top.
Understand the Code
The code consists of a function handler, which services voice input from Alexa, and a local function for helping determine the time offset for a location.
FunctionHandler (lines 15-66) gets two parameters, input and context. 'input is a SkillsRequestwith the details of the voice utterance we need to respond to. context is an ILambdaContext object we can use for logging as the function executes.
24-30: FunctionHandler gets the input request type, then uses a series of conditionals to respond to the request. If it's a launch request, we provide a welcome prompt, Welcome! I can tell you the time in different cities.. We also tell Alexa that if a later re-prompt is needed, it can say Say what time is it in a city. The response is returned with the ResponseBuilder.Ask method, which is awaiting another intent.
31-34: If the request is session end request, our dialog is ending. We say Goodbye with ResponseBuilder.Tell.
35-64: If the response is an intent, we get the intent request from input.Request and use a switch statement on intentRequest.Intent.Name to determine whether it's one of the Alexa built-in intents (cancel, stop, help). If it's our intended what_time_is_it intent (lines 48-55), we get the location slot value from the intent request. We then call a local function to get the place name, timezone offset, and time zone name based on the location slot value, returned as a tuple. We then create a message of the form Right now in New York it is 11:35 AM Eastern Standard Time and return it with ResponseBuilder.Tell.
GetLocationOffset (lines 68-88) does a switch on the location slot value. If it's one of the values we expect, we return a tuple containing the location name, UTC offset from GMT, and name of the time zone. We are not handling daylight savings time in this simple implementation. If we don't recognize the location, we return GMT time and identify the place as Greenwich and time zone as Greenwich Mean Time.
Step 4: Configure Lambda Function
In this step, you'll configure the AWS Lambda function that was just created in the AWS console to respond to your Alexa skill as a trigger.
Sign in to the AWS management console. At the top right, select the same region you've been using in prior steps.
Navigate to AWS Lambda. You can enter lambda in the search bar.
Your HelloAlexa Lambda function should be listed. Click it to view its detail.
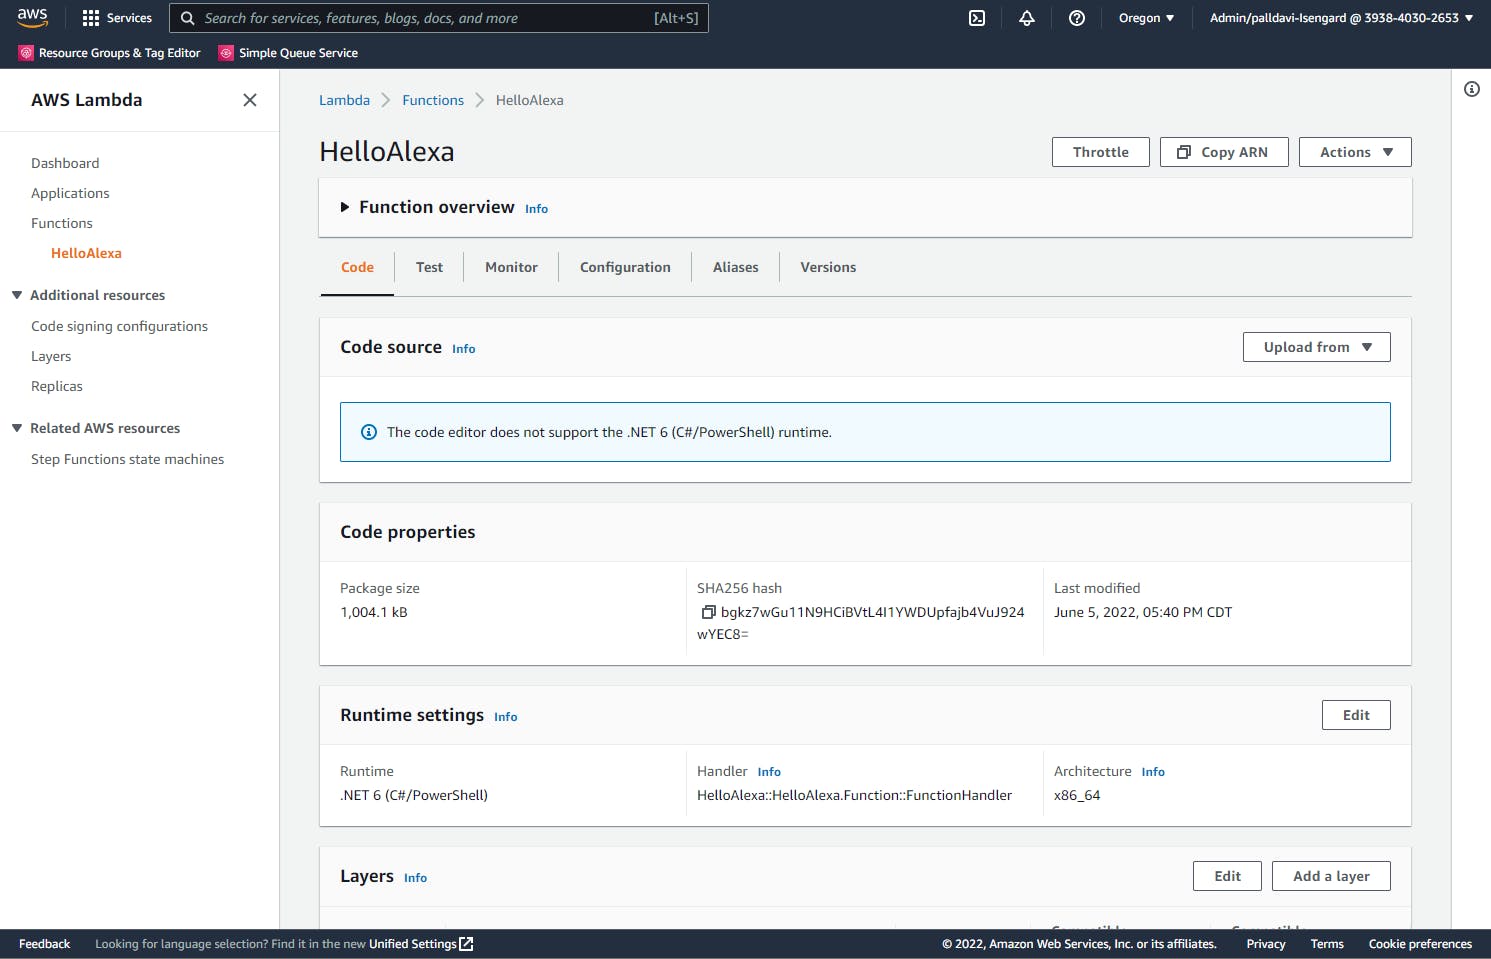
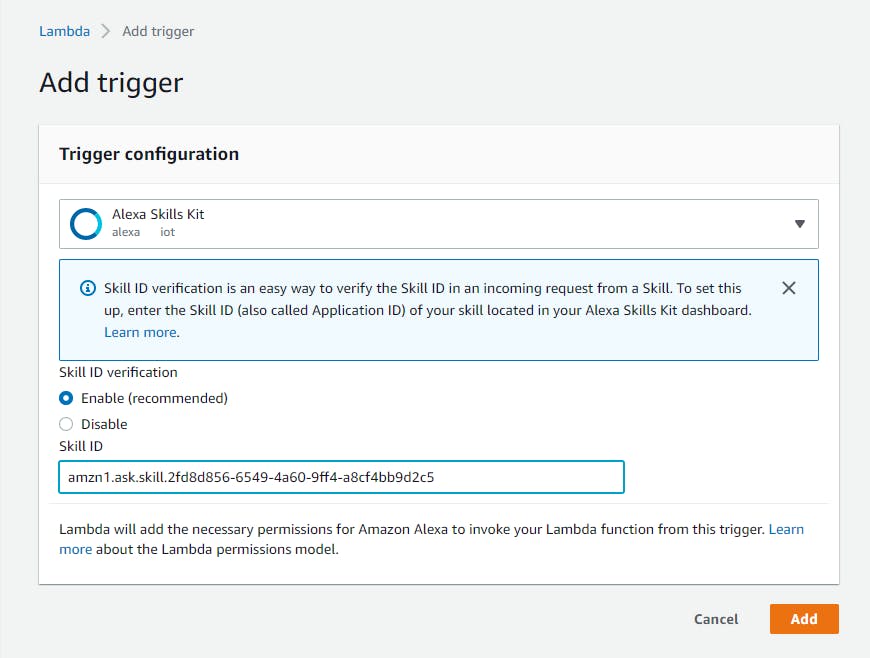
Add a trigger:
A. Expand the Function Overview section of the page.
B. Click the Add Trigger button and select Alexa Skills Kit.
C. Enter your Alexa Skill ID that you recorded at the end of Step 2 and click Add.

Record the Amazon Resource Name (ARN) of your Lambda function. Ours is
arn:aws:lambda:us-east-1:xxxxxxxxxxxx:function:HelloAlexa.In the Alexa Developer Console, select Endpoint from the outline at left.
A. Replace the AWS Lambda ARN with the ARN you copied at the end of Step 4.
B. Click Save Endpoints.

Step 5: Test Your Alexa Skill
In this step, you'll test your new Alexa skill and Lambda function back end from the Alexa Developer Console.
The Alexa Developer Console, select the Test tab at top.
In the skill testing dropdown, select select Development.
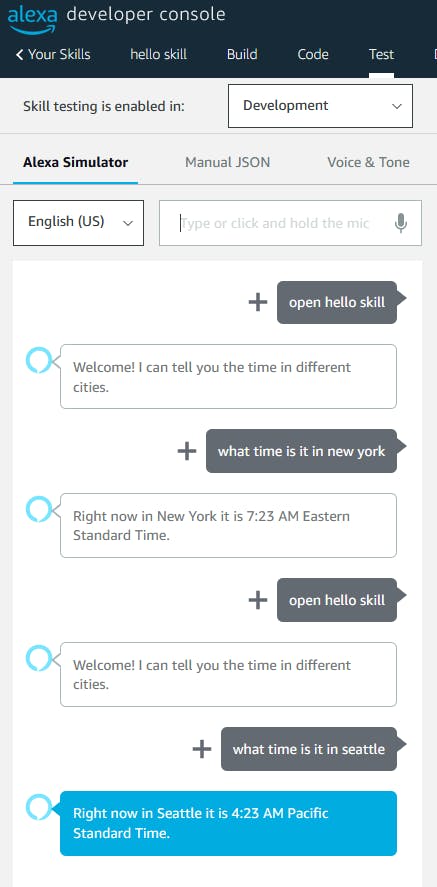
Test the utterance ask hello skill, what time is it in New York? by 1) typing it in the input box or 2) clicking-and-holding the microphone icon while you say the phrase into your microphone.
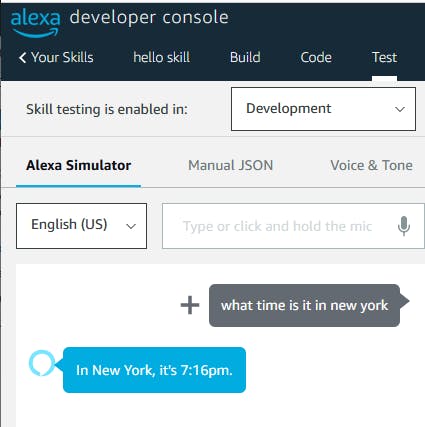
You should hear and see a response with the time. There are two ways you can invoke and test your skill:
1) invoke your skill and ask a query in a single utterance: "Ask hello skill, (query)"
ask hello skill, what time is it in Denver?
or 2) say "open hello skill" to invoke your skill, and then say your query as a separate utterance: "what time is it in (location)?"
open hello skillwhat time is it in Denver?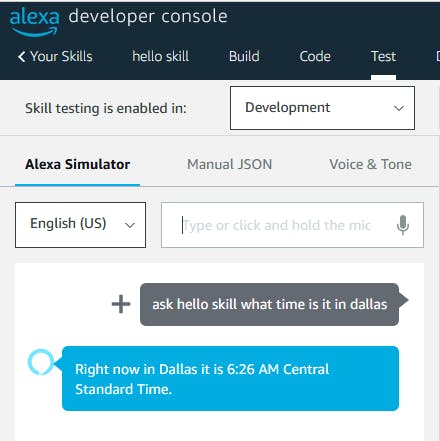
Now try other cities you defined earlier. Remember to invoke your skill each time. Try, "What time is it in Denver?" or "What time is it in Seattle?"
Congratulations! You've created a rudimentary Alexa skill, implemented an AWS Lambda function in C#, and tested it. You're on your way!
Where to Go From Here
In this tutorial, you created a very simple Alexa skill and a C# AWS Lambda function to implement it. You were exposed to the Alexa skill model of intents, utterances, and slots. With the help of the Alexa .NET helper library, you wrote an AWS Lambda function to implement your skill.
We barely scratched the surface with Alexa. A more elaborate skill and Lambda function could support multiple intents and sustain a dialog. We did not go over how to publish your Alexa skill. You can integrate with a plethora of home devices, AWS services, or other online resources. That's fertile ground for innovation. We'll cover more of Alexa in future blog posts.
Further Reading
Amazon Alexa
AWS SDK for .NET Documentation
Packages
Videos
How to Build Alexa Skill using C# and AWS Lambda by Nick Naddaf
ASP.NET Core Alexa App and NGROK by Shiv Kumar
Let's build an Alexa Skill Together Using C# on AWS by Paul Oliver
Blogs
Build an Alexa Skill with .NET Core and AWS Lambda by Matthew Trimble